

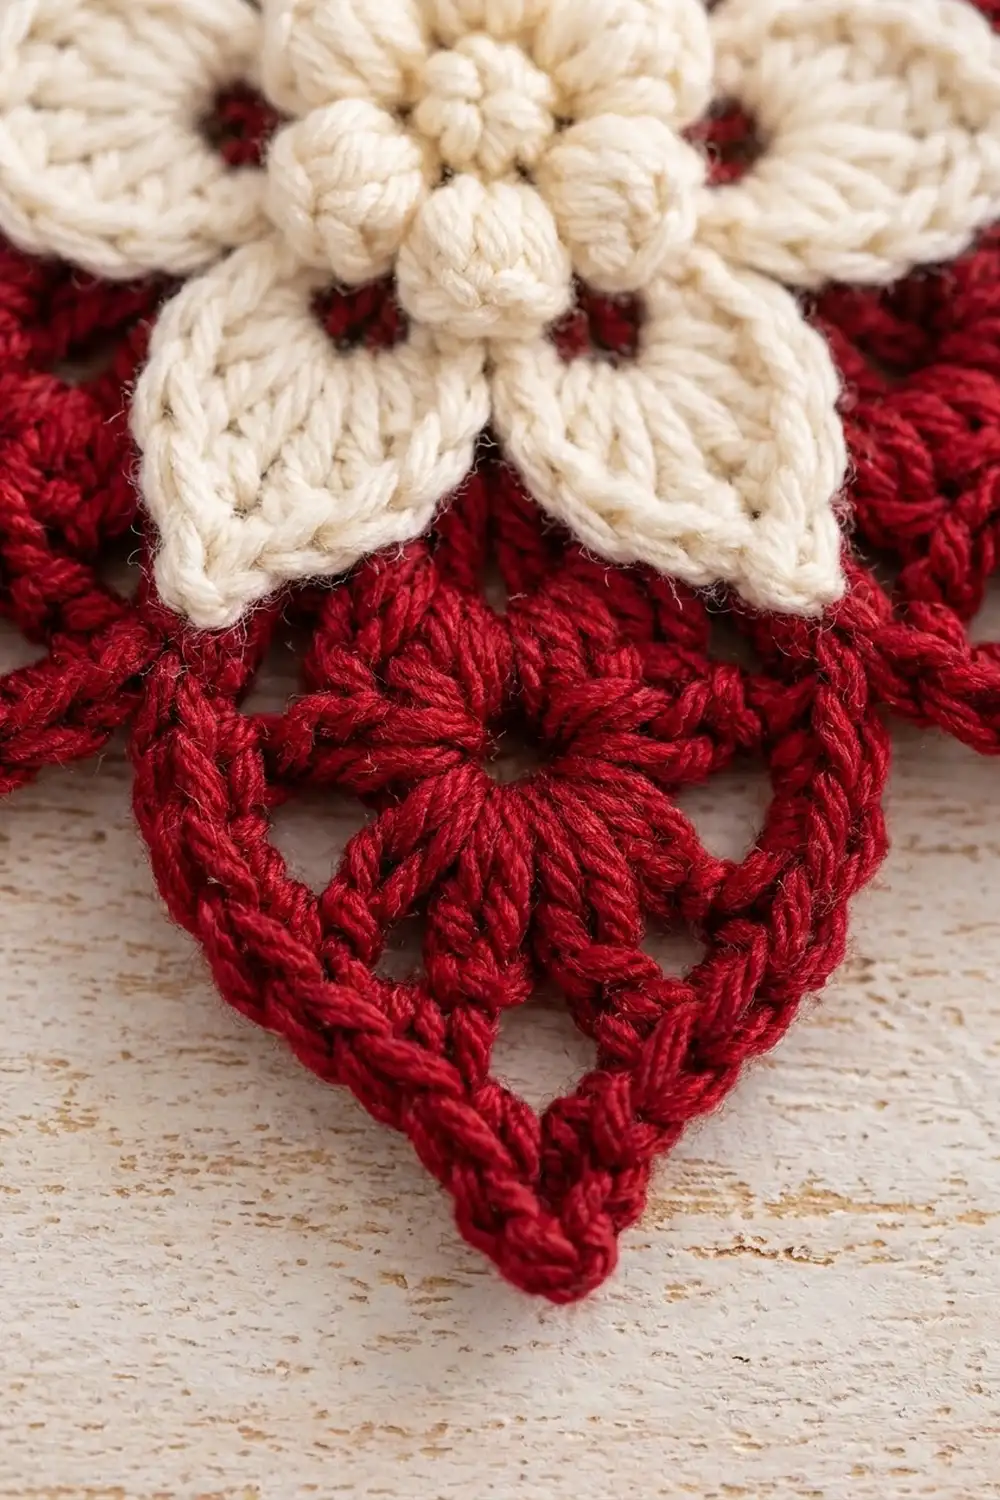
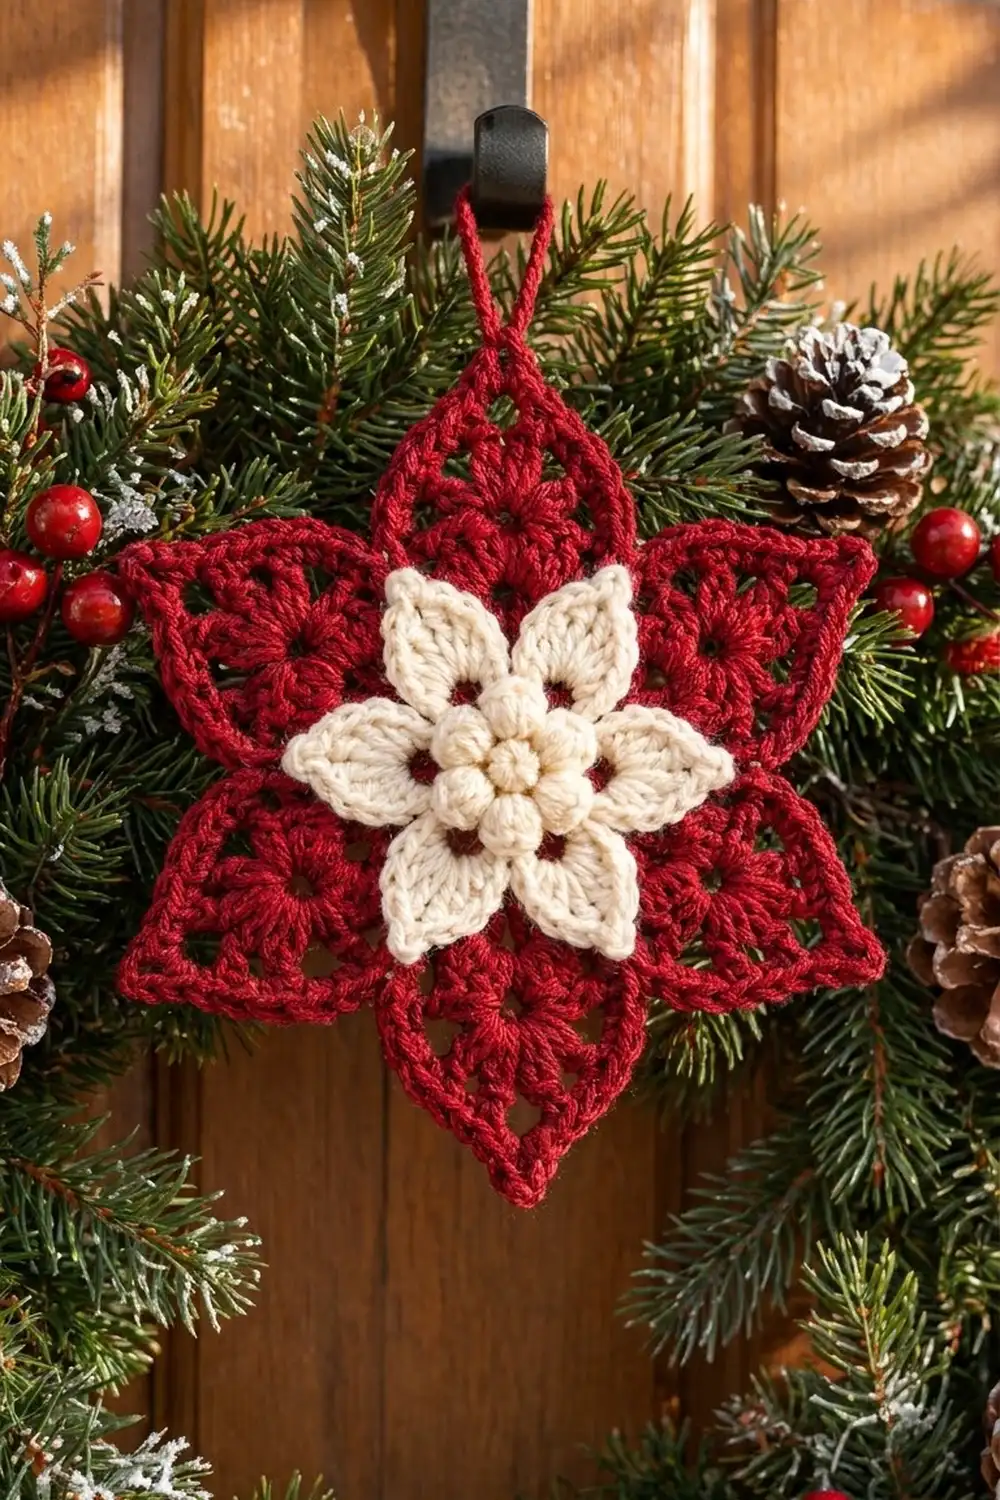
The Cranberry Frost Star is a layered holiday motif: an eight-pointed cranberry red star with a cream flower on top and a small cluster of bobbles in the center. The red points are lacy and open, and the cream flower is solid. Together they look like a frosted poinsettia.
Two colors give it a classic Christmas look. Cranberry red forms the star base, and soft cream is used for the flower and the bobbles. The style is traditional and cozy, and the raised center gives it a three-dimensional finish.
This pattern uses US crochet terms. The finished motif measures 6 in (15.2 cm) from point to point. The cream flower is 3 in (7.6 cm) across, and the bobble center is about 1 in (2.5 cm) across.
You make three parts. The red star base is worked in the round in 6 rounds. The cream flower is worked in 3 rounds. The bobble center is a 2-round ring plus one single bobble. You then stack and sew the parts into one motif. Use it as an ornament, a gift topper, or a wreath decoration.
Finished Size and Construction
- Finished size: 6 in (15.2 cm) point to point
- Skill level: Easy-intermediate
- Terminology: US crochet terms
- Yarn weight: DK (#3)
- Hook: 3.5 mm (E-4)
- Number of pieces: 1 finished motif, made from 3 crocheted parts plus 1 single bobble
- Layout: Single layered motif: star base, flower on top, bobble center on top of that
- Piece size: Star 6 in (15.2 cm); flower 3 in (7.6 cm); center 1 in (2.5 cm)
- Size before border: 5.5 in (14.0 cm) point to point after Round 5
- Border depth: 0.25 in (0.6 cm) per side (Round 6, single crochet edging)
Materials
Pick a smooth DK cotton or cotton blend so the stitches show clearly and the points hold their shape. Acrylic also works, but it blocks less crisply. Choose a deep cranberry red and a warm cream rather than bright white.
- Color A (Cranberry Red): 12 g / 28 m (31 yd)
- Color B (Cream): 8 g / 18 m (20 yd)
Both quantities include a safety margin of about 30% over what one motif actually uses.
Tools:
– 3.5 mm (E-4) crochet hook
– Tapestry needle
– Scissors
– Stitch marker
– Rust-proof pins and a blocking mat
– Spray bottle with water
Abbreviations (US Terms)
- ch – chain
- sl st – slip stitch
- sc – single crochet
- hdc – half double crochet
- dc – double crochet
- tr – treble crochet
- sp – space
- st(s) – stitch(es)
- MR – magic ring
Special stitches:
- CL (3-dc cluster): [Yarn over, insert hook in the stated space, pull up a loop, yarn over, pull through 2 loops] 3 times, then yarn over and pull through all 4 loops on the hook.
- Bobble (4-dc bobble): [Yarn over, insert hook in the stated stitch, pull up a loop, yarn over, pull through 2 loops] 4 times, then yarn over and pull through all 5 loops on the hook.
Gauge and Checkpoints
Gauge is not critical for an ornament, but it controls how sharp the points look. Make one star base first and check these measurements as you go:
- After Round 2: 2 in (5.1 cm) across
- After Round 3: 2.75 in (7.0 cm) across the chain loops
- After Round 4: 4 in (10.2 cm) point to point
- After Round 5: 5.5 in (14.0 cm) point to point
- After Round 6: 6 in (15.2 cm) point to point
- Border gauge: 5 sc = 1 in (2.5 cm) along the edge
If your piece is more than 0.25 in (0.6 cm) too big after Round 2, go down to a 3.25 mm hook. If it is too small, go up to a 3.75 mm hook. Do not fix size by adding or skipping stitches, because each point depends on the exact counts.
Part 1: Star Base (Color A)
Round 1: Make a MR. Ch 3 (counts as dc), work 15 dc into the ring. Join with sl st to the top of the ch-3. Pull the ring tight. (16 dc)
Round 2: Ch 3 (counts as dc), dc in the same st, then 2 dc in each st around. Join with sl st to the top of the ch-3. (32 dc)
Checkpoint: the piece should lie flat at 2 in (5.1 cm) across.
Round 3: Ch 1, sc in the same st, ch 5, skip 3 sts, sc in next st. Repeat from * 6 more times, then ch 5, skip 3 sts and join with sl st to the first sc. (8 sc, 8 ch-5 loops)
Math check: each repeat uses 4 sts (1 sc plus 3 skipped), and 4 × 8 = 32, which matches Round 2.
Round 4 (point base): Sl st into the first ch-5 loop. In the ch-5 loop work [hdc, dc, CL, ch 3, CL, dc, hdc], then sc in the next sc of Round 3. Repeat from * 7 more times. Join with sl st to the first hdc.
Each repeat is 7 sts (hdc, dc, CL, CL, dc, hdc, sc) plus 1 ch-3 sp. (56 sts, 8 ch-3 tip sps)
The ch-3 between the two clusters forms the small eyelet at the center of each point. Checkpoint: 4 in (10.2 cm) point to point.
Round 5 (lace frame): Sl st across to the first sc between groups. Ch 1, sc in the sc between groups, ch 5, work (sc, ch 3, sc) in the next ch-3 tip sp, ch 5. Repeat from * 7 more times. Join with sl st to the first sc. (24 sc, 16 ch-5 loops, 8 ch-3 tip sps)
Each ch-5 arches from a valley up to a tip and leaves an open window along each side of the cluster group. Checkpoint: 5.5 in (14.0 cm) point to point.
Border (Round 6, Color A)
The border is a firm single crochet outline. It closes the edges of the windows and sharpens each point.
Border gauge: 5 sc = 1 in (2.5 cm).
Round 6: Sl st into the first ch-5 loop. Ch 1, then work this sequence for each point:
- 6 sc in the ch-5 loop (rising side)
- skip the tip sc, then (sc, ch 3, sc) in the ch-3 tip sp
- skip the next tip sc, then 6 sc in the next ch-5 loop (falling side)
- skip the valley sc
Repeat for all 8 points. Join with sl st to the first sc. Fasten off and weave in the ends.
Counts per point:
– Rising side: 6 sc + 1 tip sc = 7 sc
– Falling side: 1 tip sc + 6 sc = 7 sc
– Per point: 14 sc + 1 ch-3 tip
– Total: 112 sc + 8 ch-3 tips
Why the math works: Each side of a point runs from a valley to a tip and is about 1.4 in (3.6 cm) long. At 5 sc per inch, 7 sc covers 1.4 in (3.6 cm), so the edge lies flat without ruffling or cupping. Skipping the valley sc makes a sharp inward V. The ch-3 at each tip adds 0.25 in (0.6 cm) of reach, which takes the star from 5.5 in (14.0 cm) to 6 in (15.2 cm).
Part 2: Flower (Color B)
Round 1: Make a MR. Ch 1, work 12 sc into the ring. Join with sl st to the first sc. Pull the ring tight. (12 sc)
Round 2: Ch 1, sc in next st, ch 4, skip 1 st. Repeat from * 5 more times. Join with sl st to the first sc. (6 sc, 6 ch-4 loops)
Math check: each repeat uses 2 sts, and 2 × 6 = 12, which matches Round 1. The skipped stitches make the small gaps at the petal bases where the red base shows through.
Round 3 (petals): In the next ch-4 loop work [sc, hdc, dc, tr, ch 2, tr, dc, hdc, sc], then sl st in the next sc of Round 2. Repeat from * 5 more times. Join with sl st at the base of the first petal. Fasten off and leave a 12 in (30.5 cm) tail for sewing.
Each petal has 8 sts plus a ch-2 tip, and each repeat adds 1 sl st. (6 petals, 48 sts, 6 ch-2 tips, 6 sl sts)
Pinch each ch-2 tip into a point. Checkpoint: 3 in (7.6 cm) across from petal tip to petal tip.
Part 3: Bobble Center (Color B)
Bobble ring, Round 1: Make a MR. Ch 1, work 6 sc into the ring. Join with sl st to the first sc. Pull the ring tight. (6 sc)
Bobble ring, Round 2: Ch 2 (does not count as a stitch). Bobble in next st, ch 1. Repeat from * 5 more times. Join with sl st to the top of the first bobble. Fasten off and leave a 10 in (25.4 cm) tail. (6 bobbles, 6 ch-1 sps)
Push each bobble to the right side so it puffs outward.
Center bobble: Ch 3, then work 1 bobble in the 3rd ch from the hook. Ch 1 to lock it. Fasten off and leave a 6 in (15.2 cm) tail.
Thread the tail through the center of the bobble ring and sew it so the single bobble fills the middle. You now have seven bobbles, six around one, about 1 in (2.5 cm) across.
Assembly
- Lay the star base right side up. Center the flower on top, with one petal pointing straight at one of the star’s points.
- Using the flower tail, backstitch around Round 1 of the flower through Round 2 of the star. Keep your stitches inside the sc so they don’t show.
- Tack each petal down at its widest point (the tr) with one small stitch. Leave the petal tips loose for a little dimension.
- Center the bobble cluster on the flower. Whipstitch its outer edge (the ch-1 sps of the bobble ring) to Round 1 of the flower.
- Weave in all ends on the back.
Checkpoint: the flower should sit with an even 1.5 in (3.8 cm) of red visible from the flower’s edge to each star tip.
Final Blocking
- Lightly spray the whole motif with water until it is damp. Do not soak it.
- Lay it face up on a blocking mat.
- Pin the center of the star so it stays flat.
- Pin each of the 8 ch-3 tips outward so the motif measures 6 in (15.2 cm) from tip to opposite tip.
- Check the spacing: neighboring tips should be about 2.3 in (5.8 cm) apart all the way around.
- Pin each valley gently inward to sharpen the V.
- Shape the cream petal tips into points with your fingers. Do not pin through the bobbles.
- Let it dry completely, about 6 to 8 hours, before unpinning.
Final Quality-Control Checklist
- [ ] Star measures 6 in (15.2 cm) point to point
- [ ] All 8 points are the same size and shape
- [ ] Each point has 14 sc plus a ch-3 tip (112 sc total)
- [ ] The open windows on both sides of each point are visible
- [ ] Flower measures 3 in (7.6 cm) and has 6 even petals
- [ ] Red shows through the gaps at the petal bases
- [ ] Seven bobbles are puffed outward with none sunken
- [ ] No sewing stitches visible from the front
- [ ] All ends woven in securely
Troubleshooting
Center ripples after Round 2: Your tension is loose. Pull the magic ring tighter or go down a hook size.
Points curl or cup: The Round 6 stitches are too tight. Loosen up, or use 7 sc per ch-5 loop and re-block. That adds 1 sc per side, so check that the edge still lies flat.
Points are blunt: Make sure you skipped the tip sc on both sides in Round 6, then pin the ch-3 tips firmly while blocking.
Valleys are rounded instead of V-shaped: You may have worked into the valley sc. Skip it as written.
Bobbles look flat: Push them through to the right side, and keep the ch-1 between bobbles loose.
Flower looks too large for the star: Your cream stitches are looser than your red ones. Work the flower with a 3.25 mm hook.
Care
Hand wash in cool water with mild soap, press out the water in a towel, and dry flat, re-pinning the points if needed. Do not tumble dry.
Final Notes
Here is the measurement chain in order. Round 2 lies flat at 2 in (5.1 cm). Round 3 reaches 2.75 in (7.0 cm), Round 4 opens the points to 4 in (10.2 cm), and Round 5 frames them at 5.5 in (14.0 cm). The 0.25 in (0.6 cm) sc border brings the star to 6 in (15.2 cm), with 112 sc and 8 ch-3 tips. On top sit a 3 in (7.6 cm) cream flower and a 1 in (2.5 cm) seven-bobble center.
If your checkpoints match, the finished motif will too. Happy crocheting!