

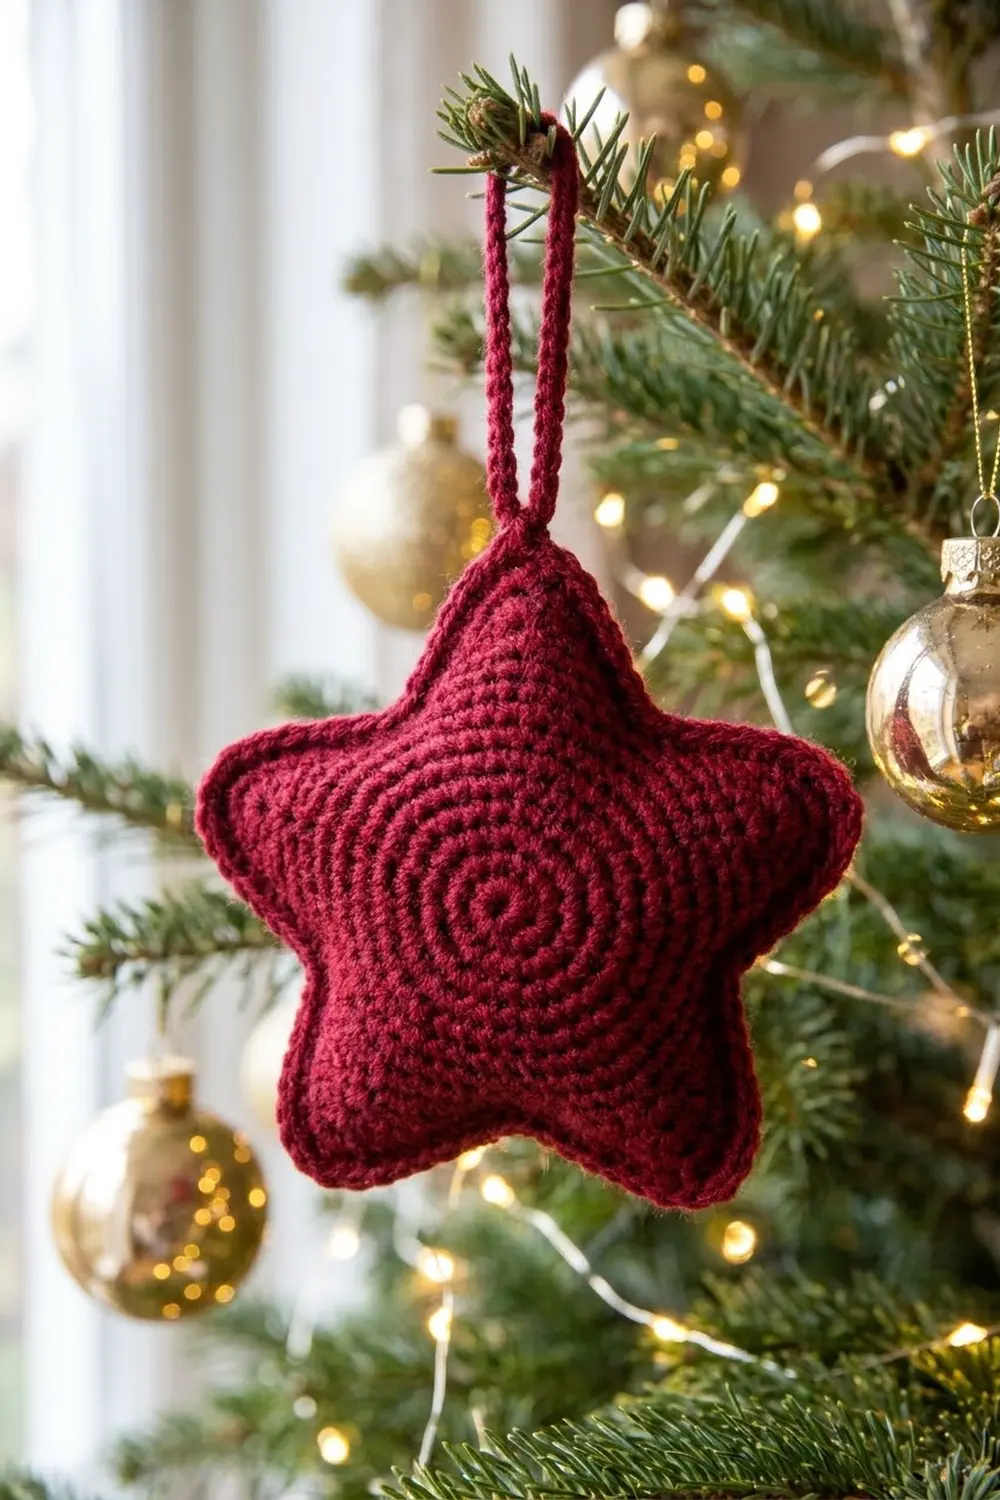
This little star is a cozy, classic Christmas ornament. It is plump, soft, and worked in tight single crochet, so the surface looks almost like knit fabric. The deep cranberry red looks good against green branches and warm string lights, and it sits well next to gold or glass baubles.
The ornament has two identical star panels. You join them with a single crochet round that also forms the raised outline along the edge. Before you close it up, a small amount of stuffing gives the star its puffy shape. A simple chain loop at the top point is all you need to hang it.
The finished star measures about 4.25 in (10.8 cm) across and 4 in (10.2 cm) tall, not counting the loop. This pattern uses US crochet terms throughout.
Here’s how it’s built. Each panel starts as a pentagon worked in rounds. You then work each point separately in short rows and add one edging round around the whole star. Finally you hold the two panels together, join them with a single crochet round that doubles as the border, and add the hanging loop.
Finished Size and Construction
- Finished size: 4.25 in (10.8 cm) wide x 4 in (10.2 cm) tall, about 0.75 in (1.9 cm) thick
- Skill level: Easy / advanced beginner
- Terminology: US crochet terms
- Yarn weight: Worsted (#4)
- Hook: US G-6 (4 mm)
- Number of pieces: 2 identical star panels, joined into 1 ornament
- Layout: Front panel stacked directly on top of back panel, wrong sides together
- Panel size (after edging): 3.75 in (9.5 cm) wide, point to point
- Size before border: 3.75 in (9.5 cm) wide
- Border depth: 0.25 in (0.6 cm) on every edge, which adds 0.5 in (1.3 cm) to the overall width
- Hanging loop: about 2 in (5.1 cm) tall when folded
Materials
Yarn: Use a smooth worsted-weight yarn so the single crochet texture shows clearly. Mercerized cotton or a cotton blend gives the crisp stitches in the photo. Soft acrylic works too and is a bit puffier. Stay away from fuzzy or very loosely plied yarns, because they blur the star’s outline.
- Cranberry red: 15 g / 30 m (33 yd) for one ornament
Tools:
- US G-6 (4 mm) crochet hook
- Tapestry needle
- Scissors
- Small amount of polyester fiberfill, about 3 g
- 2 locking stitch markers
- Ruler or tape measure
- Pins and a foam blocking mat (optional)
The yarn amount includes a margin of about 20 percent for your gauge swatch and tails. If you are making a set, one 100 g ball of worsted yarn makes about six stars.
Abbreviations (US Terms)
- ch – chain
- sl st – slip stitch
- sc – single crochet
- sc2tog – single crochet 2 together (decrease)
- sc3tog – single crochet 3 together (double decrease)
- inc – 2 sc in the same stitch
- st(s) – stitch(es)
- MR – magic ring
- RS / WS – right side / wrong side
Special stitch – sc3tog: Insert the hook in the next stitch, yarn over, and pull up a loop. Repeat in each of the next 2 stitches, so you have 4 loops on the hook. Yarn over and pull through all 4 loops.
Gauge and Checkpoints
Gauge: 18 sc and 20 rows = 4 in (10.2 cm) in sc worked flat, which is 4.5 sts and 5 rows per inch (2.5 cm).
Tight gauge matters here because loose stitches let the stuffing show through. Make one complete panel first and check it against these checkpoints before you make the second one:
- After Round 5: The pentagon measures about 2 in (5.1 cm) across and lies flat.
- After each point: Each point is about 1 in (2.5 cm) long, measured from the base row to the tip.
- After the edging round: The panel is 3.75 in (9.5 cm) wide from point to point.
- After joining: The finished star is 4.25 in (10.8 cm) wide.
Too big? Go down to a US 7 (4.5 mm)… no, go down to a US G-6 equivalent smaller size such as a US F-5 (3.75 mm), or crochet more tightly.
Too small? Go up to a US 7 (4.5 mm) hook.
Ruffling at Round 5? Your tension is looser in the increases than in the regular stitches. Tighten up on the “inc” stitches.
Cupping at Round 5? Your stitches are too tight. Relax your tension or go up half a hook size.

Star Panel (Make 2)
Work Rounds 1–5 in continuous spirals, without joining. Put a stitch marker in the first stitch of each round and move it up as you go.
Round 1: Make a magic ring and work 6 sc into it… correction for a five-point star: work 5 sc into the ring. Pull the ring tight. (5 sts)
Round 2: Inc in each st around. (10 sts)
Round 3: Sc in next st, inc in next st; repeat from * 5 times. (15 sts)
Round 4: Sc in next 2 sts, inc in next st; repeat from * 5 times. (20 sts)
Round 5: Sc in next 3 sts, inc in next st; repeat from * 5 times. (25 sts)
Sl st in the next stitch to smooth the step, then fasten off.
Checkpoint: The pentagon is 2 in (5.1 cm) across and has 5 slightly pointed corners where the increases stack up. Divide the 25 stitches into 5 sections of 5 stitches each, with each section centered on one increase column. Mark the first stitch of section 1.
Points (work 5 times)
Each point is worked in short rows over one 5-stitch section. The ch 1 at the start of each row is a turning chain and does not count as a stitch.
Row 1 (RS): Join the yarn with a standing sc in the first stitch of the section, then sc in the next 4 sts. Turn. (5 sts)
Row 2: Ch 1, sc in each st across. Turn. (5 sts)
Row 3: Ch 1, sc2tog, sc in next st, sc2tog. Turn. (3 sts)
Row 4: Ch 1, sc in each st across. Turn. (3 sts)
Row 5: Ch 1, sc3tog. (1 st)
Fasten off, leaving a 4 in (10.2 cm) tail. Join the yarn in the first stitch of the next section and repeat Rows 1–5. Continue until all 5 points are done.
Holding the decreases back until Rows 3 and 5 is what gives each point its broad, rounded tip instead of a needle-sharp one.
Tails tip: You don’t need to weave in the point tails. Tie each pair of neighboring tails together at the valley on the WS. Later they sit inside the ornament and act as extra stuffing.
Checkpoint: Each point is 1 in (2.5 cm) long.
Edging Round
This round outlines the panel and sets up a fixed count for joining. Each point has 5 row-ends up each side, and Row 5 is the tip.
Round 6 (RS): Join the yarn at any valley. Work one sc2tog across the two neighboring Row 1 row-ends, one from each point; this is the valley stitch. Then do the following for each point:
- 1 sc into each of the row-ends of Rows 2–5 going up the side (4 sts)
- 3 sc in the Row 5 tip stitch (3 sts)
- 1 sc into each of the row-ends of Rows 5–2 going down the other side (4 sts)
- sc2tog across the Row 1 row-ends at the next valley (1 st)
Repeat around and end with the last 4 sc down the side of the final point. The sc2tog you worked at the start is that point’s valley stitch. Sl st to the first stitch to join.
Count per point: 1 valley + 4 + 3 tip + 4 = 12 sts.
Total: 12 x 5 = 60 sts.
Fasten off one panel and weave in its tail; this one becomes the back. Leave the second panel’s working loop live and put it on a stitch marker; this one becomes the front.
Checkpoint: The panel is 3.75 in (9.5 cm) wide from point to point. The tips should come to a clear corner from the 3 sc, and the valleys should pull inward neatly from the sc2tog.
Make All Pieces
- Cranberry red: 2 star panels, both worked exactly the same through Round 6
Layout grid (stacked, viewed from the side):
[ FRONT PANEL – RS facing out ]
[ BACK PANEL  – RS facing out ]
Place the panels WS together with the points lined up. Match the 60 edge stitches of the front panel to the 60 edge stitches of the back panel, valley to valley and tip to tip.
Joining
Method: Single crochet join, worked through both layers.
Stitch-to-stitch logic: Each joining stitch goes through one edging stitch on the front panel and the matching edging stitch directly behind it on the back panel. Insert the hook under both loops of each panel’s stitch. Because both panels have exactly 12 sts per point, the stitches line up perfectly all the way around.
Tension: Use the same firm tension as the panels. If you work it too tightly, the star curls and the points pull in. If you work it too loosely, the ridge flops and stuffing can poke through. Pin the two panels together at all 5 tips and all 5 valleys before you start.
Stuffing: Work the join through 3 points. Then push in the fiberfill in small pinches, filling the points first with the back of the hook and then the center. Aim for a gentle puff about 0.75 in (1.9 cm) thick. Don’t stuff it firmly. Finish joining the last 2 points and add a final wisp of stuffing before you close the last valley.
Size checkpoint: Halfway around, lay the star flat. The joined edge should look straight and smooth, not wavy.
Border
The joining round is also the border. It makes the raised cranberry ridge you see around the edge in the photo.
Border gauge: 4.5 sc per inch (2.5 cm) along the straight sides of the points, the same as the panel gauge. The border adds 0.25 in (0.6 cm) of depth to every edge.
Border Round (worked through both layers): Pick up the front panel’s live loop, starting at the valley before the top point, and work through the matching pairs of stitches as follows. For each point:
- sc in the valley stitch (1 st)
- sc in the next 4 side sts (4 sts)
- sc in the first tip st (1 st)
- 3 sc in the center tip st (3 sts)
- sc in the last tip st (1 st)
- sc in the next 4 side sts (4 sts)
Count per point: 1 + 4 + 1 + 3 + 1 + 4 = 14 sts.
Total: 14 x 5 = 70 sts. Sl st to the first stitch to join.
Why the math works: Each panel has 12 sts per point, so a plain 1-to-1 join would give 12 x 5 = 60 sts. The only extra stitches are the 2 added at each tip (3 sc in one stitch instead of 1). That gives 60 + (2 x 5) = 70. Those extra stitches only go on the outer corners, where the edge has to stretch further, so the tips stay crisp and flat. The valleys get a plain single stitch with no increase, so the inner corners stay tight and sharp.
Hanging loop: Without fastening off, sl st along the border to the center stitch of the top tip. Ch 20, which is about 4 in (10.2 cm) of chain. Sl st into the same tip stitch to make a loop about 2 in (5.1 cm) tall. Fasten off, run the tail down through the inside of the star, and trim.
Final checkpoint: The star measures 4.25 in (10.8 cm) wide and 4 in (10.2 cm) tall without the loop.
Final Blocking
- Lightly mist the whole star with water until it’s damp, not soaked.
- Shape each point with your fingers. Pinch the tips so they’re rounded but clear, and press the valleys inward.
- Put the star face up on a blocking mat. Pin through the border ridge only, at each of the 5 tips, so the star is 4.25 in (10.8 cm) wide.
- Check that all 5 points are about the same length, 1 in (2.5 cm) plus 0.25 in (0.6 cm) of border.
- Lay the loop straight up from the top tip.
- Let it dry completely, which takes about 6–8 hours. Don’t press it flat with an iron; you’ll lose the puff.
Final Quality-Control Checklist
- [ ] Both panels have 25 sts at Round 5 and 60 sts at Round 6
- [ ] All 5 points have the same 5-row shape
- [ ] The border round has 70 sts, 14 per point
- [ ] The finished star is 4.25 in (10.8 cm) wide and 4 in (10.2 cm) tall
- [ ] Stuffing is even and doesn’t show through the stitches
- [ ] Valleys are tight and tips are rounded but clearly defined
- [ ] The loop is secure and about 2 in (5.1 cm) tall
- [ ] No yarn tails are visible on the outside
Troubleshooting
Points are different lengths: One point probably has an extra or missing row. Count the row-ends and redo that point.
Panels don’t line up when joining: One panel has the wrong edging count. Recount it; it should be 12 per point.
Tips curl backward: The border is too tight at the tips. Make sure you worked 3 sc in the center tip stitch.
Valleys gape open: You missed the sc2tog in the edging round. Rework the edging round with the sc2tog at each valley.
Stuffing shows through: Your gauge is too loose. Use a smaller hook, or put in less fiberfill.
Star looks lumpy: Pull out the stuffing and put it back in smaller pinches, filling the points first.
Loop twists: Before blocking, spritz the loop with water and hang the star by it to dry.
Care
Hand wash in cool water with mild soap, gently squeeze out the water, and reshape. Dry it flat. Between seasons, store it in a box rather than squashed in a bag.
Final Notes
The measurements build on each other in this order:
- The 25-stitch pentagon measures 2 in (5.1 cm).
- The five 5-row points add 1 in (2.5 cm) each.
- The 60-stitch edging brings each panel to 3.75 in (9.5 cm).
- The 70-stitch join-and-border adds 0.25 in (0.6 cm) on every edge, so the finished star is 4.25 in (10.8 cm) wide.
If each stage matches its checkpoint, the next stage will fit. Once you’ve made one, the second goes much faster. A few cranberry stars on the tree, or tied onto a gift, make a warm handmade touch.
Happy crocheting!