

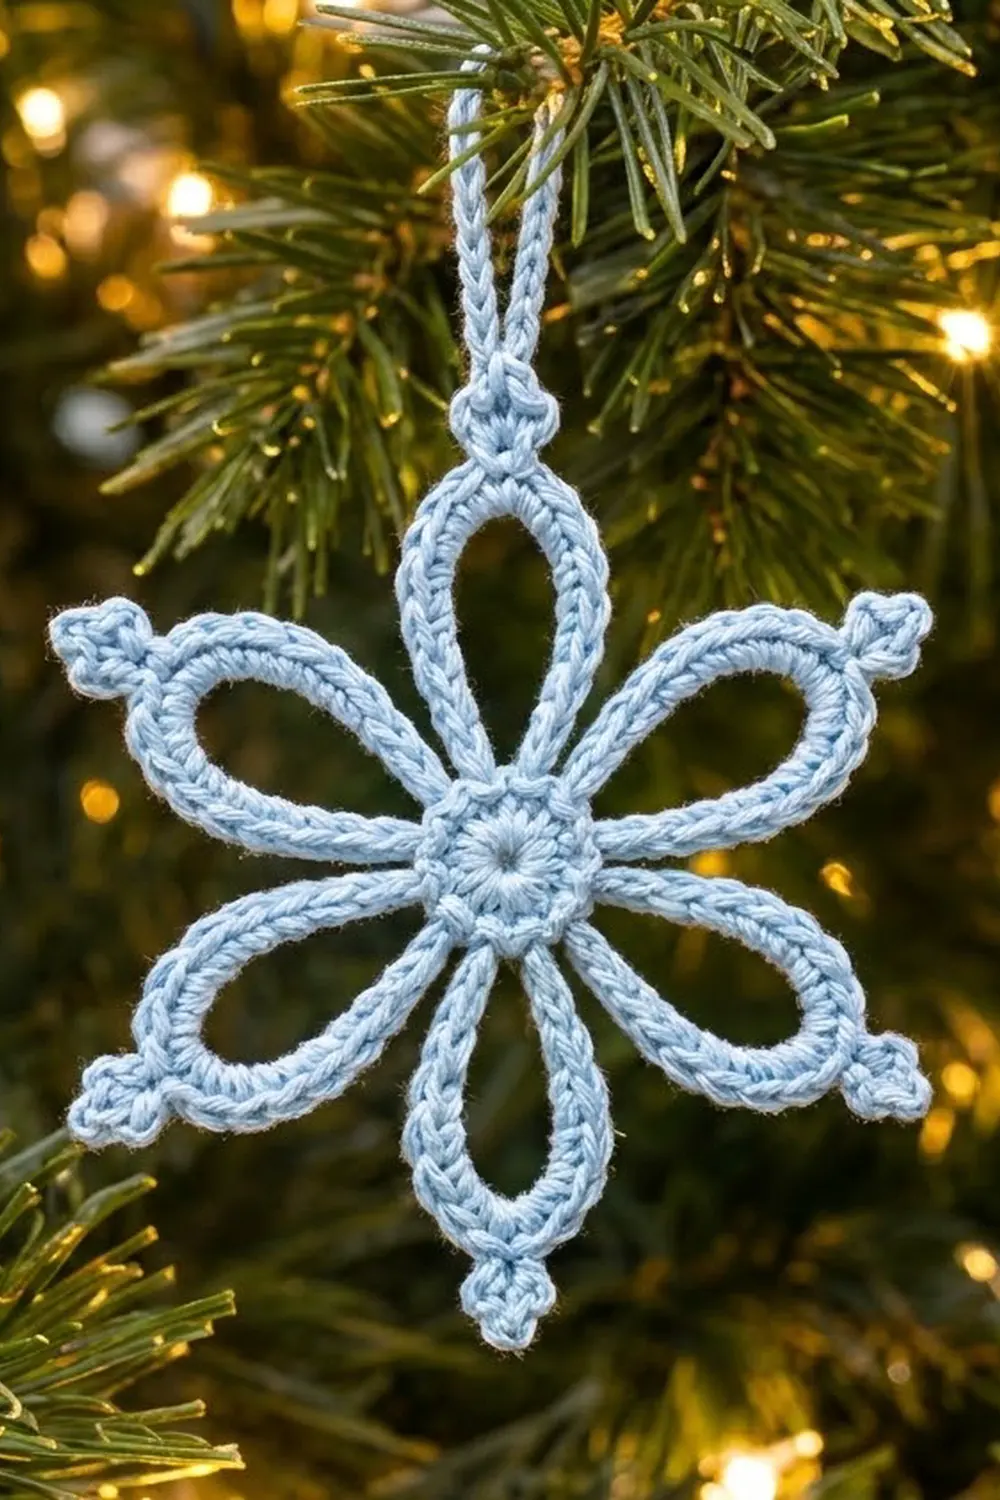
The Frost Petal Snowflake is a light, airy ornament with six open teardrop petals around a small solid center. Each petal is outlined with a neat, rope-like cord of single crochet. Five petals end in a small three-picot trefoil, and the sixth ends in a chain hanging loop, so the snowflake is ready for the tree as soon as it is blocked.
The sample is worked in a single powder-blue cotton, which gives it a frosty, wintry look. Pale blue, white, silver-grey or icy mint all suit the design. Because the petals are open, the ornament shows up well against greenery and twinkle lights.
This pattern uses US crochet terms throughout. The finished snowflake measures about 4.2 in (10.7 cm) from tip to tip. With the hanging loop it is about 5.25 in (13.3 cm) tall.
You work the whole snowflake in one piece, in three rounds. First you make a small single crochet center in a magic ring. Next you make six long chain loops for the petals. Then you cover every loop with single crochet, adding the tip trefoils and the hanging loop along the way. You don’t need to join any pieces or sew anything on, and you weave in only two tails.
Finished Size and Construction
- Finished size: 4.2 in (10.7 cm) tip to tip; 5.25 in (13.3 cm) tall including the hanging loop
- Skill level: Easy
- Terminology: US crochet terms
- Yarn weight: Sport / #2 fine, mercerized cotton
- Hook: 2.5 mm
- Number of pieces: 1 (a single motif)
- Layout: six petals radiating evenly from one center, with the hanging loop on the top petal
- Piece size: center disc 0.5 in (1.3 cm) across; each petal 1.6 in (4.1 cm) long and 0.9 in (2.3 cm) wide at its widest point
- Size before border: 4.0 in (10.2 cm) tip to tip after Round 2 (bare chain loops)
- Border depth: the single crochet cord adds about 0.125 in (0.3 cm) to each petal outline
Materials
Yarn: Use a smooth, mercerized sport-weight cotton or cotton blend. Mercerized cotton shows the twisted cord clearly and holds its shape after blocking. Avoid fuzzy or very stretchy yarns: they blur the stitch definition, and the petals tend to droop.
- Powder blue: 5 g, about 15 m (16.4 yd)
This quantity includes a generous margin for a gauge swatch and tails. One snowflake actually uses about 6 m (6.6 yd), so a single 50 g ball will make several ornaments.
Tools:
– 2.5 mm crochet hook
– Tapestry needle
– Scissors
– Stitch marker
– Rust-proof pins and a foam blocking mat
– Fabric stiffener, or a starch solution (optional but recommended)
– Ruler or tape measure
Abbreviations (US Terms)
- ch – chain
- sc – single crochet
- sl st – slip stitch
- st(s) – stitch(es)
- sp – space
- rep – repeat
- MR – magic ring
Special stitches:
Tip Trefoil (TT): Ch 5. Sl st in the 3rd ch from hook to make the first picot. Ch 4 and sl st in the same ch to make the taller center picot. Ch 3 and sl st in the same ch again to make the third picot. Sl st in each of the next 2 ch to work back down the stem. This gives a 2-ch stem topped by three picots, with the middle picot the tallest.
Hanging Loop (HL): Ch 18. Sl st in the 17th ch from hook, which forms a 16-ch loop on a short stem. Sl st in the last remaining ch to finish the stem.
Gauge and Checkpoints
Gauge isn’t critical for an ornament, but it controls the finished size and how well the petals hold their shape. Make one complete snowflake before you start a batch.
Chain gauge: 6 ch = 1 in (2.5 cm), measured relaxed.
Checkpoints:
- After Round 1: the center disc measures 0.5 in (1.3 cm) across, with a center hole about 0.125 in (0.3 cm) wide.
- After Round 2: each chain loop, laid flat and pinched together, reaches 1.75 in (4.4 cm) from the edge of the center. Opposite tips measure 4.0 in (10.2 cm) apart.
- After Round 3: each petal is 1.6 in (4.1 cm) long from the center edge to the base of the tip. The snowflake measures 4.2 in (10.7 cm) tip to tip, not counting the hanging loop.
If your snowflake is too big: go down to a 2.25 mm hook, or chain more firmly. If the petals look loose and floppy, chain the loops with 22 ch instead of 24 and cover each one with 12 sc on each side.
If it’s too small or stiff: go up to a 2.75 mm hook. If the cords buckle, your single crochets are packed too tightly. Relax your tension rather than adding stitches.

Pattern
Round 1: Center
Make a magic ring.
Ch 1 (this does not count as a stitch). Work 12 sc into the ring. Pull the tail to close the ring, leaving a small hole about 0.125 in (0.3 cm) across. Sl st to the first sc to join.
Stitch count: 12 sc.
Check that the disc lies flat and measures 0.5 in (1.3 cm) across. If it cups, the ring is pulled too tight, so loosen it slightly before joining.
Round 2: Petal Loops
Each petal loop starts at one sc and lands in the next sc, so each petal sits on 2 center stitches.
Ch 1. Sc in the same st as the join. Ch 24, keeping the chain untwisted. Sc in the next st. This makes the first petal loop.
Sc in the next st, ch 24, sc in the next st. Rep from * to * 4 more times.
Sl st to the first sc to join.
Stitch count: 12 sc and 6 ch-24 loops (144 ch).
Each petal loop is anchored by its own pair of sc, and the 6 pairs use all 12 stitches of Round 1. Before you go on, lay the piece flat and check that none of the loops is twisted. A twisted loop will show up as a crooked petal after Round 3. Opposite loop tips should measure 4.0 in (10.2 cm) apart.
Place a marker in the first ch-24 loop. That loop becomes the top petal, which carries the hanging loop.
Border: Petal Cord Round
Round 3 is the snowflake’s edging. It wraps every chain loop in single crochet, which turns the thin chains into a firm cord. It also adds the trefoils and the hanging loop.
Border gauge: 13 sc fit along each side of a ch-24 loop and cover it fully without bunching.
Round 3
You work the sc into the ch-24 space itself, around the chain, rather than into the individual chains. This covers the chain completely and gives the cord its rope-like, twisted look.
Top petal: Work 13 sc into the marked ch-24 space. Work the HL. Work 13 sc into the same ch-24 space. Sl st in each of the next 2 sc of Round 2.
Petals 2 to 6: Work 13 sc into the next ch-24 space. Work a TT. Work 13 sc into the same ch-24 space. Sl st in each of the next 2 sc of Round 2. Rep from * to * 4 more times.
The last pair of slip stitches lands in the final sc of Round 2 and the first sc of Round 2. The second of these slip stitches closes the round.
Fasten off, leaving a 6 in (15.2 cm) tail.
Stitch count per petal (one “side” of the motif): 13 sc + tip + 13 sc = 26 sc, followed by 2 sl st.
Round totals: 156 sc, 12 sl st, 5 TT and 1 HL.
Why the Math Works
Each petal loop has 24 chains, so each half of the loop has 12 chains. The 13 sc per side give one extra stitch on each half. That extra stitch is enough to ease the cord around the curve near the petal tip without crowding the narrow base. The tip stitch (TT or HL) sits exactly at the 13-sc midpoint, so it always lands at the true point of the teardrop.
Between petals, the 2 slip stitches go into the 2 sc of Round 2 that sit between neighbouring loops. Round 2 has 12 sc, and 6 petals × 2 sl st = 12 sl st, so every center stitch is used exactly once. The round closes with nothing left over and no extra stitch to fudge.
Checkpoint: each covered petal is 1.6 in (4.1 cm) long from the center edge to the tip base and 0.9 in (2.3 cm) wide. The finished piece measures 4.2 in (10.7 cm) tip to tip. The hanging loop adds about 1.25 in (3.2 cm) above the top petal, bringing the total height to about 5.25 in (13.3 cm).
Finishing
Weave the starting tail through the back of the Round 1 stitches. As you weave, tug it gently so the center hole stays small and round.
Weave the final tail back through the single crochet cord of the nearest petal, staying inside the stitches so it can’t be seen. Trim both tails close.
Final Blocking
Blocking turns soft loops into crisp, even petals.
- Wet the piece. Soak the snowflake in cool water for a few minutes. If you’re using stiffener, soak it in a diluted fabric stiffener or starch solution instead.
- Remove excess liquid. Press the snowflake gently in a towel. Don’t wring it.
- Pin the center. Lay the piece face up on the blocking mat. Pin through the center hole so the disc lies flat.
- Pin the tips. Pin each petal tip at the base of its trefoil. Opposite tips should sit 4.2 in (10.7 cm) apart, and neighbouring tips should be evenly spaced at 60 degrees.
- Shape the petals. Put one pin inside each petal at its widest point and ease the petal open to 0.9 in (2.3 cm) wide. This sets the teardrop shape.
- Open the picots. Use a pin to open each picot of the trefoils, with the center picot pointing straight outward.
- Lay the hanging loop flat. Pin the loop into a smooth oval above the top petal.
- Let it dry. Leave the snowflake to dry completely, which takes 12 to 24 hours if you used stiffener. Then unpin it.
Final Quality-Control Checklist
- [ ] The center disc is flat, 0.5 in (1.3 cm) across, with a small, round center hole.
- [ ] All six petals are the same length, 1.6 in (4.1 cm), and none of them is twisted.
- [ ] Each petal has exactly 13 sc on each side of its tip.
- [ ] Five trefoils each have three open picots, with the center picot the tallest.
- [ ] The hanging loop is centred on the top petal and is not twisted.
- [ ] The snowflake measures 4.2 in (10.7 cm) tip to tip and 5.25 in (13.3 cm) tall with the loop.
- [ ] All tails are woven in invisibly.
- [ ] The piece is fully dry and holds its shape when hung.
Troubleshooting
A petal looks crooked or bent: the ch-24 loop was twisted when you joined it in Round 2. Unravel back to that loop and chain it again, laying it flat before you work the sc.
The cord ruffles or waves: your sc are too tight, or the chains are too loose for 13 sc per side. Relax your sc tension, or chain the loops more firmly.
You can see chain gaps through the cord: you are working into the chains instead of around them. Insert the hook into the loop space so the stitches wrap around the whole chain.
The trefoil picots collapse: pin each picot open during blocking, and use stiffener.
The center won’t lie flat: if it cups, the ring was pulled too tight before Round 1 was finished. If it ruffles, the ring is too loose. Adjust the tail before you weave it in.
The petals are different sizes: count the chains in each loop again. A loop that is just 1 ch short or long shows up clearly after blocking.
The ornament droops when hung: block it again with a stronger stiffener solution.
Care
Store the ornament flat or hanging, away from moisture and crushing. If it gets dusty, wipe it lightly with a damp cloth and re-block it with stiffener if it loses its shape.
Final Notes
The size of the Frost Petal Snowflake comes down to a short, simple chain of measurements:
- Round 1 gives a 0.5 in (1.3 cm) center with 12 sc.
- Round 2 adds six ch-24 loops. They reach 4.0 in (10.2 cm) tip to tip before the border.
- Round 3 covers each loop with 13 + 13 sc and adds a trefoil or hanging loop at each tip. This gives a finished snowflake of 4.2 in (10.7 cm) across and about 5.25 in (13.3 cm) tall with the loop.
If you check your work at each of these three stages, every snowflake in your batch will match. Make one in a single evening, then work up a whole flurry for the tree, for gift toppers, or as a small handmade present.
Happy crocheting!