

This holly sprig is a classic Christmas motif with a lacy look. It has three forest-green leaves, each with a solid center vein and open fishbone lace. Each leaf ends in a crisp, pointed holly edge. Three bobbly cranberry-red berries are sewn over the center where the leaves meet.
The finished motif measures about 6.5 in (16.5 cm) wide and 5 in (12.7 cm) tall. Each leaf is 3.5 in (8.9 cm) long and 2.25 in (5.7 cm) wide across the points. Each berry is about 0.75 in (1.9 cm) across. This pattern uses US crochet terms.
Construction is simple. Each leaf is worked in rounds around both sides of a foundation chain. The chain becomes the center vein, then two lace rounds build the body, and a holly-point border finishes the edge. The berries are small stuffed balls with a bobble texture. Then you overlap the three leaves, sew them together, and add the berries on top.
Use the finished sprig on a wreath, a gift package, a stocking cuff, or a tote bag, or hang it as an ornament.
Finished Size and Construction
- Finished motif: 6.5 in (16.5 cm) wide × 5 in (12.7 cm) tall
- Skill level: Easy-intermediate
- Terminology: US crochet terms
- Yarn weight: DK / light worsted (#3) cotton
- Hook: 3.5 mm (E-4)
- Number of pieces: 6 parts (3 leaves, 3 berries) joined into 1 motif
- Layout: one leaf pointing up, two leaves pointing out to the sides, berries in a triangle at the center
- Leaf size: 3.5 in (8.9 cm) long × 2.25 in (5.7 cm) wide at the points
- Leaf size before border: 3.25 in (8.3 cm) × 1.75 in (4.4 cm)
- Border depth: about 0.25 in (0.6 cm) on each side, with points reaching a little further
Materials
Use a smooth mercerized cotton or cotton blend in DK weight. Cotton gives the points and lace veins a crisp edge and holds its shape after blocking. Avoid fuzzy yarns, because they blur the lace.
- Forest green: 12 g, about 29 m (3 leaves)
- Cranberry red: 5 g, about 12 m (3 berries)
- 3.5 mm (E-4) crochet hook
- A small amount of polyester fiberfill, or same-color yarn scraps, for stuffing the berries
- Tapestry needle
- Stitch markers (2)
- Scissors
- Rust-proof pins and a blocking mat or folded towel
- Spray bottle with water
These quantities include a margin for the gauge swatch, the sewing tails, and one spare berry.
Abbreviations (US Terms)
- ch – chain
- sl st – slip stitch
- sc – single crochet
- hdc – half double crochet
- dc – double crochet
- tr – treble crochet
- sc2tog – single crochet 2 together
- sk – skip
- sp / lp – space / loop
- st(s) – stitch(es)
- RS – right side
Special stitches
- V: (dc, ch 2, dc) in the same space.
- Picot: ch 3, sl st in 3rd ch from hook.
- Point: (hdc, dc, picot, dc, hdc) in the same space. This counts as 4 sts plus 1 picot.
- Tip Point: (dc, tr, picot, tr, dc) in the same space. This counts as 4 sts plus 1 picot.
- Bobble (bob): [yarn over, insert hook in st, yarn over, pull up a loop, yarn over, pull through 2 loops] 3 times in the same st, then yarn over and pull through all 4 loops on the hook.
Gauge and Checkpoints
Gauge for this motif is measured on the leaf, not on a flat swatch. Make one complete leaf first and check it against these numbers before you make the other two.
- Base gauge: 11 sc = 2 in (5.1 cm)
- After Rnd 1: 2.75 in (7.0 cm) long × 0.5 in (1.3 cm) wide
- After Rnd 2: 3 in (7.6 cm) long × 1 in (2.5 cm) wide
- After Rnd 3: 3.25 in (8.3 cm) long × 1.75 in (4.4 cm) wide
- After Rnd 4 (border): 3.5 in (8.9 cm) long × 2.25 in (5.7 cm) wide at the points
If your leaf is too big (more than 0.25 in / 0.6 cm over at any checkpoint), switch to a 3.25 mm hook.
If your leaf is too small, switch to a 3.75 mm hook.
Check Rnd 1 especially carefully. The foundation chain sets the length of every later round, so a loose or tight chain throws off the whole leaf.
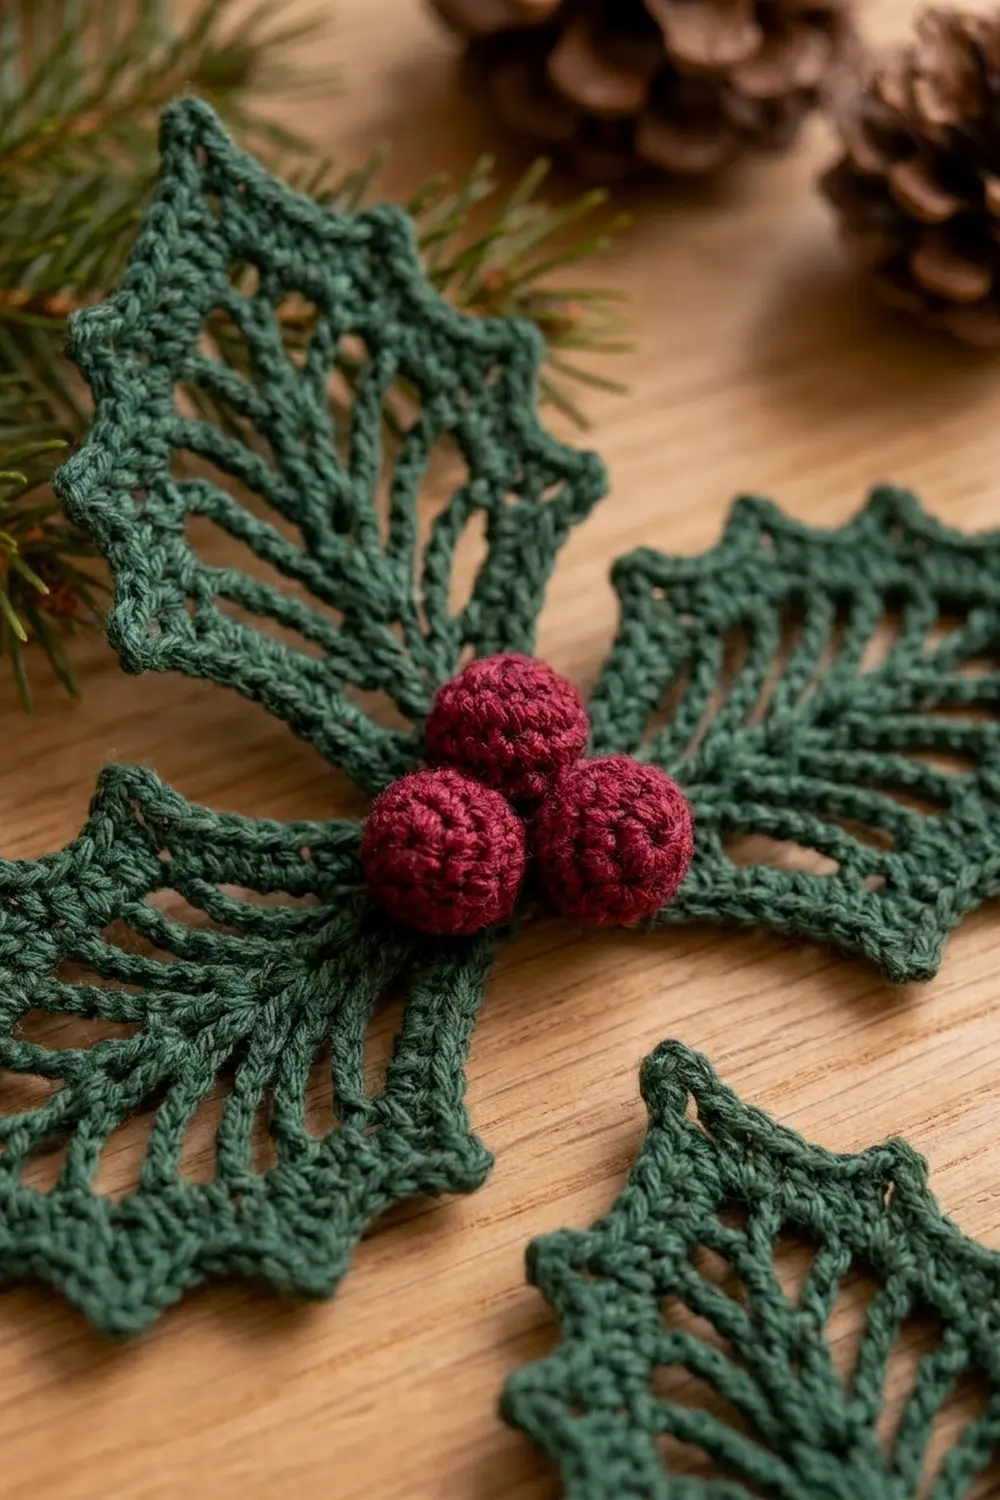
Leaf (Make 3)
Use forest green.
Foundation: Ch 16.
Rnd 1 (center vein):
- Sc in 2nd ch from hook and in the next 13 ch (14 sc).
- Work 3 sc in the last ch. This is the base end.
- Rotate the work. Working in the free loops on the other side of the chain, sc in each of the next 13 ch.
- Work 2 sc in the same ch as the first sc. This is the tip end.
- Sl st in the first sc to join.
Rnd 1 total: 32 sc (13 sc along each side, a 3-sc group at the base, and a 3-sc group at the tip).
Place a marker in the middle sc of the base group. This tells you which end is the base for the rest of the leaf.
Rnd 2 (lace veins):
- Ch 1, sc in the same st.
- [Ch 3, sk 1 sc, sc in next sc] 7 times. The last sc lands in the first sc of the base group.
- Ch 2, sk the marked sc, sc in the next sc.
- [Ch 3, sk 1 sc, sc in next sc] 7 times.
- Ch 3, sk the last sc, sl st in the first sc to join.
Rnd 2 total: 16 sc, 15 ch-3 loops (7 on each side plus 1 tip loop), and 1 ch-2 base space.
These 16 sc are the anchors for the vein lines. Call them S1–S16 in order. S1 is the sc you joined into, and S8 and S9 sit on either side of the base space.
Rnd 3 (leaf body):
- Sl st into the tip ch-3 loop.
- Ch 3 (counts as dc), then work (dc, ch 2, 2 dc) in the same loop. This is the tip group.
- Side 1: [Sc in next sc, V in next ch-3 loop] 7 times, then sc in next sc (S8).
- Base: Work 2 sc in the ch-2 base space.
- Side 2: Sc in next sc (S9), then [V in next ch-3 loop, sc in next sc] 7 times. The last sc is S16.
- Sl st in the top of the beginning ch-3 to join.
Rnd 3 total: 50 sts (4 dc at the tip, 8 sc and 7 V on each side, and 2 sc at the base), plus 15 ch-2 spaces.
Each sc sitting on a Rnd 2 anchor forms a short vein line between the V-stitches. This is what creates the open fishbone look.
Do not fasten off. Go straight on to the Holly-Point Border (Rnd 4) in the Border section below. Finish all three leaves with the border before you make the berries.
Berry (Make 3)
Use cranberry red. The berries are worked in continuous spiral rounds, so place a marker in the first st of each round.
Rnd 1: Make a magic ring. Work 6 sc in the ring. (6 sc)
Rnd 2: Work 2 sc in each st around. (12 sc)
The disc will start to cup. Hold it so that you are looking into the inside of the cup. Bobbles always pop out away from you, so working this way pushes them to the outside of the berry.
Rnd 3: [Sc in next st, bob in next st] 6 times. (12 sts: 6 sc, 6 bob)
Rnd 4: [Bob in next st, sc in next st] 6 times. (12 sts: 6 bob, 6 sc)
This round staggers the bobbles so the surface looks evenly nubby.
Checkpoint: The berry should measure about 0.75 in (1.9 cm) across.
Stuff the berry firmly with fiberfill or yarn scraps.
Rnd 5: Sc2tog 6 times. (6 sts)
Fasten off, leaving an 8 in (20.3 cm) tail. Thread the tail through the front loops of the last 6 sts and pull tight to close. Leave the tail hanging; you will use it to sew the berry onto the leaves.
Make All Pieces
For one motif you need:
- Forest green: 3 leaves, each with Rnds 1–4 complete
- Cranberry red: 3 berries
Layout grid (seen from the front):
             [ LEAF A ]
              points up
                  |
[ LEAF B ] ---- ( o ) ---- [ LEAF C ]
points left     (o) (o)    points right
Leaves B and C lie almost horizontal, tilted about 10° downward. The berries cover the spot where the three leaf bases meet.
Joining
Method: Overlap and whipstitch the leaves, then sew the berries on top.
- Lay Leaf A pointing up, with the RS facing you.
- Slide the base of Leaf B under the left side of Leaf A’s base, overlapping by 0.5 in (1.3 cm). Slide Leaf C under the right side in the same way.
- Pin the leaves in place and check that the motif is 6.5 in (16.5 cm) wide from tip to tip.
- Using a green tail, whipstitch through the 2 base sc of each leaf’s border round and the overlapping Rnd 1 sts underneath. Work 6–8 small stitches in total.
Stitch-to-stitch logic: Sew only through the solid center vein and the base sts. Never sew through the open lace, or the veins will distort.
Tension: Pull each stitch just snug. Tight stitches will cup the center. Loose ones will let the leaves rotate.
Berries:
- Place one berry centered over the overlap, just above where the leaves meet.
- Place the other two side by side just below it, touching each other.
- Sew each berry down with its red tail, going through all layers 3–4 times.
- Weave in all the ends on the back.
Size checkpoint: The motif should measure 6.5 in (16.5 cm) wide × 5 in (12.7 cm) tall, within ±0.25 in (0.6 cm).
Border: Holly-Point Edging (Leaf Rnd 4)
Work this border on each leaf right after its Rnd 3, before you do any joining.
Border gauge: The border adds about 0.25 in (0.6 cm) on each side, and the points reach slightly past that. This takes the leaf from 1.75 in (4.4 cm) wide before the border to 2.25 in (5.7 cm) wide at the points. The Tip Point adds about 0.25 in (0.6 cm) of length, so the leaf goes from 3.25 in (8.3 cm) to 3.5 in (8.9 cm) long.
Rnd 4:
- Tip: Ch 1. Sc in the same st and in the next dc. Work a Tip Point in the tip ch-2 space. Sc in each of the next 2 dc. (4 sc + Tip Point)
- Side 1: Sc in next sc (S1). Then work the following sequence 7 times:
- sc in next dc
- work into the V’s ch-2 space: 1 sc if it is the 1st, 3rd, 5th or 7th V, or a Point if it is the 2nd, 4th or 6th V
- sc in next dc
- sc in next sc
(26 sc + 3 Points)
3. Base: Sc in each of the 2 base sc. (2 sc)
4. Side 2: Work the same 7-repeat sequence as Side 1, starting with the V right after S9. Points again go in the 2nd, 4th and 6th V. (26 sc + 3 Points)
5. Sl st in the first sc to join. Fasten off, leaving an 8 in (20.3 cm) tail on the first leaf only. Weave in the ends on the other two leaves.
Rnd 4 total: 58 sc + 7 points. That is 58 sc + (6 Points × 4 sts) + (Tip Point, 4 sts) = 86 sts + 7 picots.
Why the math works: Each side of Rnd 3 has 8 anchor sc and 7 V’s. Rnd 4 works 1 sc into each of those 8 sc and into each of the 14 dc that make up the V’s, for 22 sc per side. The 4 valley V’s each get 1 more sc, so 22 + 4 = 26 sc per side.
The points sit on V numbers 2, 4 and 6. The count is 7 on each side, so these positions are the same whether you count from the tip or from the base. That means both sides come out as mirror images, with no counting adjustment needed. Each valley V gets only 1 sc in its space instead of a full Point, which pulls the edge in between the points and creates the sharp holly outline.
Final Blocking
- Mist the joined motif until it is damp but not soaking.
- Lay it RS up on the blocking mat.
- Pin the center vein of each leaf straight, then pin the tip.
- Pull each point outward and pin it through its picot. Pin the valleys between the points slightly inward.
- Open each lace space gently with a fingertip so the veins sit in clean diagonal lines.
- Check the measurements: 6.5 in (16.5 cm) wide and 5 in (12.7 cm) tall.
- Leave it to dry completely, at least 6 hours. Don’t put pins through the berries; just press them round with your fingers.
Final Quality-Control Checklist
- Each leaf has 7 points in total: 3 on each side plus the tip.
- The points mirror each other across the center vein.
- Each leaf is 3.5 in (8.9 cm) long and 2.25 in (5.7 cm) wide at the points.
- The lace veins are open and even, with no twisted V’s.
- The berries are round and firm, with their bobbles facing outward.
- Leaf bases overlap 0.5 in (1.3 cm), and none of the stitching shows on the front.
- The motif is 6.5 in × 5 in (16.5 cm × 12.7 cm).
- All ends are woven in on the back.
Troubleshooting
The leaf curls or twists. The foundation chain is too tight. Chain with a hook one size larger, then switch back for Rnd 1.
The points look rounded. Pull the picot snug and block with a pin through each picot.
The two sides don’t match. Recount the V’s on each side of Rnd 3; there should be exactly 7 per side. Then place the Points on the 2nd, 4th and 6th V.
The bobbles sit inside the berry. You were looking at the outside of the cup while you worked. Rip back to Rnd 2 and hold the cup with the inside facing you.
The center bunches up. The joining stitches are too tight. Remove them and resew with lighter tension.
The berries flop. Add more stuffing and sew through all layers one more time.
Care
Hand wash in cool water with mild soap, roll it in a towel, and reshape it flat to dry. Don’t wring it, and don’t tumble dry.

Final Notes
Every measurement in this pattern builds on the one before it:
- A 15-stitch center vein measures 2.75 in (7.0 cm).
- Two lace rounds grow the leaf to 3.25 in × 1.75 in (8.3 cm × 4.4 cm).
- The holly-point border brings each leaf to 3.5 in × 2.25 in (8.9 cm × 5.7 cm).
- Three leaves overlapped by 0.5 in (1.3 cm) make a 6.5 in × 5 in (16.5 cm × 12.7 cm) motif, finished with three 0.75 in (1.9 cm) berries.
If you check your first leaf at each stage, the rest of the motif will come out right.
Happy crocheting!