

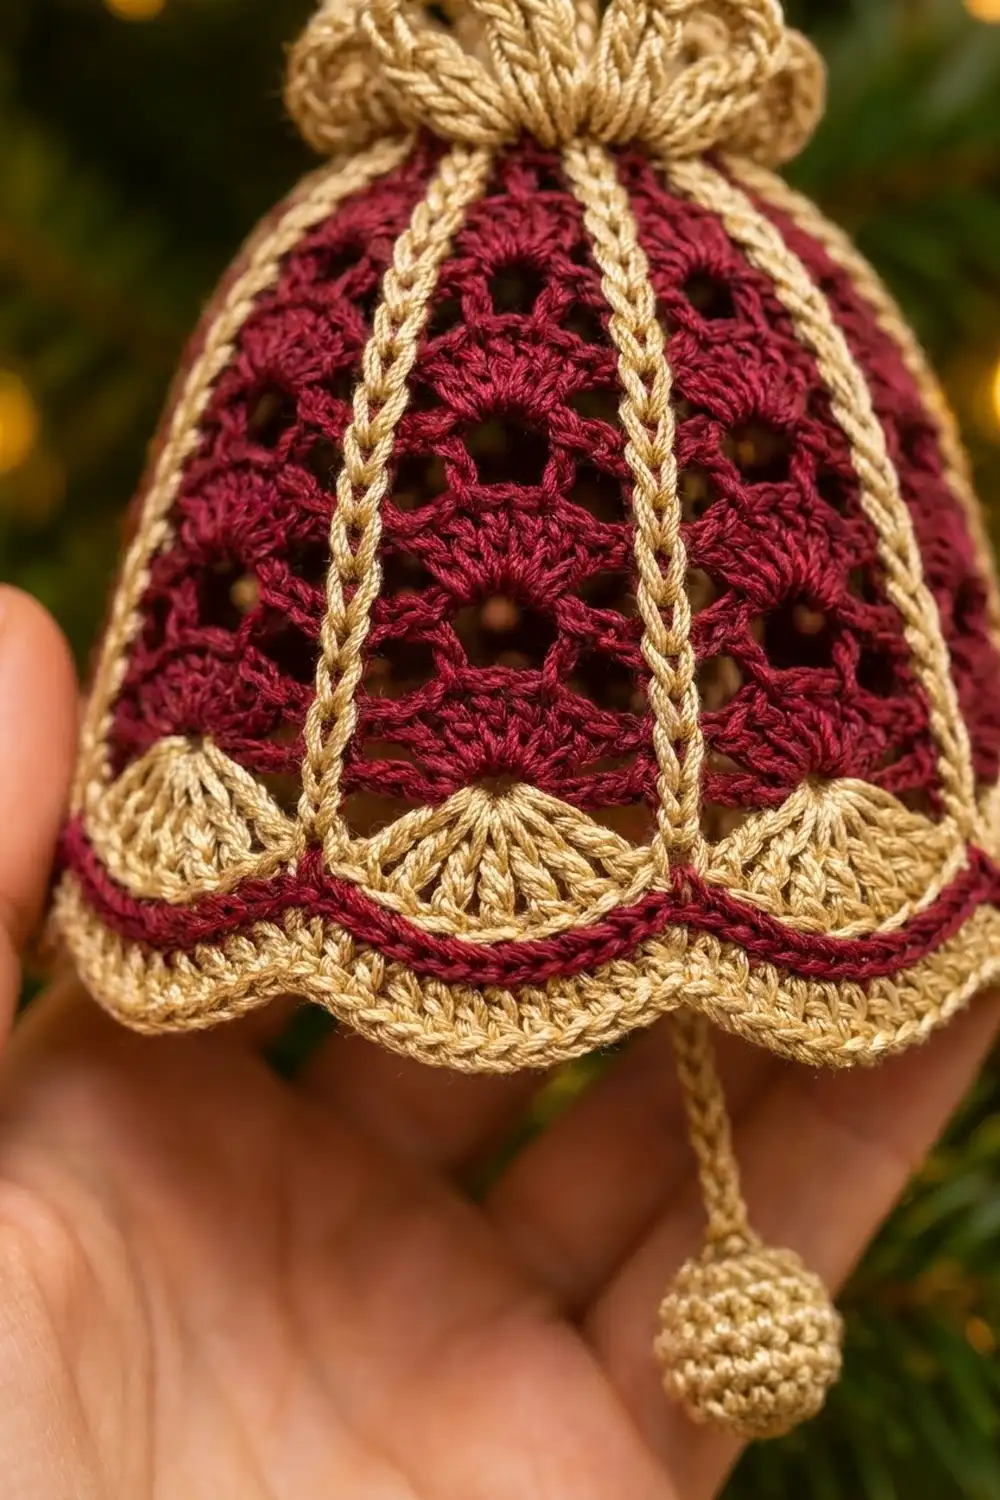
This little bell is a classic tree ornament with lace added. A gold flower crown sits on top. The cranberry body opens into V-stitch and shell lace, and eight raised gold ribs divide it into neat panels. The hem has two gold layers: flat fans on top and a flared, scalloped ruffle underneath.
The colors are deep cranberry red and soft champagne gold. In size 3 cotton thread the stitches look crisp and a little vintage, and the bell keeps its shape well after blocking.
The finished bell measures about 3.5 in (8.9 cm) tall and 4.75 in (12.1 cm) wide at the hem. With the hanging loop, it is about 5.75 in (14.6 cm) long. This pattern uses US crochet terms.
The bell is one piece, worked top-down in the round. You start with the crown. Then you work the body into the back loops of the center ring, add a two-layer hem, and surface slip stitch the ribs. A tiny stuffed clapper and a chain loop finish it.
Finished Size and Construction
- Finished size: 3.5 in (8.9 cm) tall x 4.75 in (12.1 cm) wide at the hem, measured flat
- Hanging length: about 5.75 in (14.6 cm) including the loop
- Skill level: Intermediate
- Terminology: US
- Yarn weight: size 3 cotton crochet thread (light fingering)
- Hook: 2.25 mm (B-1)
- Number of pieces: 1 bell, plus a small clapper and a chain loop attached to it
- Layout: 8 identical panels around, separated by 8 gold ribs
- Crown diameter: 1.5 in (3.8 cm)
- Size before border (after Round 10): 2.6 in (6.6 cm) tall x 4 in (10.2 cm) wide, flat
- Border depth: 0.9 in (2.3 cm)
Materials
Choose a mercerized cotton thread in size 3. It has a clean twist and good stitch definition, and it takes stiffener well. Fingering-weight cotton also works, but the bell will come out slightly larger.
- Color A, cranberry/burgundy: 7 g, about 28 m
- Color B, champagne gold: 9 g, about 36 m
These amounts include about 20 percent extra for swatching and weaving in ends.
Tools:
– 2.25 mm (B-1) crochet hook
– Tapestry needle
– Stitch marker
– Scissors
– A small scrap of gold thread for stuffing the clapper
– A shaping form, such as a small plastic cup or egg-shaped ornament wrapped in plastic
– Rust-proof pins
– Optional fabric stiffener or spray starch
Abbreviations (US Terms)
- ch – chain
- sl st – slip stitch
- sc – single crochet
- hdc – half double crochet
- dc – double crochet
- sc2tog – single crochet 2 together
- MR – magic ring
- FLO / BLO – front loop only / back loop only
- sp – space
- st(s) – stitch(es)
- rib dc – the dc that starts each panel; the gold ribs are worked over this column
Special stitches:
– V-st: (dc, ch 1, dc) in the same st or sp.
– Shell: (2 dc, ch 1, 2 dc) in the same sp.
– Large shell: (3 dc, ch 1, 3 dc) in the same sp.
– Standing sc / standing dc: start with a slip knot on the hook and work the stitch as normal. This joins new yarn without a sl st.
– Surface sl st: hold the yarn behind the work and insert the hook from front to back through the fabric. Pull up a loop and draw it through the loop on the hook.
Gauge and Checkpoints
Gauge in dc worked flat: 16 dc and 6 rows = 2 in (5.1 cm). Each dc round is about 0.33 in tall.
Gauge matters less for an ornament than for a garment, but it controls the bell’s proportions. Work the crown and Round 4, then check:
- After Round 3: crown flower is 1.5 in (3.8 cm) across.
- After Round 4: the dc round lies flat, about 1.25 in (3.2 cm) across.
- After Round 6: body flattened is 2 in (5.1 cm) wide.
- After Round 8: body flattened is 3 in (7.6 cm) wide.
- After Round 10: body flattened is 4 in (10.2 cm) wide and 2.6 in (6.6 cm) tall from the crown top.
If your bell is too big, go down to a 2 mm hook. If it is too small or the lace looks crowded, go up to a 2.5 mm hook. If Round 4 ruffles, your tension is loose. If it cups upward, your tension is tight.
Crown
Round 1 (Color A): MR, ch 1, 16 sc in ring. Pull the ring fully closed. Sl st to first sc. (16 sc) Fasten off, leaving a short tail.
Round 2 (Color B, FLO): Join with a standing sc in FLO of any st. Ch 4, skip next st, sc in FLO of next st; repeat 6 more times, ch 4, skip last st, sl st to first sc. (8 sc, 8 ch-4 loops)
Round 3 (Color B): In each ch-4 loop work (sc, hdc, 3 dc, hdc, sc). Sl st to first sc. (8 petals, 56 sts) Fasten off.
The back loops of all 16 Round 1 stitches are still free. The body grows from these, so the petals stand in front like a collar.
Body
Hold the crown with the petals facing you. The body hangs down behind the petals.
Round 4 (Color A, BLO of Round 1): Join with a standing dc in BLO of any Round 1 st, dc in BLO of same st, 2 dc in BLO of each remaining st. Sl st to first dc. (32 dc)
Every fourth dc, starting with the first, is a rib dc. Place a marker in the first one.
Round 5: Ch 3 (counts as rib dc), skip next dc, V-st in next dc, skip next dc, dc in next dc; repeat 6 more times, ending the last repeat at **. Sl st to top of ch-3. (24 dc: 8 rib dc + 8 V-sts; 8 ch-1 sps)
Round 6: Ch 3, V-st in ch-1 sp of next V-st, dc in next rib dc; repeat around, ending at **. Sl st to top of ch-3. (24 dc, 8 ch-1 sps)
Rounds 5 and 6 stay the same width. This forms the straight neck of the bell.
Round 7: Ch 3, shell in next V-st sp, dc in next rib dc; repeat around, ending at **. Sl st to top of ch-3. (40 dc: 8 rib dc + 8 shells; 8 ch-1 sps)
Round 8: Ch 3, shell in next shell sp, dc in next rib dc; repeat around, ending at **. Sl st to top of ch-3. (40 dc, 8 ch-1 sps)
Round 9: Ch 4 (counts as rib dc and ch 1), shell in next shell sp, ch 1, dc in next rib dc, ch 1; repeat around, ending at **. Sl st to 3rd ch of ch-4. (40 dc, 24 ch-1 sps)
Round 10: Ch 4 (counts as rib dc and ch 1), large shell in next shell sp, ch 1, dc in next rib dc, ch 1; repeat around, ending at **. Sl st to 3rd ch of ch-4. (56 dc: 8 rib dc + 8 large shells; 24 ch-1 sps)
The ch-1 spaces in Rounds 9 and 10 start the flare. Check the Round 10 measurements before you go on.
Border (Two-Layer Hem)
The hem has three parts: a solid burgundy base, gold fans worked in its front loops, and a gold ruffle worked in its back loops.
Border gauge: 8 sc = 1 in (2.5 cm). Each of the 8 panels has 10 base stitches, so the base goes around the bell in 80 sts.
Round 11 (Color A, conversion round): Ch 1, sc in rib dc, sc in next ch-1 sp, sc in each of next 3 dc, sc in shell ch-1 sp, sc in each of next 3 dc, sc in next ch-1 sp; repeat around. Sl st to first sc. (80 sc = 56 sc worked 1 per dc + 24 sc worked in ch-1 sps) Fasten off.
Each panel now has 10 sc: the rib sc (st 1), then sts 2 to 10. Stitch 6, the sc in the shell space, is the center of the panel.
Round 12 (Color B, FLO fans): Join with a standing sc in FLO of any rib sc. Skip next 4 sts, 9 dc in FLO of next st (center st 6), skip next 4 sts, sc in FLO of next rib sc; repeat around, ending at **. Sl st to first sc. (8 sc + 8 fans of 9 dc = 80 sts) Fasten off.
The fans lie flat against the bell, with a thin burgundy line showing below them.
Round 13 (Color B, BLO ruffle base): Fold the fans up. Join with a standing dc in BLO of any rib sc. 2 dc in BLO of next st, dc in next, 2 dc in next, dc in each of next 3 sts, 2 dc in next, dc in next, 2 dc in next, dc in BLO of next rib sc; repeat around, ending at **. Sl st to first dc. (112 dc = 80 dc worked 1 per st + 32 extra dc)
Each panel now has 14 dc: the rib dc plus 13 panel sts. The 7th panel st sits directly under the center of the fan above.
Round 14 (Color B, ruffle scallops): Ch 1, sc in rib dc, skip next 2 sts, dc in next st, 2 dc in each of next 7 sts, dc in next st, skip next 2 sts; repeat around. Sl st to first sc. (8 sc + 128 dc = 136 sts) Fasten off.
Why the math works: Rounds 11 and 12 have 8 panels x 10 sts = 80 sts. Round 13 adds 4 sts per panel, so it has 8 x 14 = 112. In Round 14, each panel uses 1 + 2 + 1 + 7 + 1 + 2 = 14 sts and makes 17 sts, so the round has 8 x 17 = 136. Every scallop is centered on a panel, and every sc lines up with a rib.
Gold Ribs
Join Color B on the right side, just under the crown petals, at the top of a rib dc column. Work surface sl sts straight down the column through Rounds 4 to 10. Make 2 sl sts per dc round, one at the base and one at the middle of each dc, for 14 sl sts. Finish with 1 sl st into the rib sc of Round 11, just above the fan point. (15 sl sts per rib) Fasten off and pull the tail to the inside.
Repeat for all 8 ribs. Keep the sl sts loose enough that the fabric stays flat.
Clapper and Hanging Loop
Clapper (Color B):
– Round 1: MR, 6 sc in ring. (6)
– Round 2: 2 sc in each st. (12)
– Rounds 3 to 4: Sc in each st. (12)
– Round 5: Sc2tog 6 times. (6)
Stuff the ball firmly with a few scrap thread clippings and close the hole. It is about 0.6 in (1.5 cm) across. Do not fasten off. Ch 20 for the cord, about 2.5 in (6.4 cm), then fasten off with a long tail.
From inside the bell, thread the cord tail through the center of Round 1 and pull it up to the top.
Hanging loop: Join Color B with a sl st through the center of Round 1, catching the clapper tail. Ch 28, then sl st into the same center. The loop stands about 1.75 in (4.4 cm) tall. Knot the clapper tail and the loop tails together inside and weave them in.
The center of the clapper ball should sit about 0.5 in (1.3 cm) below the ruffle edge. Shorten or lengthen the cord by a few chains if needed.
Final Blocking
- Weave in all ends inside the bell.
- Wet the bell in cool water, or soak it in diluted fabric stiffener, and squeeze out the excess.
- Slip the bell over a form about 2.5 in (6.4 cm) wide at the base, wrapped in plastic.
- Stretch the panels evenly so each rib runs straight from the crown to its scallop.
- Pin the 8 fans flat against the body.
- Pull the 8 ruffle scallops outward and pin each center so the hem reaches 4.75 in (12.1 cm) across.
- Open each crown petal with your fingers.
- Let the bell dry completely, then lift it off the form.
Final Quality-Control Checklist
- Bell is 3.5 in (8.9 cm) tall and 4.75 in (12.1 cm) wide.
- Crown has 8 even petals around a closed burgundy center.
- Body has 8 panels and 8 straight gold ribs.
- Round 11 has 80 sc; Round 14 has 136 sts.
- The 8 fans and 8 ruffle scallops line up with the panel centers.
- Clapper hangs centered just below the hem.
- Loop is secure and all ends are hidden.
Troubleshooting
- The top cups upward: Round 4 is too tight. Redo it with a larger hook.
- Ribs pucker the panels: Your surface sl sts are too tight. Work them looser, or use a hook one size larger.
- Panels lean or twist: You may have worked into the V-st dc instead of the space. Check that each V-st and shell sits in a ch-1 sp.
- Fans look crowded: Make sure you skipped exactly 4 sts on each side.
- Ruffle won’t flare: Check that Round 13 has 112 dc. Starching also helps a lot.
- Clapper hangs crooked: Re-thread the cord through the exact center of Round 1.
Care
Hand wash in cool water with mild soap, reshape the bell over the form, and dry it flat. Store it flat or stuffed with tissue so the ruffle keeps its shape.

Final Notes
Here is the measurement chain in order. The crown is 1.5 in (3.8 cm) across and Round 4 lies flat at 1.25 in (3.2 cm). The neck is 2 in (5.1 cm) wide, the body is 3 in (7.6 cm) after Round 8, and 4 in (10.2 cm) after Round 10. The 0.9 in (2.3 cm) border then brings the bell to 3.5 in (8.9 cm) tall and 4.75 in (12.1 cm) wide. If each checkpoint matches, the bell will too.
Happy crocheting!