

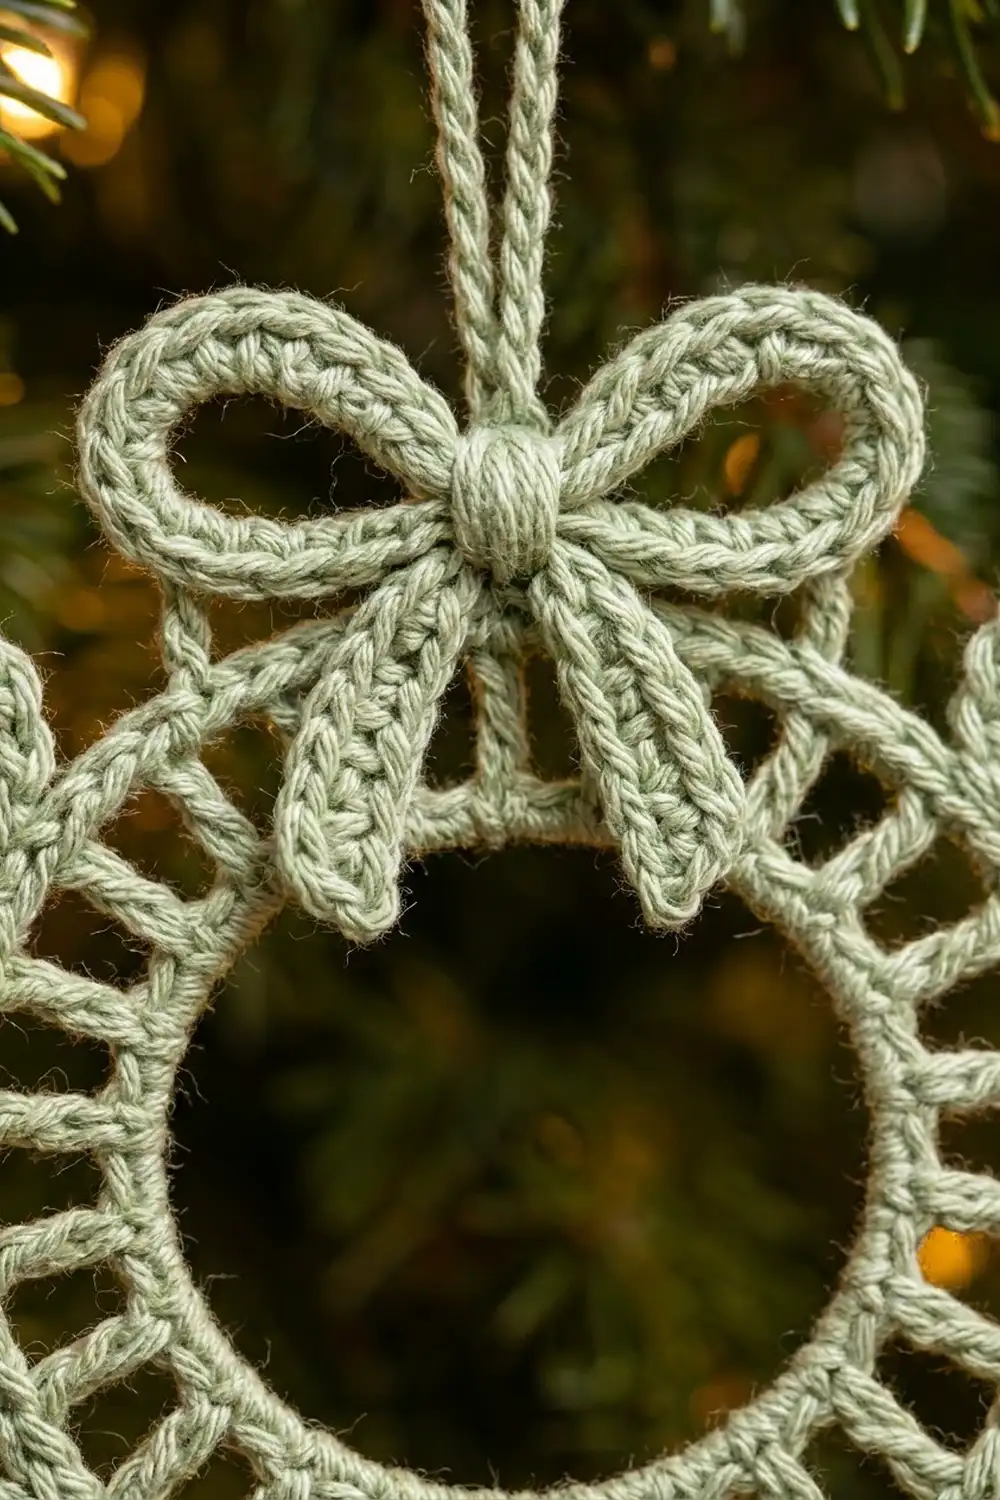
This little wreath ornament is light, airy, and quick to finish. It is a flat lace ring with a ladder band of tall posts and open gaps between them. Nine pointed, open-centered leaves sit around the sides and bottom, and a looped bow sits on top.
The sample is worked in soft sage green for a calm, vintage feel. Cream, lavender, and blush pink also look lovely on the tree. Each ornament uses one color only, so it’s a good way to use up small leftover amounts of yarn.
This pattern uses US crochet terms. The finished wreath measures about 5¼ in (13.3 cm) across from leaf tip to leaf tip. The ornament is about 7¼ in (18.4 cm) tall including the hanging loop.
The wreath is worked in the round from a foundation chain: a single crochet round, a ladder round of treble crochet, a closing single crochet round, and then a leaf round. The bow is made separately and sewn on. You finish with a single-crochet-covered hanging loop.
Finished Size and Construction
- Finished size: 5¼ in (13.3 cm) across at the leaf tips; 7¼ in (18.4 cm) tall with the hanging loop
- Skill level: Easy / advanced beginner
- Terminology: US crochet terms
- Yarn weight: Sport weight (2), cotton or cotton blend
- Hook: 3.25 mm (US D/3)
- Number of pieces: 1 wreath plus 1 small bow sewn on (one ornament)
- Layout: Single round motif; leaves on the sides and bottom, bow at top center
- Ring size (Rounds 1–3): 3¾ in (9.5 cm) outer diameter, with a 2¼ in (5.7 cm) center opening
- Size before leaf border: 3¾ in (9.5 cm)
- Leaf border depth: ¾ in (1.9 cm)
- Bow: about 2½ in (6.4 cm) wide
Materials
Use a smooth sport weight cotton or a cotton blend with good stitch definition. Mercerized cotton makes the leaf points crisp and helps the ladder posts stand straight. Avoid fuzzy or very splitty yarn because it hides the open gaps.
Yarn (one ornament):
- Main color, Sage Green: 12 g, about 36 m (39 yd)
Optional colorways: Cream, Lavender, or Blush Pink in the same amount, 12 g (about 36 m / 39 yd) each.
The wreath uses about 6 g, the bow about 2 g, and the hanging loop about 1 g. The quantities above include a margin for your gauge swatch and for weaving in ends.
Tools:
- 3.25 mm (US D/3) crochet hook
- Tapestry needle
- Stitch marker
- Scissors
- Blocking mat or foam board and rustproof pins
- Spray bottle with water (optional: light spray starch)
- Ruler or tape measure
Abbreviations (US Terms)
- ch – chain
- sl st – slip stitch
- sc – single crochet
- hdc – half double crochet
- tr – treble crochet (yarn over twice, insert hook, pull up a loop, [yarn over, pull through 2 loops] 3 times)
- sk – skip
- sp – space
- st(s) – stitch(es)
- rep – repeat
Special stitch – Leaf: Ch 9, sl st in the 9th ch from the hook (the first ch of this ch-9) to form a small ring. Work into the ring: 3 sc, hdc, ch 2, hdc, 3 sc. Sl st into the same first ch to close. Each leaf has 8 sts plus a ch-2 tip. It makes a pointed, outlined leaf with a small open center.
Gauge and Checkpoints
Gauge: 24 sc = 4 in (10.2 cm), worked flat in rows. That’s 6 sc per 1 in (2.5 cm).
A small ornament doesn’t need a big swatch. The best test is to work Rounds 1–3 once and measure. If those match, the leaves and bow will match too.
Checkpoints:
- After Round 1: outer edge 2½ in (6.4 cm) across; center opening about 2¼ in (5.7 cm)
- After Round 3: 3¾ in (9.5 cm) across, lying flat with no ruffling
- After Round 4: 5¼ in (13.3 cm) across at the leaf tips
- Bow: about 2½ in (6.4 cm) wide
If your ring is too big: go down 0.25 mm in hook size. If it ruffles but is the right size, your treble posts are too tall, so pull up shorter loops.
If your ring is too small or cups: go up 0.25 mm in hook size, or loosen your foundation chain. A tight chain is the most common cause.
Wreath
Do not twist the chain when you join it. Mark the join of Round 1 as top center. Every later join stacks above it and ends up hidden behind the bow.
Round 1 (inner edge)
Ch 48 and sl st in the first ch to form a ring, taking care not to twist it. Ch 1 (does not count as a st). Sc in each ch around. Join with a sl st in the first sc. (48 sc)
Lay the ring flat. It should measure 2½ in (6.4 cm) across the outer edge.
Round 2 (ladder round)
Ch 6 (counts as tr + ch 2). Sk the next sc. Tr in the next sc, ch 2, sk the next sc; rep from * around. Join with a sl st in the 4th ch of the beginning ch-6. (24 tr, 24 ch-2 sps)
This round forms the ladder bars. Each tr sits in every other sc of Round 1: 48 ÷ 2 = 24 posts. The ch-2 spaces make the open gaps between them.
Round 3 (outer edge – conversion round)
Ch 1. Sc in the same st as the join. Work 2 sc in the next ch-2 sp. Sc in the next tr, 2 sc in the next ch-2 sp; rep from * around. Join with a sl st in the first sc.
Count: 24 sc (1 in each tr) + 48 sc (2 in each of the 24 spaces) = 72 sc
The extra stitches let the outer edge grow to fit the larger circle, so the band lies flat. Check now: 3¾ in (9.5 cm) across. The center opening stays about 2¼ in (5.7 cm), and the band is ¾ in (1.9 cm) wide.
Leaf Border (Round 4)
Border gauge: this round is worked into the 72 sc of Round 3 at the same 6 sc per 1 in (2.5 cm). Each leaf adds ¾ in (1.9 cm) beyond the ring edge.
Number the Round 3 stitches 1 to 72, starting with the first sc after the top-center join.
Round 4
Ch 1. Sc in each of sts 1–9. (9 sc, top right section)
Sc in each of the next 3 sts, make a Leaf, sc in each of the next 3 sts; rep from * 8 more times, for 9 repeats in total. (54 sc, 9 leaves)
Sc in each of the last 9 sts. (9 sc, top left section)
Join with a sl st in the first sc. Fasten off and weave in the ends.
Count: 9 + 54 + 9 = 72 sc, plus 9 leaves of 8 sts and a ch-2 tip each.
Why the math works
Each 6-st repeat places a leaf after its 3rd sc. The leaves therefore sit on sts 12, 18, 24, 30, 36, 42, 48, 54, and 60. Six stitches out of 72 is one-twelfth of the circle, so the leaves are spaced 30 degrees apart.
The middle leaf, on st 36, is exactly opposite the top-center join. It points straight down at the bottom center. The first and last leaves (sts 12 and 60) are each 12 sts from the join, so the layout is symmetrical.
From st 60 up over the top to st 12 is a plain arc of 23 sc, nearly 4 in (10.2 cm) of edge. That leaves room for the 2½ in (6.4 cm) bow with a little space on each side.
Check now: 5¼ in (13.3 cm) across at the leaf tips.
Bow
The bow is a figure-eight of two chain loops covered in sc, with two tails.
Loops: Ch 16. Sl st in the first ch to form loop A (a ch-15 loop). Ch 15, then sl st in the same first ch to form loop B. The first ch is now the bow center.
Cover loop B: Work 20 sc into loop B. Sl st in the center ch.
Cover loop A: Work 20 sc into loop A. Sl st in the center ch. (2 loops, 20 sc each)
Tail 1: Ch 7. Sc in the 2nd ch from the hook and in each of the next 5 ch. Sl st in the center ch. (6 sc)
Tail 2: Rep Tail 1. (6 sc)
Fasten off and leave a 12 in (30.5 cm) tail.
Center knot: Use the tapestry needle to wrap the long tail tightly around the bow center 6 times. This pinches both loops and makes the round knot. Pass the needle under the wraps at the back to secure them. Keep the remaining tail for sewing.
The bow should measure about 2½ in (6.4 cm) wide. Each loop is about 1 in (2.5 cm) across, and the tails are about 1 in (2.5 cm) long. Angle the tails down and outward.
Assembly and Hanging Loop
- Place the bow at top center so its knot sits over the outer edge of Round 3 and its loops rise above the ring.
- Use the bow tail to sew through the knot and the Round 3 and 4 sts below it with 3–4 small stitches.
- Tack the outer tip of each bow loop to Round 4 with one hidden stitch so the loops don’t flop.
- Hanging loop: Working from the back, join the yarn with a sl st in the top-center join of Round 4. Ch 30, then sl st in the same st to form the loop. Ch 1. Work 36 sc into the loop and sl st in the base to finish. Fasten off and weave in the ends.
The loop stands about 2½ in (6.4 cm) tall. The 36 sc cover the 30 ch evenly without ruffling.
Final Blocking
- Wet the ornament or mist it thoroughly, then gently squeeze out the extra water in a towel.
- Lay it face up on the blocking mat. Draw or mark a 5¼ in (13.3 cm) circle as a guide.
- Pin the outer ring into a true 3¾ in (9.5 cm) circle. Check that the ladder posts point straight out from the center.
- Pin each leaf tip through its ch-2 space, so the tips point straight out at even 30-degree spacing.
- Fluff the bow loops open and pin each one at its outer curve. Straighten the tails.
- Pin the hanging loop straight up.
- For a firmer ornament, spray lightly with starch.
- Leave it to dry completely before unpinning, usually 6–8 hours.
Final Quality-Control Checklist
- Round 1 has 48 sc, and the ring is not twisted.
- Round 2 has 24 tr posts with even ch-2 gaps.
- Round 3 has 72 sc and lies flat.
- Round 4 has 72 sc and 9 leaves, with one leaf pointing straight down.
- The plain top arc has 23 sc between the first and last leaves.
- Each leaf has a clear point and a small open center.
- The bow has two even loops, two matching tails, and a firm knot.
- The bow sits centered over the top-center join.
- The ornament measures 5¼ in (13.3 cm) across and 7¼ in (18.4 cm) tall with the loop.
- All ends are woven in securely on the back.
Troubleshooting
The ring is twisted. You twisted the foundation chain when you joined it. You’ll need to restart Round 1. Lay the chain flat before you join it.
The ladder band ruffles. Your tr stitches are too tall for the 72-st outer edge. Pull up shorter loops, or go down a hook size for Round 2 only.
The ladder band cups. Your foundation chain is too tight. Chain loosely, or use a hook one size larger for the chain only.
The leaves are rounded, not pointed. Make sure you work the ch-2 tip, and pin through it when blocking.
The leaves twist sideways. Close each leaf with the sl st in the first ch of that leaf, not in the next Round 3 st.
The leaves are uneven at the top. Recount sts 1–9 and the last 9. Each top section must have exactly 9 plain sc.
The bow loops flop. Add one tacking stitch at each loop curve, and starch lightly.
The bow is crooked. Line up the knot with the top-center join before you sew.
Care
Hand wash in cool water with mild soap, press out the water in a towel, and lay flat to dry, re-pinning the leaves if needed. Store the ornament flat between tissue paper so the leaves and bow keep their shape.

Final Notes
Here’s the full measurement chain:
- 48 sc in Round 1 makes a 2½ in (6.4 cm) ring.
- 24 tr posts make the ladder band.
- 72 sc in Round 3 brings the ring to 3¾ in (9.5 cm).
- 9 leaves at 30-degree spacing add ¾ in (1.9 cm) all around, for 5¼ in (13.3 cm).
- A 2½ in (6.4 cm) bow covers the plain top arc.
- A 2½ in (6.4 cm) loop finishes the ornament at 7¼ in (18.4 cm) tall.
If you match the checkpoint after each step, the ornament will come out flat and even. Make one in each color for a soft, cozy tree.
Happy crocheting!