

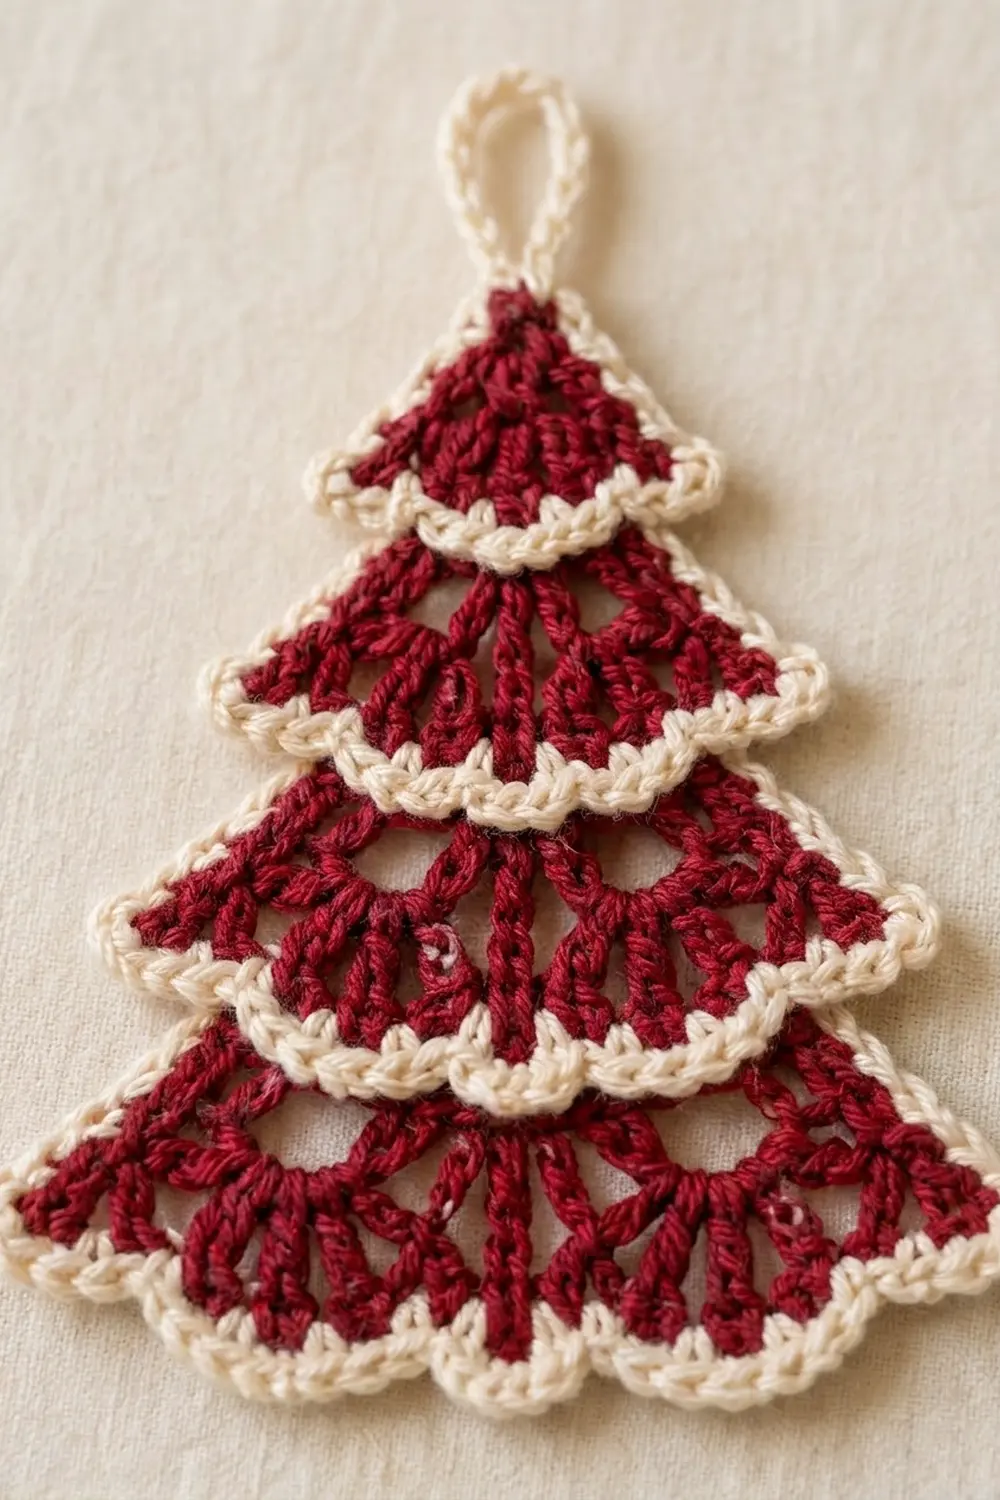
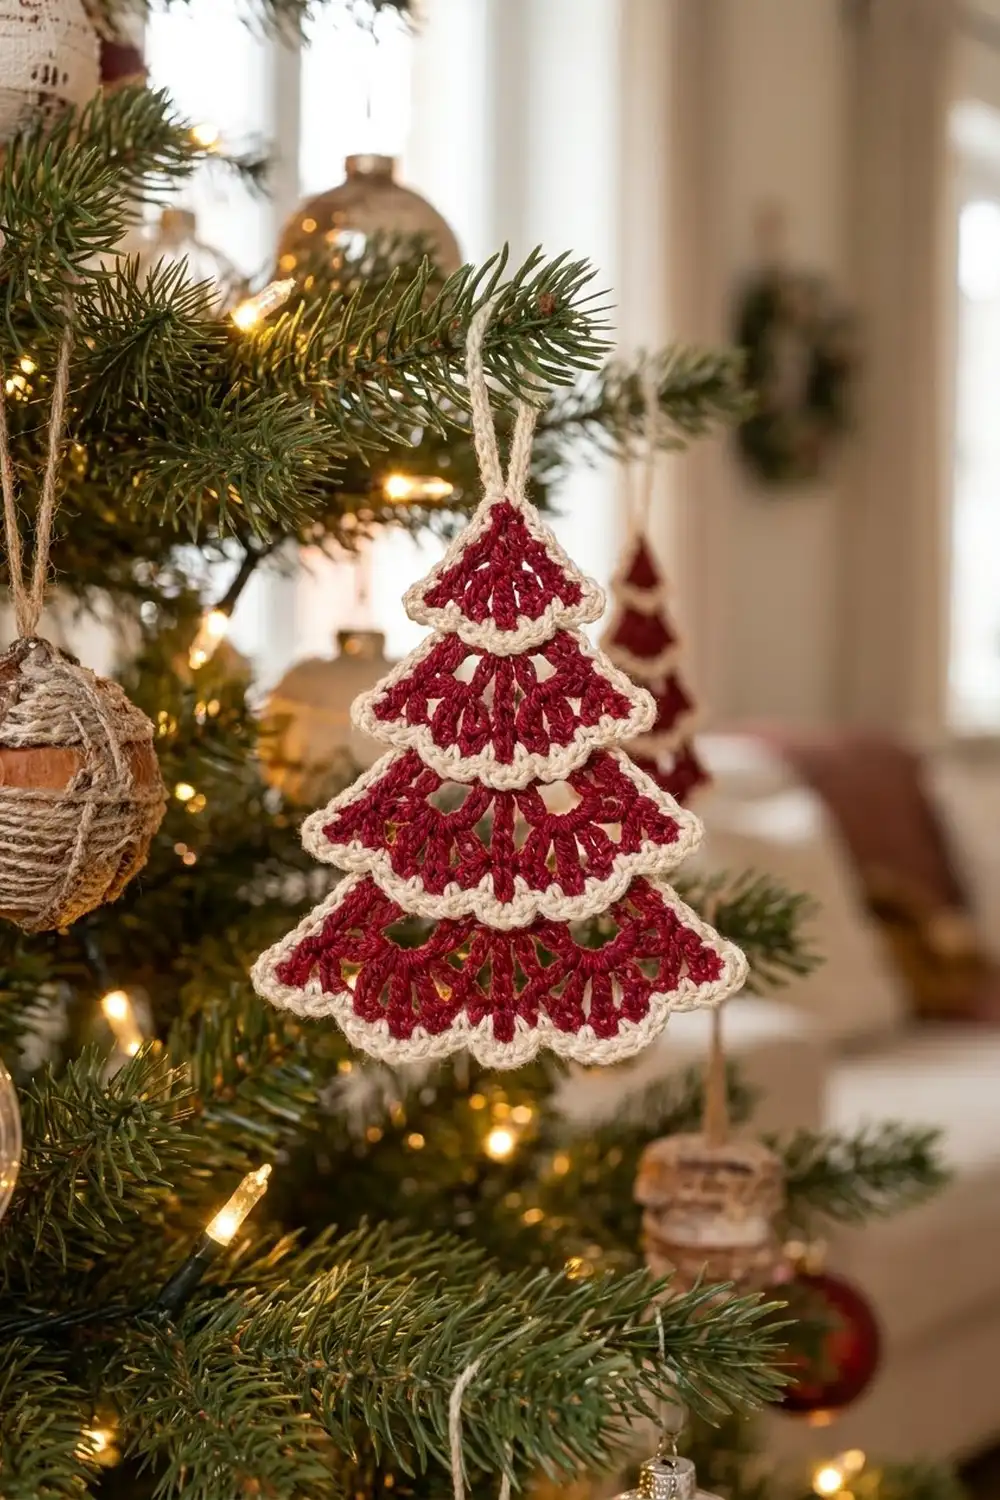
This little ornament is a flat Christmas tree made from four stacked tiers. Each tier is a fan of deep cranberry stitches, and each one has a cream scalloped edge that sits over the top of the tier below it. A cream hanging loop at the tip finishes it, so it’s ready to go on the tree.
The palette is just two colors: cranberry red for the tree and soft cream for the trim and loop. The top tier is solid. The three lower tiers each start with a mesh row, so you get open spokes that look a little like snow-dusted branches against the red.
The pattern uses US crochet terms. The finished ornament measures about 4.5 in (11.4 cm) wide across the bottom tier and 4 in (10.2 cm) tall from tip to scallops. The loop adds about 1 in (2.5 cm), for an overall hanging length of about 5 in (12.7 cm).
Construction is simple once you see it. You work the whole tree as one piece, in turned rows from the top down. Each new tier grows out of the wrong-side loops of the tier above. That leaves the right-side loops free for the cream scallops, and it’s what makes the tiers look layered even though everything stays one piece.
Finished Size and Construction
- Finished size: about 4.5 in (11.4 cm) wide × 4 in (10.2 cm) tall, plus a 1 in (2.5 cm) loop
- Skill level: Intermediate (you need to be comfortable with front and back loops)
- Terminology: US
- Yarn weight: Light (#3 / DK-weight) mercerized cotton
- Hook: 3.25 mm (US D/3)
- Number of pieces: 1
- Layout: four tiers stacked from top to bottom, all worked in one piece
- Piece size before edging: about 4.25 in (10.8 cm) wide × 3.5 in (8.9 cm) tall
- Edging depth: about 1/8 in (0.3 cm) on the sides; scallops add about 1/2 in (1.3 cm) at the bottom
Materials
Mercerized cotton works best here. It gives crisp stitch definition, holds the scallops’ shape, and blocks flat. Any light-weight cotton or cotton blend will do, as long as it’s around 125 m per 50 g. Avoid fuzzy yarns, because they blur the mesh spokes.
- Color A – Cranberry red: 8 g, about 20 m
- Color B – Cream: 5 g, about 12 m
These quantities include a margin of about 30% over what one ornament actually uses. That covers swatching and a few rip-backs.
Tools:
- 3.25 mm (US D/3) crochet hook
- Tapestry needle
- Scissors
- Locking stitch markers (2)
- Blocking mat or folded towel, plus rust-proof pins
- Spray bottle; spray starch (optional)
Abbreviations (US Terms)
- ch – chain
- sl st – slip stitch
- sc – single crochet
- hdc – half double crochet
- dc – double crochet
- sp – space
- st(s) – stitch(es)
- RS / WS – right side / wrong side
- WS loop – of the two top loops of a stitch, the one closer to the WS of the piece
Special stitch – Shell: (hdc, dc, hdc) all in the same st.
Scallop repeat: skip next st, shell in next st, sc in next st. Each repeat uses 3 sts.
Turning chains: ch 3 counts as a dc. Ch 4 counts as a dc plus ch 1.
Gauge and Checkpoints
Gauge: 22 dc and 9 rows of dc = 4 in (10.2 cm) in a flat swatch.
This ornament is one piece, so let Tier 1 be your test. Work Rows 1–2, then check before you go on.
- After Tier 1 (Row 2): about 0.9 in (2.3 cm) from ring to edge, and about 1.75 in (4.4 cm) straight across the bottom corners. The curved edge measures about 2.4 in (6.1 cm).
- After Tier 2 (Row 4): about 1.75 in (4.4 cm) tall in total, and about 2.5 in (6.4 cm) across.
- After Tier 3 (Row 6): about 2.6 in (6.6 cm) tall, and about 3.5 in (8.9 cm) across.
- After Tier 4 (Row 8): about 3.5 in (8.9 cm) tall, and about 4.25 in (10.8 cm) across.
- After edging: about 4 in (10.2 cm) tall and 4.5 in (11.4 cm) wide.
Too big? Switch to a 3.0 mm hook, or use a slightly thinner cotton. Too small? Switch to a 3.5 mm (US E/4) hook. If the tiers ruffle, your dc are shorter than the gauge. Go up a hook size rather than leaving out increases.
The Pattern
Every odd row (1, 3, 5, 7) is a WS row, and every even row (2, 4, 6, 8) is a RS row. Mark the RS with a locking marker after Row 2.
The tiers stack because of one rule. Rows 3, 5, and 7 are worked into the WS loops only of the row before. When the WS is facing you, those are the front loops, the ones closest to you. The RS loops stay free for the cream scallops.
Tier 1 (Top, Solid)
With Color A:
Row 1 (WS): Make a magic ring. Ch 3 (counts as dc), 6 dc in the ring. Pull the ring tight, but don’t join. Turn. (7 dc)
Row 2 (RS): Ch 3 (counts as dc), dc in the same st, 2 dc in each of the next 2 sts, dc in the next st (the center st), 2 dc in each of the next 3 sts. The last st is the top of the turning ch. Turn. (13 dc)
The single dc in the center keeps the count odd, which the scallop edging needs. Check your Tier 1 measurement now.
Tier 2
Row 3 (WS, WS loops only): Ch 4 (counts as dc + ch 1), skip the next st, dc in the next st, [ch 1, skip the next st, dc in the next st] 5 times. Turn. (7 dc, 6 ch-1 sps)
Row 4 (RS, both loops): Ch 3 (counts as dc), [2 dc in the next ch-1 sp, dc in the next dc] 6 times. Turn. (19 dc)
Check: 1 + (6 × 3) = 19.
Tier 3
Row 5 (WS, WS loops only): Ch 4 (counts as dc + ch 1), skip the next st, dc in the next st, [ch 1, skip the next st, dc in the next st] 8 times. Turn. (10 dc, 9 ch-1 sps)
Row 6 (RS, both loops): Ch 3 (counts as dc), 2 dc in the next ch-1 sp, dc in the next dc, dc in the next ch-1 sp, dc in the next dc, 2 dc in the next ch-1 sp, dc in the next dc. Repeat from * to * 2 more times (3 repeats in all). Turn. (25 dc)
Check: each repeat makes 8 dc, so 1 + (3 × 8) = 25. The increases fall 2-1-2 across every set of three spaces, which keeps the tier symmetrical.
Tier 4 (Bottom)
Row 7 (WS, WS loops only): Ch 4 (counts as dc + ch 1), skip the next st, dc in the next st, [ch 1, skip the next st, dc in the next st] 11 times. Turn. (13 dc, 12 ch-1 sps)
Row 8 (RS, both loops): Ch 3 (counts as dc), dc in the next ch-1 sp, dc in the next dc, [2 dc in the next ch-1 sp, dc in the next dc] twice, dc in the next ch-1 sp, dc in the next dc. Repeat from * to * 2 more times (3 repeats in all). (31 dc) Fasten off and weave in the ends.
Check: each repeat makes 10 dc, so 1 + (3 × 10) = 31. Measure the full tree now. It should be about 3.5 in (8.9 cm) tall and 4.25 in (10.8 cm) across.
Border (Cream Scalloped Edging)
Each tier gets its own cream edging. On Tiers 1–3, the scallops go into the free RS loops along that tier’s bottom, so they sit over the top of the next tier. On Tier 4, nothing hangs below, so you work into both loops. Keep the RS facing you for all edging, and turn the piece as needed so you always work counterclockwise.
Border gauge: 1 scallop repeat covers 3 dc, or about 0.55 in (1.4 cm). Along the sides, work 2 sc into each dc row-end.
Why the math works: a scallop edge needs 1 starting sc plus a multiple of 3. The bottom rows have 13, 19, 25, and 31 sts, and each one equals 1 + (3 × a whole number). That gives 4, 6, 8, and 10 scallops, and every tier ends with a sc exactly on its corner. Each tier is 2 rows deep, so each side gets 2 × 2 = 4 sc.
Tier 1 Edging and Hanging Loop
With the RS facing, join Color B with a sl st in the free RS loop of the corner st at the bottom-left of Row 2.
Bottom: Ch 1, sc in the same st, then work the scallop repeat 4 times, moving toward the right corner. (4 scallops; 13 sts used)
Right side: Work 2 sc in each of the 2 row-ends to reach the tip. (4 sc)
Loop: Ch 14, sl st into the tip at the ring. Work 20 sc into the ch-14 loop, then sl st into the tip again.
Left side: Work 2 sc in each of the 2 row-ends down to the corner. (4 sc) Sl st into the first sc. Fasten off.
Tiers 2 and 3 Edging
With the RS facing, join Color B with a sl st at the top of the left side of the tier, just under the cream edge of the tier above.
Left side: Ch 1. Working down, work 2 sc in each of the 2 row-ends. (4 sc)
Bottom: Working in the free RS loops of the tier’s last row, sc in the first st, then work the scallop repeat across.
- Tier 2 (Row 4): repeat 6 times. (6 scallops; 19 sts used)
- Tier 3 (Row 6): repeat 8 times. (8 scallops; 25 sts used)
Right side: Working up, work 2 sc in each of the 2 row-ends. (4 sc) Fasten off.
Tier 4 Edging
Join as for Tiers 2 and 3.
Left side: Ch 1, then 2 sc in each of the 2 row-ends. (4 sc)
Bottom: Working in both loops of Row 8, sc in the first st, then work the scallop repeat 10 times. (10 scallops; 31 sts used)
Right side: Work 2 sc in each of the 2 row-ends. (4 sc) Fasten off.
Weave all the cream ends into the cream edging, so they don’t show through the red mesh.
Final Blocking
- Soak the ornament in cool water for 10 minutes.
- Press the water out gently in a towel. Don’t wring it.
- Lay it RS up on the blocking mat.
- Pin the tip, then the two bottom corners, so the piece measures 4 in (10.2 cm) tall and 4.5 in (11.4 cm) wide.
- Pin each tier’s side corners so the sides run in a straight diagonal line.
- Pin the point of every bottom scallop, then open the mesh spaces with your fingertips.
- Lift each cream scallop so it lies flat over the tier below it.
- Pin the loop into a neat teardrop shape about 1 in (2.5 cm) long.
- Mist with spray starch if you’d like a stiffer ornament. Let it dry completely before you unpin it.
Final Quality-Control Checklist
- Stitch counts: Row 2 = 13, Row 4 = 19, Row 6 = 25, Row 8 = 31.
- Every mesh row has 1 more dc than ch-1 sps (7/6, 10/9, 13/12).
- Scallop counts are 4, 6, 8, and 10, with a sc on every corner.
- Each tier has 4 cream sc on each side.
- Each cream edge lies on top of the next tier, with no red showing between them.
- The ornament is about 4 in (10.2 cm) tall and 4.5 in (11.4 cm) wide, plus a 1 in (2.5 cm) loop.
- All ends are woven in and invisible from the RS.
Troubleshooting
The tiers don’t overlap, and the cream sits flush. You worked a mesh row into both loops. Rip it back and work into the WS loops only.
There’s no free loop for the scallops. You probably used the RS loops for the mesh row. Check which side your marker is on.
The scallop edge ends half a repeat short. You miscounted the row below. Recount it, since it must be 13, 19, 25, or 31.
The tiers ruffle. Your dc are too short for the increases. Go up a hook size, or pull up taller loops.
The tiers cup. Your tension is too loose. Go down a hook size.
The ring has a hole at the tip. Pull the magic ring tighter before you weave in the tail.
The loop twists. Your 20 sc are too tight. Work them more loosely, or use 18 sc.
Care
Hand wash in cool water with mild soap, then reshape and dry flat. If you used starch, re-starch after washing to keep the scallops crisp.
Final Notes
Each measurement in this pattern builds on the one before. Get the gauge of 22 dc to 4 in (10.2 cm), and Tier 1 comes out 1.75 in (4.4 cm) across. Then each tier adds 6 sts, giving 13, 19, 25, and 31, and widens the tree to 4.25 in (10.8 cm). Each count is 1 plus a multiple of 3, so the scallops land evenly. The edging brings the ornament to 4.5 in × 4 in (11.4 × 10.2 cm), and the loop adds 1 in (2.5 cm). Check each link in that chain as you go, and your tree will match.
Happy crocheting!