

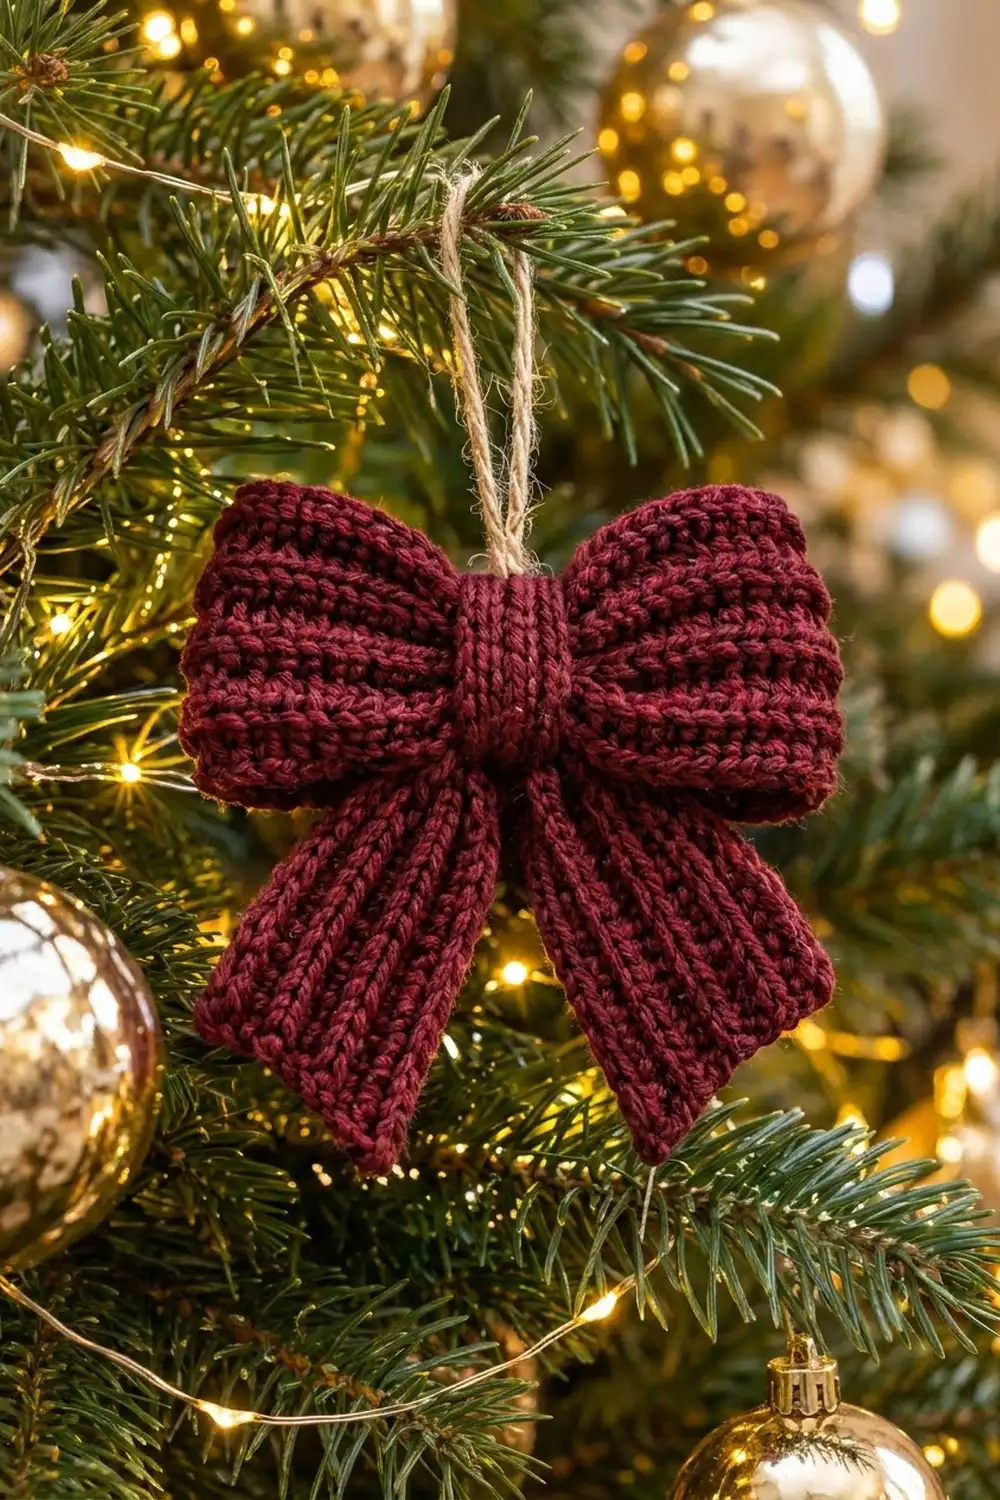
This little bow brings a cozy, knit-look texture to your tree. Every part is worked in back-loop-only single crochet, which gives deep, even ridges that look a lot like knitted ribbing. In a rich cranberry-burgundy yarn with a rustic jute hanger, it looks classic, warm and a bit vintage.
The finished bow measures about 5 in (12.7 cm) wide and 5.5 in (14.0 cm) tall. The pattern uses US crochet terms throughout.
The construction is simple. You crochet three flat rectangles: a loop band, a tail strip and a narrow center wrap. Then you sew them into one bow. Nothing is worked in the round, and the only stitches are chain, single crochet and slip stitch.
The bow is one ornament made from three components. It is not a set of motifs joined into a larger item, so there is no layout grid or motif joining. You’ll find an assembly section instead.
Finished Size and Construction
- Finished size: about 5 in (12.7 cm) wide x 5.5 in (14.0 cm) tall
- Skill level: Easy
- Terminology: US crochet terms
- Yarn weight: Worsted (#4)
- Hook: 4.0 mm (G-6)
- Number of pieces: 3 components (loop band, tail strip, center wrap) assembled into 1 bow
- Layout: loop band seamed into a ring and flattened, tail strip folded into an inverted V behind it, wrap around the center
- Piece sizes (flat): loop band 10 x 2.5 in (25.4 x 6.4 cm); tail strip 8 x 2 in (20.3 x 5.1 cm); center wrap 3.5 x 1 in (8.9 x 2.5 cm)
- Size before border: same as above
- Border depth: one slip-stitch edging round, which adds no measurable width (well under 0.25 in / 0.6 cm)
Materials
Yarn: Use a smooth worsted-weight yarn with good stitch definition. An acrylic, wool blend or cotton blend in a firm twist will all work. Avoid fuzzy or very splitty yarns, because they blur the ribbing.
- Burgundy / Cranberry: 15 g, about 30 m (33 yd)
- Natural jute twine (hanger): one piece 8 in (20.3 cm) long
Tools:
– 4.0 mm (G-6) crochet hook
– Tapestry needle
– Scissors
– Stitch markers (2)
– Ruler or measuring tape
– Spray bottle and pins for blocking
The yarn amount includes about a 25% margin for your gauge swatch, sewing and weaving in ends.
Abbreviations (US Terms)
- ch – chain
- sc – single crochet
- sl st – slip stitch
- st(s) – stitch(es)
- BLO – back loop only
- RS / WS – right side / wrong side
Special stitch – sc BLO: Insert the hook under only the back loop of the stitch (the loop farther from you), yarn over and pull up a loop, then yarn over and pull through both loops on the hook. Working every row this way makes one raised ridge for every 2 rows on each side.
Turning chain: The ch 1 at the start of each row does not count as a stitch. Always work the first sc into the first stitch.
Gauge and Checkpoints
Gauge: 16 sts and 16 rows of sc BLO = 4 in (10.2 cm) square, gently blocked.
Test one piece first. The center wrap is your gauge swatch. Make it before anything else (directions below). It is 14 sts wide and 4 rows tall and should measure 3.5 x 1 in (8.9 x 2.5 cm).
Checkpoints:
1. Center wrap: 3.5 in (8.9 cm) long after Row 1.
2. Loop band: 10 in (25.4 cm) long after Row 1 and 2.5 in (6.4 cm) tall after Row 10.
3. Tail strip: 8 in (20.3 cm) long after Row 1 and 2 in (5.1 cm) tall after Row 8.
4. Assembled bow: about 5 in (12.7 cm) wide and 5.5 in (14.0 cm) tall.
If your piece is too big, go down a hook size (3.75 mm / F-5) and test the wrap again. If it is too small, go up to 4.5 mm (7).
If only your row height is off, it’s usually tension. BLO rows naturally squash together, so give each stitch a moment before pulling the loop through. Length (stitch gauge) matters most, because it sets the bow’s width.
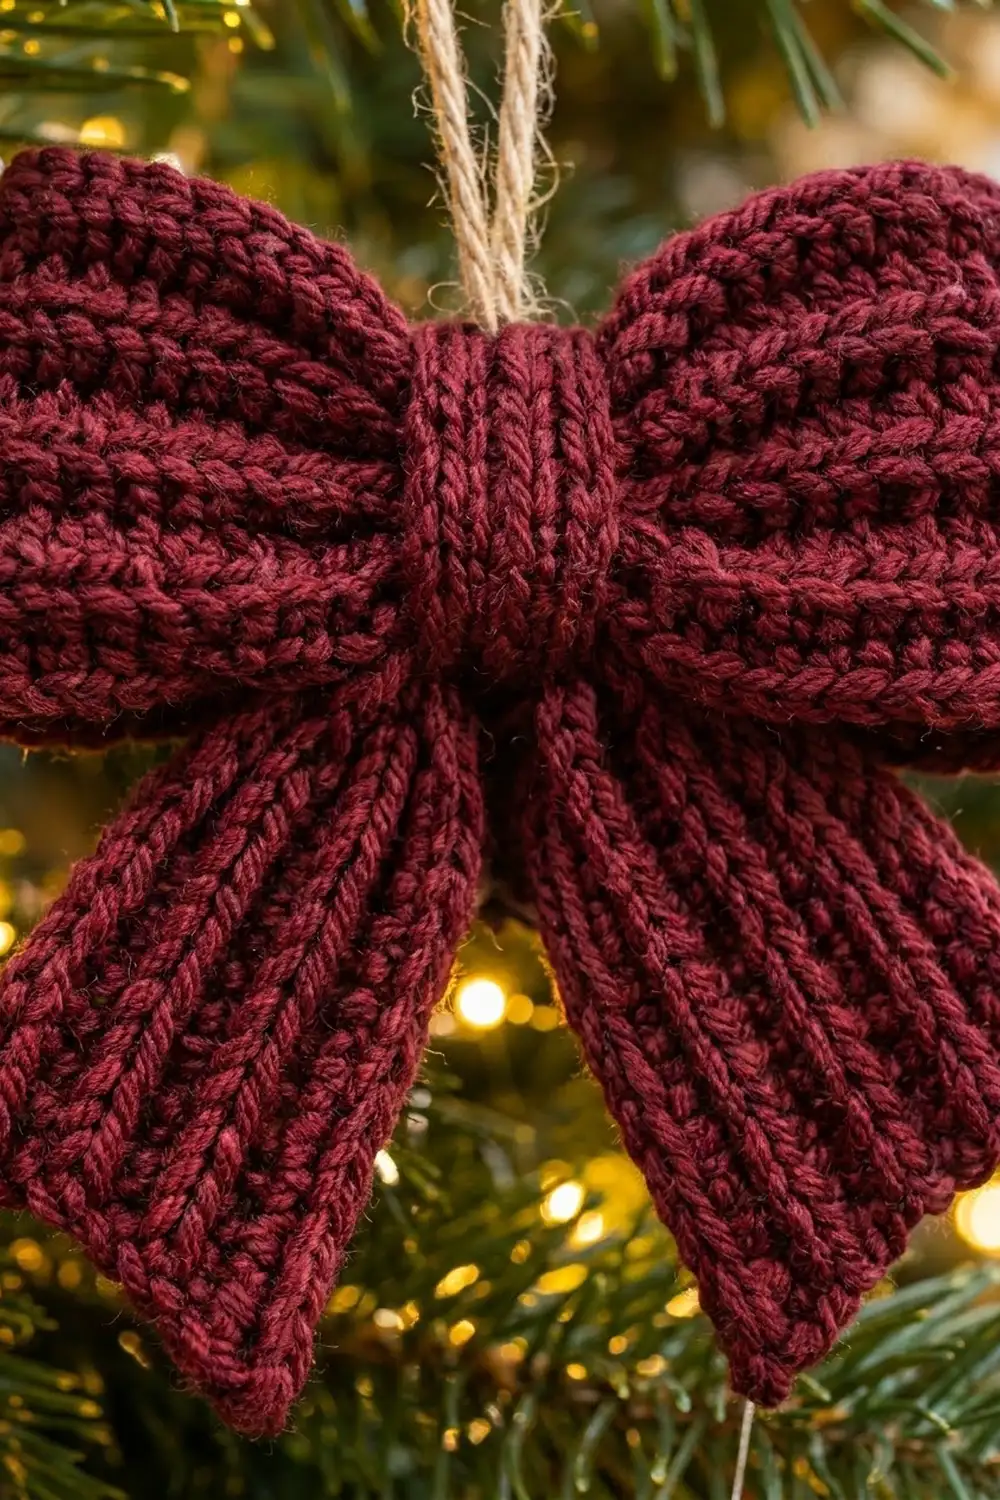
Center Wrap (make 1)
Make this first so you can check gauge. All rows are worked lengthwise, so the ribs run along the strip. When wrapped around the bow, they run vertically across the center.
Foundation: Ch 15.
Row 1 (RS): Sc in 2nd ch from hook and in each ch across, turn. (14 sts)
Rows 2–4: Ch 1, sc BLO in each st across, turn. (14 sts)
Fasten off and leave a 10 in (25.4 cm) tail for sewing.
Checkpoint: 3.5 x 1 in (8.9 x 2.5 cm), with 2 ridges visible on each side.
Loop Band (make 1)
This band becomes the two rounded loops. It is worked lengthwise, so once it is formed into a ring the ribs run horizontally across both loops.
Foundation: Ch 41.
Row 1 (RS): Sc in 2nd ch from hook and in each ch across, turn. (40 sts)
Checkpoint: 10 in (25.4 cm) long.
Rows 2–10: Ch 1, sc BLO in each st across, turn. (40 sts)
Do not fasten off. Go straight to the loop band edging in the Border section.
Checkpoint after Row 10: 10 x 2.5 in (25.4 x 6.4 cm), with 5 ridges on each side.
Tail Strip (make 1)
The tail strip makes both tails from one piece. It is folded at the midpoint into an inverted V, so there are no cut ends to hide at the top of the tails.
Foundation: Ch 33.
Row 1 (RS): Sc in 2nd ch from hook and in each ch across, turn. (32 sts)
Checkpoint: 8 in (20.3 cm) long.
Rows 2–8: Ch 1, sc BLO in each st across, turn. (32 sts)
Do not fasten off. Go straight to the tail strip edging in the Border section.
Checkpoint after Row 8: 8 x 2 in (20.3 x 5.1 cm), with 4 ridges on each side.
Border
The edging is a light slip-stitch finish. It tidies the edges, firms up the long sides so the loops hold their shape, and gives the tails crisp, square ends. It does not change the measurements.
Border gauge: 1 sl st per stitch along the long edges and 1 sl st per row-end along the short edges. This matches the fabric’s own gauge (4 sts per inch along the length and 4 rows per inch along the height), so the edges don’t flare or pucker.
Loop band edging (long edges only)
Keep the short ends unedged because they will be seamed.
Edge 1: After Row 10, do not turn. Rotate the work and ch 1. Work loosely along the last row: sl st in each of the 40 sts. (40 sl sts)
Fasten off with a 12 in (30.5 cm) tail for seaming.
Edge 2: Join the yarn in the first foundation chain loop on the opposite long edge. Sl st in each of the 40 foundation loops. (40 sl sts) Fasten off and weave in.
Math check: Each long edge has 40 sts, which is exactly the Row 1 count. At 4 sts per inch, that gives 10 in (25.4 cm).
Tail strip edging (full round)
In this round, each side’s count includes its corner stitch. Turn each corner by simply working the next stitch in the new direction. No extra corner stitches are added.
Round 1: After Row 8, do not turn. Ch 1.
- Long side 1: sl st in each of the 32 sts of Row 8. (32)
- Short end 1: sl st in each of the 8 row-ends. (8)
- Long side 2: sl st in each of the 32 foundation loops. (32)
- Short end 2: sl st in each of the 8 row-ends. (8)
Join with a sl st to the first sl st. (80 sl sts total)
Fasten off with a 12 in (30.5 cm) tail.
Why the math works: 32 + 8 + 32 + 8 = 80. The long sides match the 32-st rows, which is 8 in (20.3 cm) at 4 sts per inch. The short ends match the 8 rows, which is 2 in (5.1 cm) at 4 rows per inch. The edging is worked one-to-one everywhere, so the strip stays a true 8 x 2 in (20.3 x 5.1 cm) rectangle, and each tail ends square.
Assembly
Step 1 – Seam the loop band into a ring. Bring the two short ends of the loop band together with the RS facing out. Using the 12 in (30.5 cm) tail, whipstitch row-end to row-end through all 10 rows (10 row-ends to 10 row-ends). Matching 1:1 keeps the ring from twisting. The ring now has a 10 in (25.4 cm) circumference.
Step 2 – Flatten the ring. Lay the ring flat with the seam centered on the back. It now measures 5 x 2.5 in (12.7 x 6.4 cm), which is the bow’s full width.
Step 3 – Pinch the center. Gather the center of the flattened ring top to bottom with your fingers until it is about 1 in (2.5 cm) tall. Wrap a spare length of burgundy yarn around the pinch 3–4 times, pull firmly and knot at the back. The two loops should puff out evenly on each side.
Step 4 – Fold the tails. Find the midpoint of the tail strip, between stitch 16 and stitch 17 of the long edge, and mark it. Fold the strip into an inverted V at this point so each tail is 4 in (10.2 cm) long. Place the fold behind the pinched center of the loops. Tack it in place with 3–4 stitches through the pinch.
Step 5 – Add the center wrap. Lay the wrap vertically across the front of the pinch with its RS facing out. Wrap both ends around to the back, covering the gathered yarn and the fold of the tails. Whipstitch the 4 row-ends of one short end to the 4 row-ends of the other at the back. The wrap should sit snugly but not cut into the loops. If there is a gap, stretch the wrap slightly. If it overlaps by more than 0.25 in (0.6 cm), tighten the pinch in Step 3 first.
Step 6 – Splay the tails. Spread the tails into an inverted V about 3 in (7.6 cm) apart at the tips. Add one tiny tacking stitch on each side at the back of the wrap so they stay in position.
Step 7 – Add the hanger. Thread the 8 in (20.3 cm) jute twine under the stitches of the center wrap at the back, near the top edge. Tie the ends in a firm overhand knot to make a hanging loop about 3.5 in (8.9 cm) tall. Hide the knot behind the wrap.
Assembled checkpoint: About 5 in (12.7 cm) wide across the loops and about 5.5 in (14.0 cm) tall from the top of the loops to the lowest tail tip.
Final Blocking
- Weave in all remaining ends through the ridges on the WS so they disappear into the ribbing.
- Lay the bow face up on a blocking mat or folded towel.
- Mist lightly with cool water until the bow is just damp, not soaked.
- Shape each loop by hand into a round, full curve. A loosely rolled tissue tucked inside each loop helps it hold its shape while it dries.
- Straighten the tails, pin the square ends flat and check that both tails measure 4 in (10.2 cm) from the fold.
- Measure the width (5 in / 12.7 cm) and nudge the loops in or out as needed.
- Let it dry completely, then remove the tissue and pins.
Final Quality-Control Checklist
- Loop band has 40 sts per row and 10 rows. Tail strip has 32 sts per row and 8 rows. Center wrap has 14 sts per row and 4 rows.
- Ridges are evenly spaced with no skipped back loops.
- Long-edge slip stitches are loose enough that the edges lie flat.
- The loop band seam sits at the center back and can’t be seen from the front.
- Both loops are the same size.
- Both tails are 4 in (10.2 cm) long with square, crisp ends.
- The center wrap fully covers the gathering yarn.
- The jute hanger is secure and the bow hangs level.
- All ends are woven in and none show on the front.
Troubleshooting
The ridges look flat or uneven. Make sure you are working into the back loop on every row, including the first stitch after the turning chain.
The edges wave or ruffle. Your slip stitches are too loose or you added stitches. Recount (40 per long edge on the loop band, 80 total on the tails) and work them more evenly.
The edges pucker or curl. The slip stitches are too tight. Redo the edging with a hook one size larger.
The pieces are too long. Your stitch gauge is loose. Go down a hook size rather than removing stitches, so all three pieces still fit together.
One loop is bigger than the other. Re-pinch the center, making sure the back seam sits exactly in the middle before wrapping.
The center wrap won’t meet at the back. Pinch the center tighter, or add one row of sc BLO to the wrap’s length by working an extra 2 sts. Re-check that it fits before seaming.
The bow tilts when hung. Move the jute twine so it sits exactly at the vertical center of the wrap.
Care
Hand wash in cool water with mild soap, press out the water in a towel and reshape to dry flat. Store the ornament with tissue paper inside the loops so they keep their shape between seasons.
Final Notes
The measurement chain is short and easy to follow. At a gauge of 16 sts and 16 rows of sc BLO to 4 in (10.2 cm):
- Center wrap: 14 sts make 3.5 in (8.9 cm).
- Loop band: 40 sts make a 10 in (25.4 cm) ring that flattens to the bow’s 5 in (12.7 cm) width, and 10 rows make its 2.5 in (6.4 cm) height.
- Tail strip: 32 sts make an 8 in (20.3 cm) strip that folds into two 4 in (10.2 cm) tails, and 8 rows make its 2 in (5.1 cm) width.
- Edging: worked one stitch per stitch and one stitch per row-end, so nothing grows or shrinks.
The result is a 5 x 5.5 in (12.7 x 14.0 cm) bow every time.
Once you’ve made one, the bows work up quickly, so you can make a few for the tree, gift toppers or a wreath.
Happy crocheting!