

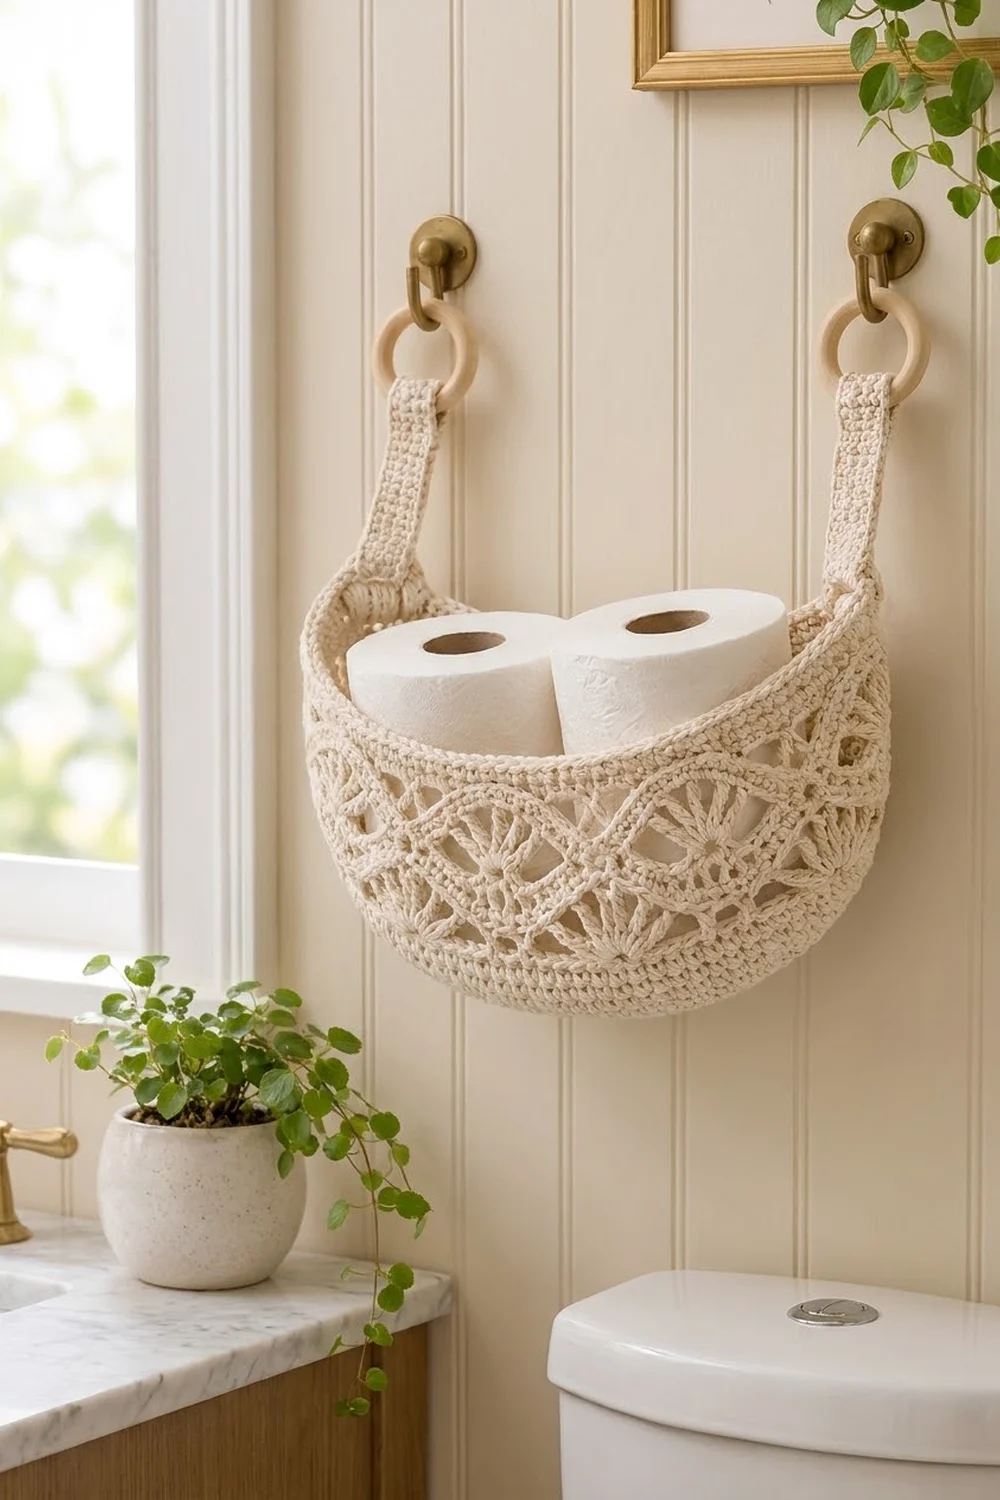
The Crescent Lace Hanging Basket is a wall basket for odds and ends, with a soft boat shape. It starts with a long oval base. The rim rises at both short ends and dips toward the middle of each long side, so from the front the basket looks like a shallow crescent moon.
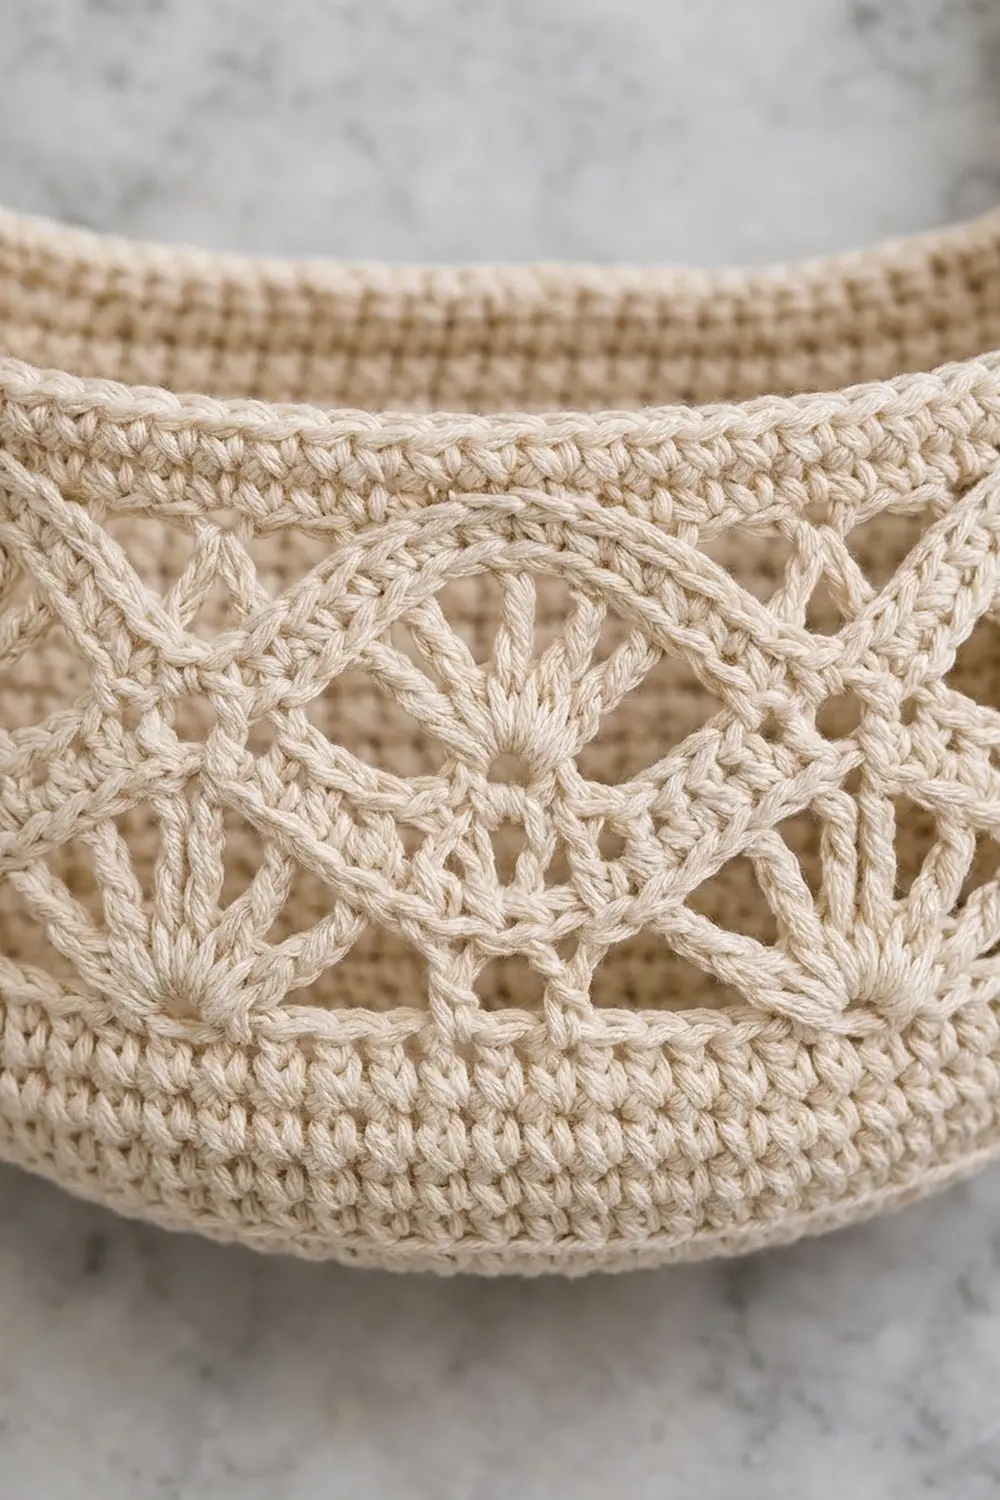
The basket uses one creamy natural cotton. There are solid single-crochet bands above and below a raised lace band. In the lace band, fans alternate up and down, and their edges form flowing wave lines with small open diamonds where the fans meet. Two solid straps loop through 2 in (5.1 cm) wooden rings, so the basket hangs from two wall hooks. It’s a good size for spare toilet rolls, hand towels or plant tools.
This pattern uses US crochet terms. The finished basket measures 11 in (27.9 cm) long and 4 in (10.2 cm) deep from front to back. It is 5 in (12.7 cm) tall at the center of each long side and 7 in (17.8 cm) tall at each end peak.
The construction is simple. You crochet the oval base in joined rounds, then work one round in the back loops so the wall turns up. The solid and lace bands are worked in rounds. Short-row wedges raise both ends, and a two-round rim finishes the edge. Then you make two straps, fold them through the rings and sew them to the end peaks.
Finished Size and Construction
- Finished size: 11 in (27.9 cm) long x 4 in (10.2 cm) deep; 5 in (12.7 cm) tall at center, 7 in (17.8 cm) tall at ends
- Skill level: Intermediate
- Terminology: US crochet terms
- Yarn weight: Worsted (#4) cotton
- Hook: 4.5 mm (US 7)
- Number of pieces: 3 crocheted pieces (1 basket body, 2 straps) plus 2 wooden rings
- Layout: One strap centered on each end peak, rings at the top
- Piece size: Base 11 x 4 in (27.9 x 10.2 cm); each strap 1.4 x 7.75 in (3.6 x 19.7 cm)
- Size before border: 4.5 in (11.4 cm) tall at center, 6.5 in (16.5 cm) tall at ends
- Border depth: 0.5 in (1.3 cm), 2 rounds
Materials
Choose a smooth, firm worsted-weight cotton or cotton blend. Cotton keeps its shape when the basket is full and copes well with a damp bathroom. Avoid soft acrylic or very drapey yarns, because the walls will sag.
- Cream (natural): 150 g, about 285 m. The body uses about 125 g and the two straps use about 15 g in total.
These amounts include a margin of roughly 10 percent to cover your gauge check and small differences in tension.
Tools:
- 4.5 mm (US 7) crochet hook
- 2 wooden rings, 2 in (5.1 cm) outer diameter
- 4 locking stitch markers
- Tapestry needle
- Scissors
- Measuring tape
- Rust-proof pins and a towel for blocking
- 2 wall hooks, set 12 in (30.5 cm) apart
Abbreviations (US Terms)
- ch – chain
- sl st – slip stitch
- sc – single crochet
- dc – double crochet
- sc2tog – single crochet 2 together
- sc3tog – single crochet 3 together
- BLO – back loop only
- sk – skip
- st(s) – stitch(es)
- sp – space
- RS – right side
- rep – repeat
Special stitches:
- Fan: 7 dc in the same stitch or space.
- Reverse sc (crab stitch): Work from left to right. Insert the hook into the next stitch to the right, yarn over, pull up a loop, then yarn over and draw through both loops on the hook.
Gauge and Checkpoints
Gauge: 14 sc and 16 rounds = 4 in (10.2 cm) in sc. One lace repeat (12 sts) = 3.4 in (8.6 cm) wide.
Use the base as your gauge test. Finish it before you start the walls, and check these measurements as you go:
- After Rnd 4: 9 in (22.9 cm) long x 2 in (5.1 cm) wide
- After Rnd 8 (base complete): 11 in (27.9 cm) long x 4 in (10.2 cm) wide
- After Rnd 13: wall 1.25 in (3.2 cm) tall
- After Rnd 17: lace band 2.25 in (5.7 cm) tall
- After Rnd 21: wall 4.5 in (11.4 cm) tall
- After the wedges: end peaks 6.5 in (16.5 cm) tall
If the base is too big, go down to a 4 mm hook. If it is too small, go up to a 5 mm hook. Keep your fabric firm, because loose fabric makes a floppy basket. If you are between two hook sizes, choose the smaller one.
Basket Body
Oval Base
Ch 27.
Rnd 1: 3 sc in 2nd ch from hook, sc in next 24 ch, 3 sc in last ch. Working along the other side of the starting chain, sc in next 24 ch. Join with sl st to first sc. (54 sts)
From here on, start every round with ch 1 (it does not count as a stitch) and join with sl st to the first sc.
Rnd 2: 2 sc in each of next 3 sts, sc in next 24 sts; rep from * once more. (60 sts)*
Rnd 3: (sc in next st, 2 sc in next st) 3 times, sc in next 24 sts; rep from * once more. (66 sts)*
Rnd 4: (sc in next 2 sts, 2 sc in next st) 3 times, sc in next 24 sts; rep from * once more. (72 sts)*
Rnd 5: (sc in next 3 sts, 2 sc in next st) 3 times, sc in next 24 sts; rep from * once more. (78 sts)*
Rnd 6: (sc in next 4 sts, 2 sc in next st) 3 times, sc in next 24 sts; rep from * once more. (84 sts)*
Rnd 7: (sc in next 5 sts, 2 sc in next st) 3 times, sc in next 24 sts; rep from * once more. (90 sts)*
Rnd 8: (sc in next 6 sts, 2 sc in next st) 3 times, sc in next 24 sts; rep from * once more. (96 sts)*
Each curved end now has 24 sts, and each straight side has 24 sts. Check the base against the gauge checkpoint before you continue.
Lower Solid Wall
Rnd 9: Sc BLO in each st around. (96 sts) The unworked front loops make a crisp fold, so the wall stands up.
Rnds 10–13: Sc in each st around. (96 sts)
Lace Band
Rnd 14: Ch 1, sc in next st, sk 2 sts, fan in next st, sk 2 sts, sc in next st, ch 5, sk 5 sts; rep from * 7 more times. Join to first sc. (8 fans, 16 sc, 8 ch-5 sps)*
Rnd 15: Sl st in next 4 dc to reach the center dc of the first fan. Ch 1, sc in same dc, ch 3, fan in next ch-5 sp, ch 3, sc in center dc of next fan; rep from * around, leaving out the last sc. Join to first sc. (8 fans, 8 sc, 16 ch-3 sps)*
Rnd 16: Ch 3 (counts as dc), 6 dc in same sc, ch 2, sc in center dc of next fan, ch 2, fan in next sc; rep from * around, leaving out the last fan. Join to top of beginning ch-3. (8 fans, 8 sc, 16 ch-2 sps)*
The fans of Rnds 14 and 16 line up in the same columns, and the fans of Rnd 15 sit between them. This offset creates the wave lines and the small open diamonds.
Rnd 17 (conversion round): Ch 1, sc in each of next 7 dc, 2 sc in next ch-2 sp, sc in next sc, 2 sc in next ch-2 sp; rep from * around. Join. (64 sts worked 1-per-stitch + 32 sc in ch-2 sps = 96 sts)*
Upper Solid Wall
Rnds 18–21: Sc in each st around. (96 sts) Fasten off after Rnd 21.
Number the Rnd 21 stitches starting at the join:
- sts 1–24: end A
- sts 25–48: long side 1
- sts 49–72: end B
- sts 73–96: long side 2
Mark sts 31, 42, 79 and 90. These markers frame the two 12-stitch gaps in the middle of the long sides.
End Wedges (Short Rows)
Wedge B, Row 1 (RS): Join yarn in st 43. Ch 1, sc in same st and next 35 sts, ending at st 78. Turn. (36 sts)
Row 2: Ch 1, sk first st, sc in next 34 sts, leave last st unworked. Turn. (34 sts)
Rows 3–8: Rep Row 2, working 2 fewer sts in each row. (Row 3: 32, Row 4: 30, Row 5: 28, Row 6: 26, Row 7: 24, Row 8: 22 sts) Fasten off.
Wedge A: With the RS facing, join yarn in st 91. Work Rows 1–8 the same way. Row 1 crosses the round join and ends at st 30. Fasten off.
The 1-stitch steps on each side form the gently sloping crescent line. Each wedge adds 2 in (5.1 cm), so the end peaks are now 6.5 in (16.5 cm) tall.
Straps (Make 2)
Ch 6.
Row 1: Sc in 2nd ch from hook and each ch across. Turn. (5 sts)
Rows 2–28: Ch 1, sc in each st across. Turn. (5 sts) The strap now measures 7 in (17.8 cm).
Row 29 (eyelet): Ch 1, sc in next 2 sts, ch 1, sk 1 st, sc in last 2 sts. Turn. (4 sc + 1 ch-1 sp)
Row 30: Ch 1, sc2tog, sc in ch-1 sp, sc2tog. Turn. (3 sts)
Row 31: Ch 1, sc3tog. (1 st) Fasten off, leaving a 16 in (40.6 cm) tail for sewing.
The last 3 rows add 0.75 in (1.9 cm) and form the rounded, tapered tip with its small eyelet. The finished strap is 1.4 x 7.75 in (3.6 x 19.7 cm).
Make All Pieces
You need 1 basket body and 2 straps, all in Cream. The body uses about 125 g, and each strap uses about 7.5 g. The layout:
 (Ring)                      (Ring)
   ||                          ||
 [Strap]                    [Strap]
   ||                          ||
[End A peak]--long side--[End B peak]
      \_______ oval base _______/
Joining
Finish the border and block all pieces before you join them.
Rings: Pass the Row 1 end of each strap through a ring from front to back. Fold 1.5 in (3.8 cm), which is 6 rows, to the back of the strap. Whipstitch the starting chain across Row 7, then sew both side edges of the fold. Each stitch goes through one strap stitch and the stitch directly under it.
Basket: Center each strap over Row 8 of a wedge, so it covers sts 9–13 of that 22-st row. Fold the tapered tip over the rim so 1 in (2.5 cm) sits inside the basket. Sew around the eyelet through the basket wall. Then sew both strap edges to the rim, matching 1 strap stitch to 1 rim stitch. This forms the small rounded knob at each peak.
Sew firmly, but don’t pull so hard that the fabric puckers. The strap should lie flat against the rim without denting it.
Size checkpoint: When hung, the basket measures about 13.5 in (34.3 cm) from the top of the rings to the base.
Border
Border gauge: 14 sc = 4 in (10.2 cm), the same as the body. Along each sloped edge, work 11 sc over 8 rows.
Border Rnd 1: With the RS facing, join yarn at marked st 31. Ch 1, then work:
- Gap 1: sc in sts 31–42. (12 sts)
- Wedge B slope up: 1 sc in the side of each row (8), plus 1 sc in the exposed step stitch at Rows 3, 5 and 7 (3). (11 sts)
- Wedge B top: sc in each st of Row 8. (22 sts)
- Wedge B slope down: work the same as the slope up. (11 sts)
- Gap 2: sc in sts 79–90. (12 sts)
- Wedge A: 11 + 22 + 11. (44 sts)
Join to first sc. (12 + 44 + 12 + 44 = 112 sts)
Border Rnd 2: Ch 1, reverse sc in each st around. Join and fasten off. (112 sts)
Why the math works: The gaps and wedge tops are worked 1 stitch into 1 stitch, so they keep their exact width. On a slope, each step moves about 0.29 in (0.7 cm) across and 0.25 in (0.6 cm) up, so the slope is about 3 in (7.6 cm) long. Eleven sc at 0.29 in (0.7 cm) each cover about 3.2 in (8.1 cm). The crab stitch pulls that edge in slightly, so the rim lies smooth without ruffles or gaps.
Final Blocking
- Weave in all ends securely, working each end in at least two directions.
- Soak the basket and straps in cool water for 10 minutes.
- Gently squeeze out the water, then roll the pieces in a towel.
- Stuff the basket firmly with a rolled towel so it holds its crescent shape.
- Shape the lace band with your fingers, opening each fan and diamond.
- Pin the straps flat to 1.4 x 7.75 in (3.6 x 19.7 cm).
- Let everything dry completely, then join the straps and rings.
Final Quality-Control Checklist
- Base measures 11 x 4 in (27.9 x 10.2 cm) and lies flat
- Wall is 4.5 in (11.4 cm) tall before the border
- Each lace round has 8 fans, and the diamonds are even
- Each wedge ends with 22 sts, and both peaks are the same height
- Border has 112 sts and lies flat on the slopes
- Straps are the same length and centered on the peaks
- Rings are sewn in securely, and the basket hangs level
- No loose ends show inside the basket
Troubleshooting
- Base cups: Check that you made 3 increases at each end in every round, and loosen your tension at the curves.
- Base ruffles: You have added extra increases. Recount each round against the totals.
- Walls lean outward: Check that Rnd 9 was worked in the BLO, then go down a hook size.
- Lace repeats don’t fit: You need exactly 96 sts before Rnd 14. Recount Rnd 13 and fix any missing stitch.
- Wedges look lopsided: Count every row. Each row must be 2 sts shorter than the row before.
- Rim ripples on the slopes: Work 10 sc per slope instead of 11, for a total of 108 sts.
- Basket tilts when hung: Re-sew the straps so they cover the same stitches on each wedge.
Care
Hand wash in cool water with a mild soap. Reshape the basket and let it air-dry with a towel stuffed inside.
Final Notes
Each measurement depends on the one before it. The base is 11 x 4 in (27.9 x 10.2 cm), with 96 sts. The walls reach 4.5 in (11.4 cm) at the center and 6.5 in (16.5 cm) at the peaks. The border brings these heights to 5 in (12.7 cm) and 7 in (17.8 cm). Two 7.75 in (19.7 cm) straps finish the basket. If every checkpoint matches, your basket will hang level and keep its crescent shape.
Happy crocheting!