

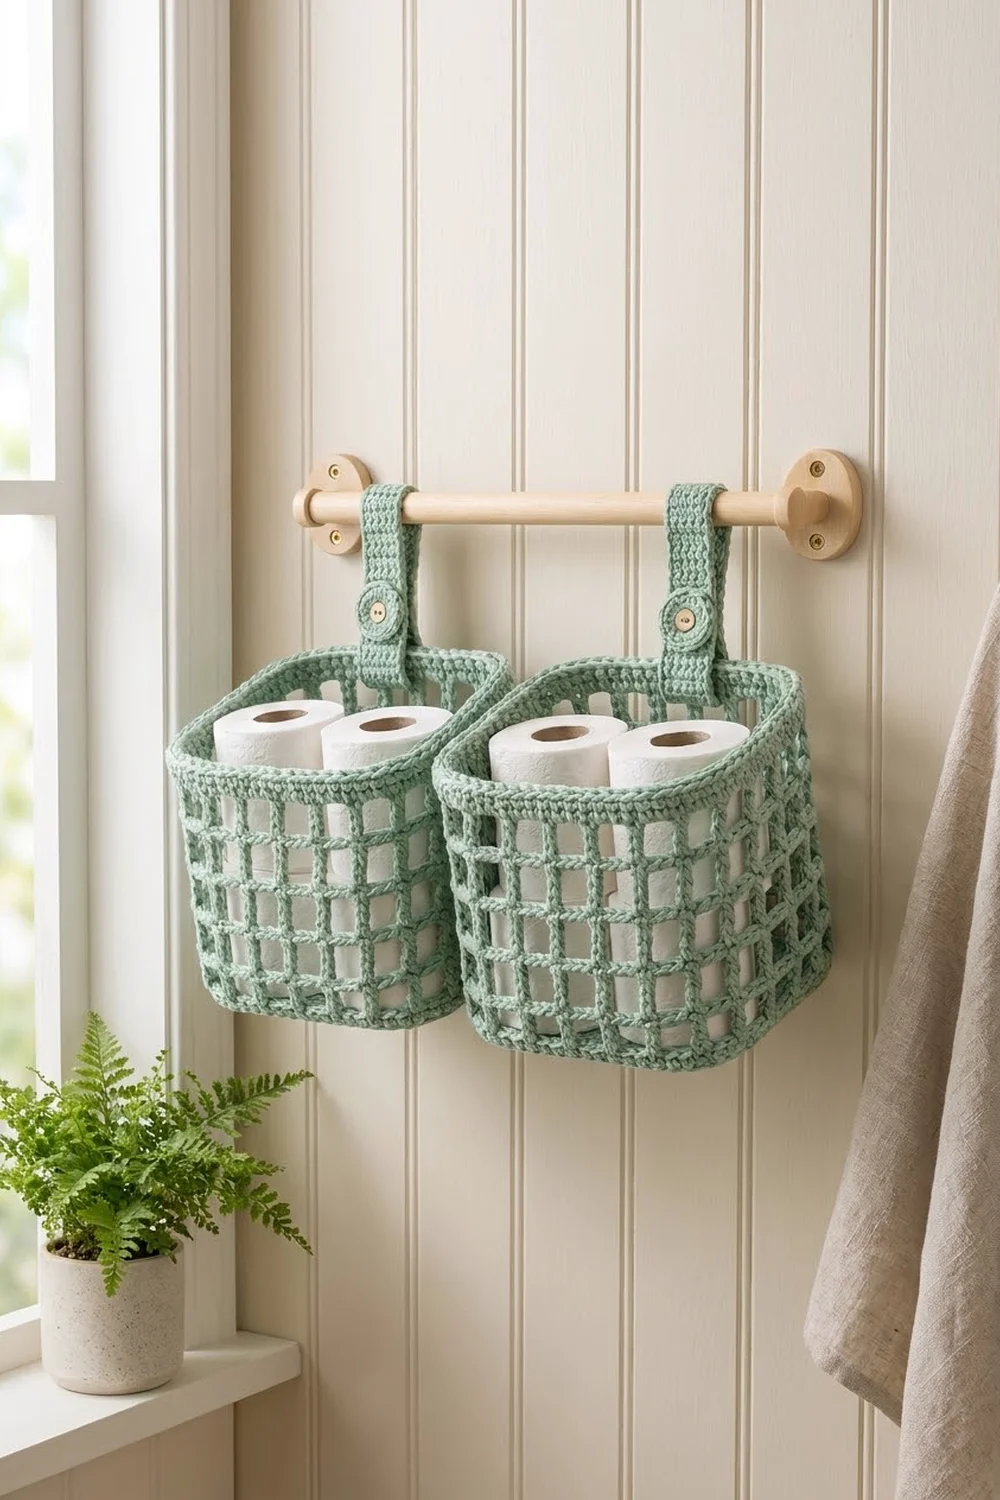
The Sage Grid Hanging Basket Set is a pair of square open-mesh storage baskets that hang from a wooden rod on two crocheted button straps. Each basket has a solid single-crochet base, see-through grid walls, and a firm solid rim with a twisted, rope-like edge. They’re made for bathroom and small-space storage, like spare toilet rolls, washcloths, or small bottles.
The whole set uses one soft sage green cotton. The style is clean and modern. The grid looks light and airy, and the solid base and rim keep the shape crisp. Because the straps button over the rod, you can lift a basket down without unscrewing anything.
This pattern uses US crochet terms. Each finished basket measures 8 x 8 in (20.3 x 20.3 cm) across the walls and stands 6.25 in (15.9 cm) tall. Each strap measures 11 x 1.75 in (27.9 x 4.4 cm).
The construction is simple. First you crochet a flat square base in rows and work one edging round. A back-loop round then turns the walls up. The walls alternate double-crochet mesh rounds with single-crochet rounds, and a solid rim finishes the top. The straps are worked in rows with a buttonhole, edged, and sewn on.
Finished Size and Construction
- Finished size (each basket): 8 x 8 x 6.25 in (20.3 x 20.3 x 15.9 cm)
- Skill level: Easy-intermediate
- Terminology: US
- Yarn weight: Worsted (#4) cotton
- Hook: 5 mm (H-8)
- Number of pieces: 4 crocheted pieces (2 baskets, 2 straps)
- Layout: 2 baskets hung side by side on one rod, about 1 in (2.5 cm) apart
- Piece size: base 8 x 8 in (20.3 x 20.3 cm) before edging; strap 11 x 1.75 in (27.9 x 4.4 cm)
- Wall height before rim: 5.5 in (14.0 cm)
- Rim depth: 0.75 in (1.9 cm)
Materials
Choose a firm worsted-weight cotton or cotton blend. Cotton holds its shape, stands up to bathroom humidity, and washes well. Avoid very soft or splitty yarns, because the walls need body.
- Sage green: 160 g, about 280 m (306 yd) total
- Each basket: about 70 g / 120 m
- Each strap: about 6 g / 10 m
These quantities include a margin of about 5–10% for gauge checks and weaving in ends.
Tools and hardware:
- 5 mm (H-8) crochet hook
- Tapestry needle
- Stitch markers
- Scissors and tape measure
- 2 wooden buttons, 1 in (2.5 cm)
- Matching sewing thread and a sewing needle
- 1 wooden dowel, 0.75 in (1.9 cm) diameter, 22 in (55.9 cm) long
- 2 wooden end brackets with screws
Abbreviations (US Terms)
- ch – chain
- sl st – slip stitch
- sc – single crochet
- dc – double crochet
- BLO – back loop only
- sk – skip
- sp – space
- st(s) – stitch(es)
- rep – repeat
Special stitch – reverse single crochet (rev sc, crab stitch): Work from left to right (if you’re right-handed). Insert the hook into the next stitch to the right, yarn over, and pull up a loop. Yarn over again and pull through both loops. This stitch makes the twisted, rope-like top edge.
Gauge and Checkpoints
Gauge: 16 sc and 16 rows = 4 in (10.2 cm). One mesh unit (1 dc + ch 3) = 1 in (2.5 cm) wide. One mesh round plus one sc round = 0.75 in (1.9 cm) tall.
Finish one whole basket before you start the second. That first basket is your real gauge test.
Checkpoints:
- Base after Row 32: 8 x 8 in (20.3 x 20.3 cm).
- Base after Rnd 1: 8.5 x 8.5 in (21.6 x 21.6 cm), laid flat.
- Walls after Rnd 8: 2.5 in (6.4 cm) above the base ridge.
- Walls after Rnd 16: 5.5 in (14.0 cm) above the base.
- Finished basket: 6.25 in (15.9 cm) tall.
If your base is too big, go down to a 4.5 mm hook. If it’s too small, go up to a 5.5 mm hook. Recheck before you start the walls. Use the same hook for the whole basket. If the walls are worked at a looser gauge than the base, they will flare.
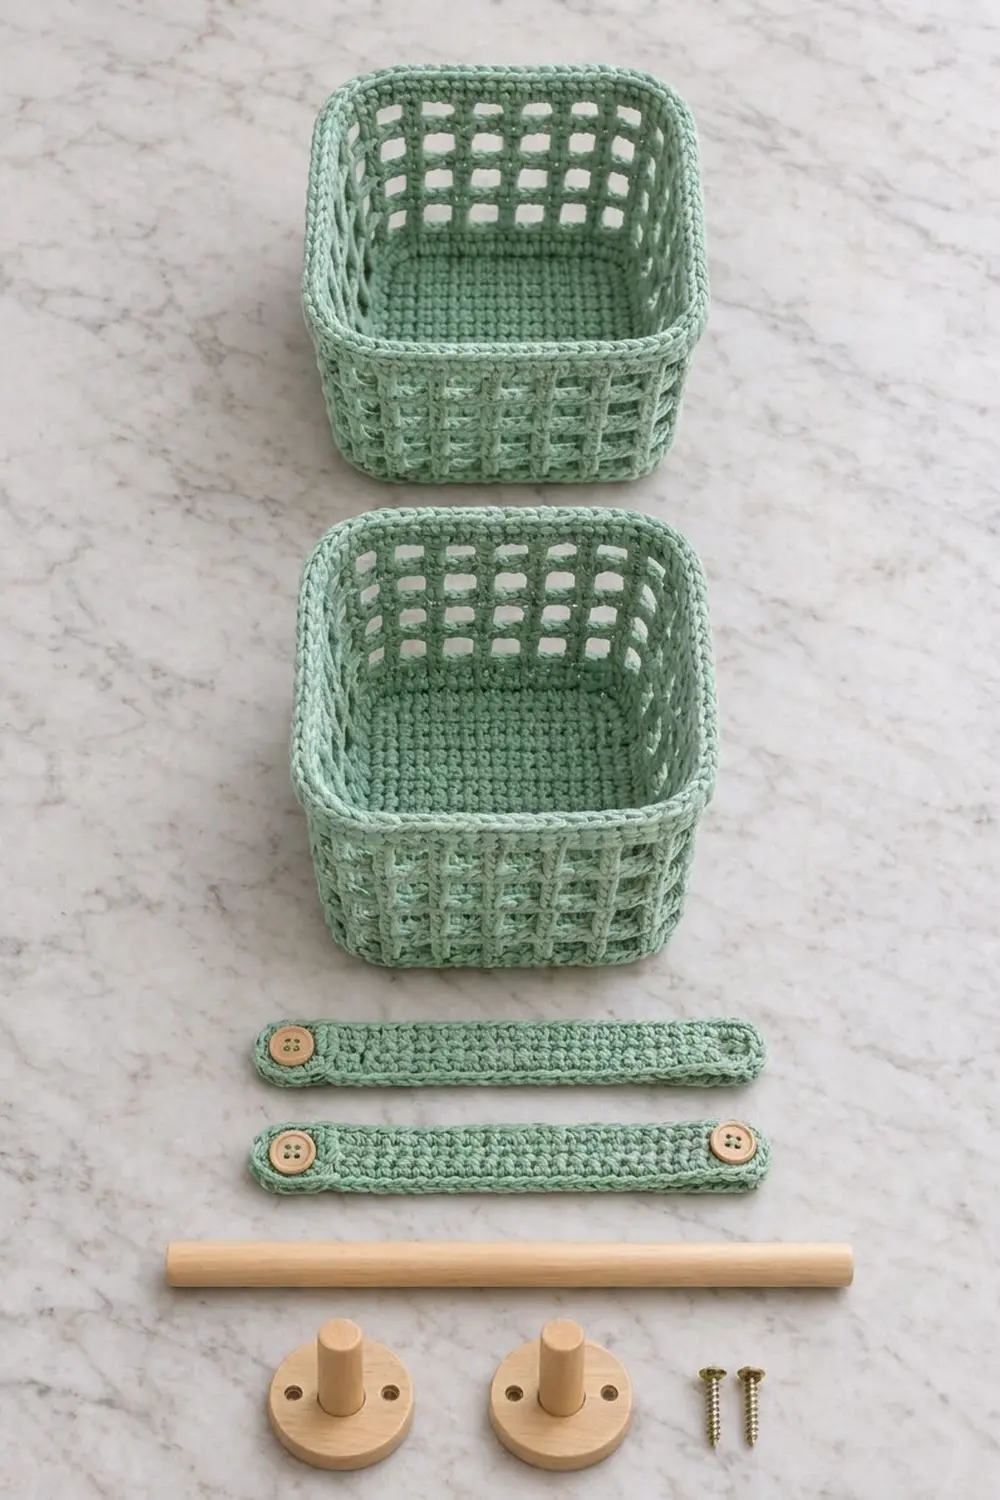
Basket (make 2)
Base
The base is worked in rows.
Foundation: Ch 33.
Row 1: Sc in 2nd ch from hook and in each ch across, turn. (32 sc)
Rows 2–32: Ch 1 (does not count as a st), sc in each st across, turn. (32 sc)
Checkpoint: 8 x 8 in (20.3 x 20.3 cm). Do not fasten off.
Base Edging
Rnd 1: Ch 1. Working into Row 32: 2 sc in first st (corner), sc in next 30 sts, 2 sc in last st (corner). Rotate the piece. Sc in the side of each of the next 30 row-ends (Rows 31 to 2). Working into the foundation chain: 2 sc in first ch (corner), sc in next 30 ch, 2 sc in last ch (corner). Sc in the side of each of the next 30 row-ends. Sl st to first sc. (128 sc: 30 sc per side + 2 sc at each of 4 corners)
Each side now has 32 sts: its 30 sc plus one stitch from each corner pair. Place a marker at each corner pair.
Checkpoint: 8.5 x 8.5 in (21.6 x 21.6 cm), flat.
Walls
Rnd 2 (turning round): Ch 1, sc BLO in each st around, sl st to first sc. (128 sc)
The unworked front loops form the braided ridge around the base, and the walls start to stand up.
Rnd 3 (mesh): Ch 6 (counts as dc + ch 3), sk next 3 sts, *dc in next st, ch 3, sk next 3 sts; rep from * around, sl st to 3rd ch of beg ch-6. (32 dc, 32 ch-3 sps; 8 mesh units per side)
Rnd 4 (sc): Ch 1, *sc in dc, 3 sc in next ch-3 sp; rep from * around, sl st to first sc. (128 sc)
This is a conversion round: 32 sc worked 1-per-dc + 96 sc worked into the 32 spaces = 128 sc.
Rnd 5 (mesh): Ch 6 (counts as dc + ch 3), sk next 3 sc, *dc in next sc (the one that sits on a dc), ch 3, sk next 3 sc; rep from * around, sl st to 3rd ch of beg ch-6. (32 dc, 32 ch-3 sps)
Placing each dc directly over the dc below makes the straight vertical bars of the grid.
Rnds 6–16: Rep Rnds 4 and 5 alternately, ending with a Rnd 4 repeat on Rnd 16. (128 sc on each sc round; 32 dc and 32 ch-3 sps on each mesh round)
You now have 7 mesh rounds (Rnds 3, 5, 7, 9, 11, 13, 15), so each column has 7 openings stacked up.
Checkpoint: the walls should measure 5.5 in (14.0 cm) from the base ridge. That’s 0.25 in (0.6 cm) for Rnd 2 plus 7 x 0.75 in (1.9 cm), which is 5.25 in (13.3 cm). Don’t fasten off. Continue with the Rim section below.
Make All Pieces
- Baskets: 2, sage green, about 70 g each
- Straps: 2, sage green, about 6 g each
Strap (make 2)
Foundation: Ch 43.
Row 1: Sc in 2nd ch from hook and in each ch across, turn. (42 sc)
Row 2: Ch 1, sc in each st across, turn. (42 sc)
Row 3 (buttonhole): Ch 1, sc in first 3 sts, ch 3, sk next 3 sts, sc in each of the remaining 36 sts, turn. (39 sc + ch-3 sp)
Row 4: Ch 1, sc in first 36 sts, 3 sc in ch-3 sp, sc in last 3 sts, turn. (42 sc)
Row 5: Ch 1, sc in each st across. (42 sc) Do not turn.
Edging Rnd: Ch 1, 3 sc in first st (corner), sc in next 40 sts, 3 sc in last st (corner), sc in side of Rows 4, 3, and 2, 3 sc in first foundation ch (corner), sc in next 40 ch, 3 sc in last ch (corner), sc in side of Rows 2, 3, and 4, sl st to first sc. Fasten off. (98 sc: 46 per long side including the corner groups, 3 per short side between corners)
Checkpoint: 11 x 1.75 in (27.9 x 4.4 cm). The buttonhole sits 1 in (2.5 cm) from one end.
Layout Grid
  [bracket]=========== rod ===========[bracket]
          |strap A|           |strap B|
       [ Basket A ]  1 in  [ Basket B ]
         8 in wide           8 in wide
Joining
Sew each strap to the center of one basket’s back wall after the rim is finished. The two baskets are not joined to each other.
- Find the center. On the back wall, count 16 sts in from a corner marker on the top round. Center the strap over this point so it covers 7 rim stitches (sts 13–19). The strap is 1.75 in (4.4 cm) wide, and 7 sts at 4 sts per inch is also 1.75 in (4.4 cm), so the edges line up stitch for stitch.
- Position the strap. Lay the plain end (no buttonhole) on the inside of the back wall so it overlaps the solid rim by 1 in (2.5 cm).
- Sew. Whipstitch the short end of the strap to the rim, one strap edge stitch to one rim stitch. Then whipstitch both long edges down along the 1 in (2.5 cm) overlap, catching Rnds 16–18.
- Tension. Pull each stitch snug but not tight. The strap should lie flat without puckering the rim.
- Button. Sew a button to the outside face of the strap, 4.5 in (11.4 cm) from the sewn end. The buttonhole end then loops over the rod, folds back down, and buttons onto it.
Size checkpoint: Once hung, the top of each rim sits about 3 in (7.6 cm) below the top of the rod. Two baskets plus a 1 in (2.5 cm) gap span 17 in (43.2 cm), which fits easily on a 22 in (55.9 cm) rod.
Rim (Border)
Rim gauge: 4 sc per inch. Each sc round adds 0.25 in (0.6 cm) of height.
Rnd 17: Ch 1, sc in each st around, sl st to first sc. (128 sc: 32 per side)
Rnd 18: Ch 1, sc in each st around, sl st to first sc. (128 sc: 32 per side)
Rnd 19: Ch 1, rev sc in each st around, sl st to first st. Fasten off. (128 rev sc: 32 per side)
Why the math works: Every wall and rim round has 128 sts, which is 4 sides x 32 sts. On mesh rounds, 32 sts per side divides into exactly 8 mesh units of 4 sts (1 dc + 3 ch). On sc rounds, each unit is 1 sc + 3 sc = 4 sts. After Rnd 1, no stitches are added or lost at the corners, so the walls rise straight and stay square. Rnd 16 and the rim rounds form a solid band above the last mesh round. The rim itself (Rnds 17–19) adds 3 x 0.25 in = 0.75 in (1.9 cm), so the total height is 5.5 + 0.75 = 6.25 in (15.9 cm).
Final Blocking
- Weave in all ends along the sc rounds so the tails don’t show in the mesh openings.
- Soak each basket in cool water. Gently squeeze out the water without wringing.
- Fill the basket with a box or rolled towels that measure 8 x 8 in (20.3 x 20.3 cm).
- Pinch each corner into a crisp vertical line and straighten each grid column.
- Lay the straps flat and pin them to 11 x 1.75 in (27.9 x 4.4 cm).
- Let everything dry completely, for at least 24 hours.
- For extra stiffness, lightly spray with fabric starch before drying.
Final Quality-Control Checklist
- The base measures 8 x 8 in (20.3 x 20.3 cm) inside the ridge.
- Every round from Rnd 1 onward has 128 sts.
- Each side shows 8 grid columns, with 7 openings in each column.
- The vertical dc bars run in straight lines.
- The basket is 6.25 in (15.9 cm) tall.
- The rim is solid and even, with a rope-like rev sc edge on top.
- The straps are centered on the back walls and sewn flat.
- The buttons are sewn firmly and pass easily through the buttonholes.
- Both baskets are the same size.
Troubleshooting
Walls lean or twist. Your dc isn’t landing on the sc above the previous dc. Count the 3 skipped sts carefully on every mesh round.
Walls flare out. Your wall gauge is looser than your base gauge. Tighten your tension, or go down one hook size for the walls only.
Base won’t stand up. Check that Rnd 2 was worked in BLO. Starch also helps a lot.
Corners look rounded. Pinch and pin them during blocking. Check that each side has exactly 32 sts.
Buttonhole is too tight. Rework Row 3 with ch 4 and sk 4, then work 4 sc into the space on Row 4. On Row 4, work sc in the first 35 sts and sc in the last 3 sts so the row still has 42 sts.
Basket sags on the strap. Sew the strap through all three solid rim rounds, not just the top one.
Care
Hand wash in cool water with mild soap, then reshape over a box and let dry flat. Don’t hang the baskets while they’re wet, or the walls will stretch.
Final Notes
Here is the measurement chain. A 32 x 32 sc base gives 8 x 8 in (20.3 x 20.3 cm). The edging brings the stitch count to 128, and that count stays the same in every wall and rim round: 32 sts per side, or 8 mesh units per side. Seven mesh-and-sc pairs build 5.25 in (13.3 cm) of grid. The turning round and the rim add 1 in (2.5 cm), so each basket finishes at 6.25 in (15.9 cm) tall. The 1.75 in (4.4 cm) straps sew stitch for stitch onto 7 rim stitches, and the pair hangs neatly on a 22 in (55.9 cm) rod.
Happy crocheting!