

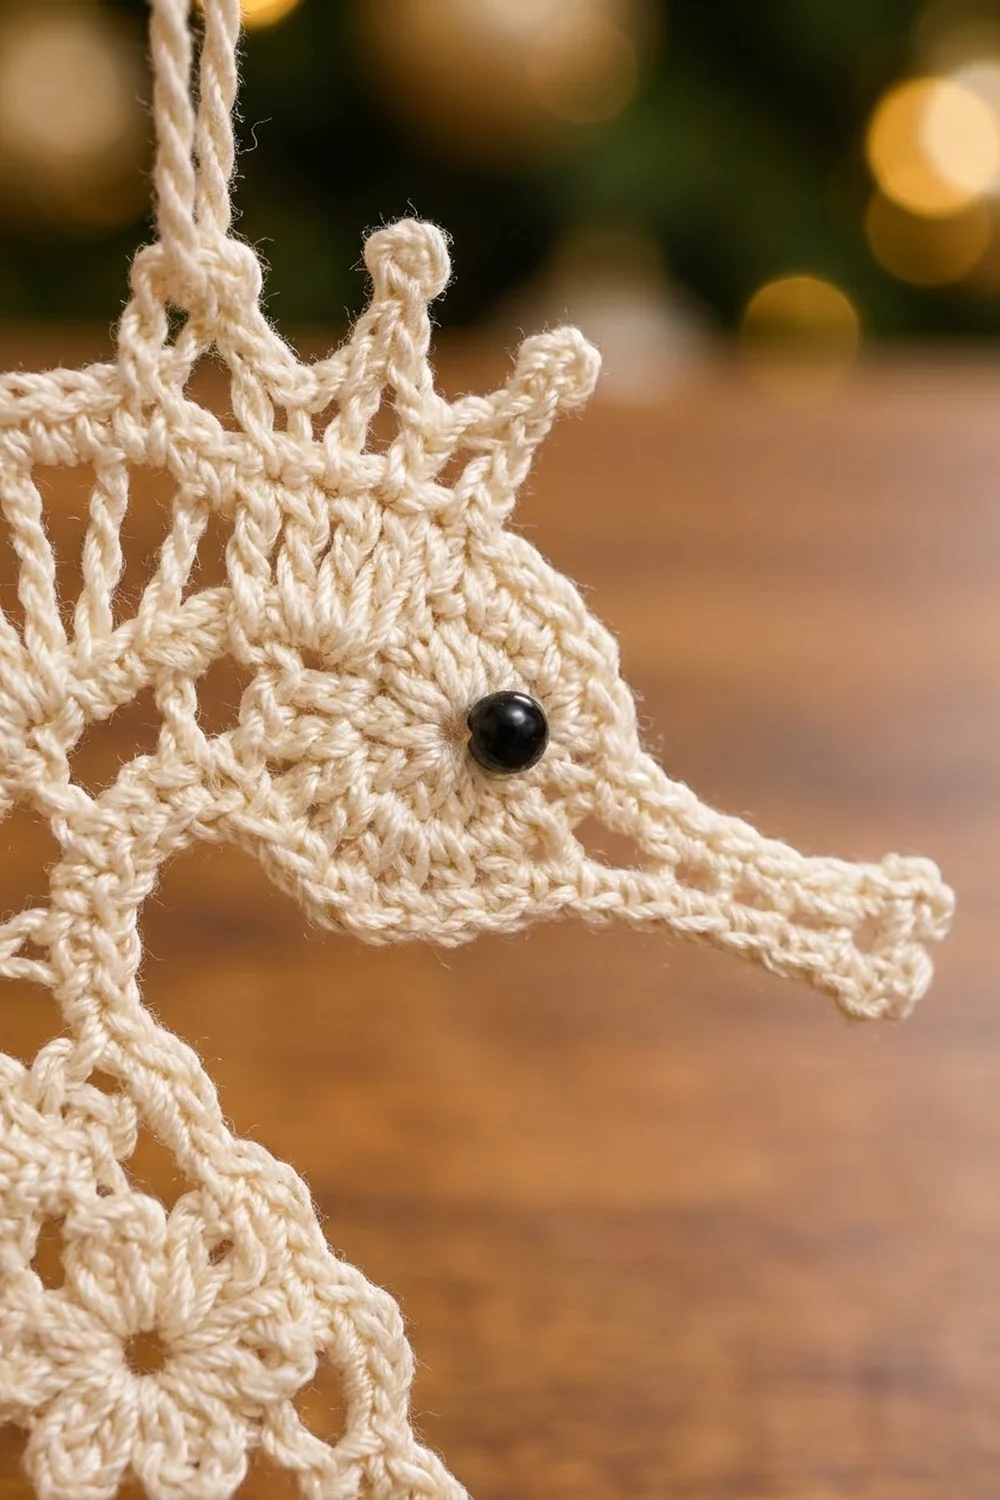
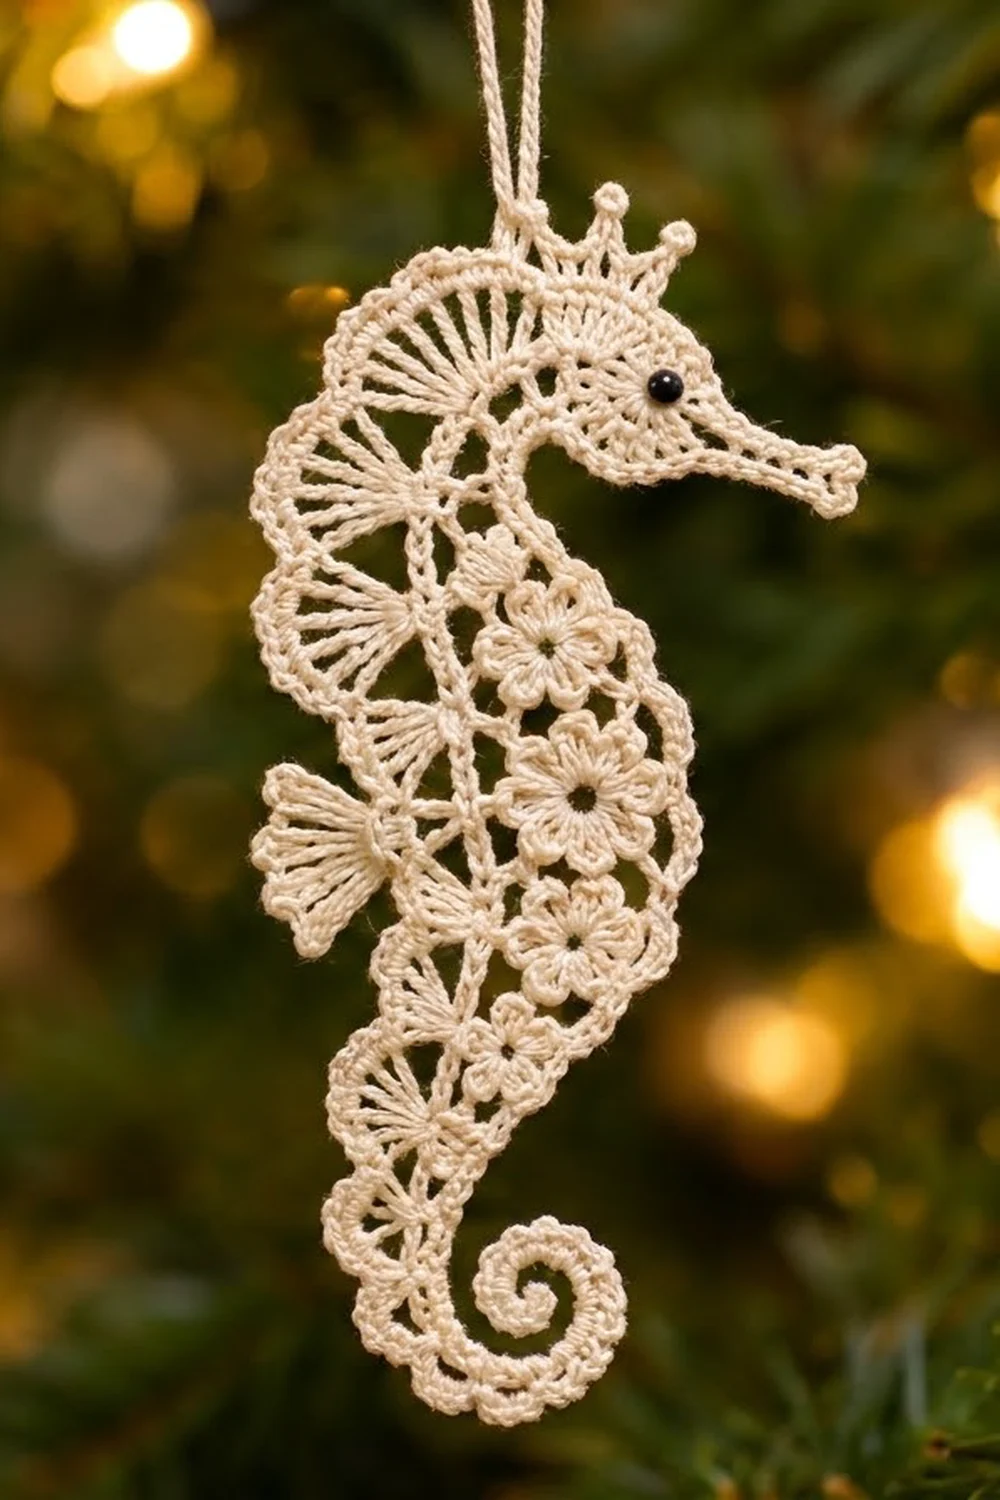
This lace seahorse is a small, upright ornament made in cream cotton thread. A row of ribbed shell fans runs down its back, and a column of five little flowers fills its belly. At the bottom, a tight spiral tail curls forward. It has a pointed three-spike crown, a long snout with a tiny picot tip, and a black bead eye.
The look is classic thread lace: one color, open spaces, and crisp, starched edges. It hangs well on a Christmas tree, in a window, or on a gift.
The pattern uses US crochet terms. The finished seahorse is about 5.75 in (14.6 cm) tall without the loop and 2.5 in (6.4 cm) wide from snout tip to back fans.
You make five small parts: the head with snout and crown, a strip of five flowers joined as you go, a back crescent with fans, a fin, and a spiral tail. Then you sew them into one ornament, add a short front edging, and starch it flat.
Finished Size and Construction
- Finished size: 5.75 in (14.6 cm) tall x 2.5 in (6.4 cm) wide, without the loop
- Hanging loop: about 1.5 in (3.8 cm) tall
- Skill level: Intermediate (thread work, small parts, sewing together)
- Terminology: US crochet terms
- Yarn weight: Size 10 crochet cotton (Lace / 0)
- Hook: 1.5 mm (US steel size 8)
- Number of pieces: 1 finished ornament, made from 5 parts (head, flower strip, back crescent, fin, tail)
- Layout: head at top, flower strip down the front, crescent down the back, fin on the back, tail spiral at the bottom
- Part sizes: flower 0.7 in (1.8 cm) across; head 0.8 in (2.0 cm) across; back crescent about 5 in (12.7 cm) long and 0.6 in (1.5 cm) deep
- Size before border: 5.75 in (14.6 cm) x 2.3 in (5.8 cm)
- Border depth: 0.2 in (0.5 cm), on the front (belly) edge only
Materials
Yarn: Use mercerized size 10 crochet cotton. It shows stitch detail well and takes starch well. Avoid acrylic thread, because it does not stiffen properly.
- Cream: 10 g, about 55 m (60 yd)
This amount includes a margin for a test flower, the sewing thread, and the hanging loop. One ornament uses about 6 g.
Tools:
- 1.5 mm (US steel size 8) crochet hook
- Fine tapestry needle that fits size 10 thread
- One 4 mm black bead for the eye, plus black sewing thread
- Fabric stiffener or a starch mix
- Blocking board or foam, plastic wrap, and rustproof pins
- Scissors and stitch markers
Abbreviations (US Terms)
- ch – chain
- sl st – slip stitch
- sc – single crochet
- hdc – half double crochet
- dc – double crochet
- sk – skip
- sp – space
- st(s) – stitch(es)
- P1–P5 – petal 1 to petal 5 of a flower
Picot: ch 3, sl st into the 3rd ch from the hook.
Petal: in the same st, work (sl st, ch 2, 2 dc, ch 2, sl st).
Joined petal: in the same st, work (sl st, ch 2, dc, sl st into the tip of the matching petal on the previous flower, dc, ch 2, sl st).
Gauge and Checkpoints
Gauge: 12 sc = 1 in (2.5 cm). One flower measures 0.7 in (1.8 cm) across, from petal tip to petal tip.
Make one test flower first. If it measures 0.7 in (1.8 cm), keep going. If it is bigger than 0.8 in (2.0 cm), change to a 1.25 mm hook. If it is smaller than 0.6 in (1.5 cm), change to a 1.75 mm hook. You can use the test flower as Flower 1.
Checkpoints:
- Head after Rnd 1: 0.5 in (1.3 cm) across
- Head after Rnd 2: 0.8 in (2.0 cm) across
- Flower strip: 3.5 in (8.9 cm) long
- Back crescent Row 1: about 5 in (12.7 cm) long when held straight
- Tail: 2 in (5.1 cm) stem, with a curl 0.9 in (2.3 cm) across
- Finished ornament: 5.75 in (14.6 cm) x 2.5 in (6.4 cm), within 0.25 in (0.6 cm)
Measure each part flat before you sew anything together.
Part 1: Head, Snout, and Crown
Rnd 1: Make a magic ring. Ch 3 (counts as dc), then work 11 dc in the ring. Pull the ring closed. Sl st in the top of the ch-3. (12 dc)
Rnd 2: Ch 1, then work 2 sc in each dc around. Sl st in the first sc. (24 sc)
Mark the first sc as sc 1. This is the base of the snout. With the right side facing, number the other stitches counterclockwise from sc 1.
Snout: Ch 13. In the 2nd ch from the hook, work (sc, picot, sc). Sc in each of the next 11 ch. Sl st in sc 1 of the head. (13 sc + 1 picot)
The snout is about 1.1 in (2.8 cm) long. The picot gives the tip a small flare.
Crown: Sl st in sc 2. Then work the following 3 times:
- Ch 5, sl st in the 2nd ch from the hook, sc in the next ch, hdc in each of the next 2 ch, sk the next sc of the head, sl st in the next sc.
The crown uses sc 3 to 8, and the points sit on sc 4, 6, and 8. Fasten off.
Hanging loop: Join the thread with a sl st in sc 6, behind the center point. Ch 36, then sl st in sc 6 again. Fasten off. The loop stands about 1.5 in (3.8 cm) above the crown.
Eye: Sew the black bead at the edge of Rnd 1, on the snout side. Pull the thread firmly so the bead sits flat.
Part 2: Flower Strip (5 Flowers)
Each flower has 5 petals, worked in order from P1 to P5. Once the flower is placed in the seahorse, P1 points up, P2 up-back, P3 down-back, P4 down-front, and P5 up-front.
Flower 1
Rnd 1: Make a magic ring. Ch 1, then work 10 sc in the ring. Pull the ring closed. Sl st in the first sc. (10 sc)
Rnd 2: Petal in the next sc, sk the next sc. Repeat from * 4 more times. Sl st in the first st. Fasten off. (5 petals)
Flowers 2 to 5
Rnd 1: Work as for Flower 1. (10 sc)
Rnd 2: For P1, work a joined petal in the next sc, joining it to P3 of the previous flower. Sk the next sc. Then work petal in the next sc, sk the next sc 4 times. Sl st in the first st. Fasten off. (5 petals, 1 joined)
Strip check: You now have 5 flowers in a column with 4 joins. The strip is 3.5 in (8.9 cm) long. It leans slightly because each join uses a down-back petal, and that lean gives the belly its curve.
Part 3: Back Crescent with Fans
Foundation: Ch 62.
Row 1: Sc in the 2nd ch from the hook and in each ch across. (61 sc)
Row 2: Ch 5 and turn (counts as dc + ch 2). Sk the next 2 sc, dc in the next sc. Ch 2, sk 2 sc, dc in the next sc. Repeat from * across. (21 dc, 20 ch-2 sp)
To check the math: the dc land on sc 1, 4, 7, and so on up to 61. That gives (61 − 1) ÷ 3 + 1 = 21 dc.
Row 3: Ch 1 and turn. Sc in the first dc. Sk the next ch-2 sp, dc, and ch-2 sp. In the next dc, work a fan: (dc, ch 1) 6 times, then dc. Sk the next ch-2 sp, dc, and ch-2 sp. Sc in the next dc. Repeat from * 4 more times. Fasten off. (5 fans of 7 dc = 35 dc; 6 sc)
The fans sit on dc 3, 7, 11, 15, and 19. The sc sit on dc 1, 5, 9, 13, 17, and 21. The crescent curves on its own because the fan edge is longer than the sc edge.
Number the free loops of the foundation chain as crescent sts 1 to 61. Crescent st 1 is at the end where you started Row 1.
Part 4: Fin
Row 1: Ch 4, then sl st in the first ch to form a ring. Ch 3 (counts as dc). Work (ch 1, dc) 6 times into the ring. (7 dc, 6 ch-1 sp)
Row 2: Ch 1 and turn. Sc in the first dc. 2 sc in the next ch-1 sp, sc in the next dc. Repeat from * 5 more times. Fasten off, leaving an 8 in (20.3 cm) tail. (19 sc)
The fin is about 0.6 in (1.5 cm) wide. The dc posts form its ribbed lines.
Part 5: Spiral Tail
Foundation: Ch 40.
Row 1: Work 2 sc in the 2nd ch from the hook. Work 2 sc in each of the next 14 ch. Sc in each of the last 24 ch. (30 + 24 = 54 sc)
The 15 doubled chains form the curl, and the 24 single chains form the straight stem.
Row 2: Ch 1 and turn. Sc in each of the first 24 sc (the stem). Over the curl, work sc in each of the next 2 sc, picot 15 times. Fasten off. (54 sc + 15 picots)
Stem st 1 of Row 2 is the top of the tail. The stem is 2 in (5.1 cm) long. Let the curl roll into a spiral and press it with your fingers. It should be about 0.9 in (2.3 cm) across.
Joining the Parts
Use a 20 in (50.8 cm) length of thread and the tapestry needle. Whipstitch through one loop on each part. Keep each stitch snug but not tight so the lace lies flat, with no puckers or gaps.
Lay all the parts right side up, with the snout pointing right.
- Head to crescent: Match head sc 10 to 17 with crescent sts 1 to 8, one stitch to one stitch. That is 8 whipstitches.
- Flower strip to head: Tack P1 of Flower 1 to head sc 19 with 2 small stitches.
- Flower strip to crescent: Tack P2 of Flowers 1 to 5 to crescent sts 16, 26, 36, 46, and 56. The 10-stitch spacing is a little longer than the flower spacing. That is correct, because the crescent runs along the outside of the curve.
- Tail to body: Tack P3 of Flower 5 to tail stem st 1. Then tack crescent st 61 to tail stem st 2.
- Fin: Place the fin ring behind the crescent, at the Row 3 sc on dc 13, between fans 3 and 4. Sew the ring in place so the fin fans out past the back edge.
Leave the spaces between the crescent and the flowers open. They are part of the lace look.
Size checkpoint: The joined piece should measure 5.75 in (14.6 cm) x 2.3 in (5.8 cm). If a join pulls, take it out and sew it again with more slack.
Front Border
Border gauge: Each ch-4 space holds 5 sc and lies flat along the belly curve.
Row 1: With the right side facing, join the thread with a sc in head sc 22 (the throat). Ch 4, sc in the tip of the next free petal. Work down the front in this order: P5, then P4 of Flower 1; P5, then P4 of Flower 2; and so on to P4 of Flower 5. Ch 4, then sc in tail stem st 6. (12 anchor sc, 11 ch-4 sp)
Row 2: Ch 1 and turn. Work 5 sc in each ch-4 space. Sl st in the anchor sc at the head. Fasten off. (11 x 5 = 55 sc)
Why the math works: There is 1 head anchor, then 10 free front petals (2 per flower x 5 flowers), then 1 tail anchor. That gives 12 anchors and 11 spaces. A ch-4 is about 0.3 in (0.8 cm) long, which would hold 4 sc on a straight edge. The belly edge curves outward, so its outer edge is longer, and the fifth sc fills that extra length. With 4 sc the belly would pull in; with 6 it would ruffle. The border adds 0.2 in (0.5 cm), which brings the width to 2.5 in (6.4 cm).
Final Blocking
- Weave in all ends along the stitch posts and trim them close.
- Soak the seahorse in fabric stiffener for 1 minute.
- Gently squeeze out the extra. Do not wring it.
- Cover the blocking board with plastic wrap.
- Pin the outline to 5.75 in (14.6 cm) x 2.5 in (6.4 cm).
- Pin each fan tip outward so its 7 dc spread evenly.
- Pin each crown point and the snout picot.
- Shape the tail into a round spiral 0.9 in (2.3 cm) across, and pin the picots.
- Open each flower petal with a pin.
- Let the piece dry completely, 12 to 24 hours, then remove the pins.
Final Quality-Control Checklist
- The head has 24 sc, 3 crown points, and a straight snout with a picot tip.
- The flower strip has 5 flowers, each with 5 petals, and 4 joins.
- The crescent has 5 fans of 7 dc, with 6 sc between and at the ends.
- The fin has 19 sc and 7 ribs.
- The tail has a 24 sc stem and a curl with 15 picots.
- The front border has 55 sc in 11 groups of 5.
- The bead eye is secure.
- The ornament measures 5.75 in (14.6 cm) x 2.5 in (6.4 cm), plus a 1.5 in (3.8 cm) loop.
Troubleshooting
The crescent does not curve. Row 1 may be loose. Work it again with a smaller hook, or pin the curve firmly while blocking.
The flowers cup. Rnd 1 is too tight. Work the 10 sc more loosely, or go up one hook size.
The tail will not spiral. Check that you worked 2 sc in each of the first 15 ch. Wet the curl, wrap it around a pencil, and let it dry.
The belly border ruffles. Your chains are too long. Work ch 3 instead of ch 4, and keep 5 sc in each space.
The ornament leans when it hangs. Move the loop one sc toward the heavier side.
Care
Dust it gently with a soft brush. If it gets dirty, hand wash it in cool water, then starch it again and block it to the same measurements.
Final Notes
The size of this seahorse comes from a short chain of measurements. Twelve sc make 1 in (2.5 cm). Each flower is 0.7 in (1.8 cm), so five flowers make a 3.5 in (8.9 cm) belly. The 61 sc crescent covers about 5 in (12.7 cm) of back. The head adds 0.8 in (2.0 cm) at the top, and the tail curl finishes the bottom. Together they give 5.75 in (14.6 cm) x 2.3 in (5.8 cm), and the 0.2 in (0.5 cm) border brings the width to 2.5 in (6.4 cm). Check your test flower first, and the rest will follow.
Happy crocheting!