

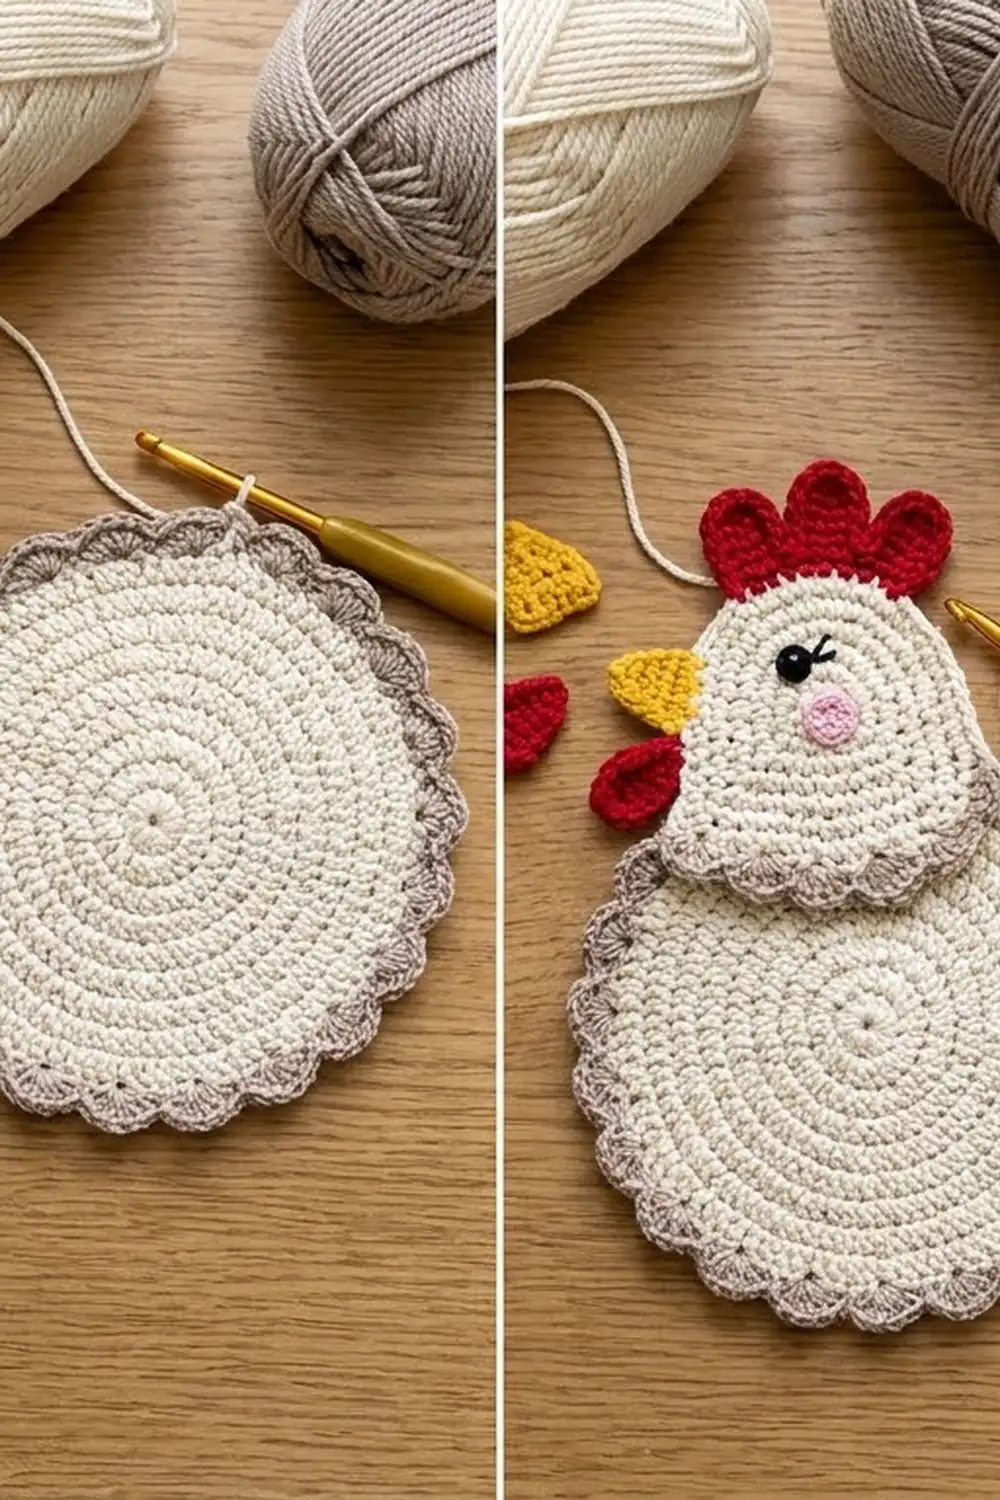
The Daisy Hen Coaster is a plump, flat hen. Her body is a cream spiral circle, and her rounded head and short tail are worked straight off its edge. A taupe scalloped band runs along her belly and tail. A red three-lobed comb, a red wattle, a small yellow beak, a pink cheek and a shiny black eye finish her face.
The colors are farmhouse-kitchen: soft cream, warm taupe, cherry red, sunny yellow and blush pink. She sits nicely under a mug of tea or on a breakfast tray, and she makes a lovely spring or Easter gift. Because she’s a little larger than a standard coaster, she also works as a mug rug for a cup and a cookie.
This pattern uses US crochet terms. The finished hen measures about 7.25 in (18.4 cm) wide × 7 in (17.8 cm) tall, including the comb.
The construction is simple:
1. Crochet one spiral circle.
2. Work the head and tail in short rows off its edge.
3. Add a cream edging round to smooth the outline.
4. Add a two-row taupe band for the scallops.
5. Sew on four small appliqués and the eye.
Finished Size and Construction
- Finished size: about 7.25 in (18.4 cm) wide × 7 in (17.8 cm) tall, comb included
- Skill level: Easy
- Terminology: US
- Yarn weight: worsted (#4) cotton
- Hook: 4.0 mm (G-6)
- Number of pieces: 1 main body plus 4 small appliqués (comb, wattle, beak, cheek) and an eye
- Layout: single piece, no joining
- Body circle: 4.75 in (12.1 cm) across after Round 10
- Size before border: about 6.25 in (15.9 cm) wide × 5.5 in (14.0 cm) tall
- Border depth: cream edging 0.25 in (0.6 cm) all around; taupe band 0.5 in (1.3 cm) along the belly and tail
Materials
Use a smooth worsted-weight cotton or cotton blend. Cotton handles warm mugs, washes well and gives crisp scallops. Don’t use acrylic for a coaster that will hold hot drinks, because it can soften or glaze under heat.
The quantities below assume about 170 m per 100 g:
- Cream (body, head, tail, edging): 22 g, about 37 m
- Taupe (scalloped band): 8 g, about 14 m
- Red (comb and wattle): 4 g, about 7 m
- Yellow (beak): 2 g, about 3 m
- Pink (cheek): 2 g, about 3 m
All quantities include a margin of about 20% for swatching and yarn tails.
Tools:
- 4.0 mm (G-6) crochet hook
- 1 black 10 mm eye: a flat sew-on button or a safety eye (a flat button keeps the coaster level)
- Black embroidery floss for the eyelash
- 4 locking stitch markers
- Tapestry needle
- Scissors
- Ruler or tape measure
- Blocking mat and pins
Abbreviations (US Terms)
- ch – chain
- sl st – slip stitch
- sc – single crochet
- hdc – half double crochet
- dc – double crochet
- inc – 2 sc in the same stitch
- sc2tog – single crochet 2 together
- MR – magic ring
- st(s) – stitch(es)
- sk – skip
- RS / WS – right side / wrong side
Special stitch – Scallop: sk 1 st, 5 dc in next st, sk 1 st, sc in next st. One scallop uses exactly 4 stitches.
Gauge and Checkpoints
Gauge: 16 sc and 17 rounds = 4 in (10.2 cm).
At this gauge, the stitch count and round count stay in balance, so the circle lies flat. Make the body circle first and treat it as your swatch. Check it before you start the head and tail.
Checkpoints (lay the circle flat and measure straight across the center):
- After Round 4 (24 sts): 1.9 in (4.8 cm)
- After Round 7 (42 sts): 3.3 in (8.4 cm)
- After Round 10 (60 sts): 4.75 in (12.1 cm)
If your circle is too big, go down to a 3.75 mm hook. If it’s too small, go up to a 4.5 mm hook. If you’re off by more than 0.25 in (0.6 cm) at Round 10, it’s worth fixing, because the head, tail and border all build on that edge.
If the circle ruffles, your rounds are shorter than your stitches are wide, so go down a hook size. If it cups, go up a size.
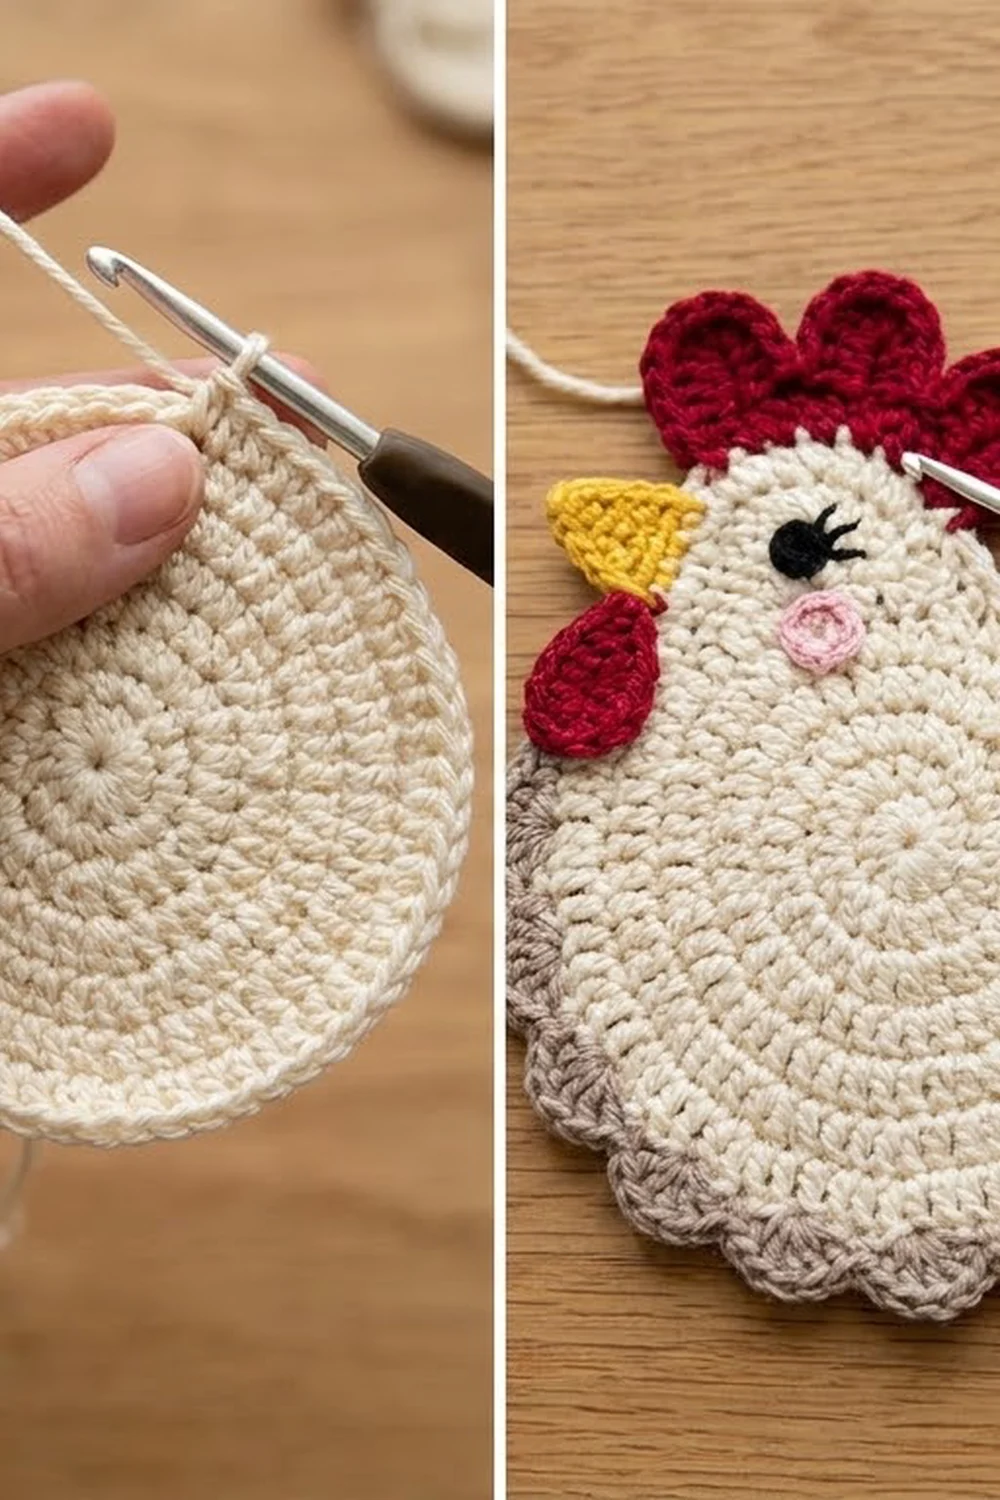
Body Circle
Work in a continuous spiral. Mark the first stitch of each round and move the marker up as you go. On even rounds the increases are staggered so the circle stays round instead of turning into a hexagon.
With cream:
- Round 1: MR, 6 sc in ring. (6 sts)
- Round 2: inc in each st around. (12 sts)
- Round 3: [sc 1, inc] 6 times. (18 sts)
- Round 4: [sc 1, inc, sc 1] 6 times. (24 sts)
- Round 5: [sc 3, inc] 6 times. (30 sts)
- Round 6: [sc 2, inc, sc 2] 6 times. (36 sts)
- Round 7: [sc 5, inc] 6 times. (42 sts)
- Round 8: [sc 3, inc, sc 3] 6 times. (48 sts)
- Round 9: [sc 7, inc] 6 times. (54 sts)
- Round 10: [sc 4, inc, sc 4] 6 times. (60 sts)
Sl st in the next st to smooth the spiral step. Fasten off and weave in the end.
Check: 60 sts, 4.75 in (12.1 cm) across.
Mark the Outline
Lay the circle RS up and find the stitch at 3 o’clock, the far right point. This is st 1. Count counterclockwise (the same direction you crocheted) and divide the edge like this:
- Sts 1–12: tail (upper right)
- Sts 13–18: back (top, left plain)
- Sts 19–30: head (upper left)
- Sts 31–60: belly (from 9 o’clock around the bottom to 3 o’clock)
Check: 12 + 6 + 12 + 30 = 60.
Place markers in sts 1, 12, 19 and 30.
Tail
The tail is a short, low bump with tapered sides.
- Row 1 (RS): Join cream in st 1. Ch 1, sc in the same st and in each st through st 12. Turn. (12 sts)
- Row 2: Ch 1, sc2tog, sc 8, sc2tog. Turn. (10 sts)
- Row 3: Ch 1, sc2tog, sc 6, sc2tog. (8 sts)
Fasten off. The tail stands about 0.75 in (1.9 cm) above the circle, on a 3 in (7.6 cm) base.
Head
The head is a taller, rounded dome.
- Row 1 (RS): Join cream in st 19. Ch 1, sc in the same st and in each st through st 30. Turn. (12 sts)
- Row 2: Ch 1, sc in each st across. Turn. (12 sts)
- Row 3: Ch 1, sc2tog, sc 8, sc2tog. Turn. (10 sts)
- Row 4: Ch 1, sc2tog, sc 6, sc2tog. Turn. (8 sts)
- Row 5: Ch 1, sc2tog, sc 4, sc2tog. (6 sts)
Fasten off. The head stands about 1.2 in (3.0 cm) above the circle, on a 3 in (7.6 cm) base.
Checkpoint: the hen shape now measures about 6.25 in (15.9 cm) wide × 5.5 in (14.0 cm) tall.
Border
Border gauge: in the scallop row, 4 sts = 1 scallop = 1 in (2.5 cm).
Round 1 – Cream Edging (trim round)
With RS facing, join cream in st 31 (the first belly stitch, just below the head). Ch 1, then work:
- Belly: sc in sts 31–60. (30 sc)
- Tail: sc in each of 3 row ends, sc in each of 8 top sts, sc in each of 3 row ends. (14 sc)
- Back: sc in sts 13–18. (6 sc)
- Head: sc in each of 5 row ends. Across the top, 2 sc in the first st, sc 4, 2 sc in the last st (8 sc). Sc in each of 5 row ends. (18 sc)
Sl st to the first sc and fasten off.
Count: 30 + 6 + (5 + 6 + 5) + (3 + 8 + 3) = 66 stitches worked one per existing stitch or row end, + 2 extra at the head top = 68 sts.
Keep the row-end stitches snug where the head and tail meet the circle so no gaps open there.
Taupe Row 1 (RS)
Join taupe in the first sc of the cream round (the first belly stitch). Ch 1, then sc in the same st and in each st along the belly (30), the tail (14) and the back (6). Stop at the last back stitch, right where the head begins. Turn. (50 sts)
Taupe Row 2 (WS) – Scallops
Ch 1, sc in each of the first 6 sts (the back). Then work [Scallop] 11 times. The final sc lands in the last stitch, at the chest. Fasten off.
Count: 6 sc + (11 scallops × 4 sts) = 6 + 44 = 50 sts used, for a total of 55 dc and 17 sc.
Why the math works: each scallop uses exactly 4 stitches, so the scalloped stretch has to be a multiple of 4. The back takes 6 plain stitches, and the other 44 divide evenly into 11 scallops. About 3½ scallops land on the tail and 7½ along the belly, so they run in one smooth wave with no squeezed or stretched scallops. The head stays cream, matching the plain neckline.
The scallops are worked on the WS, but they look the same from both sides.
Appliqués
Leave a long tail on every appliqué for sewing.
Comb (red)
- Row 1: Ch 8, sc in 2nd ch from hook and in each ch across. Turn. (7 sc)
- Row 2: Sl st in first sc, [6 dc in next sc, sl st in next sc] 3 times. (3 lobes: 18 dc, 4 sl st)
Fasten off. The comb is about 2 in (5.1 cm) wide and 0.75 in (1.9 cm) tall, which matches the head’s 8-stitch top edge.
Wattle (red)
- Round 1: MR, ch 1, 8 sc in ring, sl st to first sc. (8 sts)
- Round 2: Ch 1, 2 sc in each of the next 6 sts (12 sc). Work (hdc, dc) in the next st, ch 2, then (dc, hdc) in the last st. Sl st to the first sc.
Fasten off. This makes a teardrop about 0.9 in (2.3 cm) long, and the ch-2 forms the point.
Beak (yellow)
- Row 1: Ch 5, sc in 2nd ch from hook and across. Turn. (4 sc)
- Row 2: Ch 1, sc2tog twice. Turn. (2 sts)
- Row 3: Ch 1, sc2tog. (1 st)
Fasten off. This makes a triangle with a 1 in (2.5 cm) base, about 0.75 in (1.9 cm) long.
Cheek (pink)
- Round 1: MR, ch 2 (does not count as a stitch), 10 hdc in ring, sl st to first hdc. (10 sts)
Fasten off. Pull the ring nearly closed, leaving a tiny hole in the center. The cheek is about 0.75 in (1.9 cm) across.
Assembly
- Comb: On the RS, lay Row 1 of the comb over the top edge of the head, overlapping by about 0.25 in (0.6 cm), so the three lobes stand above the head. Whipstitch along the whole foundation row.
- Beak: Place the base against the middle of the head’s front curve with the tip pointing left. Tuck the base 0.25 in (0.6 cm) under the head edge and sew it down.
- Wattle: Sew the pointed end just below the beak so the round end hangs down along the chest.
- Eye: Sew the button on (or fit the safety eye) about 0.75 in (1.9 cm) in from the beak, level with it. Add one short slanted straight stitch of black floss above the eye as a lash.
- Cheek: Sew the cheek just below the eye and slightly behind it.
Weave in all ends on the WS.
Final Blocking
- Soak the coaster in cool water, then gently press out the excess. Don’t wring it.
- Roll it in a towel to remove more water.
- Lay it RS up on a blocking mat.
- Pat the body circle round, then shape the head dome and the tail.
- Pin the tip of each scallop so the wave is even.
- Check the size: about 7.25 in (18.4 cm) wide × 7 in (17.8 cm) tall.
- Let it dry completely before you take out the pins.
Final Quality-Control Checklist
- The body circle has 60 sts and measures 4.75 in (12.1 cm) across.
- The circle lies flat, with no cupping or ruffling.
- The tail has 3 rows ending in 8 sts; the head has 5 rows ending in 6 sts.
- The cream edging round has 68 sts.
- Taupe Row 1 has 50 sts; Row 2 has 6 plain sc and 11 scallops.
- The taupe band stops at the chest and at the back of the neck, and the head edge is cream.
- The comb, beak, wattle, eye and cheek are secure and lie flat.
- The finished size is about 7.25 in (18.4 cm) × 7 in (17.8 cm).
- All ends are woven in.
Troubleshooting
The circle looks like a hexagon. Work the staggered even rounds exactly as written, and block firmly.
The circle cups. Your hook is too small or your tension is too tight. Go up one hook size.
The circle ruffles. Go down one hook size, and check that you haven’t added an extra increase.
The head looks pointed instead of round. Make sure Row 2 has no decreases, and block the dome into a curve.
There are gaps where the head or tail meets the body. Work each row-end sc under a full edge stitch, not just one loop, and keep it snug.
The scallops are uneven. Recount Taupe Row 1. It must have exactly 50 sts. If it doesn’t, fix the cream round count before you continue.
The taupe band pulls the edge in. Work the taupe rows with a 4.5 mm hook.
The comb flops forward. Sew along the whole foundation row, not just its ends.
The coaster rocks under a mug. Use a flat sew-on button instead of a safety eye.
Care
Hand wash in cool water with mild soap, reshape, and dry flat. If you used a safety eye, keep the coaster out of the dryer.
Final Notes
Each stage depends on the measurement before it:
– The 60-stitch circle measures 4.75 in (12.1 cm).
– Adding the head and tail brings the shape to 6.25 in (15.9 cm) × 5.5 in (14.0 cm).
– The 68-stitch cream edging, the 50-stitch taupe band and the comb bring the hen to about 7.25 in (18.4 cm) × 7 in (17.8 cm).
If each checkpoint matches, every count after it will fall into place.
Happy crocheting!