

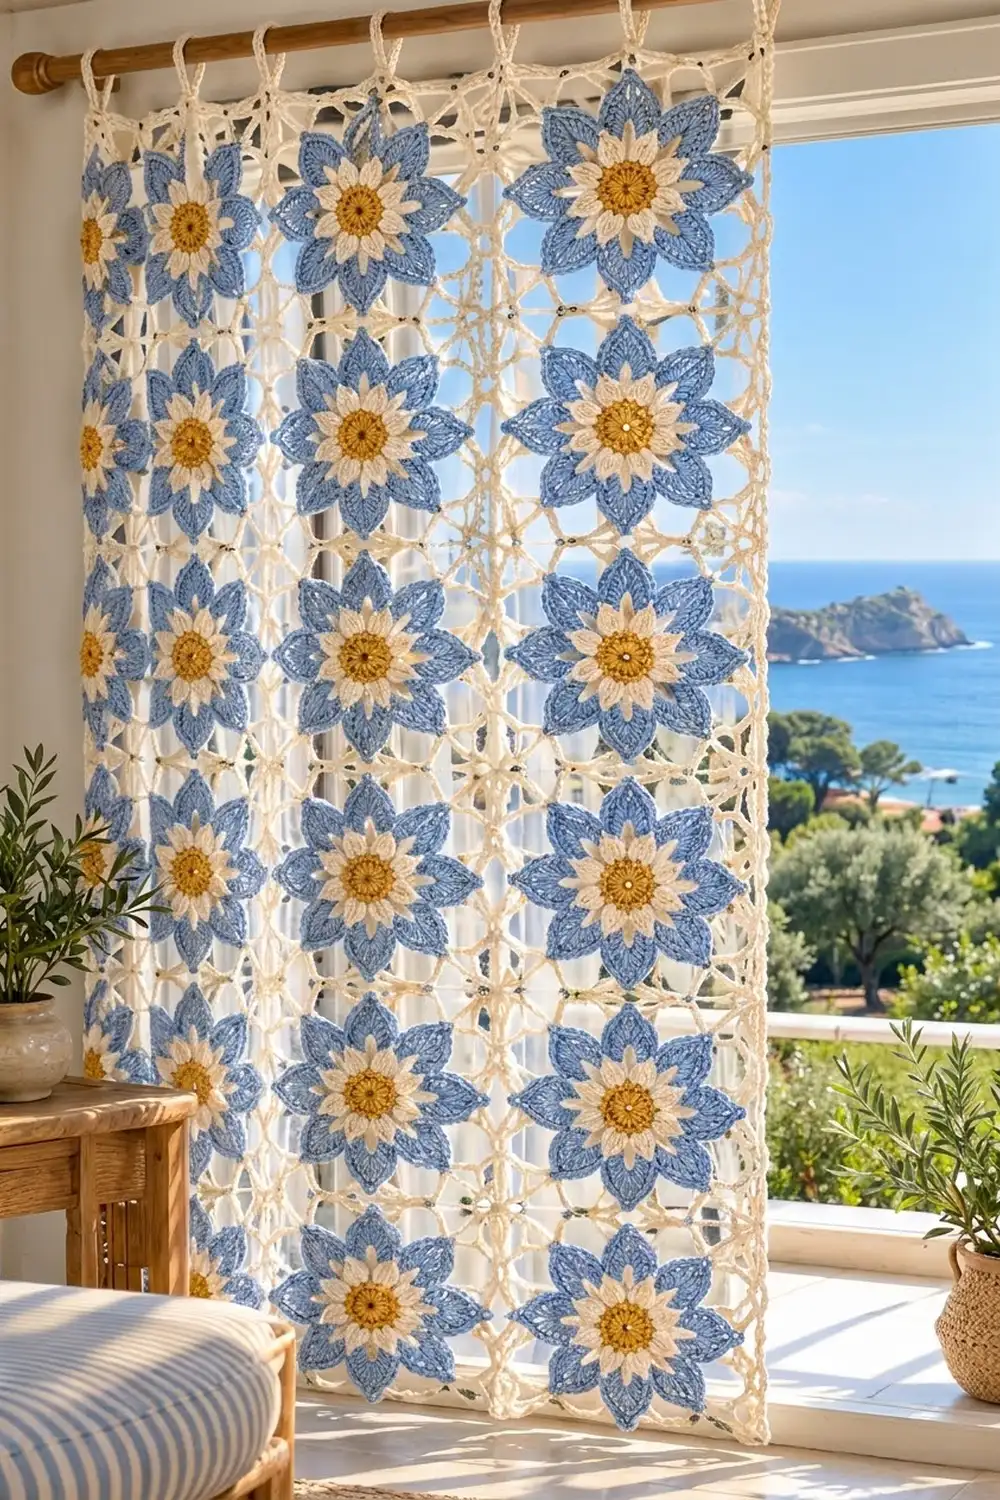
This curtain panel is made of twenty-eight flower motifs set in an airy cream chain mesh. Each motif has a solid golden center, a ring of eight short cream petals, and eight larger, pointed sky-blue petals that sit in the gaps between the cream ones. The mesh squares off each star and joins the motifs into a light, see-through panel.
There are three colors: soft cornflower blue, warm ivory cream, and mustard gold. The style is relaxed and coastal. Light passes through the mesh, and the blue stars stand out clearly against the window.
The pattern uses US crochet terms throughout. The finished panel measures 29 in wide x 50 in long (73.7 cm x 127.0 cm), not counting the hanging tabs. The tabs add about 2.25 in (5.7 cm) above the top edge.
Each motif is worked in the round from the center out. The last cream mesh round turns the star into a 7 in (17.8 cm) square, and from the second motif on, you join each motif to its neighbors as you work that round. A two-round cream border finishes the edges, and a row of tabs along the top slides onto a curtain rod.
Finished Size and Construction
- Finished size: 29 in x 50 in (73.7 cm x 127.0 cm), plus 2.25 in (5.7 cm) tabs
- Skill level: Intermediate
- Terminology: US crochet terms
- Yarn weight: DK (#3), cotton or cotton blend
- Hook: 4.0 mm (G-6)
- Number of pieces: 28 identical motifs
- Layout: 4 motifs wide x 7 motifs tall
- Motif size: 7 in (17.8 cm) square, blocked
- Size before border: 28 in x 49 in (71.1 cm x 124.5 cm)
- Border depth: 0.5 in (1.3 cm) on each side
Materials
DK cotton works best, either mercerized or matte. It keeps the petal points sharp, blocks flat, and stretches very little while the curtain hangs. Avoid fuzzy or loosely plied yarns, because they blur the mesh.
- Color A, mustard gold (centers): 75 g, about 173 m
- Color B, ivory cream (inner petals, mesh, border, tabs): 200 g, about 460 m
- Color C, cornflower blue (outer petals): 165 g, about 380 m
These amounts assume a cotton DK of about 115 m per 50 g. They include a margin of roughly 15 percent for gauge differences and a test motif.
Tools:
- 4.0 mm (G-6) crochet hook
- Tapestry needle
- Scissors
- Rustproof pins
- Blocking surface at least 30 in x 51 in (76.2 cm x 129.5 cm), or block in sections
- Spray bottle
- Tape measure
- Stitch markers
Abbreviations (US Terms)
- ch – chain
- sl st – slip stitch
- sc – single crochet
- hdc – half double crochet
- dc – double crochet
- tr – treble crochet
- dtr – double treble crochet: yo 3 times, insert hook, pull up a loop, [yo, pull through 2 loops] 4 times
- sk – skip
- sp(s) – space(s)
- st(s) – stitch(es)
- yo – yarn over
- MR – magic ring
Special stitch – joining chain (j-ch5): Use this in place of a ch-5 sp when joining. Ch 2, remove the hook from the loop, insert it from the front through the matching ch-5 sp of the neighboring motif, pick up the dropped loop and pull it through, then ch 2. The finished space is the same size as a ch-5 sp.
Gauge and Checkpoints
Make and block one complete motif before you buy all your yarn. Check its size at each stage:
- After Round 2: 2 in (5.1 cm) across
- After Round 3: 3.5 in (8.9 cm) tip to tip
- After Round 5: 6 in (15.2 cm) tip to tip
- After Round 7: 7 in (17.8 cm) square, blocked
- Border gauge: 17 sc = 3.5 in (8.9 cm)
A finished motif within ±0.25 in (0.6 cm) of 7 in is fine.
If your motif is too big, use a 3.75 mm hook or tighten the chains in Rounds 6–7. If it is too small, use a 4.5 mm hook. Chain tension in the mesh rounds affects size the most, so adjust that first.
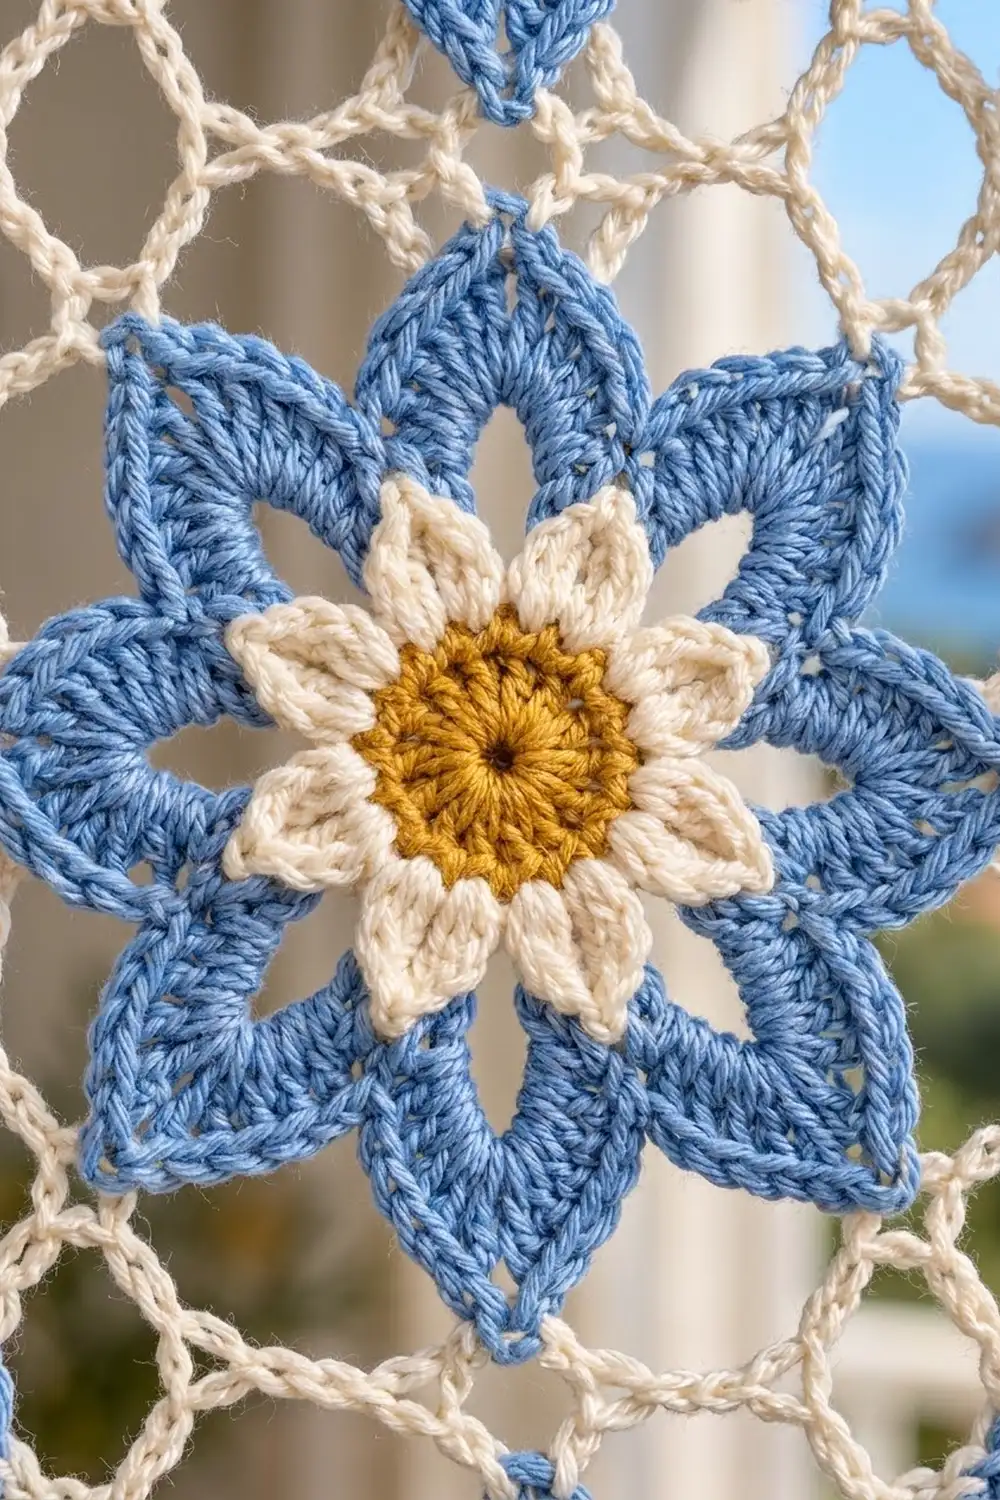
Motif (Make 28)
Round 1 (Color A)
Make a MR. Ch 3 (counts as dc), then work 15 dc into the ring. Pull the ring closed and sl st to the top of the ch-3. (16 dc)
The disc measures about 1.25 in (3.2 cm) across.
Round 2 (Color A)
Ch 3 (counts as dc), dc in the same st, then 2 dc in each st around. Sl st to the top of the ch-3. (32 dc)
Fasten off. The center measures 2 in (5.1 cm) across.
Round 3 (Color B – cream petals)
Join Color B with a sl st in any dc.
*Sc in the next st, sk 1 st, (hdc, dc, tr, ch 2, tr, dc, hdc) in the next st, sk 1 st; repeat from * 7 more times. Sl st to the first sc.
(8 petals: 8 sc + 56 petal sts, plus 8 ch-2 tips)
Each repeat uses 4 sts (8 x 4 = 32). The ch-2 forms each petal’s point. Fasten off. The flower measures 3.5 in (8.9 cm) tip to tip.
Round 4 (Color C – arches)
Join Color C with a sc in any cream ch-2 tip.
*Ch 8, sc in the next cream ch-2 tip; repeat from * 6 more times, ch 8, sl st to the first sc.
(8 sc, 8 ch-8 arches)
Each arch sits behind the gap between two cream petals.
Round 5 (Color C – pointed petals)
Sl st into the first arch. In each ch-8 arch, work (sc, hdc, 2 dc, 2 tr, ch 3, 2 tr, 2 dc, hdc, sc). Sl st to the first sc.
(8 petals: 96 sts, plus 8 ch-3 tips)
The ch-3 makes the sharp point. The space left between the arch and the cream petals becomes the small open window inside each blue petal. Fasten off. The star measures 6 in (15.2 cm) tip to tip.
Round 6 (Color B – squaring round)
Choose four alternating blue tips to be the corners. The other four are the side tips.
Join Color B with a sc in any side-tip ch-3.
*Ch 9, (dtr, ch 5, dtr) in the next tip (corner), ch 9, sc in the next tip (side); repeat from * 3 more times. On the last repeat, replace the final sc with a sl st to the first sc.
(4 sc, 8 dtr, 8 ch-9 sps, 4 corner ch-5 sps)
The tall dtr pairs push the corners outward so the star becomes a square.
Round 7 (Color B – mesh and joining round)
Work this round without joins on the first motif only.
Ch 1, sc in the same st.
*Ch 5, sc in the next ch-9 sp, ch 5, (sc, ch 5, sc) in the corner ch-5 sp, ch 5, sc in the next ch-9 sp, ch 5, sc in the next sc; repeat from * 3 more times. On the last repeat, replace the final sc with a sl st to the first sc.
(20 sc, 16 side ch-5 sps, 4 corner ch-5 sps)
Each side has 4 side ch-5 sps between its two corner sps. Fasten off, then block to 7 in (17.8 cm) square.
Make All Pieces
- Color A: Rounds 1–2 on all 28 motifs
- Color B: Round 3 on all 28; Rounds 6–7 while joining
- Color C: Rounds 4–5 on all 28 motifs
Work Rounds 1–6 on every motif first, weaving in the gold and blue ends as you go. Then work all the Round 7 joins.
Layout (4 wide x 7 tall):
[M1 ][M2 ][M3 ][M4 ]
[M5 ][M6 ][M7 ][M8 ]
[M9 ][M10][M11][M12]
[M13][M14][M15][M16]
[M17][M18][M19][M20]
[M21][M22][M23][M24]
[M25][M26][M27][M28]
Join the motifs in reading order, left to right and top to bottom. From M5 on, each new motif joins to the motif above it. From M6 on, motifs that aren’t at the start of a row also join to the motif on their left.
Joining
Join as you go on Round 7. Work the round as written, but along any side that touches a finished motif, use a j-ch5 in place of each ch-5 sp.
Side join: Each side has 4 side ch-5 sps. Join them one to one: sp 1 to sp 1, and so on through sp 4 to sp 4. Nothing is added or skipped, so the seam lies flat.
Corner join: At a shared corner, work (sc, j-ch5, sc). The corner sp joins to the neighbor’s corner sp.
Four-way junction: Where four corners meet, the third and fourth motifs join into the first corner join point (insert the hook under that joining strand). This keeps all four corners together in one neat point.
Tension: Make your j-ch5 chains the same length as your regular ch-5 chains. Tight joins pucker and narrow the panel. Loose joins let the mesh sag as it hangs.
Size checkpoint: Two joined motifs measure 14 in (35.6 cm) across, and a full row of four measures 28 in (71.1 cm). With all rows joined, the panel measures 28 in x 49 in (71.1 cm x 124.5 cm).
Border
Border gauge: 17 sc = 3.5 in (8.9 cm), or 34 sc per 7 in (17.8 cm) motif side.
Count per motif side: 4 side sps x 7 sc = 28 sc, plus 3 sc in each of its 2 corner sps = 6 sc. That makes 34 sc per motif side. These 34 already include the corner sc, so don’t count them again.
Border Round 1 (Color B, sc)
Join Color B with a sc in any side ch-5 sp on the outer edge, then work 6 more sc in the same sp.
- Each side ch-5 sp: 7 sc.
- Each seam along the edge: 3 sc in the first motif’s corner sp, then 3 sc in the next motif’s corner sp. These are the corner sc already included in the 34.
- Each of the 4 panel corners: (3 sc, ch 2, 3 sc) in the free corner sp. The ch-2 is the panel corner and isn’t counted as a stitch.
Sl st to the first sc.
- Top and bottom: 4 x 34 = 136 sc each
- Left and right: 7 x 34 = 238 sc each
- Total: 748 sc, plus 4 corner ch-2 sps
Border Round 2 (Color B, hdc)
Ch 2 (does not count as a st). Hdc in each sc around, and work (hdc, ch 2, hdc) in each corner ch-2 sp. Sl st to the first hdc. Fasten off.
- Top and bottom: 136 + 2 corner hdc = 138 hdc each
- Left and right: 238 + 2 corner hdc = 240 hdc each
- Total: 756 hdc, plus 4 corner ch-2 sps
Tab Row (Color B, top edge only)
With the right side facing, join Color B with a sc in the first hdc of the top edge, just after the top right corner ch-2 sp.
*(Sc, ch 24, sc) in the next st, sc in the next 14 sts; repeat from * 8 more times. Then (sc, ch 24, sc) in the next st, and sc in the last st. Fasten off.
(10 tabs; 138 sts worked)
Check: 1 + 9 x 15 + 1 + 1 = 138. The tabs sit on sts 2, 17, 32 and so on through st 137, about 3 in (7.6 cm) apart. Each tab hangs about 2.25 in (5.7 cm) and fits a rod up to 1 in (2.5 cm) thick.
Why the math works: 34 sc per 7 in (17.8 cm) is 4.86 sc per inch, which matches the border gauge of 17 sc per 3.5 in (8.9 cm). So the edge neither ruffles nor pulls in. Each edge count is a straight multiple of its motif count, so every seam gets the same number of stitches. Round 2 adds only the 2 corner stitches on each side.
Final Blocking
- Weave in the remaining ends along the mesh chains, not through the petals.
- Soak the panel in cool water with a little wool wash for 15 minutes. Press the water out gently without wringing.
- Roll the panel in a towel to remove excess water.
- Lay it flat and pin the corners out to 29 in x 50 in (73.7 cm x 127.0 cm).
- Pin the motif junctions along the edges so each motif side measures 7 in (17.8 cm).
- Pin out the blue petal tips and open each petal window with a fingertip.
- Straighten the mesh so the joining lines run straight across and down.
- Let the panel dry completely for at least 24 hours before unpinning.
Final Quality-Control Checklist
- All 28 motifs measure 7 in (17.8 cm), ±0.25 in (0.6 cm).
- Each motif has 8 cream petals and 8 pointed blue petals.
- Every seam joins 4 sps to 4 sps.
- Each four-way junction meets at a single point.
- Border Round 1 has 136 / 238 / 136 / 238 sc.
- Border Round 2 has 138 / 240 / 138 / 240 hdc.
- There are 10 evenly spaced ch-24 tabs.
- The blocked panel measures 29 in x 50 in (73.7 cm x 127.0 cm).
Troubleshooting
Blue petals cup: The ch-8 arches are too tight. Chain more loosely, or go up one hook size for Round 4.
Cream petals ruffle: Check that Round 2 has 32 dc and the center measures 2 in (5.1 cm).
Motif isn’t square: Your dtr or ch-9 chains are too short. Keep the dtr loops even, and block the corners firmly.
Seams pucker: Your j-ch5 chains are tighter than your regular ch-5. Relax your hand when joining.
Border ruffles or pulls in: Recount to make sure you have exactly 34 sc per motif side, and adjust your hook size if the count is already right.
Uneven tabs: Recount the 14-st gaps between them.
Care
Hand wash in cold water and dry flat, reshaping the petal tips while damp. Never hang the panel while it is wet, or it will stretch.
Final Notes
Each size builds on the one before it. The 2 in (5.1 cm) center becomes a 3.5 in (8.9 cm) flower, then a 6 in (15.2 cm) star, then a 7 in (17.8 cm) square. Twenty-eight squares, joined 4 x 7, make 28 in x 49 in (71.1 cm x 124.5 cm). The 0.5 in (1.3 cm) border brings the panel to 29 in x 50 in (73.7 cm x 127.0 cm), and ten tabs hang it on the rod. If your first motif matches every checkpoint, the rest of the curtain will come out the right size.
Happy crocheting!