
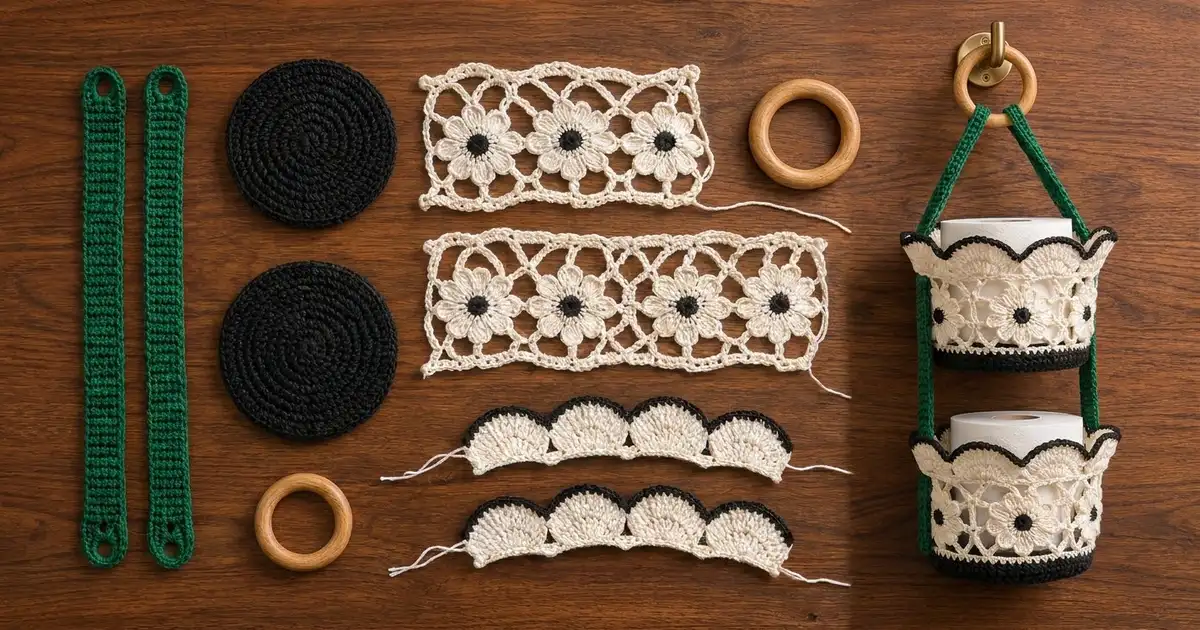
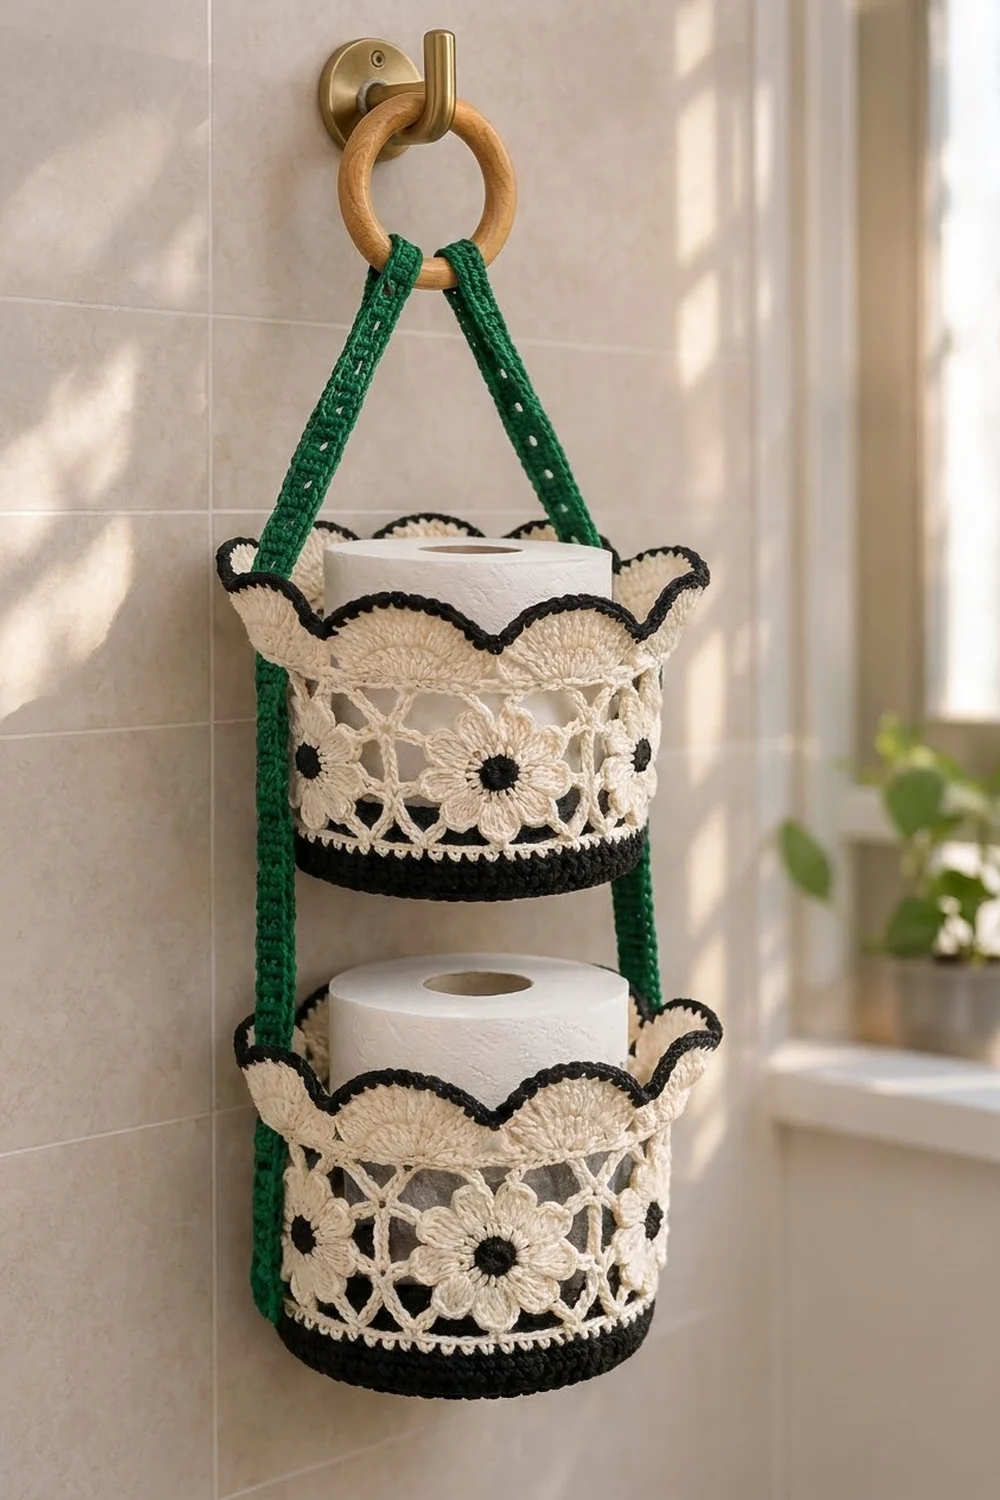
This hanging holder stacks two lacy baskets on a pair of green straps and hangs them from a wooden ring. Each basket has a solid black base, a band of cream daisies with black centers set in an open chain lattice, and a flared scalloped rim edged in black.
The colors are cream, black and forest green. The cream-and-black contrast makes the flowers stand out, and the green straps tie the two tiers together. The pattern uses US crochet terms throughout.
Each basket measures about 5.75 in (14.6 cm) across and 5.9 in (15.0 cm) tall, which fits a standard toilet roll. Each strap measures 22 in (55.9 cm) by 1.25 in (3.2 cm).
You make each basket in parts. First work a flat round base with a short wall. Next, join six flower motifs as you go into a ring and edge the ring top and bottom. Then make a shell-scallop rim strip. Crochet the parts together with single crochet, and sew both baskets to the straps.
Finished Size and Construction
- Finished basket: 5.75 in (14.6 cm) diameter × 5.9 in (15.0 cm) tall
- Skill level: Intermediate
- Terminology: US
- Yarn weight: Worsted (#4) cotton
- Hook: 4.0 mm (G-6)
- Number of pieces: 2 bases, 12 flower motifs, 2 rim strips, 2 straps (18 pieces in total)
- Layout: 6 motifs in a ring per basket; 2 baskets stacked on 2 straps
- Motif size: 3 in (7.6 cm) square
- Basket height before rim: 4.4 in (11.2 cm)
- Rim depth: 1.5 in (3.8 cm)
Materials
Use a smooth, firm worsted-weight cotton or cotton blend at about 180 m per 100 g. Cotton holds its shape and stands up to bathroom humidity.
- Cream: 150 g (270 m)
- Black: 130 g (234 m)
- Green: 70 g (126 m)
These quantities include a margin of about 15%.
Tools:
– 4.0 mm (G-6) hook
– Tapestry needle
– Stitch markers
– Wooden ring, 3 in (7.6 cm) outer diameter
– Scissors, tape measure, rust-proof pins
– Optional: wall hook with screws and anchors
Abbreviations (US Terms)
- ch – chain
- sl st – slip stitch
- sc – single crochet
- dc – double crochet
- BLO – back loop only
- sp(s) – space(s)
- st(s) – stitch(es)
- rep – repeat
Special stitches:
– Shell: 7 dc worked in the same stitch.
– Joining ch-5 (JAYG join): ch 2, sl st in the matching ch-5 sp of the finished motif, ch 2.
Gauge and Checkpoints
Gauge: 16 sc × 18 rows = 4 in (10.2 cm) in sc.
Make one flower motif before you start the full project. It should measure 3 in (7.6 cm) square when lightly pinned. If it’s larger, go down 0.5 mm in hook size. If it’s smaller, go up 0.5 mm.
Checkpoints:
– Base after Rnd 12: 5.75 in (14.6 cm) diameter.
– Base wall (Rnds 13–16): 0.9 in (2.3 cm) tall.
– Strip of 6 motifs, before closing the ring: 18 in (45.7 cm) long.
– Basket before rim: 4.4 in (11.2 cm) tall.
– Finished basket: 5.9 in (15.0 cm) tall.
If the base cups, your tension is too tight; go up a hook size. If it ruffles, go down a hook size. The base and the band must both measure 18 in (45.7 cm) around, or the joining round will pucker.

Base (Make 2, Black)
Work in joined rounds without turning. The ch 1 at the start of each round doesn’t count as a stitch.
Rnd 1: Magic ring, ch 1, 6 sc in ring, sl st to first sc. (6 sc)
Rnd 2: Ch 1, 2 sc in each st around, sl st to first sc. (12 sc)
Rnd 3: Ch 1, sc in next st, 2 sc in next st; rep 6 times total. (18 sc)
Rnds 4–12: Keep increasing by 6 stitches per round. In each round, work 1 more sc between increases than in the round before. Finish each round with sl st to first sc.
– Rnd 4: 24 sc
– Rnd 5: 30 sc
– Rnd 6: 36 sc
– Rnd 7: 42 sc
– Rnd 8: 48 sc
– Rnd 9: 54 sc
– Rnd 10: 60 sc
– Rnd 11: 66 sc
– Rnd 12: 72 sc
Stagger the increases in alternate rounds so the circle stays round. Checkpoint: 5.75 in (14.6 cm) across, which is 72 sts at 4 sts per inch, or 18 in (45.7 cm) around.
Rnd 13: Ch 1, sc BLO in each st around. (72 sc) This turns the work upward.
Rnds 14–16: Ch 1, sc in each st around. (72 sc)
Fasten off and leave a 10 in (25.4 cm) tail. Checkpoint: the wall measures 0.9 in (2.3 cm).
Flower Motifs (Make 12: 6 per Basket)
Rnd 1 (black): Magic ring, ch 1, 8 sc in ring, sl st to first sc. (8 sc) Fasten off.
Rnd 2 (cream): Join cream in any sc. Work (ch 3, 2 dc, ch 3, sl st) all in the same sc, then sl st in next sc. Rep from * 8 times total, ending with the last sl st in the joining st. (8 petals)
Rnd 3: Sl st in each of the next 3 ch and in the first dc. Ch 1, sc between the 2 dc of the same petal, ch 5. Sc between the 2 dc of the next petal, ch 5; rep 6 more times. Sl st to first sc. (8 sc, 8 ch-5 sps)
Rnd 4 (first motif only):
1. Sl st in each of the first 2 ch, then sl st into the ch-5 sp.
2. Ch 1, (sc, ch 5, sc) in the same sp. This is a corner.
3. Ch 5, sc in next sp, ch 5, (sc, ch 5, sc) in next sp; rep 2 more times.
4. Ch 5, sc in last sp, ch 5, sl st to first sc.
Count: 12 sc and 12 ch-5 sps. That’s 4 corner loops and 8 side sps, so each side has a corner loop, 2 side sps and a corner loop. Checkpoint: 3 in (7.6 cm) square.
Motifs 2–5 (join as you go): Work Rnds 1–3, then work Rnd 4 until you reach the first corner of the joining side.
1. At that corner, work sc, a Joining ch-5 to the neighbor’s corner loop, then sc.
2. Along the side, replace the next two ch-5 with Joining ch-5s.
3. At the next corner, work sc, a Joining ch-5, then sc.
That makes 4 joins per side. Finish the round as normal.
Motif 6: Join it to Motif 5 on one side and to Motif 1 on the opposite side. This closes the band into a ring of 6 motifs. Weave in the ends.
Band edging (cream), same on both open edges: Join cream in any corner loop. Ch 1, then for each motif work:
– 2 sc in the corner loop
– 4 sc in each of the 2 side sps
– 2 sc in the next corner loop
That’s 12 sc per motif. Sl st to first sc. (72 sc)
The edging count matches the base: 6 motifs × 12 sc = 72 sts.
Make All Pieces
For each basket you need:
– 1 base (black)
– 6 motifs (black centers, cream petals and lattice)
– 1 rim strip (cream with black edge)
For the full holder you need:
– Black: 2 bases, 12 motif centers, 2 rim edges
– Cream: 12 motifs, 4 band edgings, 2 rim strips
– Green: 2 straps
Layout of one band (ring), with M = motif and | = join:
| M1 | M2 | M3 | M4 | M5 | M6 | (M6 joins back to M1)
Hanging layout (front view):
        ( RING )
       /        \
   strap        strap
   [  UPPER BASKET  ]
   |  2 in gap      |
   [  LOWER BASKET  ]
Strap (Make 2, Green)
Work in rows and turn at the end of each row. The ch 1 doesn’t count as a stitch.
Row 1: Ch 6, sc in 2nd ch from hook and in each ch across. (5 sc)
Rows 2–3: Ch 1, turn, sc in each st across. (5 sc)
Row 4 (eyelet): Ch 1, turn, sc in first st, ch 3, skip 3 sts, sc in last st. (2 sc, 1 ch-3 sp)
Row 5: Ch 1, turn, sc in first st, 3 sc in ch-3 sp, sc in last st. (5 sc)
Rows 6–94: Ch 1, turn, sc in each st across. (5 sc)
Row 95: Repeat Row 4.
Row 96: Repeat Row 5.
Rows 97–99: Repeat Row 2.
Fasten off. Checkpoint: 99 rows at 18 rows per 4 in gives 22 in (55.9 cm). Five sts give a width of 1.25 in (3.2 cm).
Joining
Base to band:
1. Line up the base’s Rnd 16 with the band’s bottom edging. Put the wrong sides together and the base on the outside.
2. Join black through both layers. Ch 1, then sc through 1 st of each layer around, so each stitch is joined to its matching stitch. (72 sc)
3. Sl st to first sc and fasten off.
This leaves a neat black ridge where the base meets the band.
Tension: Keep these join stitches at normal gauge. If you pull them tight, the bottom of the basket will narrow. Checkpoint: the basket measures 4.4 in (11.2 cm) tall before the rim and 18 in (45.7 cm) around.
Border: Scalloped Rim (Make 2)
Border gauge: The foundation row works at 4 sc per inch. The shell row is about 1 in (2.5 cm) tall.
Row 1 (cream): Ch 74, sc in 2nd ch from hook and in each ch across. (73 sc)
Row 2: Ch 1, turn, sc in first st. Skip 2 sts, shell in next st, skip 2 sts, sc in next st; rep 12 times. (12 shells, 13 sc, 97 sts)
Shells land on sts 4, 10 and so on up to 70. The sc land on sts 7, 13 and so on up to 73, so the last sc lands exactly on the last stitch.
Row 3 (black): Join black in the first sc, ch 1, sc in the same st. Sc in each of the next 3 dc, 2 sc in the next dc, sc in each of the next 3 dc, sc in the next sc; rep 12 times. (109 sc: 12 × 8 + 13)
Fasten off.
Attach the rim:
1. Wrap the strip around the band’s top edging with the shells pointing up.
2. Overlap foundation st 73 on top of st 1 so they act as one stitch. That leaves 73 − 1 = 72 sts, which matches the band’s 72 sts.
3. Join cream and sc through each rim stitch and its matching band stitch. (72 sc)
4. Whipstitch the short ends of Rows 2–3 together.
Why the math works: The base, the band edgings and the rim all have 72 sts, and the 6-st repeat fits 72 exactly 12 times. Every join is one stitch to one stitch, so nothing ruffles or puckers. The shells add only width at the top of the rim, which makes it flare.
Assembly
- Choose two opposite joins on each basket: M1/M6 and M3/M4.
- Lower basket: Lay one strap over each chosen join. Line up the bottom of the strap with the base’s joining ridge so the Row 4 eyelet sits on the ridge. Whipstitch around the eyelet and along both long edges of the strap to the base ridge, the band edgings and the rim joining round.
- Upper basket: Leave a 2 in (5.1 cm) gap above the lower rim, so the bottom of the upper basket sits 7.9 in (20.1 cm) up from the bottom of the strap. Sew it on the same way.
- Ring: Pass each strap end through the ring from front to back. Fold it back 1.5 in (3.8 cm) so the Row 95 eyelet sits flat on the strap, then whipstitch around the eyelet to lock the fold.
Final Blocking
- Wet each basket lightly with a spray bottle.
- Stuff it with a toilet roll wrapped in a towel to set the round shape.
- Pin the scallops so they flare evenly.
- Pin the straps flat and straight on a towel.
- Let everything dry completely, which takes about 24 hours.
- Remove the pins and check the measurements again.
Final Quality-Control Checklist
- [ ] Each base measures 5.75 in (14.6 cm) across and lies flat.
- [ ] All 12 motifs measure 3 in (7.6 cm) square.
- [ ] Each band and base has 72 sts per edge.
- [ ] Each rim has 12 even shells with a 109-st black edge.
- [ ] Each basket measures 5.9 in (15.0 cm) tall.
- [ ] Both straps measure 22 in (55.9 cm) and are the same length.
- [ ] The baskets hang level with a 2 in (5.1 cm) gap.
- [ ] All ends are woven in securely.
Troubleshooting
- Base cups or ruffles: Recount the increases; you should have exactly 6 per round. Change hook size if the count is right.
- Band too loose for the base: The motifs are oversized. Remake them with a smaller hook.
- Rim leans inward: The joining round is too tight. Rework it more loosely.
- Shells uneven: Check that you skip exactly 2 sts on each side of every shell.
- Holder tilts: Make sure the two straps are identical in length and the folds are equal.
Care
Hand wash in cool water and lay flat to dry, reshaping the baskets around a roll. Don’t tumble dry.
Final Notes
The measurements build on each other. A 3 in (7.6 cm) motif gives an 18 in (45.7 cm) band. That band matches the 72-st, 5.75 in (14.6 cm) base. The base and band together make a 4.4 in (11.2 cm) basket, and the 1.5 in (3.8 cm) rim brings it to 5.9 in (15.0 cm). Two baskets hang on 22 in (55.9 cm) straps from a 3 in (7.6 cm) ring. If you check each stage as you go, the finished holder will hang level.
Happy crocheting!