

This two-tier hanging basket is built for real use. Two firm oval baskets hang one above the other on two lacy straps, and the straps loop over wooden rings on a dowel. In a bathroom it holds two toilet rolls per tier, and it works just as well for yarn, washcloths or small toys.
Everything is made in one soft cream color. The base is solid single crochet, so each basket keeps its shape. The walls get their character from a band of six-petal flowers set in a chain lattice and a rim of small round bobble picots. The look is calm and a little vintage, and it suits light wood and white tile.
The pattern uses US crochet terms. Each basket measures 10 in x 5 in (25.4 x 12.7 cm) at the base and 4 in (10.2 cm) tall. The assembled organizer hangs about 21 in (53.3 cm) from the dowel to the bottom of the lower basket.
Construction is simple. You crochet each oval base in joined rounds, turn the wall up with a back-loop round, and work the wall straight up, including the flower band and the bobble border. The straps are worked flat in rows and then sewn to the curved ends of both baskets.
Finished Size and Construction
- Basket size: 10 in x 5 in (25.4 x 12.7 cm) base, 4 in (10.2 cm) tall
- Assembled length: about 21 in (53.3 cm) below the dowel
- Skill level: Intermediate
- Terminology: US
- Yarn weight: Worsted (#4) cotton
- Hook: 4.5 mm (US 7)
- Number of pieces: 4 crocheted (2 baskets, 2 straps), plus hardware
- Layout: 2 baskets stacked vertically, 5 in (12.7 cm) apart, on 2 straps
- Strap size: 1.25 in x 20.5 in (3.2 x 52.1 cm)
- Wall height before border: 3.5 in (8.9 cm)
- Border depth: 0.5 in (1.3 cm)
Materials
Use a smooth, firm 100% cotton or cotton blend in worsted weight. Cotton holds the basket shape and handles damp rooms well. Avoid soft acrylics, because the walls will sag.
- Cream: about 180 g / 300 yd (274 m)
The quantity includes a margin of roughly 15% for gauge swatches and variations in tension.
Tools and hardware:
– 4.5 mm (US 7) crochet hook
– Tapestry needle
– 4 locking stitch markers
– Scissors and a measuring tape
– 1 wooden dowel, 14 in (35.6 cm) long, 0.75 in (1.9 cm) diameter, with wall brackets
– 2 wooden rings, 2 in (5.1 cm) diameter
Abbreviations (US Terms)
- ch – chain
- sl st – slip stitch
- sc – single crochet
- dc – double crochet
- tr – treble crochet
- BLO – back loop only
- st(s) – stitch(es)
- sk – skip
- sp – space
- inc – 2 sc in the same st
Special stitches
Cluster (cl): [yo twice, insert hook in the indicated sp, pull up a loop, (yo, pull through 2 loops) twice] 2 times, yo, pull through all 3 loops.
Lower petal cluster (LPC): You work this over 5 sts. [Yo twice, insert hook in the indicated st, pull up a loop, (yo, pull through 2 loops) twice] 2 times in the 1st st, then 2 times in the 3rd st, then 2 times in the 5th st. You now have 7 loops on the hook. Yo and pull through all 7. This makes 3 petals that meet at the top.
Bobble picot (BP): Ch 3. [Yo, insert hook in the 3rd ch from hook, pull up a loop, yo, pull through 2 loops] 4 times, yo, pull through all 5 loops, then sl st in the sc at the base of the ch-3.
Gauge and Checkpoints
Gauge: 16 sc and 18 sc rounds = 4 in (10.2 cm).
Strap gauge: 8 strap rows = 3 in (7.6 cm).
Make one basket completely before starting the second. That basket is your real gauge test.
Checkpoints:
– After base Rnd 5: about 7.5 in x 2.25 in (19.1 x 5.7 cm)
– After base Rnd 11: 10 in x 5 in (25.4 x 12.7 cm)
– After Rnd 17: wall about 1.3 in (3.3 cm) tall
– After Rnd 20 (flower band): wall about 2.8 in (7.1 cm) tall
– After Rnd 23: wall 3.5 in (8.9 cm) tall
– After the border: wall 4 in (10.2 cm) tall
If the base is too big, change to a 4 mm hook. If it’s too small or feels stiff like cardboard, change to a 5 mm hook. If the base ruffles at the right size, your tension is loose on the increase rounds, so tighten up only on those.
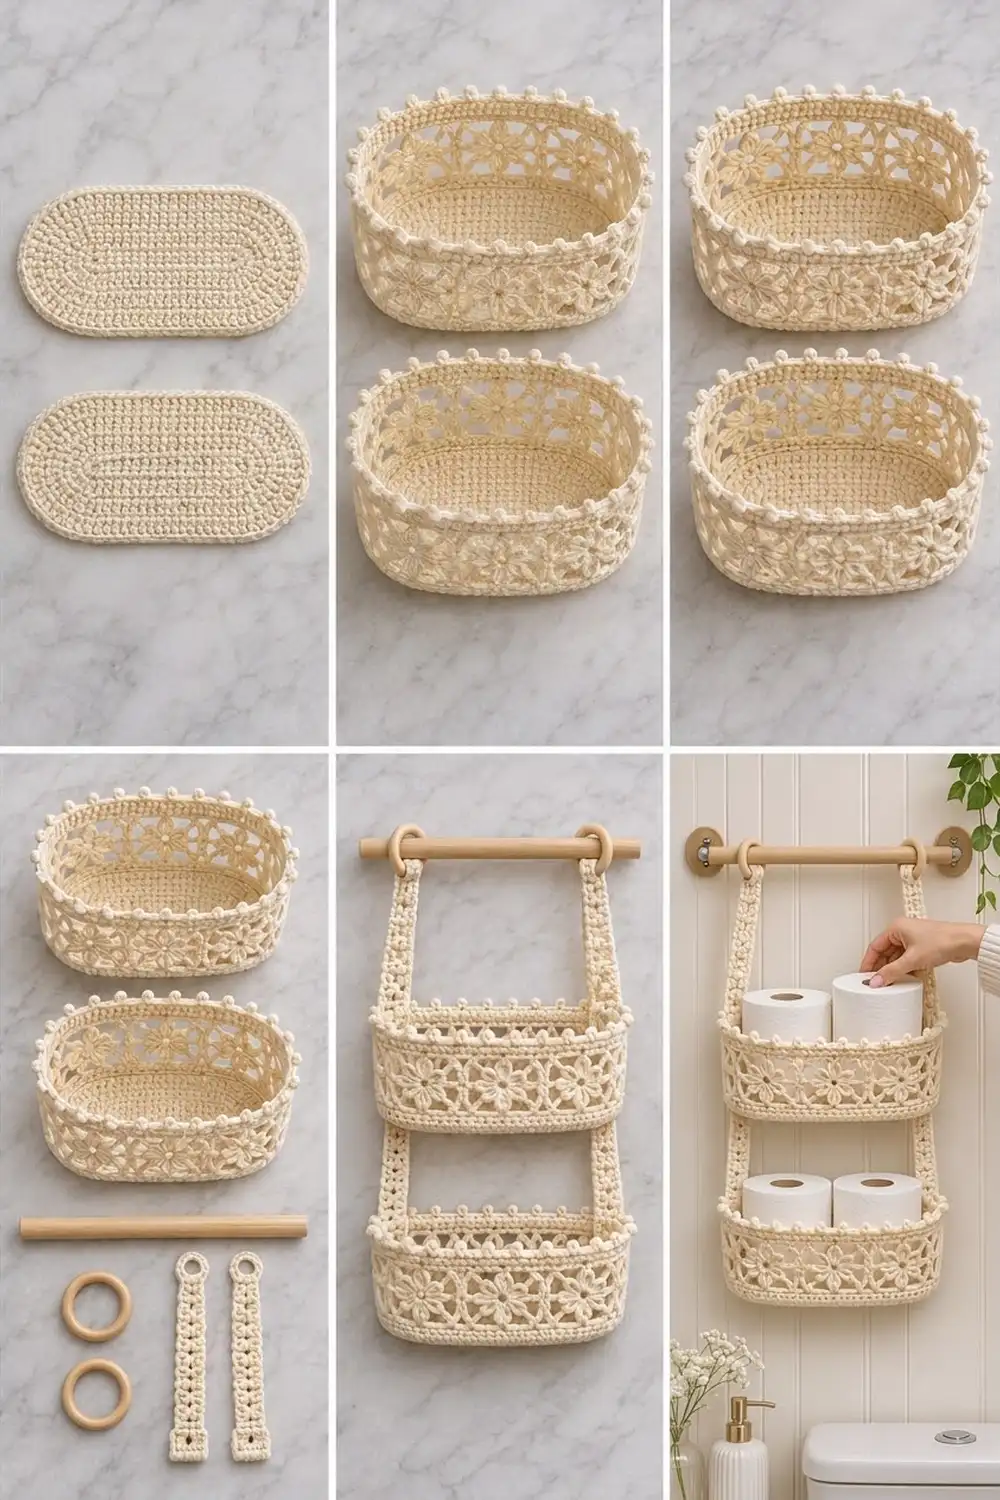
Basket (Make 2)
Work in joined rounds. Ch 1 at the start of each round doesn’t count as a st. Join each round with a sl st to the first st.
Oval Base
Ch 24.
Rnd 1: 3 sc in 2nd ch from hook, sc in next 21 ch, 3 sc in last ch. Working in the free loops on the other side of the chain, sc in next 21 ch. Join. (48 sts: 3 per end, 21 per straight side)
Rnd 2: Ch 1, inc in each of next 3 sts, sc in next 21 sts, inc in each of next 3 sts, sc in next 21 sts. Join. (54 sts)
Rnd 3: Ch 1, [sc in next st, inc] 3 times, sc in next 21 sts, [sc in next st, inc] 3 times, sc in next 21 sts. Join. (60 sts)
Rnds 4–11: Ch 1, [sc in next X sts, inc] 3 times, sc in next 21 sts, [sc in next X sts, inc] 3 times, sc in next 21 sts. Join. X is 2 in Rnd 4 and goes up by 1 each round, so X is 9 in Rnd 11.
- Rnd 4: 66 sts
- Rnd 5: 72 sts
- Rnd 6: 78 sts
- Rnd 7: 84 sts
- Rnd 8: 90 sts
- Rnd 9: 96 sts
- Rnd 10: 102 sts
- Rnd 11: 108 sts (33 per end, 21 per straight side)
Each straight side keeps exactly 21 sts. All the growth happens on the curved ends: 6 sts per round, 3 per end.
Wall
Rnd 12: Ch 1, sc in BLO of each st around. Join. (108 sts) The front loops left unworked make a crisp fold line, so the wall stands up.
Rnds 13–17: Ch 1, sc in each st around. Join. (108 sts)
Flower Band
The band uses a 9-st repeat, worked 12 times (12 × 9 = 108). Each flower is about 2.25 in (5.7 cm) wide.
Rnd 18: Ch 4 (counts as tr), ch 3, sk next st, LPC over next 5 sts, ch 1 tightly (this is the flower’s eye), ch 3, sk next st, tr in next st. Tr in next st, ch 3, sk next st, LPC over next 5 sts, ch 1 tightly, ch 3, sk next st, tr in next st. Repeat from * 10 more times. Join to top of beg ch-4. (12 LPCs, 24 tr)*
Check the repeat: 1 tr + 1 sk + 5 (LPC) + 1 sk + 1 tr = 9 sts. Each pair of tr between flowers forms a vertical lattice bar.
Rnd 19: Ch 4 (counts as tr) in the join, ch 2, [cl, ch 2, cl, ch 2, cl] in next eye, ch 2. Tr in the sp between the next pair of tr, ch 2, [cl, ch 2, cl, ch 2, cl] in next eye, ch 2. Repeat from * 10 more times. Join to top of beg ch-4. (12 tr, 36 cl, 48 ch-2 sps)*
The three upper petals spread out from the eye and meet the three lower petals from Rnd 18, which makes a six-petal flower.
Rnd 20: Ch 1. Sc in tr, sc in ch-2 sp, sc in cl, sc in ch-2 sp, 2 sc in center cl, sc in ch-2 sp, sc in cl, sc in ch-2 sp. Repeat from * 11 more times. Join. (108 sts)*
Per repeat that’s 1 + 1 + 1 + 1 + 2 + 1 + 1 + 1 = 9 sts, so the count comes back to exactly 108.
Rnds 21–23: Ch 1, sc in each st around. Join. (108 sts)
The wall is now 3.5 in (8.9 cm) tall. Before the border, mark the strap positions: place markers in sts 15 and 19 (the center 5 sts of end 1) and sts 69 and 73 (the center 5 sts of end 2).
Border
Border gauge: the same as the body, 16 sc = 4 in (10.2 cm). Keep the border at the body tension. A tight border pulls the rim inward, and a loose one flares it.
The rim has 4 sections: 2 curved ends of 33 sts each and 2 straight sides of 21 sts each. These are the same counts as base Rnd 11, because the wall never increases. Rnd 1 of the border starts at the first st of end 1.
Border Rnd 1 (Rnd 24): Ch 1, sc in each st around. Join.
– End 1: 33 sc
– Straight side: 21 sc
– End 2: 33 sc
– Straight side: 21 sc
– Total: 108 sts
Border Rnd 2 (Rnd 25): Ch 1, sc in next 2 sts, sc in next st, BP. Repeat from * 35 more times. Join and fasten off.
– End 1: 11 BP
– Straight side: 7 BP
– End 2: 11 BP
– Straight side: 7 BP
– Total: 108 sc + 36 BP*
Why the math works: The bobble repeat is 3 sts. Both 33 and 21 divide evenly by 3, so every section ends on a complete repeat. You never get a half-repeat or a crowded bobble at a corner of the curve, and the picots sit about 0.75 in (1.9 cm) apart all the way around the 27 in (68.6 cm) rim.
Strap (Make 2)
Ch 6.
Row 1: Sc in 2nd ch from hook and in each ch across. Turn. (5 sts)
Row 2: Ch 3 (counts as dc), dc in next st, ch 1, sk next st, dc in last 2 sts. Turn. (4 dc + 1 ch-1 sp = 5 sts)
Row 3: Ch 1, sc in first 2 sts, sc in ch-1 sp, sc in last 2 sts. Turn. (5 sts)
Rows 4–55: Repeat Rows 2–3 another 26 times. Fasten off, leaving a 30 in (76.2 cm) tail.
That gives 27 eyelet rows and 28 sc rows. The strap measures 1.25 in x 20.5 in (3.2 x 52.1 cm).
Make All Pieces
All pieces are cream:
– 2 baskets: about 75 g each
– 2 straps: about 10 g each
Layout grid:
  ring ======== dowel ======== ring
   |                            |
 strap  (6 in / 15.2 cm free)  strap
   |                            |
  [end ----- Basket 1 ----- end]
   |                            |
 strap  (5 in / 12.7 cm gap)   strap
   |                            |
  [end ----- Basket 2 ----- end]
Joining
Method: Whipstitch with the strap tail through both loops of the wall stitches.
- Fold the top 1.5 in (3.8 cm) of each strap over a ring and whipstitch the strap end flat to the back of the strap.
- Measure 6 in (15.2 cm) down from the fold. Lay this point at the top of Basket 1, centered over the marked sts 15–19.
- Stitch-to-stitch logic: The 5 strap sts sit exactly over the 5 marked rim sts. Whipstitch down both long edges of the strap. Sew 1 stitch into each strap row-end and catch the wall stitch directly beside it. The strap runs over 4 in (10.2 cm) of wall, so you’ll match about 11 strap rows to the 14 wall rounds (Rnds 12–25). Stop at the BLO fold line at Rnd 12.
- Leave 5 in (12.7 cm) of strap free, then sew the remaining 4 in (10.2 cm) to Basket 2 in the same way.
- Repeat on the opposite ends with the second strap, at sts 69–73.
Tension: Pull each whipstitch just snug. If you sew too tightly, the wall puckers. If you sew too loosely, the basket tips forward under weight.
Size checkpoint: Hold it up by the rings. Both baskets should hang level, 5 in (12.7 cm) apart, about 21 in (53.3 cm) below the dowel.
Final Blocking
- Spray each basket lightly with water until it’s damp but not soaked.
- Stuff each basket firmly with a towel shaped to 10 in x 5 in (25.4 x 12.7 cm).
- Push the walls upright and straighten the vertical lattice bars.
- Pinch each bobble picot round and upright.
- Lay the straps flat and pin them to 1.25 in (3.2 cm) wide.
- Let everything dry completely, for 24 hours, before hanging it.
Final Quality-Control Checklist
- Each base is 10 in x 5 in (25.4 x 12.7 cm) and lies flat
- The wall is 4 in (10.2 cm) tall and vertical all the way around
- There are 12 complete flowers per basket
- There are 36 bobble picots per basket: 11 on each end, 7 on each side
- The straps are centered on the end sts and the same length on both sides
- The 5 in (12.7 cm) gap between baskets is equal on both straps
- All tails are woven in securely
Troubleshooting
The base cups upward. Too few stitches for your tension. Go up a hook size, or add 1 extra increase round.
The base ruffles. The increases are too loose. Go down a hook size for Rnds 2–11.
The flower count is off. Check that you have exactly 108 sts at Rnd 17 before starting the band.
The petals are floppy. Pull the ch-1 eye tight after each LPC.
The basket tilts. The straps aren’t centered or aren’t the same length. Re-sew them to the exact marked sts.
The rim flares. The border tension is too loose. Rework Border Rnd 1 with a 4 mm hook.
Care
Hand wash in cool water with mild soap, press out the water in a towel, and dry the baskets reshaped over a folded towel. Wipe the wooden parts with a dry cloth only.
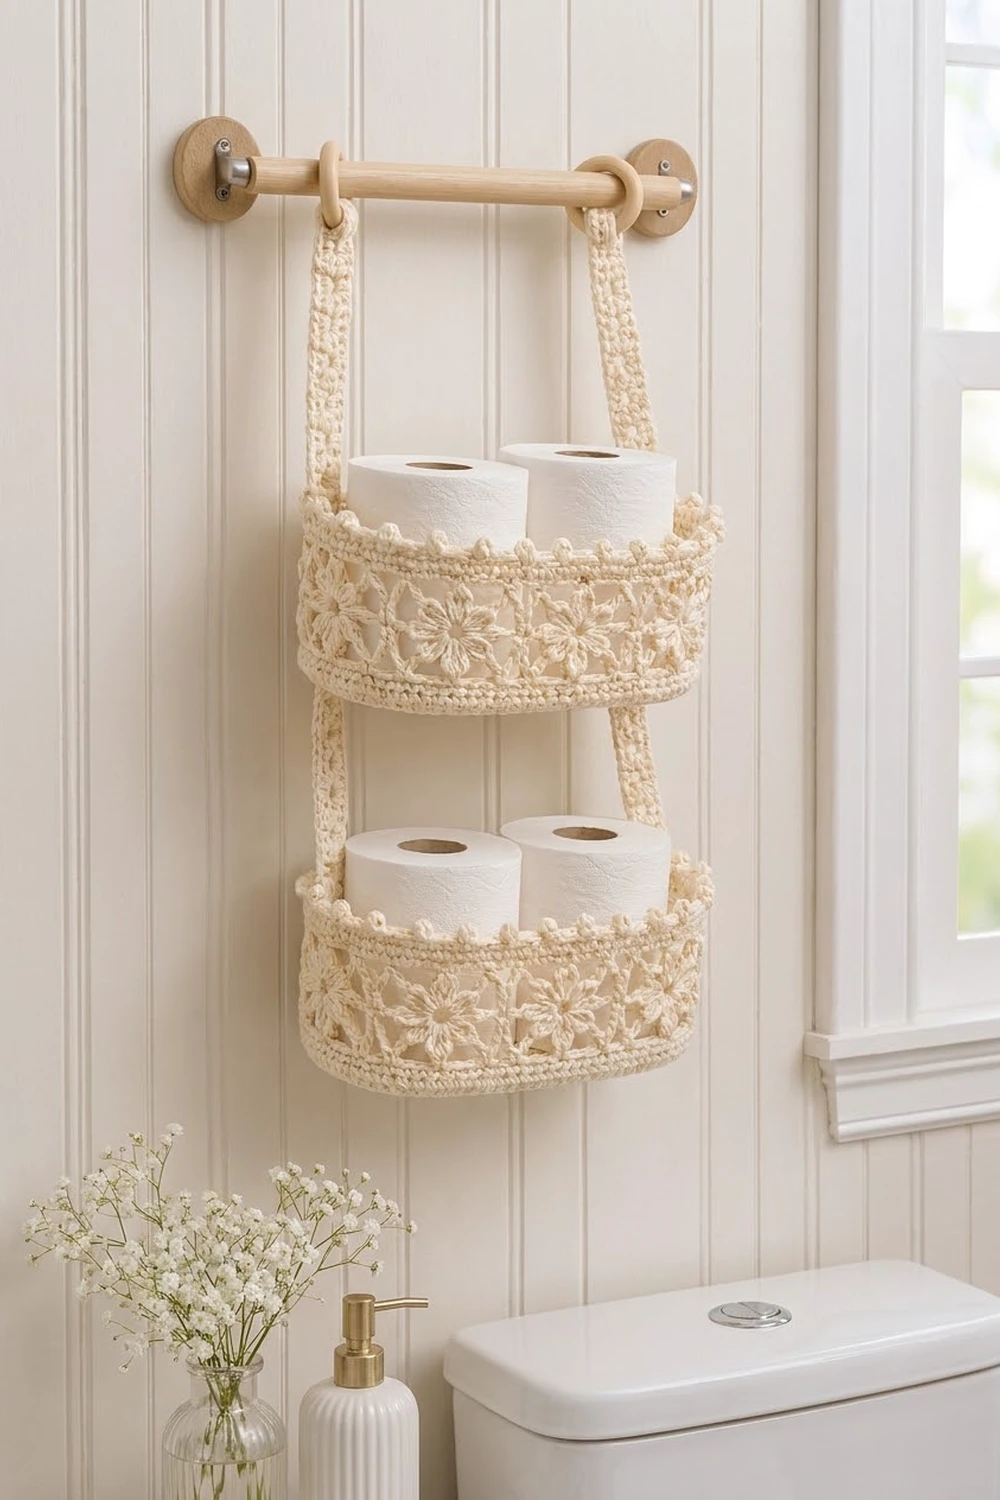
Final Notes
The measurement chain is straightforward. A 108-st base at 16 sc per 4 in (10.2 cm) gives a 10 in x 5 in (25.4 x 12.7 cm) oval. The wall keeps those 108 sts, so it rises straight to 3.5 in (8.9 cm). Twelve 9-st flowers and thirty-six 3-st bobble repeats divide that count evenly, and the border brings each basket to 4 in (10.2 cm). Two 20.5 in (52.1 cm) straps join everything into a 21 in (53.3 cm) hanging organizer. If your gauge matches, every piece fits.
Happy crocheting!