

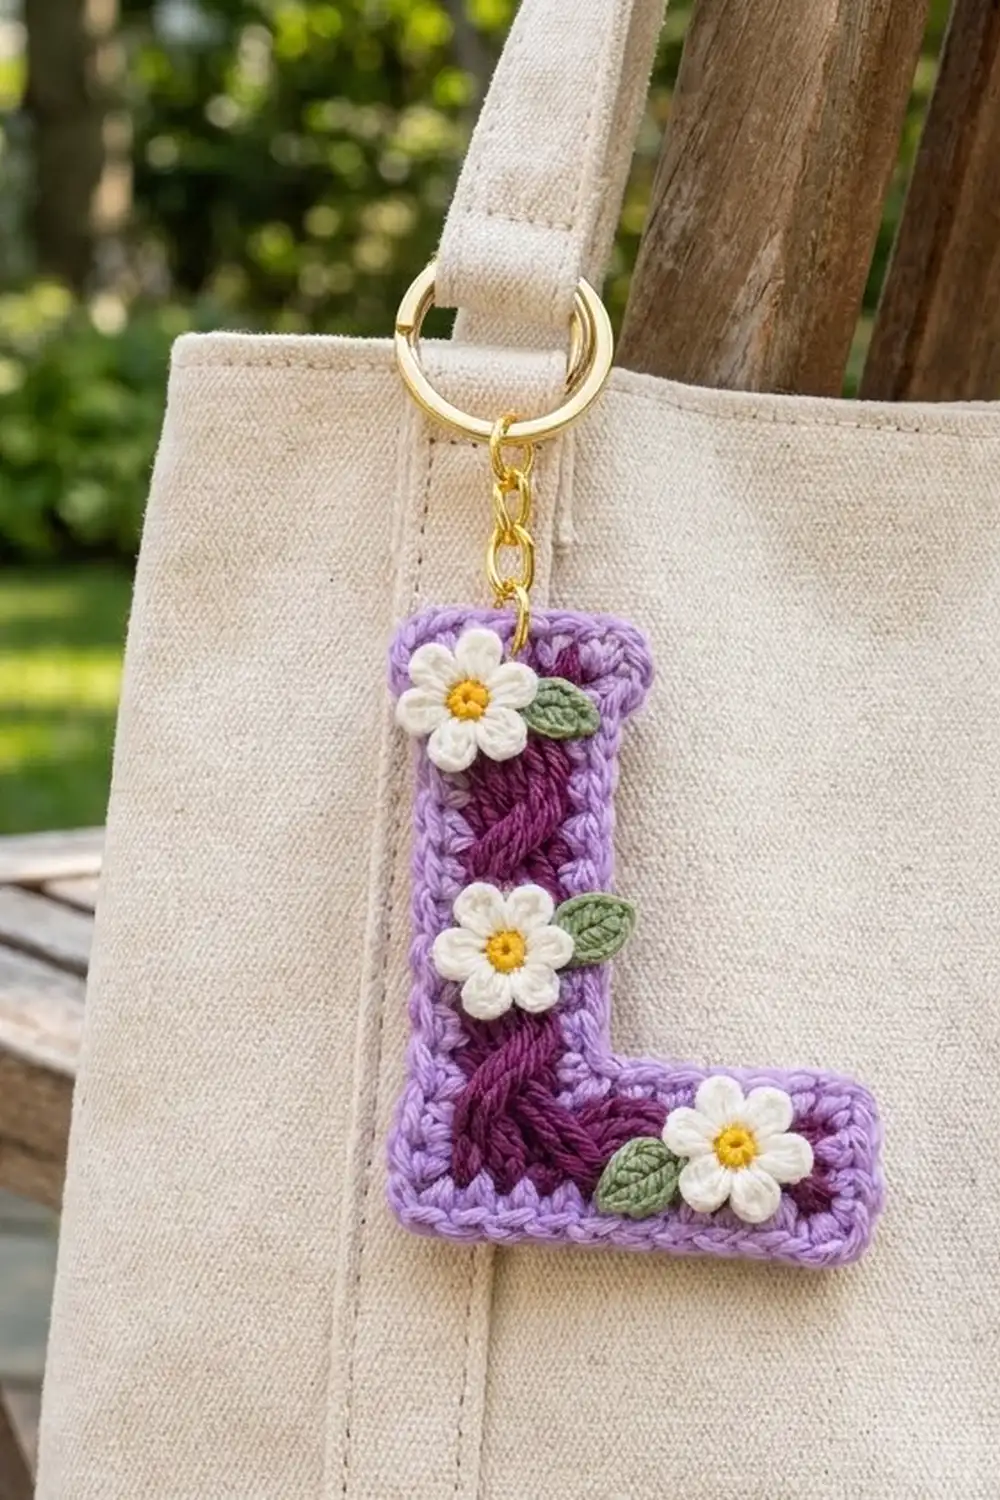
This little letter L keychain combines a deep plum rope cable with a soft lavender border and three tiny white daisies. It’s a small project that works up in one sitting, and it makes a personal gift for anyone whose name starts with L.
The cable runs down the stem of the letter and then turns into the foot, so the twist seems to follow the letter’s shape. A tight two-round border in lavender keeps the edges crisp. Small white flowers with yellow centers and sage-green leaves add a cottage-garden touch.
The pattern uses US crochet terms. The finished letter is about 3.0 in (7.6 cm) wide and 3.8 in (9.7 cm) tall.
Construction is simple. You work the plum cable core in rows from the top of the stem down, then pick up stitches along the side to work the foot. Next, you add two border rounds in lavender. Last, you make the flowers and leaves, sew them on and attach the key ring.
Finished Size and Construction
- Finished size: 3.0 in (7.6 cm) wide x 3.8 in (9.7 cm) tall
- Skill level: Intermediate (front post cables, picking up stitches)
- Terminology: US crochet terms
- Yarn weight: DK (light worsted, #3), cotton or cotton blend
- Hooks: 3.5 mm (US E-4) for the letter; 2.75 mm (US C-2) for the flowers and leaves
- Number of pieces: 1 letter body, plus 3 flowers and 3 leaves sewn on as appliqués
- Layout: a single L shape; no joining needed
- Core size (before border): 2.2 in (5.6 cm) wide x 3.0 in (7.6 cm) tall; the stem is 1.2 in (3.0 cm) wide
- Border depth: 2 rounds, about 0.4 in (1.0 cm) on every side
Materials
Use a smooth DK cotton so the cable stands out and the keychain keeps its shape with daily use. Avoid fuzzy yarns, because they blur the twist. The quantities below are based on DK cotton at about 50 g = 115 m.
- Plum (Color A): 10 g, about 23 m, for the cable core
- Light lavender (Color B): 5 g, about 12 m, for the border
- White (Color C): 3 g, about 7 m, for the petals
- Golden yellow (Color D): 1 g, about 2.3 m, for the flower centers
- Sage green (Color E): 2 g, about 4.6 m, for the leaves
Tools:
– 3.5 mm (US E-4) and 2.75 mm (US C-2) crochet hooks
– 1 gold split key ring, 1.0 in (2.5 cm), with a short chain about 1.2 in (3.0 cm) long
– 1 gold jump ring, 0.3 in (0.8 cm)
– 2 pairs of flat-nose pliers
– Tapestry needle, scissors and 2 stitch markers
– Rustproof pins and a blocking mat
All quantities include a small safety margin for gauge swatching and weaving in ends.
Abbreviations (US Terms)
- ch – chain
- sl st – slip stitch
- sc – single crochet
- hdc – half double crochet
- dc – double crochet
- fpdc – front post double crochet
- fptr – front post treble crochet
- sc2tog – single crochet 2 together
- sc3tog – single crochet 3 together
- MR – magic ring
- st(s) – stitch(es)
- RS / WS – right side / wrong side
Special stitch – Rope Cross (RC), worked over 4 sts: Skip the next 2 post sts 2 rows below. Work fptr around each of the next 2 post sts 2 rows below. Then, working in front of the 2 fptr you just made, work fptr around each of the 2 skipped post sts. This makes 4 sts.
Post-stitch rule: Each time you work a post stitch, skip the sc of the current row that sits behind it. Your row count always stays at 6.
Gauge and Checkpoints
Gauge: 5 sc and 6 rows = 1 in (2.5 cm) on the 3.5 mm hook. In other words, 10 sts and 12 rows = 2 in (5.1 cm).
The stem is your test piece. Work the first 6 rows, lay the piece flat and measure it before you go on.
Checkpoints:
1. After stem Row 6: 1.2 in (3.0 cm) wide x 1.0 in (2.5 cm) tall.
2. After stem Row 18: 1.2 in (3.0 cm) wide x 3.0 in (7.6 cm) tall.
3. After the foot: the core measures 2.2 in (5.6 cm) wide x 3.0 in (7.6 cm) tall.
4. After border Round 1: about 2.6 in (6.6 cm) x 3.4 in (8.6 cm).
5. After border Round 2: 3.0 in (7.6 cm) x 3.8 in (9.7 cm).
If the piece is too big: go down one hook size (3.25 mm) and restart.
If it is too small: go up to a 3.75 mm hook.
The cable pulls the stem in slightly. If your stem is up to 0.1 in (0.3 cm) narrower than 1.2 in (3.0 cm), that’s normal, and blocking will open it up.
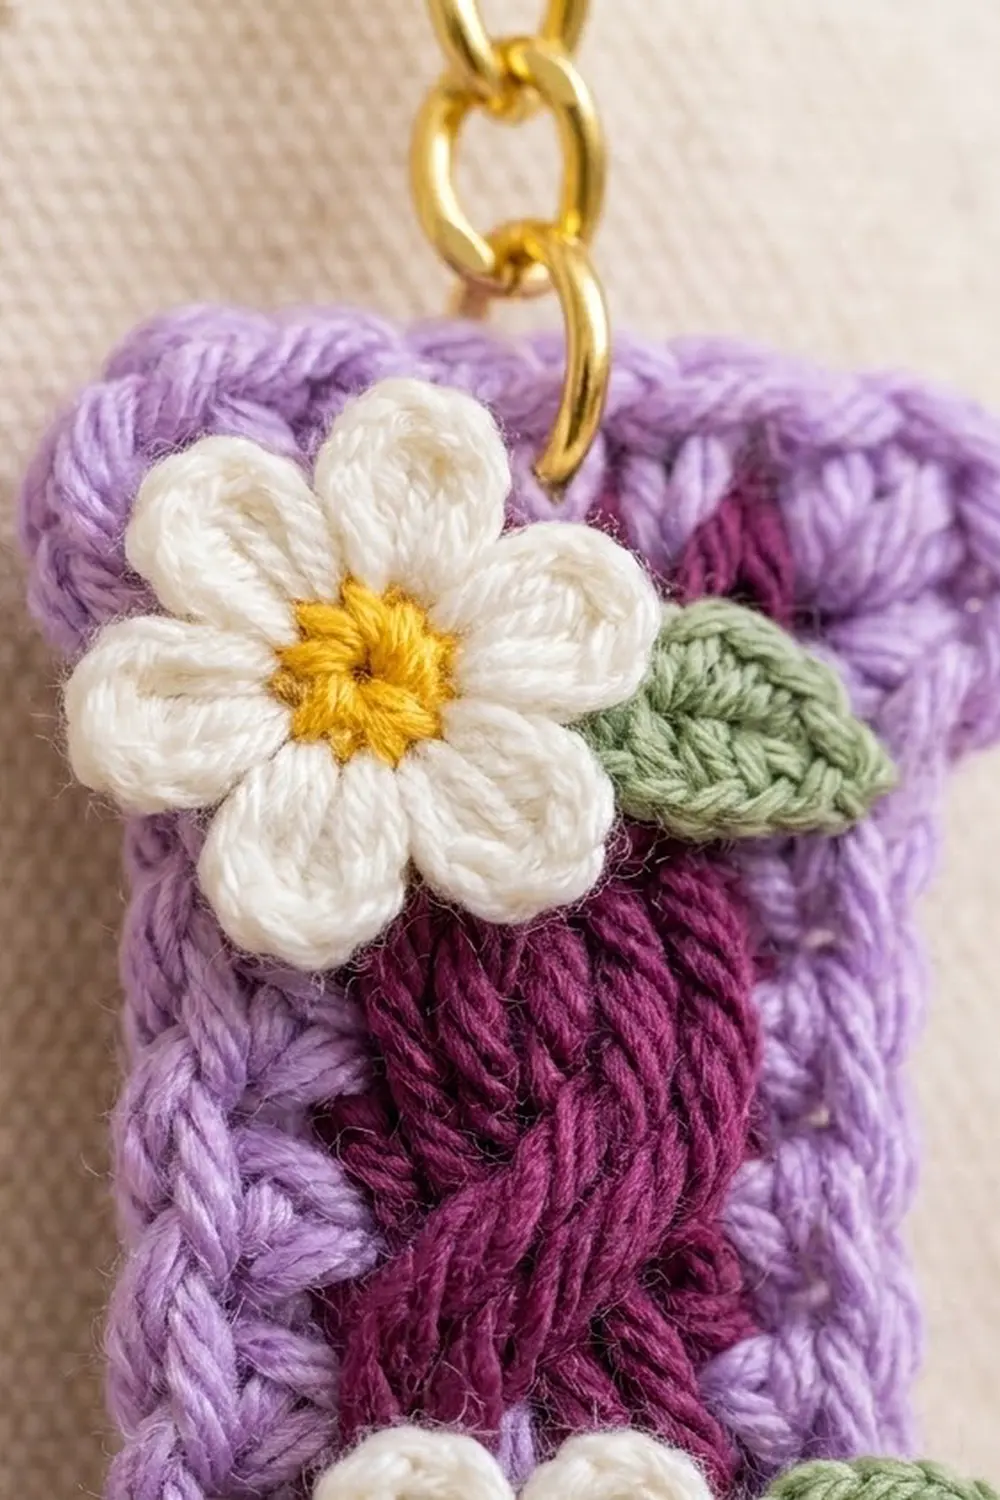
Part 1: Stem (Color A, 3.5 mm hook)
You work the stem from the top down. Hold it with Row 1 at the top. With the RS facing you, the foot will grow from the right-hand edge.
Row 1 (WS): Ch 7. Sc in the 2nd ch from hook and in each ch across. Turn. (6 sts)
Row 2 (RS): Ch 1. Sc in the first st, fpdc around each of the next 4 sts of Row 1, sc in the last st. Turn. (6 sts: 2 sc, 4 fpdc)
Row 3 (WS): Ch 1, sc in each st across. Turn. (6 sts)
Row 4 (RS, cross row): Ch 1. Sc in the first st, work RC around the 4 fpdc of Row 2, sc in the last st. Turn. (6 sts)
Row 5 (WS): Ch 1, sc in each st across. Turn. (6 sts)
Row 6 (RS): Ch 1. Sc in the first st, fpdc around each of the 4 fptr 2 rows below, sc in the last st. Turn. (6 sts)
Check your gauge now: the piece should be 1.0 in (2.5 cm) tall.
Rows 7–18: Repeat Rows 3–6 three more times. (6 sts in every row)
Each RS row alternates between a straight post row (Rows 10 and 14) and an RC cross row (Rows 8, 12 and 16). Row 18 is a straight RS post row.
Fasten off. The stem now has 18 rows, 4 rope crosses, and measures 1.2 in (3.0 cm) x 3.0 in (7.6 cm).
Part 2: Foot (Color A, 3.5 mm hook)
The foot is picked up along the right-hand edge of the bottom of the stem, across the ends of Rows 12–18. Those 7 row-ends measure about 1.2 in (3.0 cm), so 6 picked-up stitches match the stem width.
Row F1 (WS): With the WS facing, join plum at the row-end of Row 18 on the foot edge. Work 1 sc into each row-end from Row 18 to Row 12, skipping the row-end of Row 15. Turn. (6 sts)
Row F2 (RS): Ch 1. Sc in the first st, fpdc around each of the next 4 sts of Row F1, sc in the last st. Turn. (6 sts)
Row F3 (WS): Ch 1, sc across. Turn. (6 sts)
Row F4 (RS): Ch 1. Sc in the first st, work RC around the 4 fpdc of Row F2, sc in the last st. Turn. (6 sts)
Row F5 (WS): Ch 1, sc across. Turn. (6 sts)
Row F6 (RS): Ch 1. Sc in the first st, fpdc around each of the 4 fptr 2 rows below, sc in the last st. (6 sts)
Fasten off and weave in the ends.
The foot is 1.0 in (2.5 cm) long, so the core now measures 2.2 in (5.6 cm) wide x 3.0 in (7.6 cm) tall.
Part 3: Flowers (make 3, 2.75 mm hook)
Center (Color D): Work 5 sc into a MR, pull it closed and sl st to the first sc. Fasten off. (5 sts)
Petals (Color C): Join white in any sc of the center. In each of the 5 sts, work (sl st, ch 2, 2 dc, ch 2, sl st). This makes 5 petals.
Fasten off, leaving an 8 in (20.3 cm) tail for sewing. Each flower is about 1.0 in (2.5 cm) across.
Part 4: Leaves (make 3, 2.75 mm hook, Color E)
Ch 5.
– Side 1: Sc in the 2nd ch from hook, then hdc in each of the next 2 ch. (3 sts)
– Tip: (sc, ch 2, sc) in the last ch.
– Side 2: Working into the underside of the chain, hdc in each of the next 2 ch, then sc in the next ch. (3 sts)
– Sl st to the first sc.
Fasten off, leaving a tail for sewing. Each leaf is about 0.8 in (2.0 cm) long.
Border (Color B, 3.5 mm hook)
Border gauge: each sc round adds about 0.2 in (0.5 cm) on every side.
Row-ends are worked at a 4-to-5 ratio: 4 sc for every 5 row-ends. Because 6 rows are 1 in (2.5 cm) tall but only 5 sc fit into 1 in, this ratio keeps the long sides from rippling. The side counts below do not include corner stitches; corners are listed separately.
Round 1: Hold the RS facing you with Row 1 at the top, and work clockwise.
- Top edge: Join lavender with sc in the 2nd free loop of the foundation chain. Sc in the next 3 loops (4 sts). Work 3 sc in the last loop for the top-right corner.
- Upper right edge of the stem: Working down the row-ends of Rows 2–10, [sc in the next 4 row-ends, skip 1 row-end], then sc in the next 4 row-ends. (8 sts)
- Inner corner: Sc2tog, inserting the hook first into the row-end of Row 11 and then into the row-end of Row F1. (1 st)
- Top of the foot: Sc in the row-ends of Rows F2–F5. (4 sts)
- Right end of the foot: Work 3 sc in the first st of Row F6 (corner). Sc in the next 4 sts (4 sts). Work 3 sc in the last st (corner).
- Bottom edge: Sc in the row-ends of Rows F5–F2 (4 sts) and skip the row-end of F1. Sc in the next 5 sts of Row 18 (5 sts). Work 3 sc in the last st of Row 18 for the bottom-left corner. This edge has 9 sts in total.
- Left edge: Working up the row-ends of Rows 17–2, [sc in the next 4 row-ends, skip 1] three times, then sc in the last row-end. (13 sts)
- Finish: Work 3 sc in the first foundation loop (top-left corner). Sl st to the first sc.
Round 1 total: 58 sts. That’s 43 side sts (4 + 8 + 1 + 4 + 4 + 9 + 13) plus 5 corners x 3 sts = 15 corner sts.
Round 2: Ch 1. Sc in each st around, with these changes:
– In the center st of each 3-sc corner, work 3 sc.
– At the inner corner, work sc3tog over the st before the sc2tog, the sc2tog itself and the st after it.
Sl st to the first sc and fasten off.
Round 2 per side:
| Section | Sts |
|---|---|
| Top edge | 6 |
| Upper right edge | 8 |
| Inner corner (sc3tog) | 1 |
| Top of foot | 4 |
| Right end of foot | 6 |
| Bottom edge | 11 |
| Left edge | 15 |
| 5 corners x 3 | 15 |
| Total | 66 |
Why the math works:
– Each outer (convex) corner adds 2 sts per round. One goes to each neighboring side, which is why the top edge grows from 4 to 6.
– The inner (concave) corner needs the opposite, so sc3tog removes 2 sts there.
– Check: 58 + (5 x 2) − 2 = 66.
– The two sides next to the inner corner (8 and 4) each gain 1 st from their outer corner and lose 1 st to the sc3tog, so their counts stay the same.
Final Blocking
- Lightly mist the letter with water, or steam it from 1 in (2.5 cm) above. Don’t press the cable flat.
- Pin it RS up to 3.0 in (7.6 cm) x 3.8 in (9.7 cm).
- Check that the stem is 2.0 in (5.1 cm) wide and the foot is 2.0 in (5.1 cm) tall, both including the border.
- Square each outer corner with one pin, and pin the inner corner to a clean right angle.
- Let it dry completely, then unpin.
- Sew the flowers on through their centers with the tails:
- Flower 1: centered 0.6 in (1.5 cm) below the top edge of the stem.
- Flower 2: at mid-stem, 1.7 in (4.3 cm) below the top edge.
- Flower 3: on the foot, 0.5 in (1.3 cm) in from the right end.
- Tuck one leaf under the edge of each flower and sew it down at its base: to the right of Flowers 1 and 2, and to the left of Flower 3.
- Use pliers to open the jump ring and push it through the top edge of the stem, 0.25 in (0.6 cm) from the edge and catching both border rounds. Add the chain and key ring, then close the jump ring flush.
Final Quality-Control Checklist
- The core has 18 stem rows and 6 foot rows, and every row has 6 sts.
- There are 4 rope crosses in the stem and 1 in the foot, all leaning the same way.
- Border Round 1 has 58 sts and Round 2 has 66 sts.
- All 5 outer corners are square and the inner corner lies flat.
- The finished size is 3.0 in (7.6 cm) x 3.8 in (9.7 cm).
- The flowers are sewn securely through the center, and the leaves are fixed at the base.
- The jump ring is fully closed and passes through both border rounds.
- All ends are woven in on the WS.
Troubleshooting
- The stem is getting narrower: You’re probably working into the sc behind the post sts. Skip them, and count 6 sts on every row.
- The cable lies flat: Work the post sts a little looser and make sure each cross row uses fptr, not fpdc.
- The border ripples: Skip more row-ends and keep to the 4-in-5 ratio.
- The border cups: You’ve skipped too many row-ends. Rework the long sides with fewer skips.
- The inner corner bulges: You probably missed the sc2tog or sc3tog.
- The corners are rounded: Make sure you work 3 sc in the center st of each corner, and block it with a pin.
- The petals are floppy: Use the 2.75 mm hook, or go down to 2.5 mm.
Care
Hand wash in cool water, press out the water in a towel and dry flat. Keep the metal hardware dry where you can.
Final Notes
The measurement chain:
1. Gauge of 5 sts and 6 rows per inch (2.5 cm)
2. A stem 1.2 in (3.0 cm) x 3.0 in (7.6 cm) after 18 rows
3. A core 2.2 in (5.6 cm) x 3.0 in (7.6 cm) after the 6-row foot
4. 58 sts after border Round 1, about 2.6 in (6.6 cm) x 3.4 in (8.6 cm)
5. 66 sts after Round 2, 3.0 in (7.6 cm) x 3.8 in (9.7 cm)
If each checkpoint matches, the finished letter will too. Add your daisies, clip on the ring, and your keychain is ready to go.
Happy crocheting!