

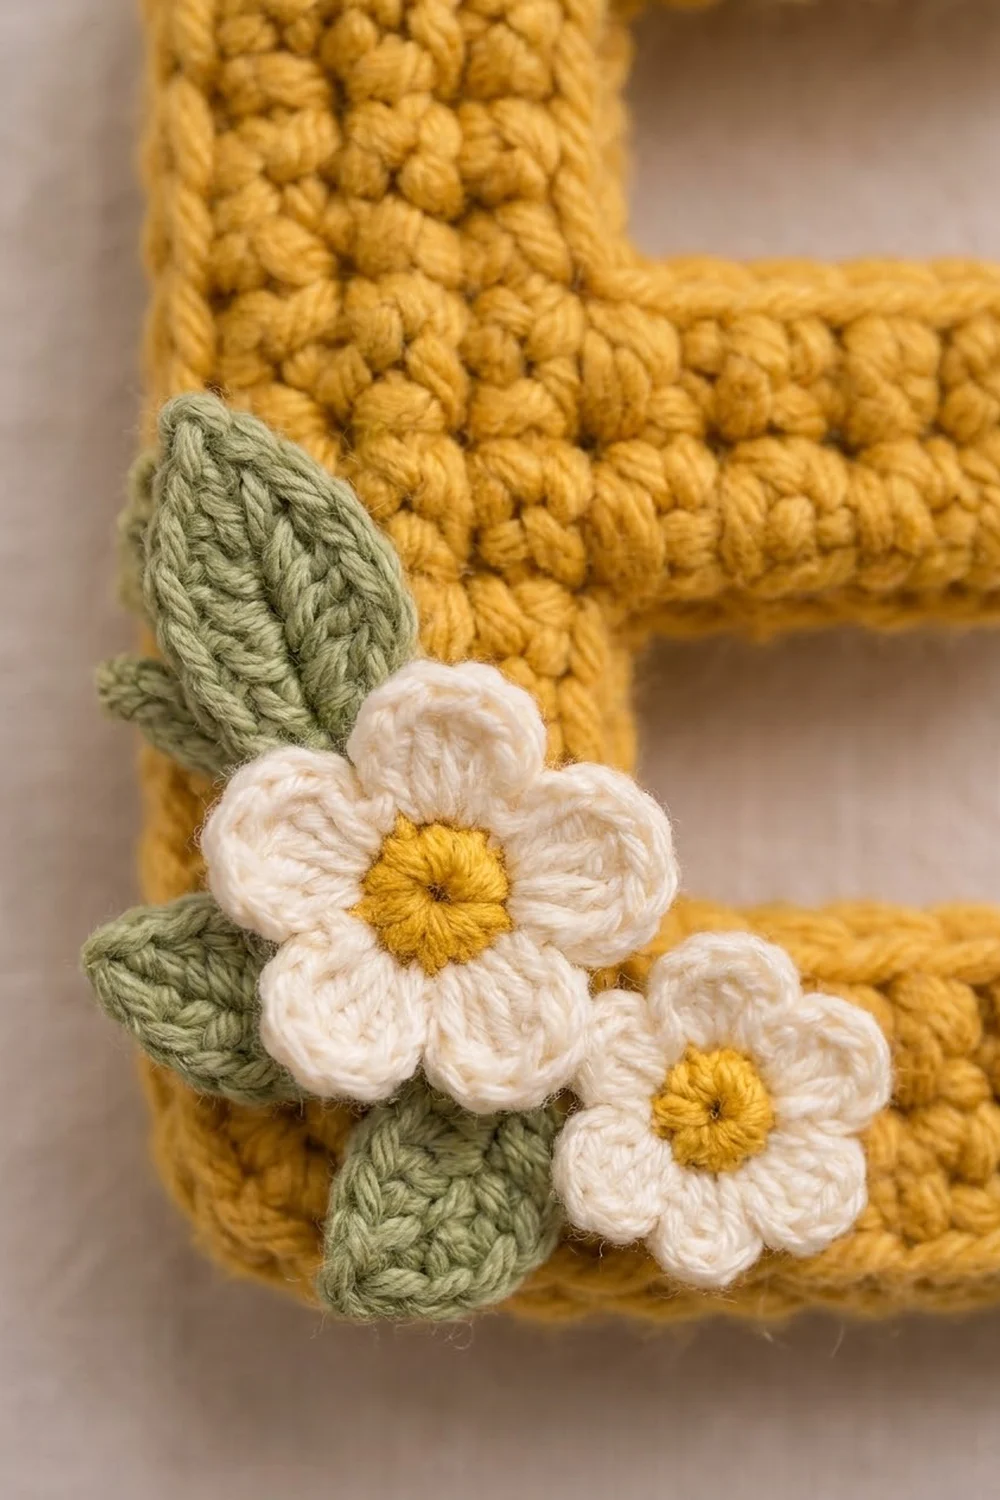
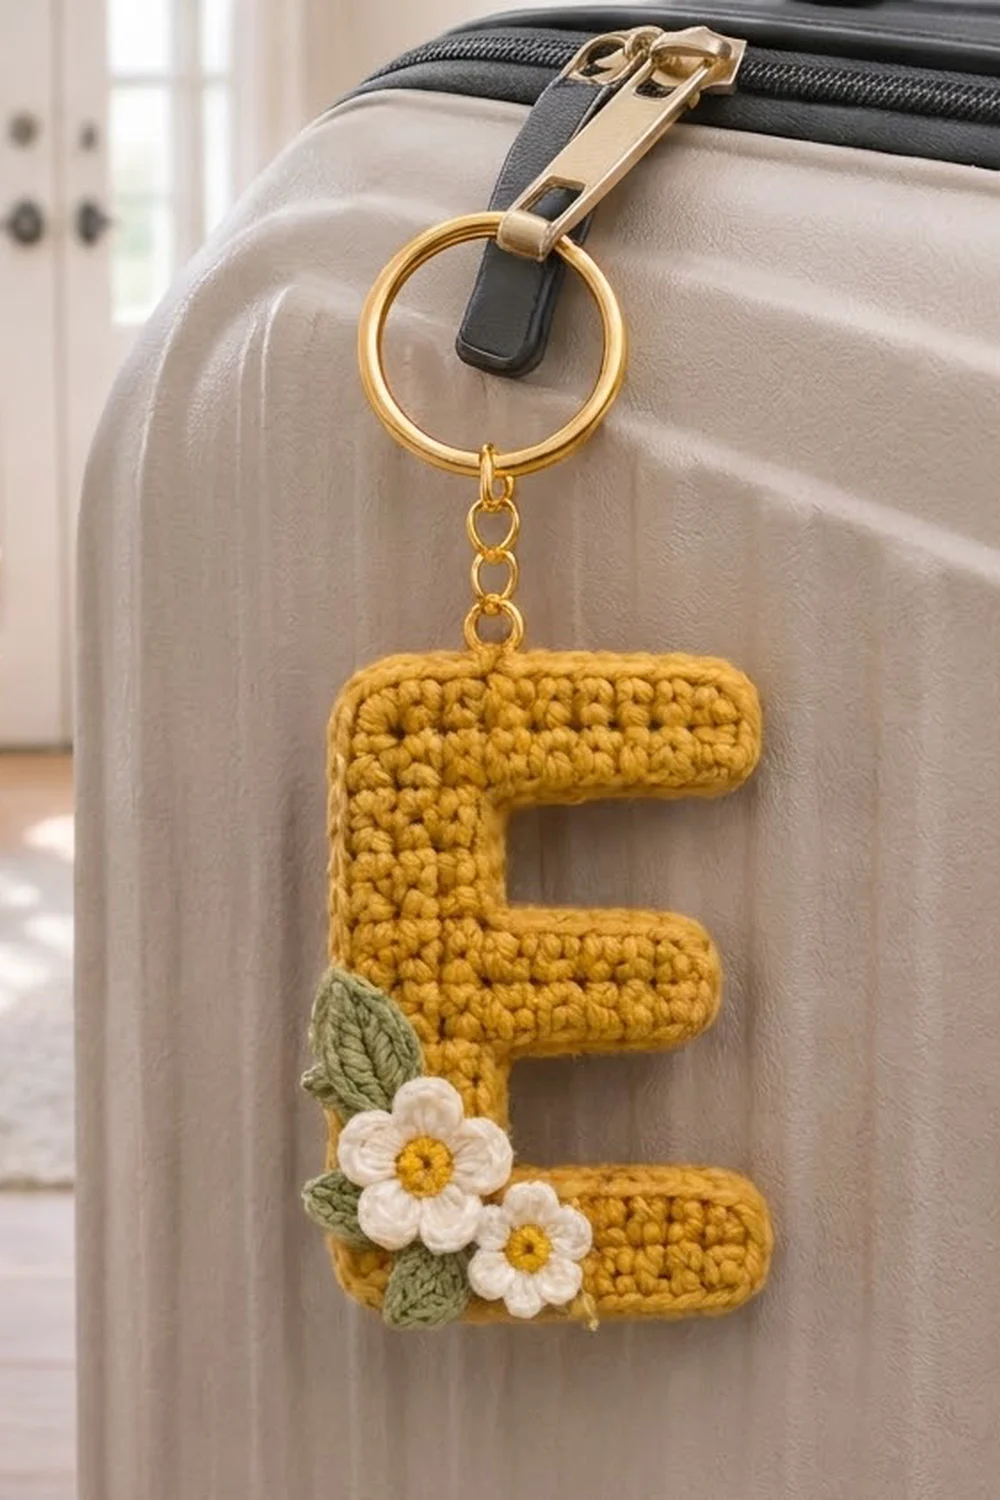
This little letter E makes a quick, personal accessory. It is a firm, flat initial in warm mustard yellow with a smooth rolled border, and a small cluster of cream flowers and sage leaves sits over the lower left corner. A gold split ring and short chain let it hang from keys, a bag strap or a suitcase zipper.
The colors are mustard yellow for the letter, cream for the petals, sunny yellow for the flower centers and soft sage green for the leaves. The look is cozy and clean: dense single crochet texture, rounded corners and a raised floral accent.
This pattern uses US crochet terms. The finished letter measures 3.0 in wide x 3.8 in tall (7.6 cm x 9.7 cm), not counting the hardware.
You crochet the letter flat in rows of single crochet, starting with the bottom arm and adding chains to build the middle and top arms. One border round evens out the outline, and a slip stitch round firms up the edge. You make two flowers and three leaves separately, then sew them on.
Finished Size and Construction
- Finished size: 3.0 in x 3.8 in (7.6 cm x 9.7 cm)
- Skill level: Easy / advanced beginner
- Terminology: US crochet terms
- Yarn weight: DK (#3), cotton or cotton blend
- Hook: 3.5 mm (E-4)
- Number of pieces: 1 letter, plus 2 flowers and 3 leaves sewn on as appliqués. The finished item is one keychain.
- Layout: a single letter E with the spine on the left, three arms pointing right and the flower cluster at the lower left corner
- Letter size before border: 2.6 in x 3.4 in (6.6 cm x 8.6 cm), on a grid 13 stitches wide and 17 rows tall
- Border depth: 0.2 in (0.5 cm) on every edge
- Size after border: 3.0 in x 3.8 in (7.6 cm x 9.7 cm)
Materials
Use a smooth cotton or cotton-blend DK yarn. Cotton holds its shape, resists stretching and shows the stitch texture clearly. Avoid fluffy yarns, because the letter should feel firm.
- Color A, mustard yellow (letter): 8 g, about 18 m
- Color B, cream (petals): 2 g, about 5 m
- Color C, sage green (leaves): 2 g, about 5 m
- Color D, sunny yellow (flower centers): 1 g, about 2 m
These amounts include a margin for testing gauge, tails and sewing.
Tools:
- 3.5 mm (E-4) crochet hook
- Tapestry needle and scissors
- 1 gold split key ring, 1 in (2.5 cm) across
- 1 short gold chain, about 0.75 in (1.9 cm) long, with 2 jump rings
- Flat-nose pliers
- 1 stitch marker
- Blocking board and rust-proof pins
- Ruler
Abbreviations (US Terms)
- ch – chain
- sl st – slip stitch
- sc – single crochet
- hdc – half double crochet
- dc – double crochet
- sc2tog – single crochet 2 together
- st(s) – stitch(es)
- BLO – back loop only
- RS – right side
Special stitch – sc2tog across an inside corner: Insert the hook in the first spot (a stitch or a row end), yarn over and pull up a loop. Insert the hook in the second spot, just around the corner, yarn over and pull up a loop. Yarn over and pull through all 3 loops. This counts as 1 stitch and keeps inside corners crisp.
Gauge and Checkpoints
Gauge: 5 sc and 5 rows = 1 in (2.5 cm) in sc worked in rows. A swatch 10 stitches wide and 10 rows tall should measure 2 in (5.1 cm) square.
The letter is small, so it can be your test piece. Work Rows 1–4, then measure before you go on.
- After Row 4: 2.6 in wide x 0.8 in tall (6.6 cm x 2.0 cm)
- After Row 10: 2.0 in tall (5.1 cm). The middle arm is 2.2 in (5.6 cm) long, measured from the spine edge.
- After Row 17: 2.6 in x 3.4 in (6.6 cm x 8.6 cm)
- After the border: 3.0 in x 3.8 in (7.6 cm x 9.7 cm)
If it’s too big: go down to a 3.25 mm or 3.0 mm hook.
If it’s too small: go up to a 3.75 mm hook.
If only the height is off: adjust how tall you pull up your loops. Your rows need to match your stitches, because the border puts 1 sc in each row end.
The Letter E
Work the letter flat in Color A. Every row starts with ch 1 and turn, and the ch 1 does not count as a stitch.
Orientation: The edge where Row 1 begins (the hook end of the foundation chain) becomes the spine. Single crochet looks the same on both sides. When you finish, pick the side where the spine is on the left and call it the RS.
Bottom Arm
Row 1: Ch 14. Sc in 2nd ch from hook and in each ch across. (13 sc)
Rows 2–4: Ch 1, turn, sc in each st across. (13 sc)
Row 4 ends at the spine edge. Place a marker in the 6th st from the spine edge. You’ll leave the 8 sts from the marker to the tip unworked. They form the top of the bottom arm.
Lower Gap
Row 5: Ch 1, turn, sc in the first 5 sts. Leave the other 8 sts unworked. (5 sc)
Rows 6–7: Ch 1, turn, sc in each st across. (5 sc)
Row 7 ends at the inner edge, away from the spine.
Middle Arm
At the end of Row 7, ch 7 (6 base chains plus 1 turning chain).
Row 8: Sc in 2nd ch from hook and in the next 5 ch, then sc in each of the 5 sts. (11 sc: 6 on the new chain + 5 over the spine)
Rows 9–10: Ch 1, turn, sc in each st across. (11 sc)
Row 10 ends at the spine edge. Checkpoint: the piece is 2.0 in (5.1 cm) tall.
Upper Gap
Row 11: Ch 1, turn, sc in the first 5 sts. Leave the other 6 sts unworked. (5 sc)
Rows 12–13: Ch 1, turn, sc in each st across. (5 sc)
Row 13 ends at the inner edge.
Top Arm
At the end of Row 13, ch 9 (8 base chains plus 1 turning chain).
Row 14: Sc in 2nd ch from hook and in the next 7 ch, then sc in each of the 5 sts. (13 sc: 8 on the new chain + 5 over the spine)
Rows 15–17: Ch 1, turn, sc in each st across. (13 sc)
Row 17 ends at the tip of the top arm. Do not fasten off.
Checkpoint: the piece measures 2.6 in x 3.4 in (6.6 cm x 8.6 cm).
- The spine is 1.0 in (2.5 cm) wide.
- The top and bottom arms are each 0.8 in (2.0 cm) tall.
- The middle arm and both gaps are each 0.6 in (1.5 cm) tall.
Border
Border gauge: The border is one round of sc and one round of sl st, at the same 5 sts per inch as the letter. It adds 0.2 in (0.5 cm) to every edge:
- Width: 2.6 in to 3.0 in (6.6 cm to 7.6 cm)
- Height: 3.4 in to 3.8 in (8.6 cm to 9.7 cm)
The outline of the letter has 12 edges, 8 outside corners and 4 inside corners. Work 1 sc in each stitch or row end, 3 sc in each outside corner stitch and an sc2tog across each inside corner.
Border Round 1: Ch 1 and turn, then work around the whole letter:
- Top edge (Row 17, 13 sts): 3 sc in the first st (top right corner), sc in the next 11 sts, 3 sc in the last st (top left corner). (17 sc)
- Spine edge (17 row ends): Sc in each row end. (17 sc)
- Bottom edge (foundation chain, 13 ch): 3 sc in the first ch (bottom left corner), sc in the next 11 ch, 3 sc in the last ch (bottom right corner). (17 sc)
- Bottom arm tip (Rows 1–4): Sc in each of the 4 row ends. (4 sc)
- Top of bottom arm (8 unworked sts of Row 4): 3 sc in the first st (corner), sc in the next 6 sts. (9 sc) Then sc2tog over the 8th st and the Row 5 row end. (1 st)
- Lower gap (Rows 5–7): Sc in the Row 6 row end. (1 sc) Then sc2tog over the Row 7 row end and the first ch on the underside of the middle arm. (1 st)
- Underside of middle arm (6 ch): Sc in the next 4 ch, 3 sc in the last ch (corner). (7 sc)
- Middle arm tip (Rows 8–10): Sc in each of the 3 row ends. (3 sc)
- Top of middle arm (6 unworked sts of Row 10): 3 sc in the first st (corner), sc in the next 4 sts. (7 sc) Then sc2tog over the 6th st and the Row 11 row end. (1 st)
- Upper gap (Rows 11–13): Sc in the Row 12 row end. (1 sc) Then sc2tog over the Row 13 row end and the first ch on the underside of the top arm. (1 st)
- Underside of top arm (8 ch): Sc in the next 6 ch, 3 sc in the last ch (corner). (9 sc)
- Top arm tip (Rows 14–17): Sc in each of the 4 row ends. (4 sc)
Join with a sl st to the first sc. Round total: 100 sts.
Why the math works: The outline has 88 places to work into (13 + 17 + 13 + 4 + 8 + 3 + 6 + 3 + 6 + 3 + 8 + 4).
- Working 1 sc in each place gives 88 sts.
- Each of the 8 outside corners adds 2 extra sc, for 16 more.
- Each of the 4 inside-corner sc2tog removes 1 st, for 4 fewer.
So Round 1 = (88 worked 1 per place) + (16 extra) − (4 removed) = 100, which matches the edge totals above. Because the stitches and rows have the same gauge, 1 sc per row end keeps the sides flat. The 3-sc corners turn the outside corners without cupping.
Border Round 2: Ch 1, sl st in the BLO of each st around, keeping your tension loose and even. Join with a sl st to the first sl st. (100 sl st) Fasten off and weave in the ends. This round gives the edge its smooth, raised, rolled look.
Flowers
Make 1 large flower and 1 small flower.
Large flower (about 1.1 in / 2.8 cm across):
- Rnd 1: With Color D, make a magic ring. Work 5 sc in the ring, pull it closed and join with a sl st to the first sc. (5 sc) Fasten off.
- Rnd 2: Join Color B in any sc. In each sc around, work (sl st, ch 2, 3 dc, ch 2, sl st). (5 petals) Fasten off, leaving a 10 in (25.4 cm) tail.
Small flower (about 0.8 in / 2.0 cm across):
- Rnd 1: With Color D, make a magic ring. Work 5 sc in the ring and join. (5 sc) Fasten off.
- Rnd 2: Join Color B in any sc. In each sc around, work (sl st, ch 1, 3 hdc, ch 1, sl st). (5 petals) Fasten off, leaving a 10 in (25.4 cm) tail.
Leaves
Make 1 large leaf and 2 small leaves in Color C. Leave an 8 in (20.3 cm) tail on each one.
Large leaf (about 1.1 in / 2.8 cm long):
- Ch 8.
- Sc in the 2nd ch from hook, hdc in the next ch, dc in the next 2 ch, hdc in the next ch, sc in the next ch.
- For the tip, work (sc, ch 2, sc) in the last ch.
- Turn the piece and work along the other side of the chain: sc in the next ch, hdc in the next ch, dc in the next 2 ch, hdc in the next ch, sc in the last ch.
- Join with a sl st to the first sc. (14 sts + ch-2 tip)
Small leaf (about 0.8 in / 2.0 cm long), make 2:
- Ch 6.
- Sc in the 2nd ch from hook, hdc in the next ch, dc in the next ch, hdc in the next ch.
- For the tip, work (sc, ch 2, sc) in the last ch.
- Along the other side of the chain: hdc in the next ch, dc in the next ch, hdc in the next ch, sc in the last ch.
- Join with a sl st to the first sc. (10 sts + ch-2 tip)
Assembly and Hardware
Lay the letter RS up with the spine on the left. The flower cluster goes over the lower left corner, where the spine meets the bottom arm.
- Pin the leaves first.
- Large leaf: base near the left edge at the lower gap, tip pointing up and slightly left so it overlaps the border.
- First small leaf: on the bottom arm, just below where the large flower will go, pointing down and left.
- Second small leaf: on the bottom arm, under where the small flower will go, tip pointing down.
- Add the large flower. Center it on the spine at the level of the lower gap, covering the bases of the large leaf and the first small leaf.
- Add the small flower. Place it just below and to the right of the large flower, on the bottom arm, with the petals of the two flowers touching.
- Sew everything down. Whipstitch around the edge of each leaf. Sew each flower through Rnd 1 and the base of each petal, and leave the petal tips loose so they stand up. Weave all tails into the back.
- Attach the hardware. Open a jump ring and push it through the top border above the middle of the spine, about 0.5 in (1.3 cm) from the top left corner. Catch both border rounds, then close the ring around one end of the chain. Use the second jump ring to attach the split ring to the other end of the chain.
Final Blocking
- Lightly mist the letter with water, keeping the hardware as dry as you can.
- Pin it flat on a blocking board, RS up.
- Pin each outside corner and straighten the edges to 3.0 in x 3.8 in (7.6 cm x 9.7 cm).
- Check that the three arms are parallel and the inside corners are square.
- Fluff the petals so they sit up.
- Let the piece dry completely before you unpin it.
Final Quality-Control Checklist
- Rows 1–4 and 14–17 have 13 sc, Rows 5–7 and 11–13 have 5 sc, and Rows 8–10 have 11 sc.
- Border Round 1 has 100 sts, and Round 2 has 100 sl sts.
- All 8 outside corners are rounded, and all 4 inside corners are crisp.
- The letter measures 3.0 in x 3.8 in (7.6 cm x 9.7 cm).
- Each flower has 5 petals, and the leaves lie flat underneath.
- The jump ring is fully closed.
- All ends are secured on the back.
Troubleshooting
- The edges ripple: Check that you worked only 1 sc per row end, or use a smaller hook for the border.
- The edges curl or pull in: Work Round 2 more loosely.
- The inside corners have gaps: Use an sc2tog at each inside corner, not 2 separate sc.
- The arms are the wrong length: Recount the chains: ch 7 for the middle arm and ch 9 for the top arm.
- The letter feels floppy: Use a smaller hook or a firmer cotton.
Care
Spot clean with mild soap and cool water. Reshape the keychain and let it dry flat.
Final Notes
Here is how the measurements fit together. At 5 sc and 5 rows per inch, a grid 13 stitches wide and 17 rows tall measures 2.6 in x 3.4 in (6.6 cm x 8.6 cm). The 100-stitch border adds 0.2 in (0.5 cm) to every edge, for a finished letter of 3.0 in x 3.8 in (7.6 cm x 9.7 cm). Measure after Row 4, Row 10, Row 17 and the border, and your letter will come out to size.
Happy crocheting!