

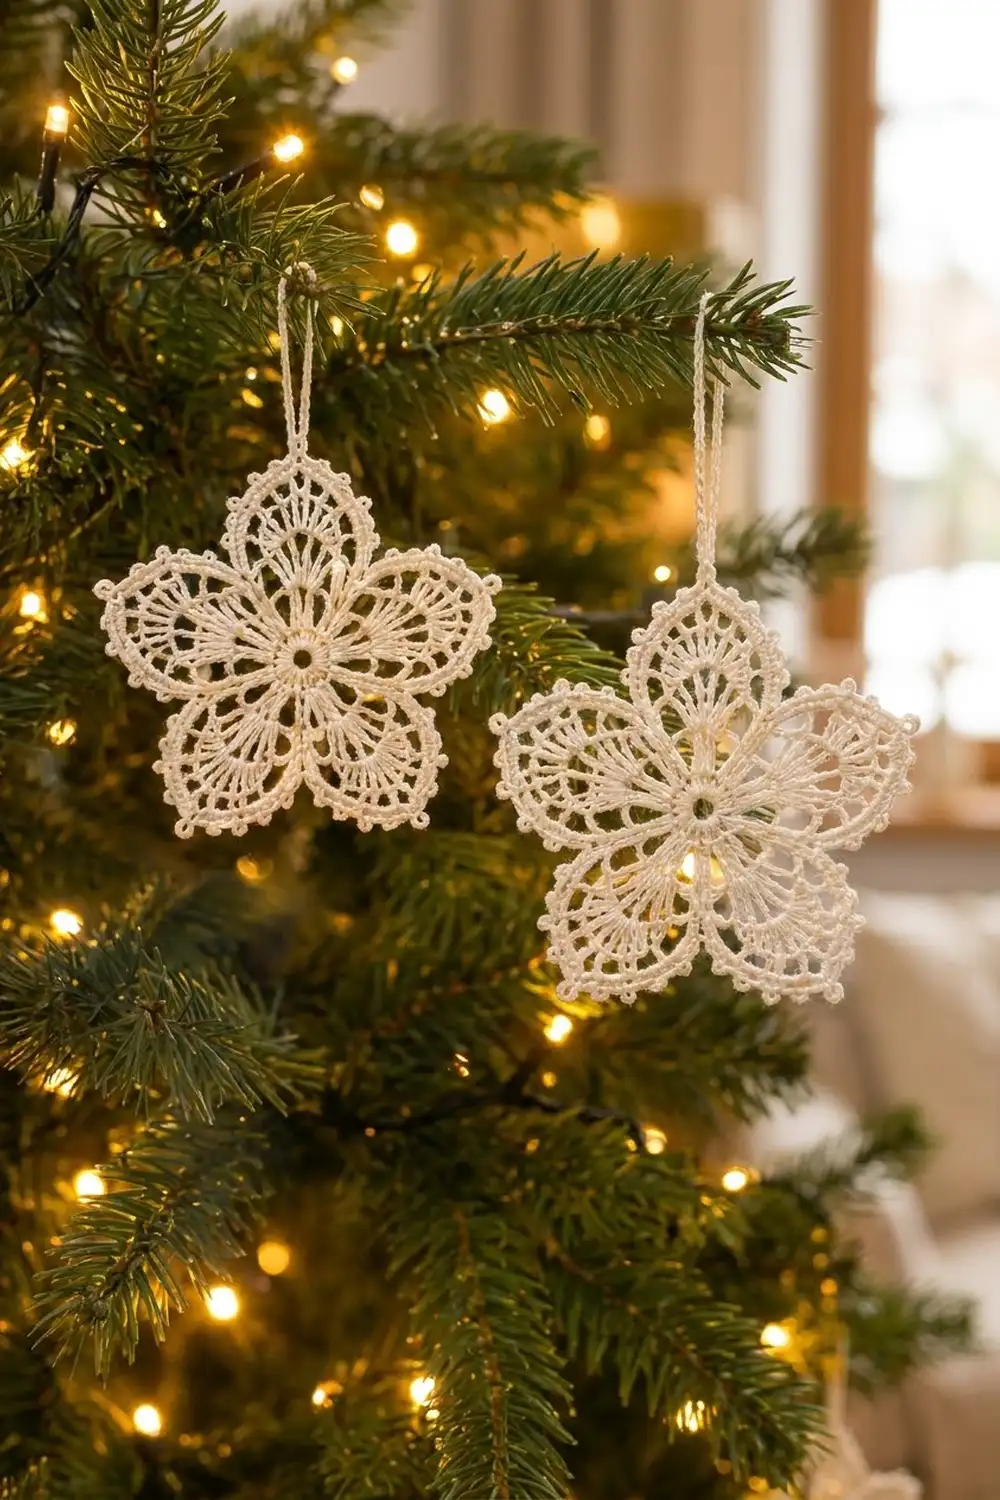
The Ivory Star Blossom is a small, lacy, five-petal ornament worked in cream crochet thread. It sits halfway between a snowflake and a flower. Rounded petals narrow to soft points, and a picot edge outlines the whole star.
It is made in one color, so the texture does all the work. Tall stitches fan out from a small open ring, and chain spaces keep each petal airy. Hung on a tree with warm lights behind it, the open spaces glow.
This pattern uses US crochet terms. After blocking, the ornament is 4 in (10.2 cm) across, tip to tip. The hanging loop adds about 1.25 in (3.2 cm) above the top petal.
You will work 5 rounds in total: a double crochet center ring, a round of chain arches, a fan of treble crochet for each petal, a shaping round that forms the points, and a picot edging round. The hanging loop is worked into the edging round, so you have only two ends to weave in.
Finished Size and Construction
- Finished size: 4 in (10.2 cm) across, tip to tip, after blocking
- Skill level: Intermediate (thread work, counting into spaces)
- Terminology: US crochet terms
- Yarn weight: Size 10 crochet cotton (Lace / weight 0)
- Hook: 1.75 mm steel hook
- Number of pieces: 1 (single piece; nothing to join)
- Layout: One five-petal star, worked in the round
- Piece size before edging (after Round 4): 3.5 in (8.9 cm)
- Edging depth: 0.25 in (0.6 cm) on each side
- Hanging loop: about 1.25 in (3.2 cm) long
Materials
Thread: Choose a mercerized size 10 cotton thread. It gives crisp stitch definition and blocks well. Pick cream, ivory, or natural white to match the photo. Avoid fuzzy or very soft blends, because the picots will not hold their shape.
- Cream / ivory size 10 cotton: about 5 g, approximately 45 m (49 yd)
This amount includes a margin for a test swatch and for weaving in ends. One standard ball of size 10 thread is enough for many ornaments.
Tools:
- 1.75 mm steel crochet hook
- Fine tapestry needle or small-eye beading needle
- Small sharp scissors
- Stitch marker (a scrap of contrasting thread works)
- Blocking board or a folded towel
- Rustproof pins
- Spray bottle with water
- Optional: fabric stiffener or a starch solution
Abbreviations (US Terms)
- ch: chain
- sl st: slip stitch
- sc: single crochet
- dc: double crochet
- tr: treble crochet (yarn over twice)
- sp(s): space(s)
- sk: skip
- st(s): stitch(es)
- rep: repeat
Special stitch: Picot (p): Ch 3, then sl st into the front loop and left vertical bar of the last sc made. This makes a small round bump that sits on the outer edge.
Gauge and Checkpoints
Thread work varies a lot from person to person, so treat your first ornament as the test piece. Check it at each stage below before you go on.
- After Round 1: the ring is 0.75 in (1.9 cm) across.
- After Round 2: the chain arches are 1.5 in (3.8 cm) across.
- After Round 3: the tr fans are 2.5 in (6.4 cm) across.
- After Round 4: the star is 3.5 in (8.9 cm) across, tip to tip.
- After Round 5 and blocking: the star is 4 in (10.2 cm) across, tip to tip.
If your piece is too big: Change to a 1.5 mm hook, or pull your chains a little tighter. Loose chain arches in Round 2 are the most common cause.
If your piece is too small: Change to a 2.0 mm hook. Check that your tr stitches are full height and not squashed when you pull through.
Each round is shaped by its own stitch count, so a size difference of up to 0.25 in (0.6 cm) is fine for an ornament. Your stitch counts must still match exactly.
Pattern
Round 1: Center Ring
Ch 8, sl st to the first ch to form a ring.
Ch 3 (counts as first dc). Work 19 dc into the ring. Sl st to the top of the beginning ch-3.
Count: 20 dc.
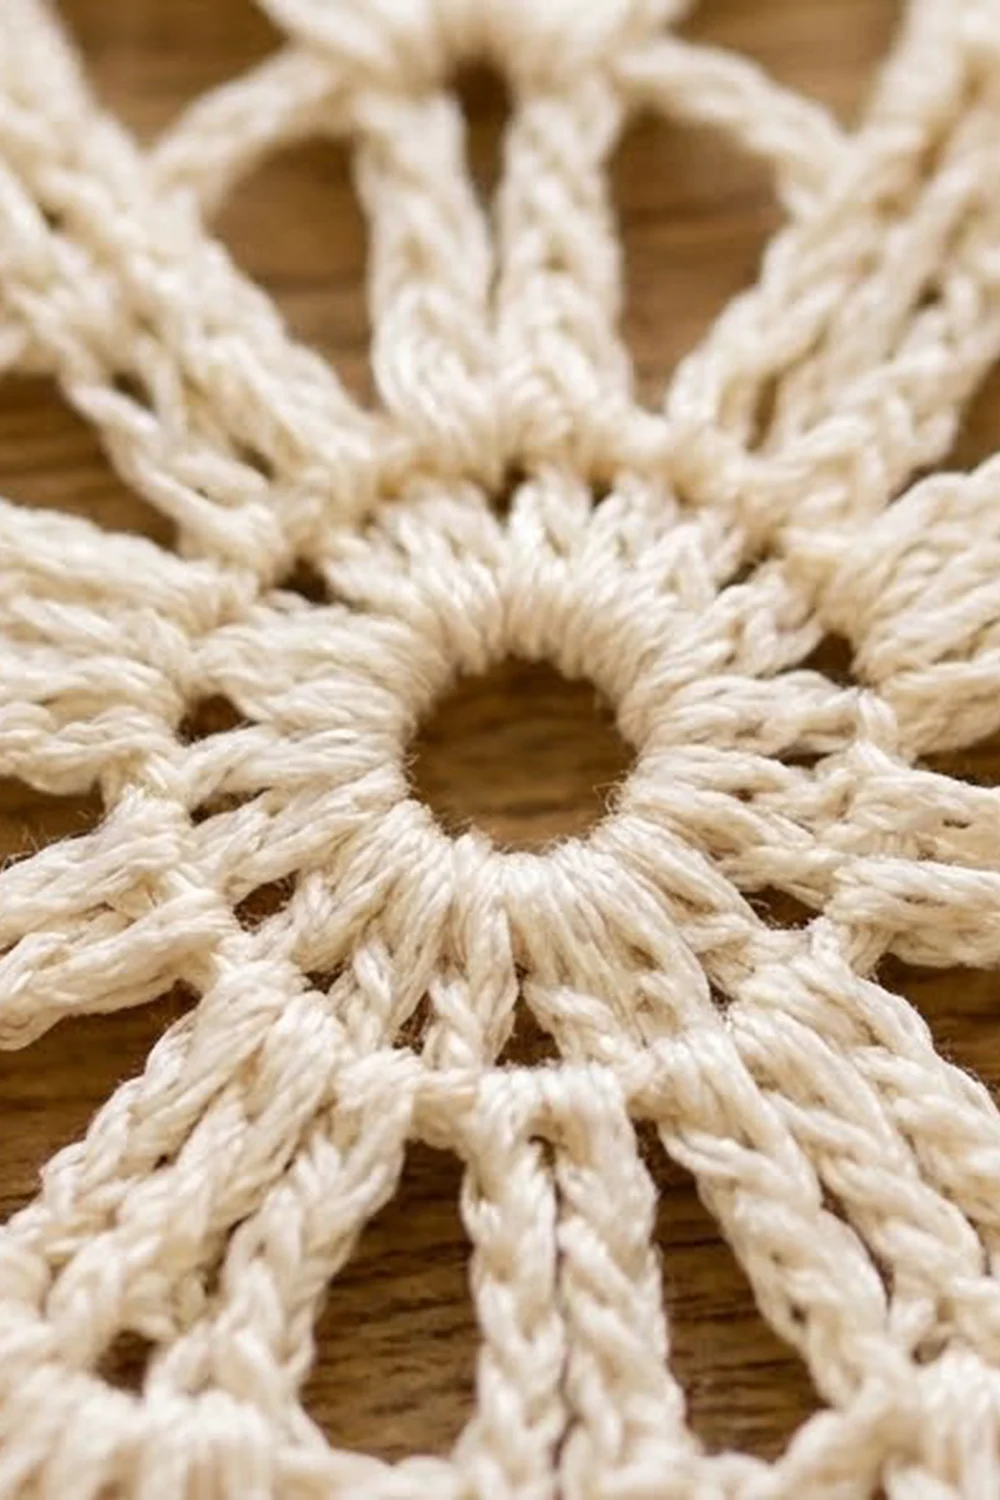
Pull the tail snug so the center hole is open but neat, as in the photo.
Round 2: Chain Arches
Ch 1. Sc in the same st as the join. Ch 7, sk next 3 dc, sc in next dc. Rep from * 3 more times. Ch 7, sk the last 3 dc, sl st to the first sc.
Count: 5 sc and 5 ch-7 sps.
Check: 5 repeats × (1 sc + 3 skipped dc) = 20 sts, which uses every dc from Round 1. Each ch-7 arch is the base of one petal.
Round 3: Petal Fans
Ch 1. Sc in the same sc as the join.
In the next ch-7 sp, work (tr, ch 2) 4 times, then tr. Sc in the next sc. Rep from * around. On the last repeat, skip the final sc and sl st to the first sc instead.
Each petal: 5 tr and 4 ch-2 sps.
Round total: 25 tr, 20 ch-2 sps, and 5 sc.
Spread the tr evenly across each arch so they fan out from the center. These are the spokes you see inside each petal.
Round 4: Petal Shaping and Points
Ch 1. Sc in the same sc as the join.
*Work the petal:
- 3 dc in the first ch-2 sp, ch 1
- 3 dc in the next ch-2 sp, ch 1
- (dc, ch 3, dc) in the center (3rd) tr. This is the petal tip.
- Ch 1, 3 dc in the next ch-2 sp
- Ch 1, 3 dc in the last ch-2 sp
- Sk the last tr, sc in the next sc.*
Rep from * around. On the last repeat, sl st to the first sc instead of working a new sc.
Each petal: 14 dc (3 + 3 + 1 + 1 + 3 + 3), 4 ch-1 sps, and 1 ch-3 tip sp.
Round total: 70 dc, 20 ch-1 sps, 5 ch-3 sps, and 5 sc.
The 5 sc are the valleys between the petals. The ch-3 spaces form the soft points. Measure now: 3.5 in (8.9 cm) tip to tip.
Round 5: Picot Edging and Hanging Loop
This is a trim round. Every dc and every ch-1 sp gets 1 sc, and the tip spaces get extra stitches.
Sl st in the same sc as the join. This is your first valley.
Petal 1 (with hanging loop):
- Side 1: Work over 3 dc, ch-1 sp, 3 dc, ch-1 sp, and the tip dc (9 sts): 2 sc, p, 3 sc, p, 3 sc, p, 1 sc. That is 9 sc and 3 picots.
- Tip with loop: 2 sc in the ch-3 sp. Ch 30, then sl st into the last sc made to form a loop. Work 40 sc into the loop. Sl st into the same sc at the loop base. Work 2 more sc in the same ch-3 sp.
- Side 2: Work over the tip dc, ch-1 sp, 3 dc, ch-1 sp, and 3 dc (9 sts): 1 sc, p, 3 sc, p, 3 sc, p, 2 sc. That is 9 sc and 3 picots.
- Sl st in the next valley sc.
Petals 2 to 5:
- Side 1: 2 sc, p, 3 sc, p, 3 sc, p, 1 sc.
- Tip: (2 sc, p, 2 sc) in the ch-3 sp.
- Side 2: 1 sc, p, 3 sc, p, 3 sc, p, 2 sc.
- Sl st in the next valley sc. After Petal 5, this is the first sl st of the round.
Fasten off.
Per petal (stitches worked 1 into each existing st and sp, plus extras): 18 sc (14 dc + 4 ch-1 sps) + 4 sc added at the tip = 22 sc.
Picots: 7 on Petals 2 to 5 (3 + 1 + 3). Petal 1 has 6, because the hanging loop replaces its tip picot.
Round total: 110 sc, 34 picots, 5 valley sl sts, and 1 hanging loop with 40 sc.
The picot placements mirror each other. On Side 1 they sit after sc 2, 5, and 8 counted from the valley. On Side 2 they sit after sc 2, 5, and 8 counted from the valley as well. This keeps every petal symmetrical.
Edging Notes
Edging gauge: On each petal side, 9 sc plus 3 picots should lie flat along a length of about 1.25 in (3.2 cm), measured along the curve from valley to tip.
Why the math works:
- Each side of a petal has exactly 9 existing places to work: 7 dc and 2 ch-1 sps. Placing exactly 1 sc in each one adds no extra fullness, so the side cannot ruffle.
- The tip is the only place where the edge turns sharply. The 4 sc in the ch-3 sp (2 on each side of the picot or loop) give it enough length to curve around the point without pulling.
- The valleys get a single sl st. This adds no height and no extra stitches, so the dip between petals stays sharp and deep, like in the photo.
- The edging adds 0.25 in (0.6 cm) on each side: 3.5 in + 0.25 in + 0.25 in = 4 in (8.9 cm + 0.6 cm + 0.6 cm = 10.1 cm, which is 10.2 cm when converted directly from 4 in).
If your edging cups, your sc are too tight; loosen up or go up half a hook size for this round only. If it waves, your sc are too loose or you added extra stitches.
Final Blocking
Blocking turns a crumpled thread motif into a crisp, flat star. Don’t skip it.
- Weave in ends first. Weave each tail through at least 1 in (2.5 cm) of stitches, then change direction for another 0.5 in (1.3 cm). Don’t trim yet.
- Wet the piece. Soak the ornament in cool water for a few minutes. If you want it stiff, use diluted fabric stiffener or starch instead.
- Press out the water. Roll it in a towel and press gently. Don’t wring it.
- Mark the size. On your blocking board, draw or pin a circle 4 in (10.2 cm) across. Mark 5 evenly spaced points on it, 72° apart.
- Pin the tips. Pin each petal tip to one of the 5 points. Put the pin through the tip picot (or the base of the hanging loop on Petal 1).
- Pin the valleys. Pin each valley sl st toward the center. Each valley should sit about 1.375 in (3.5 cm) from the center hole.
- Open the picots. Run a pin through each picot to round it out, pinning the larger ones if needed.
- Open the center. Put a pin or a round toothpick through the center ring so it dries open and round.
- Dry completely. Leave it for at least 6 hours, or overnight if you used stiffener.
- Trim the ends. Unpin it, then trim the woven tails close to the fabric.
Final Quality-Control Checklist
- [ ] The ornament is 4 in (10.2 cm) across, tip to tip
- [ ] All 5 petals are the same size and shape
- [ ] Each petal has 5 tr spokes in the inner fan
- [ ] Each petal has 14 dc in Round 4 with a ch-3 point
- [ ] Petals 2 to 5 each have 7 picots, and Petal 1 has 6 plus the loop
- [ ] The valleys between petals are sharp and lie flat
- [ ] The center ring is open and round
- [ ] The hanging loop is about 1.25 in (3.2 cm) long and centered on the tip
- [ ] No ends show on the front
- [ ] The piece lies completely flat with no cupping or waves
Troubleshooting
The petals cup upward. Your Round 4 dc are too tight, or your Round 3 chains are too short. Block firmly, or rework Round 4 with a looser tension.
The petals ruffle. Check that you worked exactly 3 dc in each ch-2 sp and 1 sc per stitch in Round 5. Extra stitches cause waves.
The center hole is closed up. Your starting ch-8 ring was pulled too tight. Next time, work Round 1 over a pencil tip or the back of the hook.
The points are blunt. Check that the (dc, ch 3, dc) group is worked into the center tr and not into a space. During blocking, pin each tip out firmly.
The picots lean or flatten. Make sure the sl st goes into the front loop and the left bar of the sc. Block with a pin through each picot.
The hanging loop twists. Twist the ch-30 back to flat before you sl st to close it. The 40 sc worked over it will lock it straight.
One petal is a different size. Count your stitches for that petal in each round. A missed ch-1 sp in Round 4 is the usual cause.
Care
Hand wash in cool water with a mild soap, press out the water in a towel, and re-block flat to dry. Store the ornament flat between sheets of tissue paper so the picots and points stay crisp.
Final Notes
The size of this ornament comes from a simple chain of measurements. Round 1 makes a 0.75 in (1.9 cm) ring. Round 2 spreads it to 1.5 in (3.8 cm) with five arches. Round 3 fans the tr out to 2.5 in (6.4 cm). Round 4 shapes the points at 3.5 in (8.9 cm). The picot edging adds 0.25 in (0.6 cm) on each side, so the blocked ornament is 4 in (10.2 cm) across.
If you check your stitch counts at each round (20, then 5 arches, then 25 tr, then 70 dc, then 110 sc), your star will come out the same every time. Make one for each branch, or tuck one into a holiday card as a small handmade gift.
Happy crocheting!