

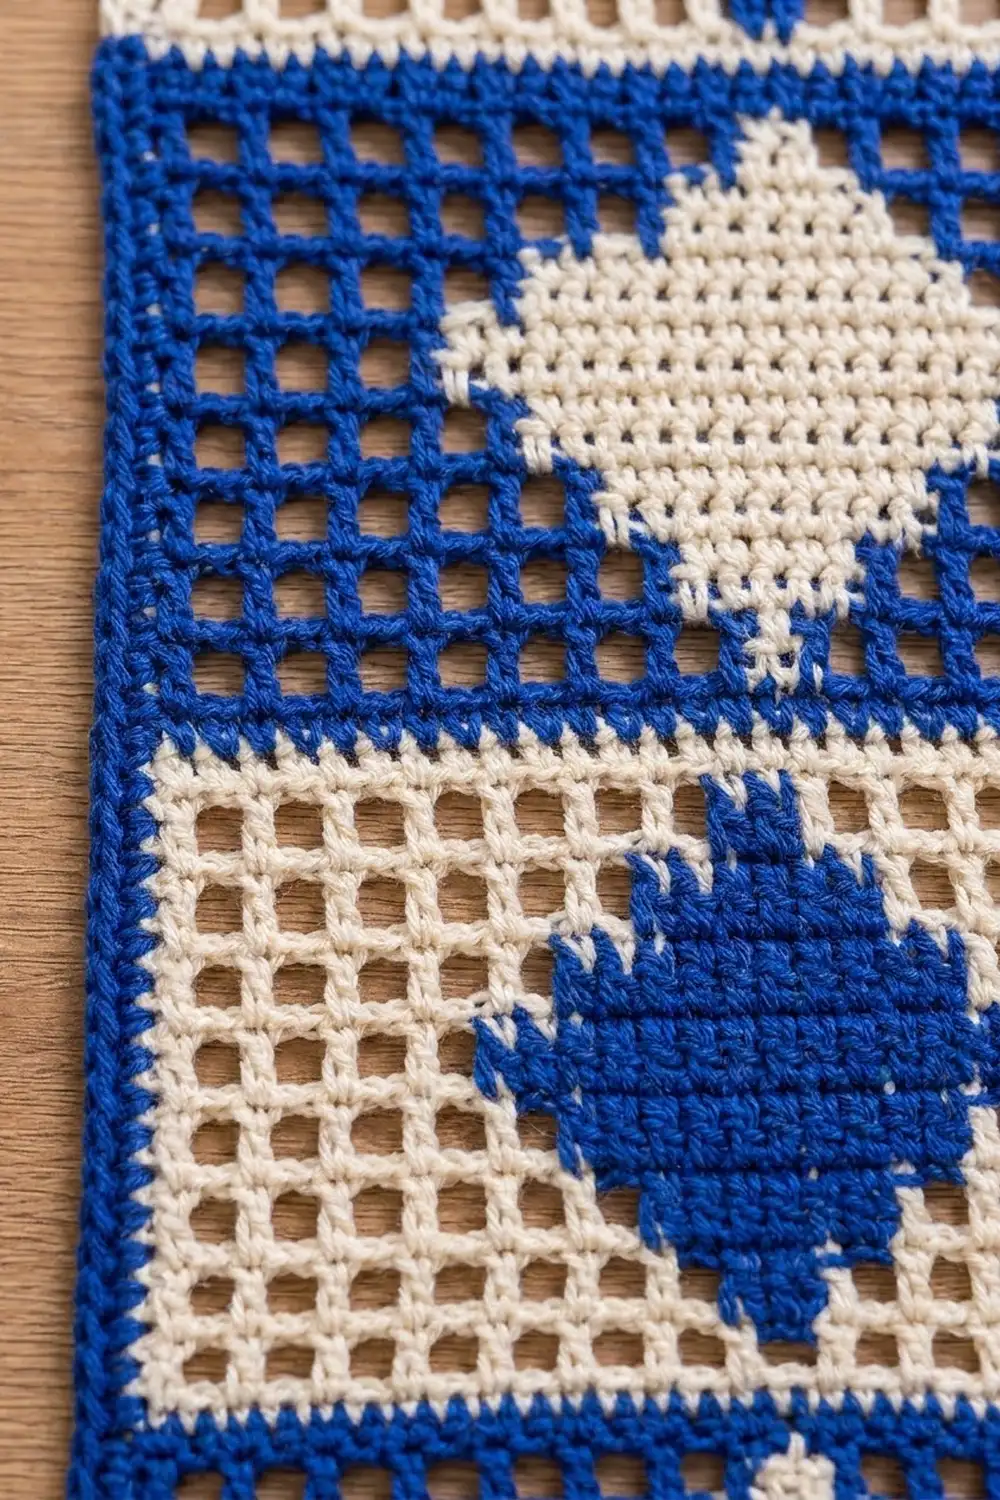
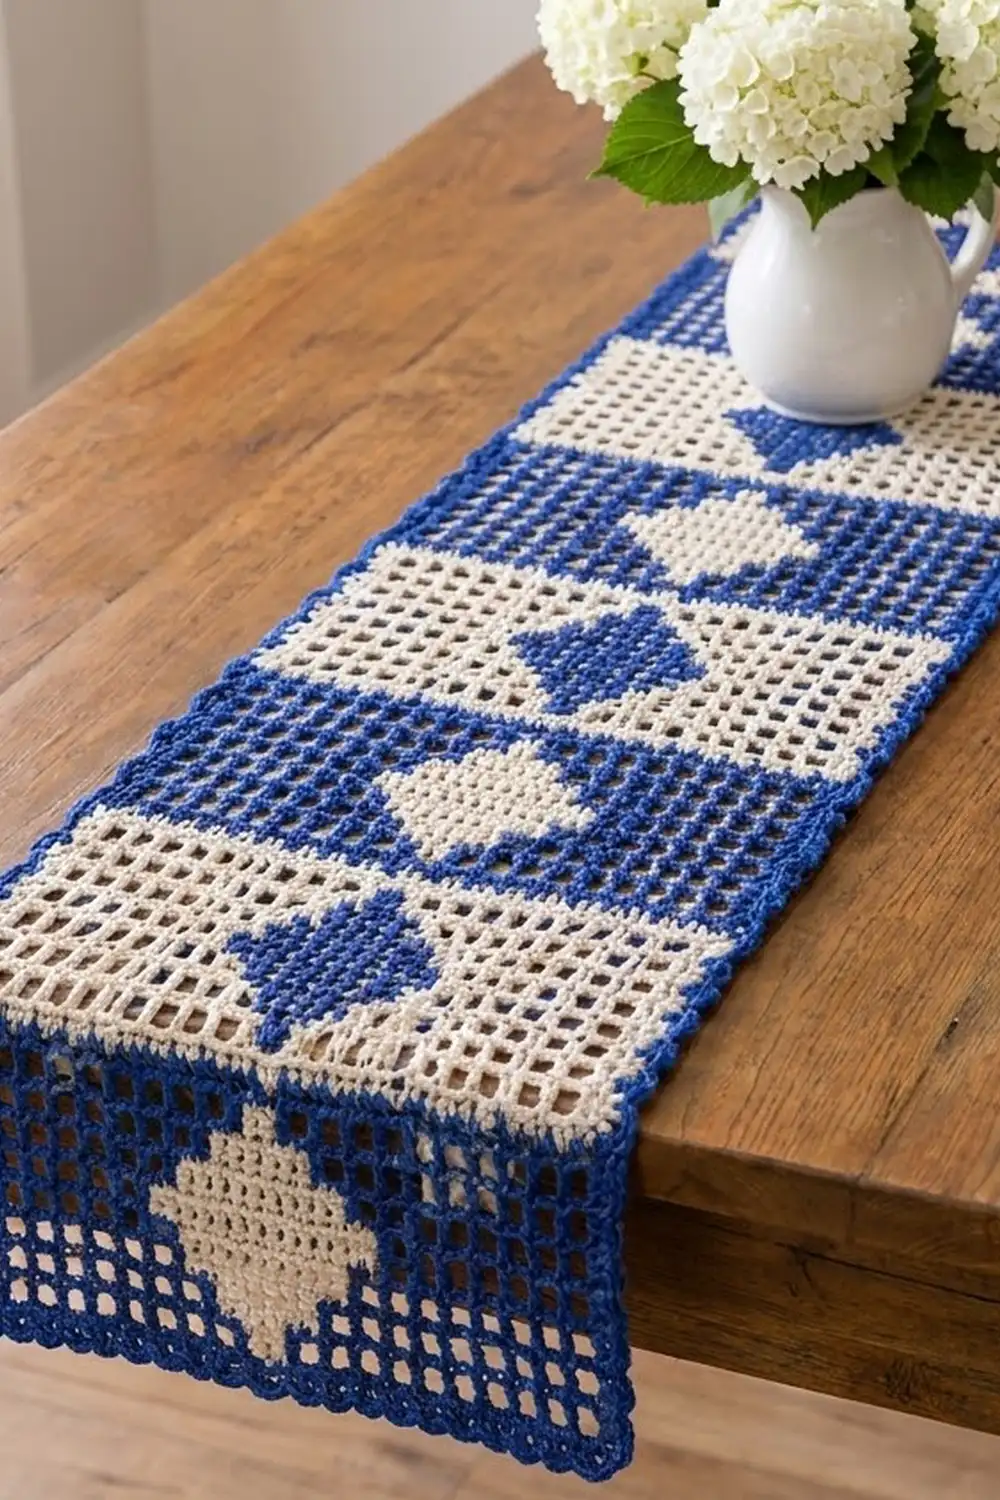
The Delft Diamond Mini Table Runner is a small filet crochet strip with a crisp two-color look. Four blocks are stacked in one continuous piece. Royal blue mesh frames a solid cream diamond, then cream mesh frames a blue diamond, and the pair repeats. A royal blue rope-edge border finishes all four sides.
The style is classic blue-and-white, like Delft tile or a farmhouse dresser scarf. It works under a vase, along a narrow shelf, or as a centerpiece mat. This pattern uses US crochet terms throughout.
The finished size is 5.7 x 14.9 in (14.5 x 37.8 cm) after blocking.
You work the strip from the bottom up in filet mesh rows. The diamonds are made in intarsia: each diamond has its own small bobbin, so the open mesh stays clean with no carried strands. When all 36 rows are done, you add a two-round border.
Finished Size and Construction
- Finished size: 5.7 x 14.9 in (14.5 x 37.8 cm)
- Skill level: Intermediate (filet mesh plus intarsia color changes)
- Terminology: US crochet terms
- Yarn weight: Sport weight (#2) mercerized cotton
- Hook: 3.0 mm
- Number of pieces: 1 (single continuous strip)
- Layout: 4 color blocks stacked vertically, 13 squares wide x 9 rows tall each
- Block size: 5.2 x 3.6 in (13.2 x 9.1 cm)
- Size before border: 5.2 x 14.4 in (13.2 x 36.6 cm)
- Border depth: 0.25 in (0.6 cm) on each side
Materials
Choose a smooth, mercerized sport-weight cotton. It gives sharp mesh squares and a firm drape. Soft or fuzzy yarns blur the diamond edges.
- Color A – Royal Blue: 40 g / 120 m (131 yd)
- Color B – Cream: 25 g / 75 m (82 yd)
These quantities include a safety margin of about 15%.
Tools:
– 3.0 mm crochet hook
– 4 yarn bobbins or small butterflies of yarn
– Tapestry needle
– Scissors
– Rust-proof pins and a blocking board
– Ruler or measuring tape
Abbreviations (US Terms)
- ch – chain
- dc – double crochet
- sc – single crochet
- rev sc – reverse single crochet (crab stitch)
- sk – skip
- sp – space
- st(s) – stitch(es)
- RS / WS – right side / wrong side
- MC – main color of the current block (the mesh color)
- CC – contrast color of the current block (the diamond color)
Special terms:
- Open square (O): ch 2, sk the next 2 sts (or the ch-2 sp), dc in the next dc.
- Solid square (S): Over an open square, work 2 dc in the ch-2 sp, then dc in the next dc. Over a solid square, work dc in each of the next 3 dc.
- Reverse sc: Working from left to right, insert the hook in the next st to the right, yo, pull up a loop, yo, and draw through both loops.
Every row has 13 squares and 40 sts: 14 dc posts plus 13 ch-2 sps or fills.
Gauge and Checkpoints
Gauge: 5 squares and 5 rows = 2 in (5.1 cm) in filet mesh, after blocking. Each square is 0.4 in (1.0 cm) wide and each row is 0.4 in (1.0 cm) tall.
Use Block 1 as your test piece. Work all 9 rows, pin it lightly flat, and measure it.
- After Row 1: width = 5.2 in (13.2 cm)
- After Block 1 (Row 9): height = 3.6 in (9.1 cm)
- After Block 2 (Row 18): height = 7.2 in (18.3 cm)
- After Block 3 (Row 27): height = 10.8 in (27.4 cm)
- After Block 4 (Row 36): 5.2 x 14.4 in (13.2 x 36.6 cm)
- After border: 5.7 x 14.9 in (14.5 x 37.8 cm)
If Block 1 is too big, your squares are larger than 0.4 in (1.0 cm). Go down 0.25 mm in hook size, or shorten your dc by pulling the first loop up less. If Block 1 is too small, go up 0.25 mm. If the height is off but the width is right, change only your dc height. Starting over at this point costs just 9 rows.
Pattern
Color Changes (Intarsia Method)
Each diamond row uses three strands: MC on the first side, CC in the center, and a second MC bobbin on the far side.
- Before Row 2 of each block, wind 1 CC bobbin of about 5 m (5.5 yd) and 1 MC bobbin of about 6 m (6.6 yd).
- Entering the diamond: Work the ch 2 of the last open square in MC, then drop MC to the WS. Work the boundary dc in CC.
- Leaving the diamond: Work the last CC dc (the far boundary post) until 2 loops remain on the hook. Finish it with the next MC strand.
- Always drop the old strand to the WS, and cross the strands at each change so no hole forms.
- If a strand has to move to reach its next post, carry it along the WS for no more than one square (3 sts). Where the new square is solid, work over the strand to hide it.
Both boundary posts of the diamond are worked in CC. Each diamond row therefore has (3 x S) + 1 CC stitches, and the diamond edges stay crisp and symmetrical.
Block Diagram (Used for Every Block)
Read each line as squares worked across that row. O squares use MC and S squares use CC.
| Block row | Squares | CC sts |
|---|---|---|
| 1 | 13 O | 0 |
| 2 | 6 O, 1 S, 6 O | 4 |
| 3 | 5 O, 3 S, 5 O | 10 |
| 4 | 4 O, 5 S, 4 O | 16 |
| 5 | 3 O, 7 S, 3 O | 22 |
| 6 | 4 O, 5 S, 4 O | 16 |
| 7 | 5 O, 3 S, 5 O | 10 |
| 8 | 6 O, 1 S, 6 O | 4 |
| 9 | 13 O | 0 |
The diamond is symmetrical, so the row direction does not change the motif. At its widest (Row 5), the diamond spans 7 squares, or 2.8 in (7.1 cm). It is also 7 rows tall, or 2.8 in (7.1 cm).
Block 1 (Rows 1–9): MC = Blue, CC = Cream
Row 1 (RS): With Blue, ch 44. Dc in 8th ch from hook. The 7 skipped ch count as the first dc, ch 2, and 2 skipped base ch. *Ch 2, sk 2 ch, dc in next ch; repeat from * 11 more times.
Result: 13 open squares, 40 sts.
Row 2: Ch 5 (counts as dc + ch 2), turn. Sk the first ch-2 sp and dc in the next dc to complete the first open square. Work 5 more O for 6 O total. Work 1 S in Cream with 4 CC dc, including both boundary posts. With the second Blue strand, work 6 O. Work the last dc in the 5th of the 7 skipped beginning ch.
Result: 40 sts (36 Blue, 4 Cream).
Rows 3–8: Begin each row with ch 5 (counts as dc + ch 2), turn. Follow the Block Diagram. End each row with a dc in the 3rd ch of the turning ch-5.
- Row 3: 40 sts (30 Blue, 10 Cream)
- Row 4: 40 sts (24 Blue, 16 Cream)
- Row 5: 40 sts (18 Blue, 22 Cream)
- Row 6: 40 sts (24 Blue, 16 Cream)
- Row 7: 40 sts (30 Blue, 10 Cream)
- Row 8: 40 sts (36 Blue, 4 Cream)
At the end of Row 8, cut the Cream bobbin and the second Blue strand, leaving 6 in (15.2 cm) tails.
Row 9: Ch 5, turn, and work 13 O in Blue. Work the final dc until 2 loops remain, then finish it with Cream. Cut Blue, leaving a 6 in (15.2 cm) tail.
Result: 40 sts.
Checkpoint: 5.2 x 3.6 in (13.2 x 9.1 cm).
Block 2 (Rows 10–18): MC = Cream, CC = Blue
Row 10: Ch 5 in Cream (counts as dc + ch 2), turn, and work 13 O.
Result: 40 sts.
Rows 11–17: Work Block rows 2–8 from the diagram. Cream is the mesh and Blue is the diamond. Wind a Blue bobbin and a second Cream bobbin before Row 11.
Row 18: Work 13 O in Cream. Change to Blue on the final yo. Cut Cream.
Checkpoint: height = 7.2 in (18.3 cm).
Block 3 (Rows 19–27): MC = Blue, CC = Cream
Repeat Block 1, Rows 2–9, but use a regular mesh row (Row 19 = 13 O) instead of the foundation row. Change to Cream on the final yo of Row 27.
Checkpoint: height = 10.8 in (27.4 cm).
Block 4 (Rows 28–36): MC = Cream, CC = Blue
Repeat Block 2. At the end of Row 36, do not change color. Fasten off Cream.
Checkpoint: 5.2 x 14.4 in (13.2 x 36.6 cm).
Weave in all color-change tails now. Weave each tail into a solid square of its own color, working through the dc posts and never across an open space.
Border
Border gauge: 7.5 sc per inch (2.5 cm), matched to the mesh. Each square is 3 sts wide over 0.4 in (1.0 cm), and each row is 0.4 in (1.0 cm) tall.
Round 1 (sc): With RS facing, join Blue in the last dc of Row 36 (a top corner). Ch 1.
- Top edge: 3 sc in the same st (corner), sc in each of the next 38 sts, 3 sc in the last st (corner).
- Side edge: Work 3 sc around each row-end post down the side. 36 rows x 3 = 108 sc.
- Bottom edge: Working in the free loops of the foundation ch, 3 sc in the first loop (corner), sc in each of the next 38 loops, 3 sc in the last loop (corner).
- Second side: 108 sc up the side, as before.
- Join with a sl st to the first sc.
Round 1 total: (2 x 38) + (2 x 10⁸) + (4 x 3) = 304 sc.
Counting the center sc of each 3-sc group as the corner stitch, each short side has 42 sts and each long side has 112 sts, corners included. Check: 2 x 42 + 2 x 112 − 4 shared corners = 304.
Round 2 (rev sc): Ch 1. Work rev sc in each sc around, with 2 rev sc in each corner sc. Join and fasten off.
Round 2 total: 304 (1 per existing st) + 4 (corner increases) = 308 sts.
Why the math works: The top and bottom edges take 40 sts across 5.2 in (13.2 cm), or 7.7 sts per inch. The long sides take 108 sts across 14.4 in (36.6 cm), or 7.5 sts per inch. That is the same density as the mesh, so the edges neither ruffle nor pull in. The 2 rounds add 0.25 in (0.6 cm) per side, which brings 5.2 x 14.4 in up to 5.7 x 14.9 in (14.5 x 37.8 cm).
Final Blocking
- Weave in the border tails.
- Soak the strip in cool water for 10 minutes. Press out the water in a towel without wringing.
- Lay it flat RS up on a blocking board.
- Pin the four corners to 5.7 x 14.9 in (14.5 x 37.8 cm).
- Pin along each long edge every 2 in (5.1 cm). Keep the block boundaries level at 3.6 in (9.1 cm) intervals.
- Nudge each open square square with a fingertip. Line up the mesh columns vertically.
- Let it dry completely, at least 12 hours, before unpinning.
Final Quality-Control Checklist
- [ ] Every row has 13 squares (40 sts)
- [ ] Each block measures 5.2 x 3.6 in (13.2 x 9.1 cm)
- [ ] All 4 diamonds are centered, 7 squares wide and 7 rows tall
- [ ] Both diamond boundary posts are in CC on every diamond row
- [ ] No floats are visible through the open squares
- [ ] Block colors alternate Blue / Cream / Blue / Cream
- [ ] Border Round 1 = 304 sc; Round 2 = 308 sts
- [ ] Finished size is 5.7 x 14.9 in (14.5 x 37.8 cm)
- [ ] All tails are woven into solid areas of their own color
Troubleshooting
Holes at color changes: You did not cross the strands. Twist the old and new strands once on the WS at every change.
A strand shows through the mesh: A float crossed an open square. Re-work that row and carry strands only behind solid squares, never more than 3 sts.
The strip narrows or widens: Count posts. Every row needs exactly 14 dc, including the turning ch-5 and the last dc in the turning ch.
The diamond is off-center: Check the O counts on both sides of the S squares. They must match the Block Diagram exactly.
Cream blocks are shorter than Blue blocks: Different dye lots can work up differently. Lengthen your dc slightly in Cream, then even out the difference when blocking.
The border ruffles: Use 2 sc per row-end on one long side as a test. If that lies flat, work the same on the other side and recount.
The border cups: Your tension is tight. Go up one hook size for the border only.
Care
Hand wash in cool water with mild soap, then reshape and dry flat. A warm iron through a pressing cloth will refresh the mesh.
Final Notes
The measurement chain is simple. Each square is 0.4 in (1.0 cm). Thirteen squares make a 5.2 in (13.2 cm) wide strip, and 9 rows make a 3.6 in (9.1 cm) block. Four blocks reach 14.4 in (36.6 cm), and the two-round border brings the strip to 5.7 x 14.9 in (14.5 x 37.8 cm). Measure Block 1, and every other number will follow.
Happy crocheting!