

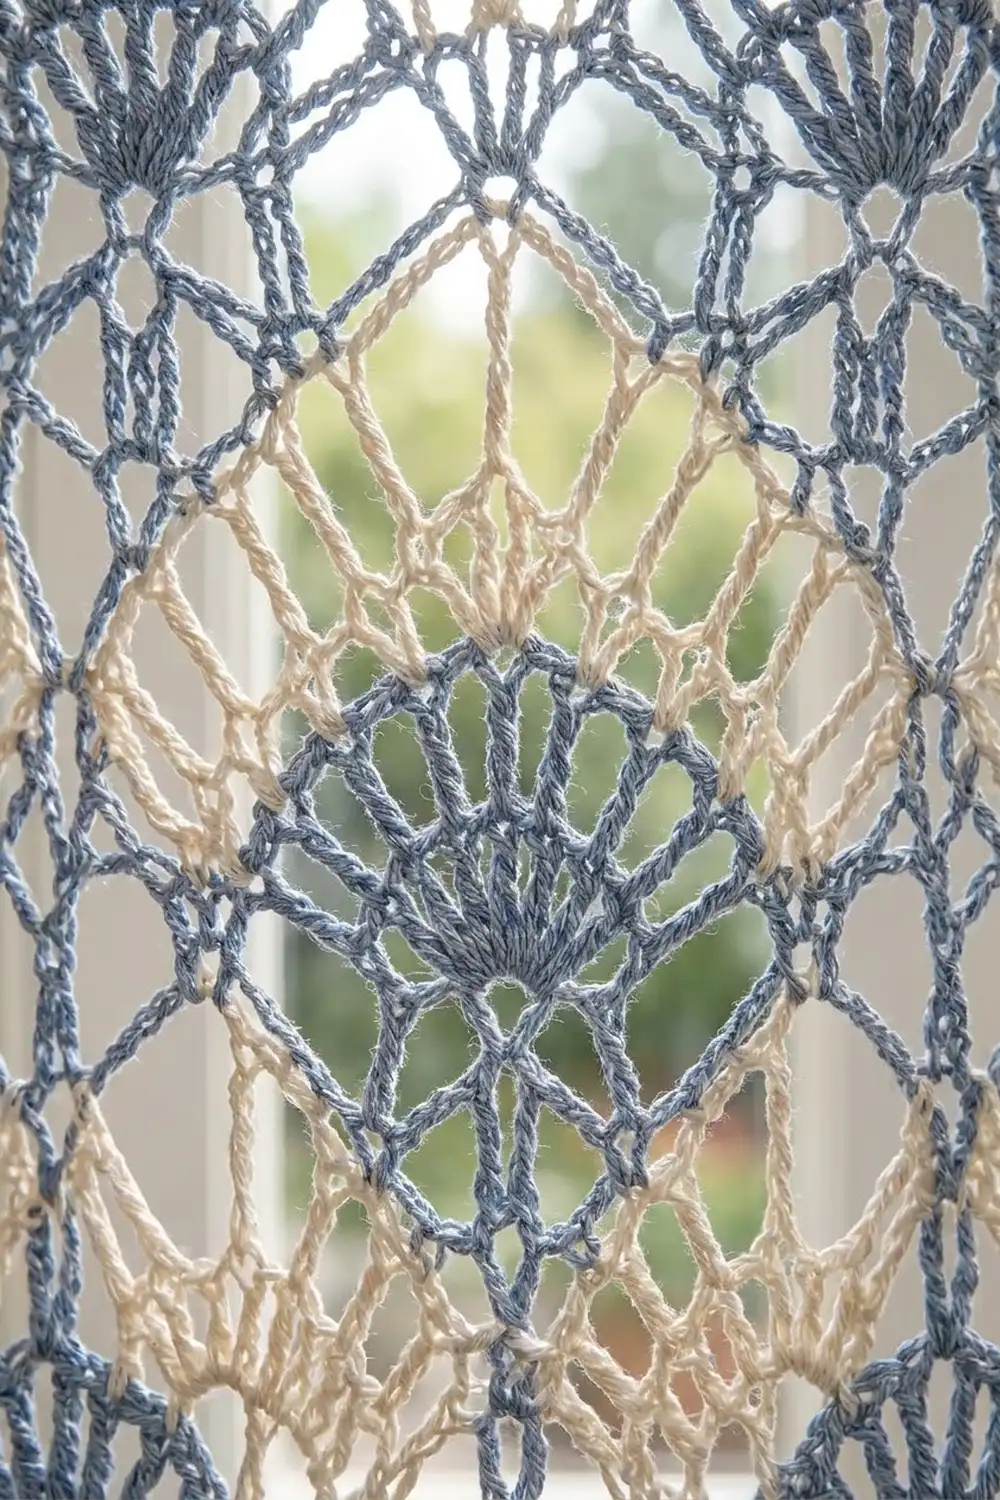
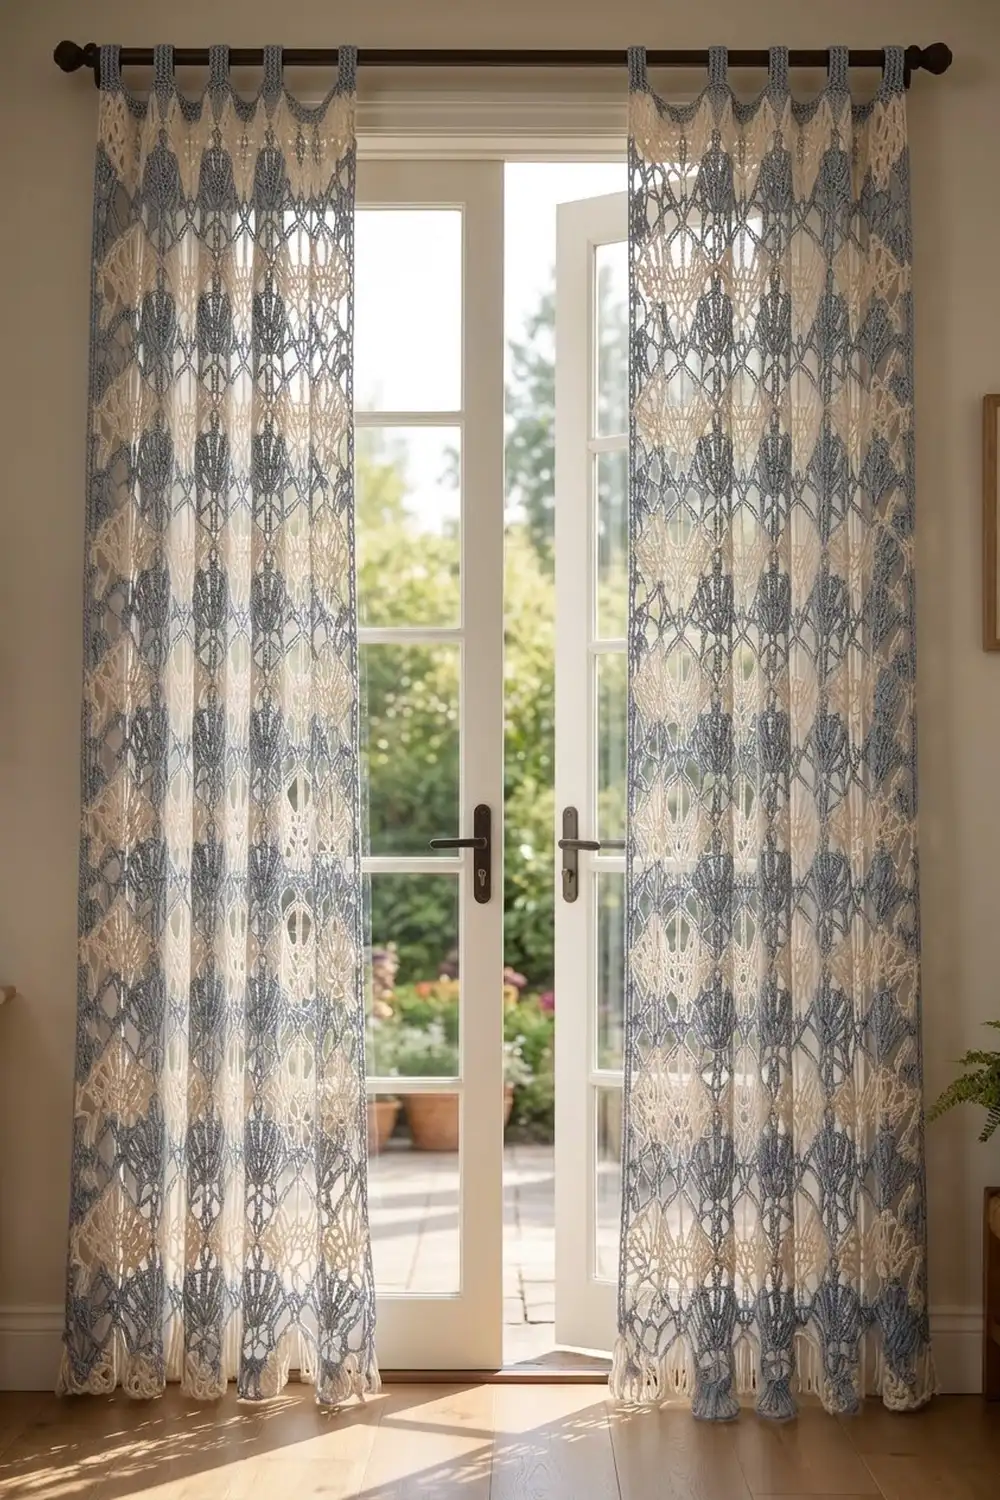
These airy curtain panels combine soft dove gray and warm cream in a lace fabric built from open shell fans. The fans sit in a staggered diamond lattice, so the finished curtains have an ornate, damask-inspired look while letting daylight through every opening.
The two colors run in alternating vertical stripes. Each fan is worked entirely in one color, and the stripe edges step gently with the lattice. The top of each panel has a ribbed gray rod casing, and the bottom has a tassel fringe that sways when the curtains move.
This pattern makes a pair of two identical panels. It uses US crochet terms. Each panel measures 54 in (137.2 cm) wide by 84 in (213.4 cm) from the bottom edge to the top of the casing. With the 4 in (10.2 cm) fringe, the total length is 88 in (223.5 cm).
Each panel is worked in one piece from the bottom up in a 4-row fan-and-lattice repeat. The vertical stripes are made with intarsia color changes. You then add four gray leveling rows, a narrow gray side border on each long edge, a folded ribbed casing, and the tassels.
Finished Size and Construction
- Finished size (each panel): 54 in (137.2 cm) wide × 84 in (213.4 cm) to top of casing; 88 in (223.5 cm) including fringe
- Skill level: Intermediate (lace plus intarsia color changes)
- Terminology: US crochet terms
- Yarn weight: Worsted (#4) cotton or cotton blend
- Hook: 5.0 mm (H-8)
- Number of pieces: 2 panels, each worked in one piece
- Layout: 13 vertical stripes per panel (7 gray, 6 cream), each 2 fan repeats wide
- Lace body size: 52 in (132.1 cm) wide × 80 in (203.2 cm) tall
- Size before border: 52 in (132.1 cm) × 81 in (205.7 cm), including the leveling rows
- Border depth: 1 in (2.5 cm) on each long side; casing 3 in (7.6 cm) finished; fringe 4 in (10.2 cm)
Materials
Yarn: Choose a smooth, mercerized or combed worsted cotton, about 180 m per 100 g. Cotton holds the fan shapes crisply and resists stretching better than acrylic. Avoid fuzzy yarns, which blur the lace.
Quantities for the pair:
- Gray (stripes, leveling rows, border, casing, tassels): 2,000 g (3,600 m), about 1,620 m per panel
- Cream (stripes, tassels): 1,300 g (2,340 m), about 990 m per panel
These quantities include a margin of roughly 10%. Buy all yarn from a single dye lot.
Tools:
- 5.0 mm (H-8) hook
- Tapestry needle
- Scissors
- Stitch markers
- Yarn bobbins or 13 small yarn cakes per panel
- A stiff card 4.5 in (11.4 cm) wide for tassels
- Tape measure
- Spray bottle and a large clean blocking surface
Abbreviations (US Terms)
- ch – chain
- sc – single crochet
- hdc – half double crochet
- dc – double crochet
- sp – space
- st(s) – stitch(es)
- BLO – back loop only
- RS / WS – right side / wrong side
Special stitches:
- Fan: (dc, ch 1) 4 times in the same st, then dc in that same st. This gives 5 dc and 4 ch-1 sps.
- Half fan: 3 dc separated by ch-1 sps, all in the same st. When a turning chain begins the half fan, the turning chain counts as the first dc.
Gauge and Checkpoints
Gauge after blocking:
- Lace: 1 repeat (8 foundation ch) = 2 in (5.1 cm) wide. One 4-row repeat = 4 in (10.2 cm) tall. Each fan row is 1.25 in (3.2 cm) and each lattice row is 0.75 in (1.9 cm).
- Sc: 4 sts and 4 rows = 1 in (2.5 cm).
- Hdc BLO: 4 sts and 3 rows = 1 in (2.5 cm).
Test swatch first: Ch 34 and work Rows 1–8 in one color. Block the swatch. It should measure 8 in (20.3 cm) wide (4 fans) by 8 in (20.3 cm) tall.
Checkpoints:
- After Row 4: 52 in (132.1 cm) wide, 4 in (10.2 cm) tall
- After Row 40: 40 in (101.6 cm) tall
- After Row 80: 80 in (203.2 cm) tall
- After Row 84: 81 in (205.7 cm) tall
- After side borders: 54 in (137.2 cm) wide
- After casing: 84 in (213.4 cm) tall
If the swatch is too big, go down 0.5 mm. If it is too small, go up 0.5 mm. Do not change the stitch counts, because the border and casing math depends on them.
Lace Body (Make 2)
Foundation: With gray, ch 210 loosely (8 × 26 + 2).
Stripe setup: Wind 7 gray and 6 cream bobbins. Row 1 is worked right to left on the RS. Each stripe is 2 fans wide:
GRAY – CREAM – GRAY – CREAM – GRAY – CREAM – GRAY – CREAM – GRAY – CREAM – GRAY – CREAM – GRAY
Color rule: In Row 1, the sc that ends a stripe (after its second fan) belongs to that stripe. Change to the next color in the final yarn over of that sc. From Row 2 onward, every stitch is worked in the same color as the stitch it is worked into. Ch-sps follow the stitch just made.
Row 1 (RS): Sc in 2nd ch from hook. Skip 3 ch, fan in next ch, skip 3 ch, sc in next ch; rep from * across. Turn.
(26 fans, 27 sc)*
Row 2 (WS, lattice): Ch 5 (counts as dc and ch 2). Sc in center dc of next fan, ch 2, dc in next sc. Ch 2, sc in center dc of next fan, ch 2, dc in next sc; rep from * across. Turn.
(27 dc, 26 sc, 52 ch-2 sps)*
Row 3 (RS, offset fans): Ch 4 (counts as dc and ch 1), then (dc, ch 1, dc) in first dc to make a half fan. Sc in next sc, fan in next dc; rep from * to the last sc. Sc in last sc, then half fan in 3rd ch of turning ch. Turn.
(25 fans, 2 half fans, 26 sc)*
Row 4 (WS, lattice): Ch 1, sc in first dc. Ch 2, dc in next sc, ch 2, sc in center dc of next fan; rep from * across, working the final sc in 3rd ch of turning ch. Turn.
(27 sc, 26 dc, 52 ch-2 sps)*
Row 5 (RS): Ch 1, sc in first sc. Fan in next dc, sc in next sc; rep from * across. Turn.
(26 fans, 27 sc)*
Row 5 places each fan directly above a Row 1 fan. Row 3 fans sit between them, which creates the diamond lattice.
Rows 6–80: Repeat Rows 2–5 for the pattern. You will finish with Row 80, a Row 4–type lattice row. That makes 20 full repeats.
Because of the color rule, the Row 3–type fans that sit on a stripe boundary take the color of the stripe on their right. This shifts the stripe edge half a repeat in those rows and gives the softly stepped stripes. Cut all stripe yarns after Row 80, leaving 6 in (15.2 cm) tails.
Leveling rows (gray):
Row 81 (RS, conversion row): Join gray. Ch 1, sc in first sc. Work 2 sc in next ch-2 sp, sc in next dc, 3 sc in next ch-2 sp, sc in next sc. 3 sc in next ch-2 sp, sc in next dc, 3 sc in next ch-2 sp, sc in next sc; rep from * 25 times. Turn.
(208 sc: first repeat 8 + 25 repeats × 8 = 208)*
Rows 82–84: Ch 1, sc in each sc across. Turn.
(208 sc)
The panel now measures 52 in (132.1 cm) × 81 in (205.7 cm).
Make All Pieces
Make 2 identical panels.
Per panel:
- Gray: 7 stripes, leveling rows, both side borders, casing, and 37 tassels
- Cream: 6 stripes and 18 tassels
Layout for the pair (RS facing, as hung):
PANEL A: GRAY CREAM GRAY CREAM GRAY CREAM GRAY CREAM GRAY CREAM GRAY CREAM GRAY
PANEL B: GRAY CREAM GRAY CREAM GRAY CREAM GRAY CREAM GRAY CREAM GRAY CREAM GRAY
The layout is symmetrical, so the panels do not need mirroring. Both inner edges and both outer edges are gray.
Joining
The two panels hang separately and are not joined to each other. The only joins are the intarsia joins between stripes within each panel.
Method: At each color change, drop the old color to the WS. Pick up the new color from under the old one so the strands twist. This closes the gap between stripes.
Stitch logic: Change color in the last yarn over of the final stitch of the old color. If a ch-2 sp crosses a boundary, work it in the color of the stitch just made.
Tension: Leave a little slack in the dropped strand. Pulling it tight puckers the stripe edge and narrows the panel. Untangle the bobbins at the end of every RS row.
Size checkpoint: Every 10 rows, lay the panel flat. Check that it measures 52 in (132.1 cm) across at both the bottom and the current row.
Border
Border gauge: 4 sc and 4 rows = 1 in (2.5 cm). For the casing, 4 hdc and 3 rows = 1 in (2.5 cm). All border sections are gray.
Side border (each long edge):
Row 1: With RS facing, join gray at the top corner of Row 84. Working down the row ends, sc evenly along the edge: 1 sc in each leveling row, 5 sc in each fan row, and 3 sc in each lattice row. Turn.
(4 + 40 × 5 + 40 × 3 = 324 sc)
Rows 2–4: Ch 1, sc in each sc. Turn.
(324 sc)
Fasten off. Repeat on the other long edge.
Casing:
Row 1: With RS facing, join at the top right corner. Ch 2 (does not count as a stitch). Hdc in the 4 border row ends, hdc in each of the 208 sc, and hdc in the 4 border row ends. Turn.
(4 + 208 + 4 = 216 hdc)
Rows 2–18: Ch 2, hdc BLO in each st. Turn.
(216 hdc)
Fold the casing in half to the WS. Whipstitch the loops of Row 18 to the base of Row 1, leaving both ends open. The finished casing is 3 in (7.6 cm) tall and fits rods up to 1.5 in (3.8 cm) in diameter.
Tassel fringe: Each tassel uses 6 strands made by wrapping the card, so each strand is 9 in (22.9 cm) long. Fold the strands and attach with a lark’s head knot. Trim to 4 in (10.2 cm).
Place the tassels at 1 in (2.5 cm) intervals along the bottom edge:
- 53 tassels in the foundation chain, under every Row 1 sc and every fan center (ch 2, 6, 10, … 210)
- 1 tassel at the bottom corner of each side border
This gives 55 tassels per panel. Color them as follows:
- Stripe-boundary points and border corners: gray (16)
- The 3 interior points of each stripe: that stripe’s color (21 gray, 18 cream)
Why the math works:
- 52 in body + 2 × 1 in border = 54 in. The casing’s 216 hdc ÷ 4 = 54 in.
- The side border’s 324 sc ÷ 4 = 81 in, which exactly matches 80 in of lace plus 1 in of leveling rows.
- Tassels: 54 in ÷ 1 in = 54 intervals, which needs 55 points.
Final Blocking
- Weave in all ends along the stripe boundaries on the WS.
- Soak one panel in cool water for 15 minutes. Press out the water without wringing.
- Lay it flat and pin it to 54 in (137.2 cm) × 84 in (213.4 cm).
- Open each fan with your fingertips so the ch-1 sps spread evenly.
- Pin the casing straight and the side borders parallel.
- Let it dry completely. Repeat with the second panel.
- Hang both panels for 24 hours, then trim the tassels level.
Final Quality-Control Checklist
- Each panel measures 54 in (137.2 cm) × 84 in (213.4 cm).
- There are 13 stripes, with gray at both edges.
- Every fan is a single color, and there are no gaps at stripe boundaries.
- The side borders are flat, with 324 sc per side.
- The casing is straight, closed along its length, and open at both ends.
- There are 55 tassels per panel, all 4 in (10.2 cm) long.
- The two panels hang at matching lengths.
Troubleshooting
- Panel narrows as you go: Your lattice ch-2s are too tight. Loosen them or go up a hook size for the lattice rows only.
- Fans cup or ruffle: Check that each fan has exactly 4 ch-1 sps and is worked into the correct stitch.
- Holes at color changes: Twist the yarns at every change.
- Wavy side border: Recount the sts in border Row 1 against the 5/3/1 rule.
- Panels lengthen when hung: Cotton drops slightly over time. Hang-block both panels and compare them before trimming the fringe.
- Uneven tassels: Trim again after the panels have hung for a day.
Optional: For 96 in (243.8 cm) curtains, work 2 extra pattern repeats, which add 8 in (20.3 cm). Increase the side border to 356 sc per side and add about 15% more yarn.
Care
Hand wash in cool water, or machine wash on a gentle cold cycle inside a mesh bag. Lay flat to dry and reshape the fans while damp.
Final Notes
Everything follows one measurement chain:
- 26 repeats at 2 in = 52 in of lace.
- The 4-row repeat at 4 in builds 80 in of body.
- Four leveling rows bring the panel to 81 in.
- The 1 in side borders widen it to 54 in.
- The 3 in casing finishes it at 84 in.
- The 4 in fringe completes 88 in.
Check each stage against these numbers and both panels will hang evenly. Happy crocheting!