

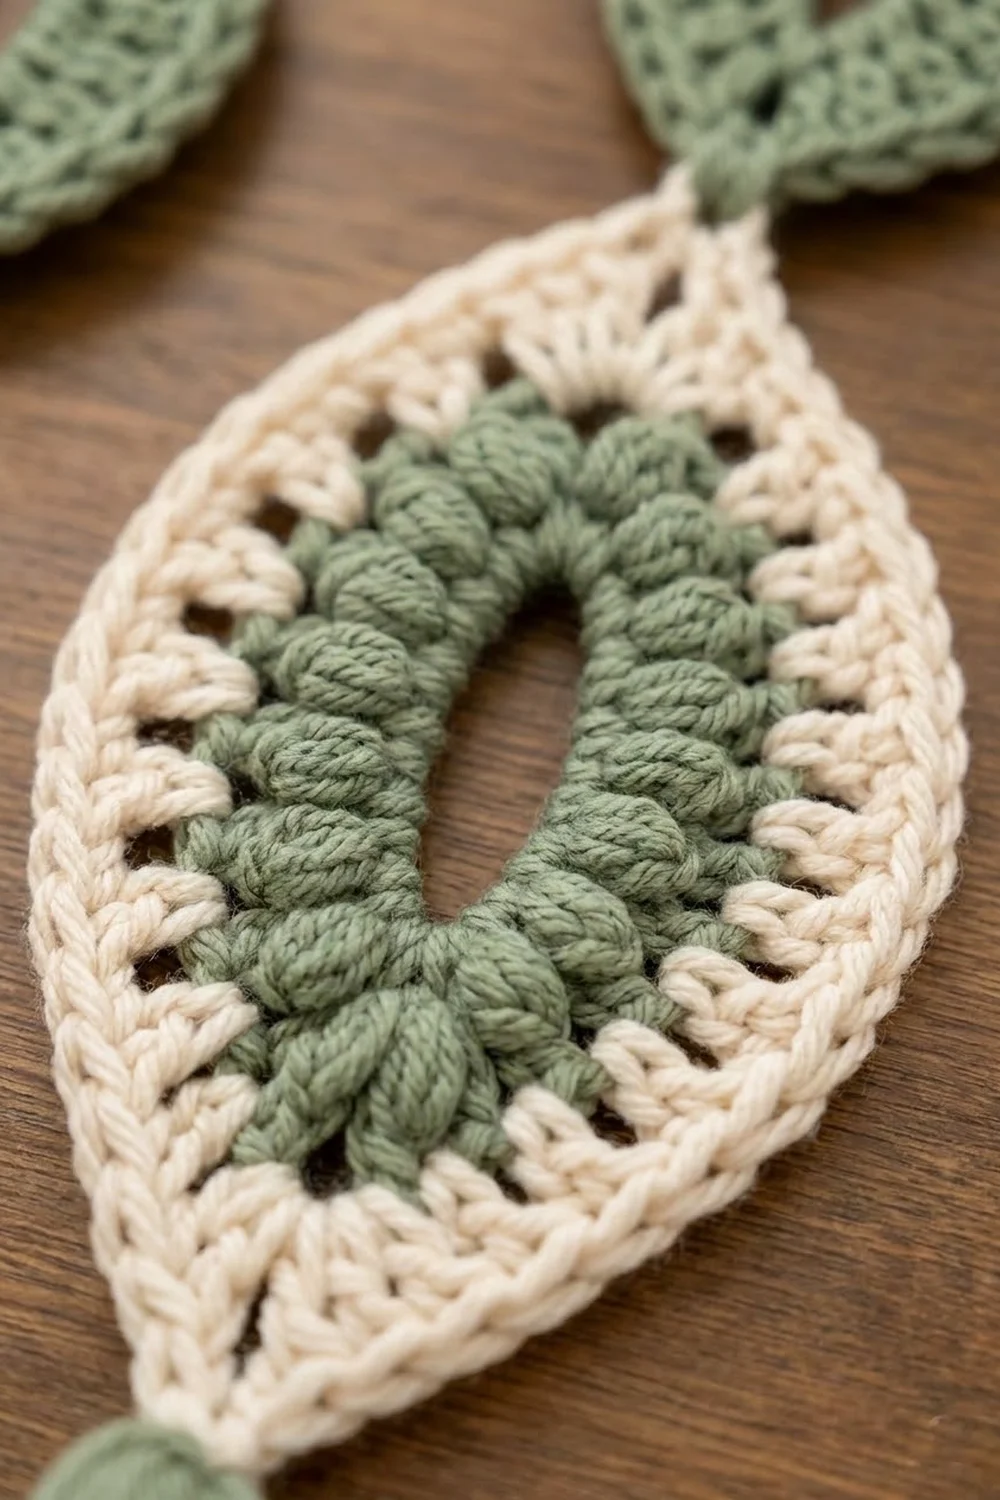
The Willow Lace Leaf is a small, upright leaf motif. It has pointed tips at the top and bottom and an open channel down the center. The body is sage green popcorn stitches, and airy cream lace frames it on both sides. The two halves are exact mirror images.
The look is soft and natural. Muted sage sits against warm cream. The popcorns give the body a raised, bumpy texture, and the chain lace keeps the outline light. A small cream loop at the top tip lets you hang the leaf on its own.
The finished motif is 3 in (7.6 cm) tall and 2.25 in (5.7 cm) wide, not counting the hanging loop. With the loop, it is about 3.75 in (9.5 cm) tall. This pattern uses US crochet terms throughout.
You work the motif in the round from the center out. A chain ring forms the open channel. Sage green rounds build the textured body. Two cream rounds of chain-and-single-crochet lace form the openwork border, and a chain loop at the top tip finishes the piece.
Finished Size and Construction
- Finished size: 3 in (7.6 cm) tall x 2.25 in (5.7 cm) wide; 3.75 in (9.5 cm) tall with the hanging loop
- Skill level: Easy (advanced beginner)
- Terminology: US crochet terms
- Yarn weight: DK / light worsted (#3), cotton or cotton blend
- Hook: 3.5 mm (E-4)
- Number of pieces: 1 (single motif)
- Layout: one upright leaf, pointed at the top and bottom, with an open center channel
- Piece size (sage body, Rounds 1-3): 2 in (5.1 cm) tall x 1.25 in (3.2 cm) wide
- Size before border: 2 in (5.1 cm) x 1.25 in (3.2 cm)
- Border depth: 0.5 in (1.3 cm) on every edge (two cream lace rounds)
Materials
Choose a smooth cotton in DK weight, either mercerized or matte. Cotton holds the pointed tips and keeps the lace loops crisp. Avoid fuzzy or very stretchy yarns. They blur the popcorns and let the center channel close up.
If you use worsted weight (#4) instead, the motif grows to roughly 3.5 in (8.9 cm) tall. Use the checkpoints below to decide whether to change hooks.
Yarn (DK / #3, about 2.4 m per gram):
- Color A – Sage green: 5 g, about 12 m (13 yd)
- Color B – Cream: 4 g, about 10 m (11 yd)
These amounts include a margin of about 30% for a test motif, yarn tails, and hook changes.
Tools:
- 3.5 mm (E-4) crochet hook
- Tapestry needle
- Scissors
- Stitch marker
- Ruler or tape measure
- Rust-proof pins and a foam blocking mat
- Spray bottle with water
Abbreviations (US Terms)
- ch – chain
- sl st – slip stitch
- sc – single crochet
- dc – double crochet
- PC – popcorn (see below)
- sk – skip
- st(s) – stitch(es)
- sp – space
- lp(s) – loop(s)
- [ ] – repeat the steps in brackets the number of times stated
Special stitch – Popcorn (PC): Work 4 dc in the same stitch. Take the hook out of the loop. Insert the hook from front to back through the top of the first dc of the group. Pick up the dropped loop and pull it through. Ch 1 to close. The closing ch 1 is not a stitch. Work the next stitch into the next stitch of the previous round, not into this ch.
Gauge and Checkpoints
Flat gauge with the 3.5 mm hook: 22 sc and 24 rows = 4 in (10.2 cm). For a motif this small, the round checkpoints below matter more than a swatch.
Make one test motif first. Lay it flat and measure at each stage without stretching the tips:
- After Round 1: the flattened ring is 1.25 in (3.2 cm) long.
- After Round 2: 1.5 in (3.8 cm) tall x 0.6 in (1.5 cm) wide.
- After Round 3 (sage body done): 2 in (5.1 cm) tall x 1.25 in (3.2 cm) wide.
- After Round 4: 2.5 in (6.4 cm) tall x 1.75 in (4.4 cm) wide.
- After Round 5: 3 in (7.6 cm) tall x 2.25 in (5.7 cm) wide.
If the motif is too big by more than 0.25 in (0.6 cm) after Round 3, switch to a 3.0 mm hook. If it is too small by the same amount, switch to a 4.0 mm hook. Check again after Round 3 before you start the border, because the border always adds 0.5 in (1.3 cm) to each edge.
Pattern
Keep the right side facing you the whole time. Do not turn between rounds.
Round 1 – Center Channel (Color A, sage)
Ch 16. Sl st in the first ch to form a ring. Make sure the chain is not twisted. (16 ch)
Flatten the ring so it stands upright. The joining ch is the bottom tip. Count 8 ch along; the 9th ch is the top tip. Each side has 7 ch between the tips: 1 + 7 + 1 + 7 = 16.
This ring stays open and becomes the center channel.
Round 2 – Single Crochet Base (Color A)
Ch 1. Work 3 sc in the bottom tip ch, sc in each of the next 7 ch, 3 sc in the top tip ch, sc in each of the next 7 ch. Sl st to the first sc. (20 sc)
Count: 3 + 7 + 3 + 7 = 20. Mark the center sc of each 3-sc group. These are the new tip stitches. Between them, each side now has 9 sts (1 + 7 + 1).
Keep your tension even and relaxed. If the sc are too tight, they squeeze the ring and narrow the channel.
Checkpoint: 1.5 in (3.8 cm) x 0.6 in (1.5 cm).
Round 3 – Popcorn Body (Color A)
Sl st in the next sc (the bottom tip center). Ch 3 (counts as the first dc), ch 2, dc in the same st. Bottom tip made.
Side 1: [Dc in next st, PC in next st] 4 times, dc in next st. (9 sts: 5 dc, 4 PC)
Top tip: (Dc, ch 2, dc) in the marked top tip st.
Side 2: [Dc in next st, PC in next st] 4 times, dc in next st. (9 sts: 5 dc, 4 PC)
Sl st to the top of the beginning ch-3. (22 sts: 14 dc, 8 PC, plus 2 ch-2 sps)
Count: 9 + 9 side sts + 4 tip dc = 22. The (dc, ch 2, dc) groups sharpen the tips. Because there is a dc on each side of every popcorn, the edge stays level.
Fasten off Color A and weave in the tail. Checkpoint: 2 in (5.1 cm) x 1.25 in (3.2 cm).
Border
The two cream rounds make the lacy openwork sides. Together they form the border.
Border gauge: each ch-3 lp in Round 4 spans 2 sts of Round 3 and adds 0.25 in (0.6 cm) of depth. Each ch-4 lp in Round 5 adds another 0.25 in (0.6 cm). Total border depth is 0.5 in (1.3 cm) per edge.
Round 4 – Inner Lace (Color B, cream)
Join Color B with a sl st in the bottom tip ch-2 sp. Ch 1, then work (sc, ch 3, sc) in the same sp.
Side 1: [Ch 3, sk next st, sc in next st] 5 times, ch 3, sk next st. (5 sc, 6 ch-3 lps)
Top tip: (Sc, ch 3, sc) in the top tip ch-2 sp.
Side 2: Repeat Side 1. (5 sc, 6 ch-3 lps)
Sl st to the first sc. (14 sc, 14 ch-3 lps)
Count: the 2 tips give 4 sc and 2 lps. The 2 sides give 10 sc and 12 lps. Totals: 14 sc and 14 lps.
Why the math works: each side has 11 sts between the two ch-2 sps (1 tip dc + 9 side sts + 1 tip dc). The 5 repeats of “skip one, sc in the next” use 10 sts, and the final skip uses the 11th. Every sc lands on a dc and every popcorn is skipped, so all 4 popcorns on each side stay visible inside a lace window.
Checkpoint: 2.5 in (6.4 cm) x 1.75 in (4.4 cm).
Round 5 – Outer Lace and Hanging Loop (Color B)
Sl st into the next ch-3 lp (the bottom tip lp). Ch 1, then work (sc, ch 4, sc) in the same lp.
Side 1: [Ch 4, sc in next ch-3 lp] 6 times, ch 4. (6 sc, 7 ch-4 lps)
Top tip: (Sc, ch 12, sc) in the top tip ch-3 lp. The ch-12 becomes the hanging loop.
Side 2: Repeat Side 1. (6 sc, 7 ch-4 lps)
Sl st to the first sc. (16 sc, 16 lps: 15 ch-4 lps and 1 ch-12 lp)
Count: the tips give 4 sc and 2 lps. The sides give 12 sc and 14 lps. Each side has 1 more lp than in Round 4 (7 instead of 6). That extra lp lets the lace spread around the curve without cupping.
Fasten off.
Hanging Loop Reinforcement (Color B)
Join Color B with a sl st in the sc just before the ch-12 loop. Work 16 sc over the ch-12 loop. Sl st in the sc after the loop. Fasten off. (16 sc over the loop)
The covered loop stands about 0.75 in (1.9 cm) above the top tip and keeps its shape on a hook or cord.
Final checkpoint: 3 in (7.6 cm) x 2.25 in (5.7 cm), plus the loop.
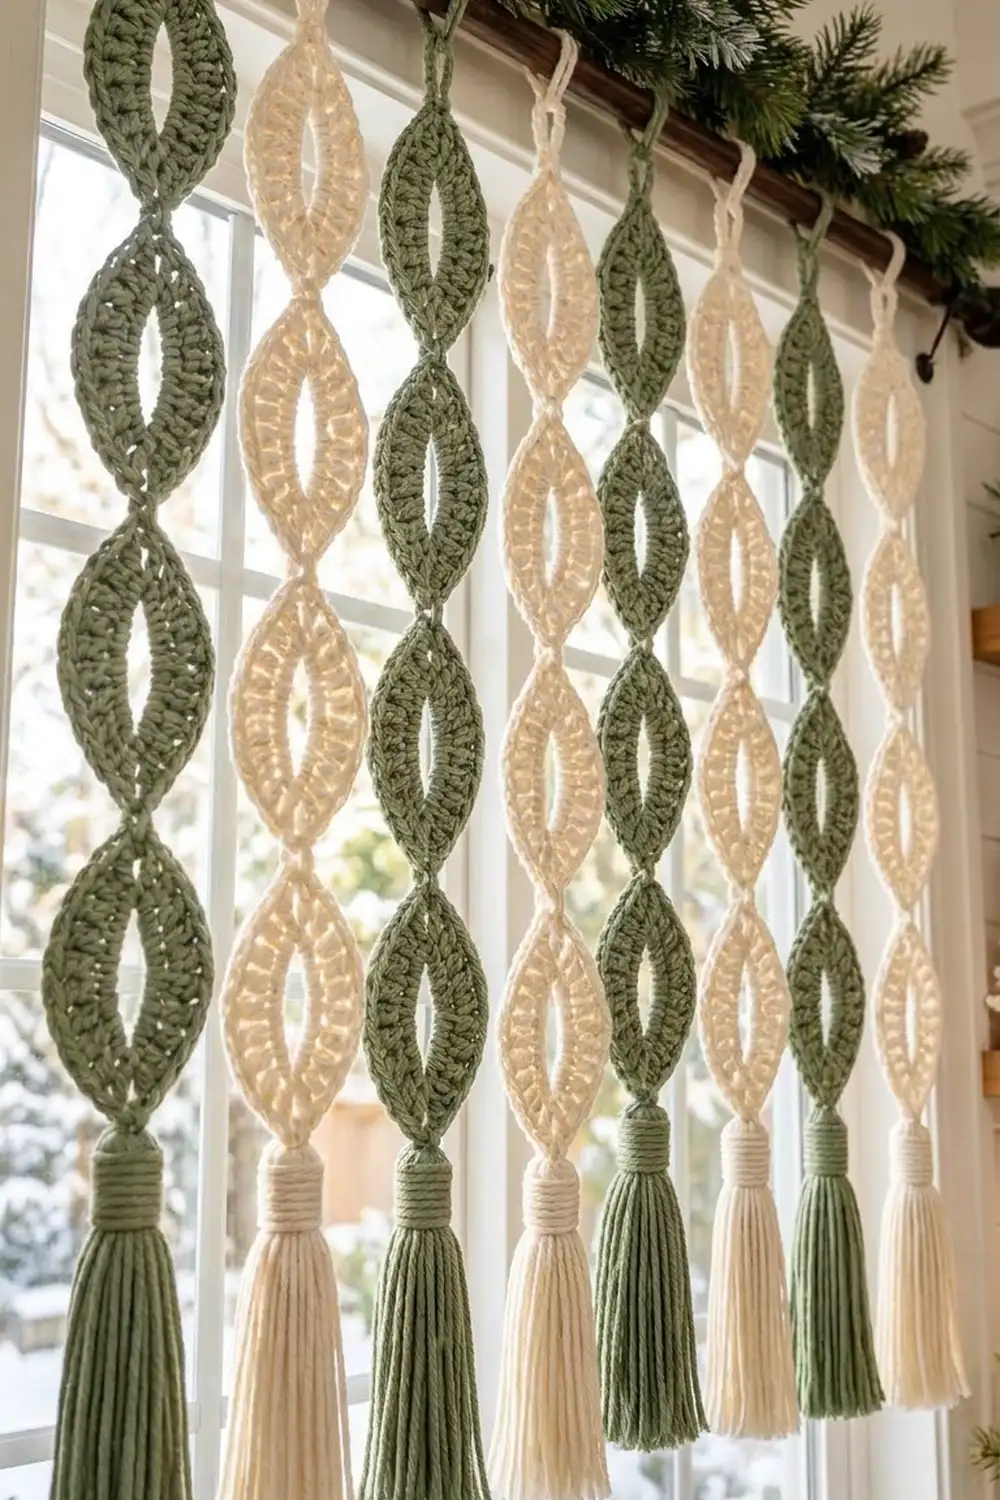
Optional: to make something bigger, crochet several motifs, tie a cream or sage tassel to each bottom tip, and string them in a vertical line for a curtain-style garland. The single motif above is the complete pattern.
Final Blocking
- Weave in all ends along the back of the stitches, away from the lace loops.
- Mist the motif with water until it is damp but not soaked.
- Lay it right side up on the blocking mat.
- Pin the bottom and top tips so the motif measures 3 in (7.6 cm) tall.
- Pin the widest point of each side so it measures 2.25 in (5.7 cm) wide.
- Pin each ch-4 lp outward so the lace opens evenly on both sides.
- Put a pin or a rolled strip of paper inside the center channel to keep it open while it dries.
- Pin the hanging loop straight up.
- Let the motif dry completely before you unpin it, usually 2-4 hours.
Final Quality-Control Checklist
- The motif measures 3 in (7.6 cm) x 2.25 in (5.7 cm), not counting the loop.
- The center channel is open along its full 1.25 in (3.2 cm) length.
- Round 2 has 20 sc. Round 3 has 22 sts, with 4 popcorns on each side.
- All 8 popcorns stand out on the right side.
- Round 4 has 6 ch-3 lps per side. Round 5 has 7 ch-4 lps per side.
- The two sides mirror each other, with the same loop count and popcorn placement.
- The top and bottom tips are sharp points, not rounded.
- The hanging loop is covered with 16 sc and centered on the top tip.
- All ends are woven in and hidden from the front.
Troubleshooting
Twisted center channel: the Round 1 chain was twisted when you joined it. Start again and lay the chain flat before the sl st.
Channel closes up: the Round 2 sc are too tight around the ring. Loosen your tension, or use a 4.0 mm hook for Round 2 only.
Popcorns push to the back: you are inserting the hook from back to front when you close them. Always insert from the front.
Motif curls or cups: the border is too tight. Loosen the chains in Rounds 4 and 5, or go up 0.5 mm for the cream rounds only.
Lace edge ruffles: the chains are too loose. Go down 0.5 mm for the cream rounds.
Tips look rounded: check that each tip has (dc, ch 2, dc) in Round 3 and (sc, ch 3, sc) in Round 4. Pin the tips sharply when blocking.
Wrong count in Round 4: you probably worked into the closing ch 1 of a popcorn. Count 11 sts per side between the ch-2 sps and check again.
Sides do not match: count each side separately after Round 3. Both should read dc, PC, dc, PC, dc, PC, dc, PC, dc.
Care
Hand wash in cool water with mild soap, press out the water gently, and dry flat. If the motif loses its shape, pin the tips and lace loops again.
Final Notes
The measurements build step by step. Round 1 sets a 1.25 in (3.2 cm) open channel. Round 2 brings the motif to 1.5 in (3.8 cm) x 0.6 in (1.5 cm). Round 3 finishes the sage popcorn body at 2 in (5.1 cm) x 1.25 in (3.2 cm). Rounds 4 and 5 each add 0.25 in (0.6 cm) of cream lace to every edge. That gives a 0.5 in (1.3 cm) border and a finished leaf of 3 in (7.6 cm) x 2.25 in (5.7 cm).
Check your counts at Rounds 2, 3, and 4, and the rest follows: 20 sc, then 22 sts with 8 popcorns, then 14 lace loops, then 16 loops including the hanging loop.
Happy crocheting!