

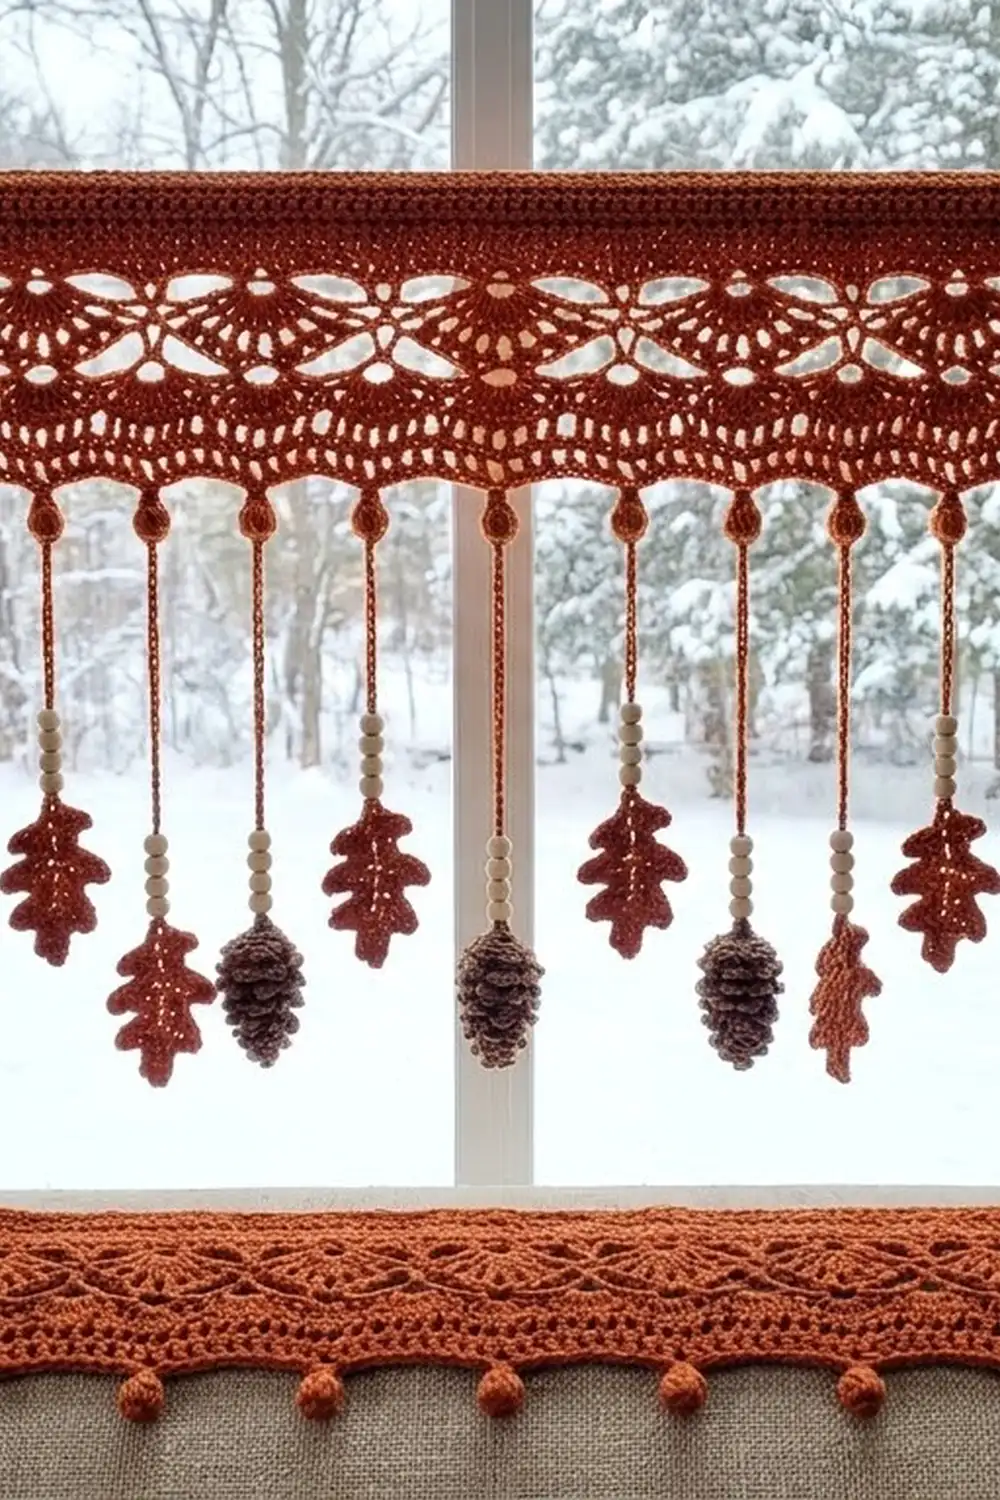
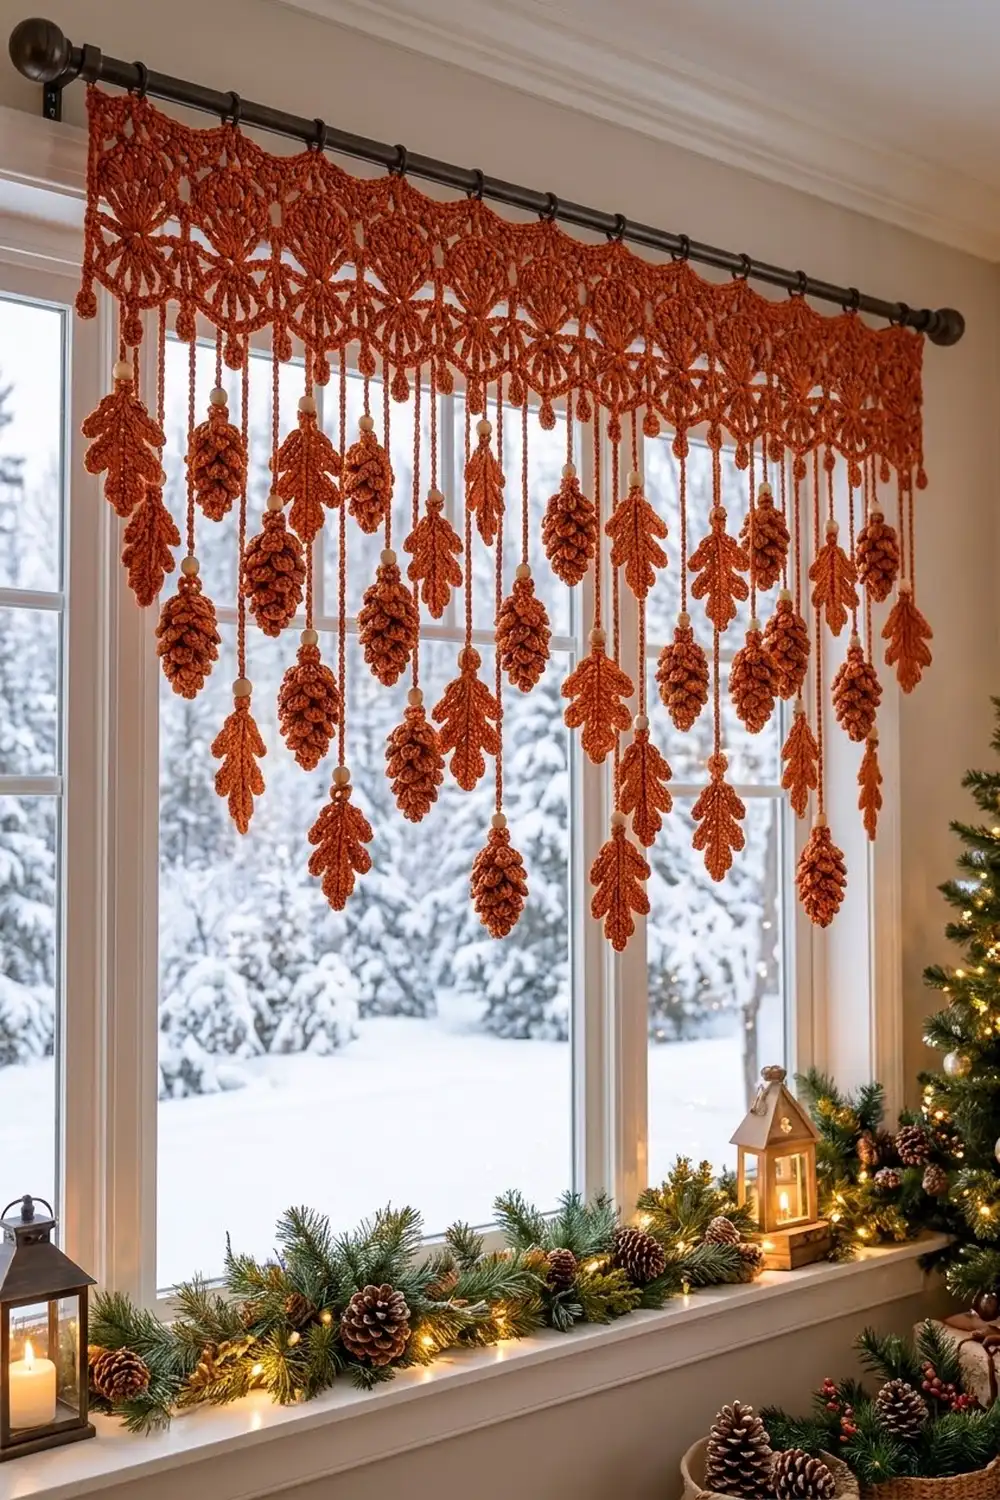
The Ember Woodland Valance is a lace window topper in one warm rust color. A straight header of shells and open fans runs across the top. Below it, chain strands hang down, each ending in an oak leaf or a small textured pinecone, with a natural wooden bead just above every ornament.
It’s a cozy, cabin-style piece. Use it for autumn and keep it up through winter, where the rust looks good against snow, greenery, and warm lights. The pattern uses US crochet terms throughout.
The header finishes at 40.5 in (102.9 cm) wide and 4.5 in (11.4 cm) deep, plus 0.75 in (1.9 cm) of bobble drops. The longest strand reaches 19.25 in (48.9 cm) from the top edge.
You’ll work the header flat in rows from a foundation chain, add a single-crochet border with hanging tabs and teardrop drops, then make 11 leaves and 10 pinecones. Each ornament gets its own beaded chain strand and is attached at a marked stitch along the bottom edge.
Finished Size and Construction
- Finished size: 40.5 in × 4.5 in (102.9 cm × 11.4 cm) header; longest drop 19.25 in (48.9 cm) overall
- Skill level: Intermediate
- Terminology: US crochet terms
- Yarn weight: Worsted (#4)
- Hooks: 5.0 mm (H-8) for the header; 4.0 mm (G-6) for the ornaments
- Number of pieces: 1 header + 21 ornaments (11 leaves, 10 pinecones)
- Layout: 21 strands in one row, spaced 2 in (5.1 cm) apart
- Piece size: leaf 3 × 2 in (7.6 × 5.1 cm); pinecone 2.75 × 1.5 in (7.0 × 3.8 cm)
- Size before border: 40 × 3.5 in (101.6 × 8.9 cm)
- Border depth: 0.25 in (0.6 cm) on each side, plus one extra 0.25 in (0.6 cm) row at the top and at the bottom
Materials
Choose a smooth worsted yarn with good stitch definition, such as a cotton blend or a soft acrylic, at about 180 m per 100 g. Fuzzy yarns hide the fan spokes and the pinecone scales.
- Rust / Burnt Orange: 250 g (450 m) in total
- Header and border: 80 g (144 m)
- 10 pinecones: 80 g (144 m)
- 11 leaves: 35 g (63 m)
- Strands and tabs: 15 g (27 m)
- 23 round natural wooden beads, 10 mm (1.0 cm), with a hole of at least 3 mm (21 used + 2 spare)
- 20 g polyester fiberfill
- 5.0 mm (H-8) and 4.0 mm (G-6) hooks
- 21 locking stitch markers
- Tapestry needle, scissors, tape measure
- Rustproof pins and a blocking mat
The total of 250 g includes a margin of about 15%. The itemized amounts add up to 210 g, so you have room for a test swatch and a re-made ornament.
Abbreviations (US Terms)
- ch: chain
- sl st: slip stitch
- sc: single crochet
- hdc: half double crochet
- dc: double crochet
- tr: treble crochet
- sc2tog: single crochet 2 together
- inc: 2 sc in the same stitch
- BLO / FLO: back loop only / front loop only
- sp: space
- st(s): stitch(es)
Special stitches
- Fan: (dc, ch 1) 7 times in the same stitch, then dc in that stitch again. That makes 8 dc and 7 ch-1 sps.
- 4-dc bobble: (yo, insert hook, pull up a loop, yo, pull through 2 loops) 4 times in the same stitch, then yo and pull through all 5 loops.
- Drop: ch 6, 4-dc bobble in the 4th ch from the hook, sl st in each of the next 2 ch. This brings you back to the edge.
- Scale (worked over 3 FLOs): sl st in next FLO, (hdc, dc, hdc) in next FLO, sl st in next FLO.
Gauge and Checkpoints
Header gauge (5.0 mm hook): 12 sc and 16 sc rows = 4 in (10.2 cm). One fan repeat (12 sts) = 4 in (10.2 cm).
Test before you commit. Make one pinecone and one leaf first, and work Rows 1–4 of the header over a short chain of 25 (24 sc, which is 2 fan repeats). Measure the fan repeat.
Checkpoints:
- Row 1: 121 sc measure 40 in (101.6 cm). Expect a hair over 40 in, because the single edge stitch is extra.
- Row 4: the distance from valley sc to valley sc is 4 in (10.2 cm), and the piece is 2.25 in (5.7 cm) tall.
- Row 7: 40 × 3.5 in (101.6 × 8.9 cm).
- Border Round 1: 40.5 × 4 in (102.9 × 10.2 cm).
- Finished header: 40.5 × 4.5 in (102.9 × 11.4 cm).
- Leaf: 3 × 2 in (7.6 × 5.1 cm). Pinecone: 2.75 × 1.5 in (7.0 × 3.8 cm).
If your piece is too big, go down 0.5 mm. If it’s too small, go up 0.5 mm. Always change the hook rather than the stitch counts, because the strand spacing depends on the 12-stitch repeat.
Header Pattern
Use the 5.0 mm hook.
Foundation: Ch 122.
Row 1 (WS): Sc in the 2nd ch from the hook and in each ch across. Turn. (121 sc)
Row 2 (RS, small shells): Ch 1, sc in the first sc. Skip 2 sc, 7 dc in next sc, skip 2 sc, sc in next sc. Repeat from * 20 times. Turn. (21 sc, 20 shells of 7 dc)
Row 3 (WS, mesh): Ch 5 (counts as dc and ch 2). Sc in the 4th (center) dc of the next shell, ch 2, dc in next sc. Ch 2, sc in center dc of next shell, ch 2, dc in next sc. Repeat from * 19 more times. Turn. (21 dc, 20 sc, 40 ch-2 sps)
Row 4 (RS, large fans): Ch 1, sc in the first dc. Ch 2, skip (ch-2 sp, sc, ch-2 sp), Fan in next dc, ch 2, skip (ch-2 sp, sc, ch-2 sp), sc in next dc. Repeat from * 10 times. The last sc goes in the 3rd ch of the turning ch. Turn. (11 valley sc, 10 fans = 80 dc, 70 ch-1 sps, 20 ch-2 sps)
Each fan sits centered over a pair of small shells, and the open ch-1 spokes give the radiating look.
Row 5 (WS, fan tops): Ch 1, sc in the first sc. Ch 3, skip ch-2 sp, sc in the first dc of the fan, (ch 1, sc in next dc) 7 times, ch 3, skip ch-2 sp, sc in next valley sc. Repeat from * 10 times. Turn. (91 sc = 11 valley + 80 arc; 20 ch-3 sps; 70 ch-1 sps)
Row 6 (RS, leveling): Ch 4 (counts as tr). Tr in next ch-3 sp, hdc in the first arc sc, sc in each of the next 7 ch-1 sps (skip the arc sc between them), hdc in the last arc sc, tr in next ch-3 sp, tr in next valley sc. Repeat from * 10 times. Turn.
(This is a conversion row: 1 + (10 × 12) = 121 sts)
The tall tr stitches fill the dips between fans so the top becomes straight.
Row 7 (WS): Ch 1, sc in each st across, with the last sc in the top of the turning ch. Turn. (121 sc)
Check: 40 × 3.5 in (101.6 × 8.9 cm). Don’t fasten off.
Leaves (make 11)
Use the 4.0 mm hook. Ch 13.
Side 1, tip to stem:
- Sl st in the 2nd ch from the hook.
- Sc in next ch, then (hdc, dc, hdc) in next ch.
- Sl st in next ch, sc in next ch, then (dc, tr, dc) in next ch.
- Sl st in next ch, sc in next ch, then (dc, tr, dc) in next ch.
- Sl st in next ch, (sc, hdc, sc) in next ch, then sc in the last ch.
(20 sts, 4 lobes)
Stem: Ch 1. Rotate the leaf to work along the opposite side of the foundation chain.
Side 2, stem to tip:
- Sc in the same last ch, then (sc, hdc, sc) in next ch.
- Sl st in next ch, (dc, tr, dc) in next ch, sc in next ch.
- Sl st in next ch, (dc, tr, dc) in next ch, sc in next ch.
- Sl st in next ch, (hdc, dc, hdc) in next ch, sc in next ch.
(19 sts, 4 lobes)
Tip: Ch 2, sl st in the first sl st. Fasten off and weave in the ends. (39 sts in total, 8 lobes)
The foundation chain forms the center vein. The leaf measures 3 × 2 in (7.6 × 5.1 cm).
Pinecones (make 10)
Use the 4.0 mm hook. Work in a continuous spiral without joining the rounds. From Round 2 on, work every stitch in BLO.
- Rnd 1: 6 sc in a magic ring. (6)
- Rnd 2: (sc, inc) 3 times. (9)
- Rnd 3: (2 sc, inc) 3 times. (12)
- Rnd 4: (3 sc, inc) 3 times. (15)
- Rnd 5: (4 sc, inc) 3 times. (18)
- Rnds 6–8: Sc in each st. (18)
- Rnd 9: (4 sc, sc2tog) 3 times. (15) Stuff firmly.
- Rnd 10: (3 sc, sc2tog) 3 times. (12)
- Rnd 11: (2 sc, sc2tog) 3 times. (9)
- Rnd 12: (sc, sc2tog) 3 times. (6)
Fasten off. Draw the tail through the front loops of the last 6 sts and close tightly.
Scales: The free front loops of Rnds 1–11 form one continuous spiral of 6 + 9 + 12 + 15 + (18 × 4) + 15 + 12 + 9 = 150 loops.
Hold the piece with the tip (Rnd 1) up and join yarn in the first free FLO. Work a Scale over every 3 loops all the way along the spiral, which gives 150 ÷ 3 = 50 scales. Fasten off.
Each upper row of scales overlaps the row below. The pinecone measures 2.75 × 1.5 in (7.0 × 3.8 cm).
Make All Pieces
All pieces are Rust.
- Header: 1
- Leaves: 11
- Pinecones: 10
- Beaded strands: 21
Make one strand for each ornament:
- Thread 1 bead onto the yarn.
- Join with a sl st at the top of the ornament (the stem ch-1 sp on a leaf, or the closed Rnd 12 center on a pinecone).
- Ch 2, slide the bead up snug, and ch 1 over it to lock it in place.
- Keep chaining until you reach the total count for that strand (the 3 ch already made are included):
- S: 24 ch = 6 in (15.2 cm)
- M: 36 ch = 9 in (22.9 cm)
- L: 48 ch = 12 in (30.5 cm)
- Leave an 8 in (20.3 cm) tail.
You need 6 S, 9 M, and 6 L strands.
Layout grid (strands 1–21, left to right):
STRAND:  1  2  3  4  5  6  7  8  9  10 11 12 13 14 15 16 17 18 19 20 21
ITEM:    LF PC LF PC LF PC LF PC LF PC LF PC LF PC LF PC LF PC LF PC LF
LENGTH:  S  L  M  M  S  L  M  M  S  L  M  L  S  M  M  L  S  M  M  L  S
The layout is mirror-symmetric around strand 11.
- Leaves: 6 S + 5 M = 11
- Pinecones: 6 L + 4 M = 10
Joining
Attach the strands only after the border below is complete. Each one hangs from a marked sc on Border Row 3.
Method:
- Remove the hook from the last chain of the strand.
- Insert the hook from front to back through the marked sc.
- Pick up the dropped loop and pull it through.
- Yo and pull through to anchor.
- Weave the tail upward into the header.
Stitch-to-stitch logic: The markers sit on bottom sts 1, 7, 13, and so on up to 121, one every 6 sts. That gives (120 ÷ 6) + 1 = 21 points. At 3 sc per inch, 6 sts is 2 in (5.1 cm).
Odd strands (leaves) hang under the valleys between fans, and even strands (pinecones) hang under the fan centers.
Tension: Keep the anchor at the same tension as the chain. If you pull it hard, the edge puckers into a V.
Size checkpoint: Measure the outer strands: strand 1 to strand 21 is 40 in (101.6 cm).
Border
Border gauge: 12 sc = 4 in (10.2 cm), and 1 sc row = 0.25 in (0.6 cm).
Round 1 (RS):
- Ch 1. Sc in each of the 121 sts of Row 7 for the top.
- Ch 1 for the corner, then sc 11 evenly down the side: 1 per sc row, 2 per shell, mesh, fan, or tr row.
- Ch 1, then sc in each of the 121 free loops of the foundation chain for the bottom.
- Ch 1, then sc 11 up the second side.
- Ch 1 and sl st to the first sc.
(Top 121, bottom 121, sides 11 each = 264 sc, plus 4 corner ch-1 sps)
The size is now 40.5 × 4 in (102.9 × 10.2 cm).
Row 2 (top tabs, RS): Ch 1, sc in the first top sc, ch 16, sc in the same sc. Sc in the next 11 sc, sc in the next sc, ch 16, sc in the same sc. Repeat from * 10 times. Fasten off.
(121 sc worked 1-per-stitch + 11 extra = 132 sc, plus 11 ch-16 loops)
The tabs are 4 in (10.2 cm) apart and fit a rod up to 1 in (2.5 cm) in diameter.
Row 3 (bottom drops, RS): Join at the first bottom sc and sc in it. Place a marker. Sc in the next 3 sc, Drop, sc in the next 3 sc, and place a marker in that last sc. Repeat from * 20 times. Fasten off.
(121 sc worked 1-per-stitch, 20 Drops, 21 markers)
Why the math works: 121 = 1 + (10 × 12).
- Tabs fall every 12 sts, giving 11.
- Strand points fall every 6 sts, giving 21.
- Drops sit halfway between strand points, giving 20.
The border rows work 1 stitch into every existing stitch, so the sts added to the width come only from the 2 side edges. That adds 0.25 in (0.6 cm) per side, for a total of 40.5 in (102.9 cm).
Final Blocking
- Pin the header flat to 40.5 × 4.5 in (102.9 × 11.4 cm), keeping the top edge straight.
- Pin each fan open so the ch-1 spokes spread evenly.
- Spray until damp, not soaked.
- Pin each leaf to 3 × 2 in (7.6 × 5.1 cm), opening the lobes.
- Roll each pinecone between your palms and flip the scales downward.
- Leave everything until fully dry, about 12 hours.
- Attach the strands following the grid.
- Hang the valance and let the strands settle for a day.
Final Quality-Control Checklist
- Rows 1 and 7 each have 121 sts.
- There are 10 fans, each 4 in (10.2 cm) wide.
- The top edge is straight, with no dips between fans.
- There are 11 tabs, 20 Drops, and 21 strands.
- Strand lengths match the grid, and the layout mirrors around strand 11.
- Every bead sits snug against its ornament.
- Every pinecone has 50 scales and is closed tightly.
- All tails are woven in and none are visible.
Troubleshooting
- Header wider than 40 in (101.6 cm): Your foundation chain is loose. Re-chain with a hook one size smaller.
- Dips between fans after Row 6: Make sure the valley stitch is a tr, not a dc.
- Fans cup: Loosen the ch-1 spaces, or block harder.
- Scales don’t come out to a whole number: Count the free loops. You should have 150; a missed BLO round changes the total.
- Strands twist: Spray and hang the valance with a light clip at each tip for one hour.
- Bead slides: Add a second lock chain.
Care
Hand wash in cool water, press out the water in a towel, and lay flat to dry. Don’t wring the valance or tumble dry it.
Final Notes
The measurement chain is simple:
- 12 sts = 4 in, so 10 repeats = 40 in (101.6 cm).
- The border brings the width to 40.5 in (102.9 cm) and the depth to 4.5 in (11.4 cm).
- 21 strands at 2 in (5.1 cm) spacing carry 11 leaves and 10 pinecones on 6 in, 9 in, or 12 in (15.2, 22.9, or 30.5 cm) chains.
Check the gauge first and count at every checkpoint, and the pieces will line up.
Happy crocheting!