

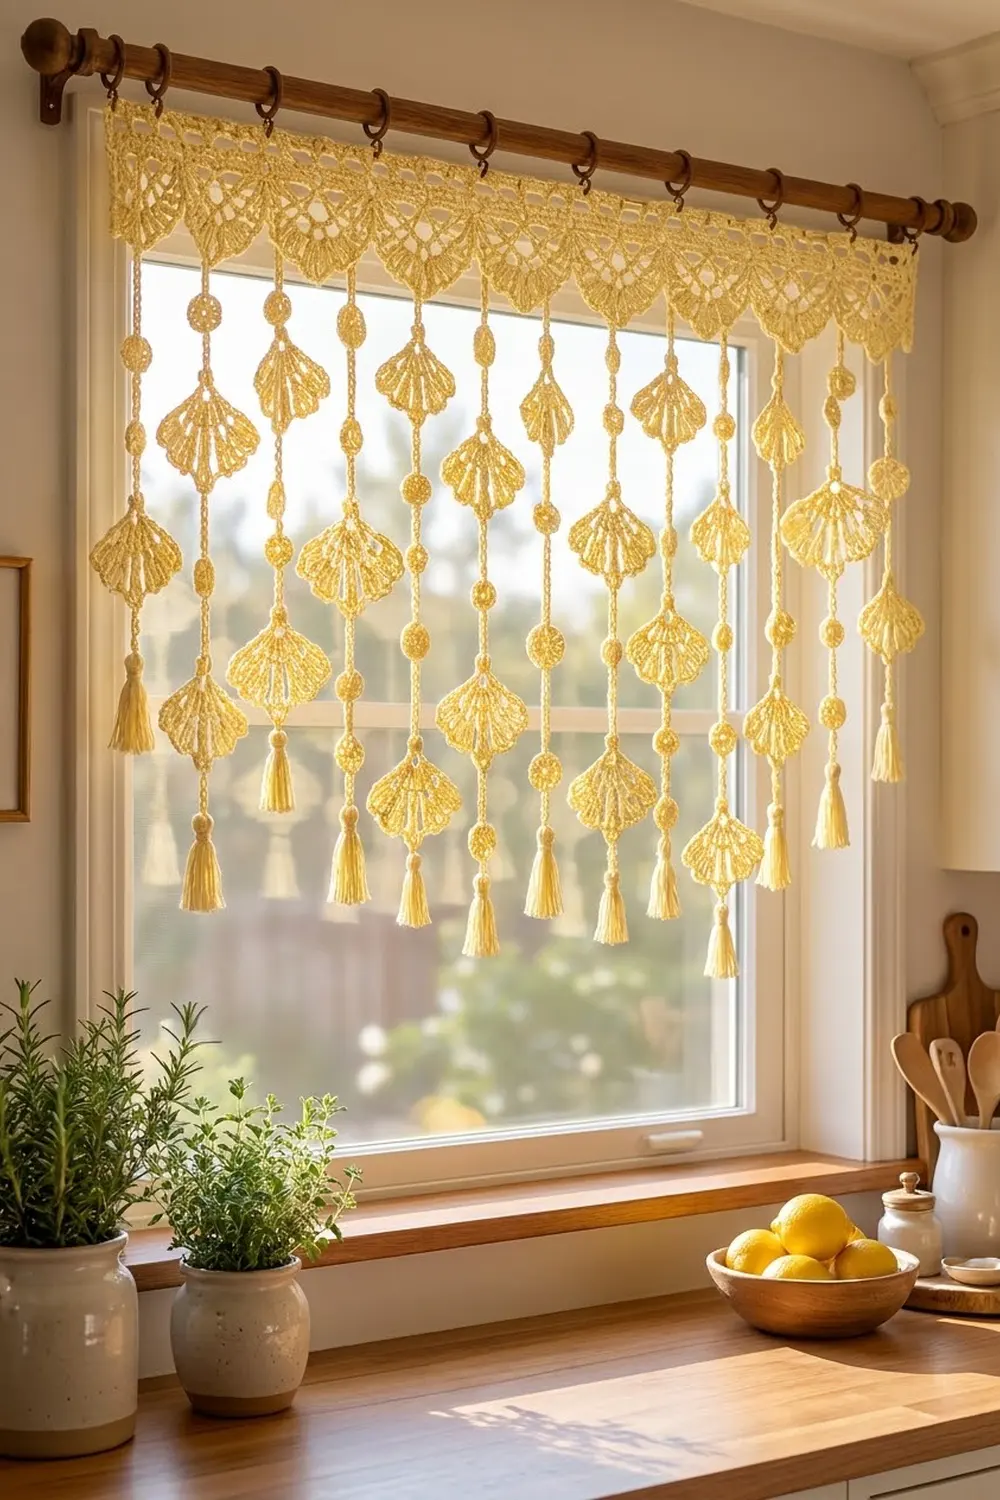
This valance is made of lacy fans that hang like little seashells in a sunny window. A scalloped lace header hangs from the rod. Below it, eleven light strands of fan motifs, small round discs and soft tassels catch the light and move a little when the window is open.
The whole curtain uses one soft color, butter yellow. That keeps the look calm and airy and lets the lace texture stand out. It suits a kitchen, a cottage-style bathroom or any window where you want privacy without losing light.
The finished valance is 33.2 in (84.3 cm) wide. The longest strands drop 24.25 in (61.6 cm) from the top edge, and the shorter strands drop 22.25 in (56.5 cm). The pattern uses US crochet terms throughout.
You make the parts separately. First you crochet 33 fans, 27 small circles and 11 tassels. Then you link them into strands with short chain connectors. Last, you work the lace header and hang each strand from the center of one header scallop.
Finished Size and Construction
- Finished size: 33.2 in (84.3 cm) wide × 24.25 in (61.6 cm) longest drop
- Skill level: Intermediate
- Terminology: US
- Yarn weight: Sport (#2) cotton
- Hook: 3.25 mm (US D-3)
- Number of pieces: 33 fans, 27 circles, 11 tassels, 1 header
- Layout: 11 strands, 3 in (7.6 cm) apart from center to center, in two alternating strand types
- Piece size: fan 3.5 in (8.9 cm) wide × 2.75 in (7.0 cm) tall including the stem; circle 1 in (2.5 cm) across
- Size before border: strand array 33.5 in (85.1 cm) wide across the outer fan tips
- Border (header) depth: 2.5 in (6.4 cm)
Materials
Use a smooth, mercerized sport-weight cotton. It gives crisp stitch definition, holds the fan shape after blocking and doesn’t fade or fuzz much in sunlight. Avoid fuzzy or very splitty yarns, because the open spokes need clean edges.
- Butter Yellow: 100 g / 300 m (328 yd), which is about two 50 g balls of 150 m (164 yd) each
The quantity includes a margin of about 15% for tails, tassels and gauge swatches.
Tools:
– 3.25 mm (US D-3) crochet hook
– Tapestry needle
– Scissors
– Stiff card cut to 2.75 in (7.0 cm) for tassels
– Rust-proof pins and a blocking mat
– Spray bottle
– 12 curtain clip rings and a curtain rod
Abbreviations (US Terms)
- ch – chain
- sl st – slip stitch
- sc – single crochet
- dc – double crochet
- sk – skip
- sp(s) – space(s)
- st(s) – stitch(es)
Special stitches:
– Fan shell: (dc, ch 1, dc, ch 1, dc) in the same stitch
– Header shell: (dc, ch 1) 6 times, then dc, all in the same space. This makes 7 dc and 6 ch-1 sps.
– Picot group: (sc, ch 3, sc) in the same space
Gauge and Checkpoints
Gauge: 24 dc and 12 rows = 4 in (10.2 cm). Your chains should measure 6 ch = 1 in (2.5 cm).
Make one fan and one circle before anything else, then block them lightly and measure.
Checkpoints:
– Fan after Row 3: about 2.25 in (5.7 cm) wide
– Fan after Row 5, blocked: 3.5 in (8.9 cm) wide
– Circle: 1 in (2.5 cm) across
– Header: 18 sts = 3 in (7.6 cm), and 1.4 in (3.6 cm) deep after Row 5
If your piece is too big, go down to a 3.0 mm hook. If it is too small, go up to a 3.5 mm hook. Measure the chains too: if 6 ch comes out shorter than 1 in (2.5 cm), loosen your chains or use ch 7 for every connector.
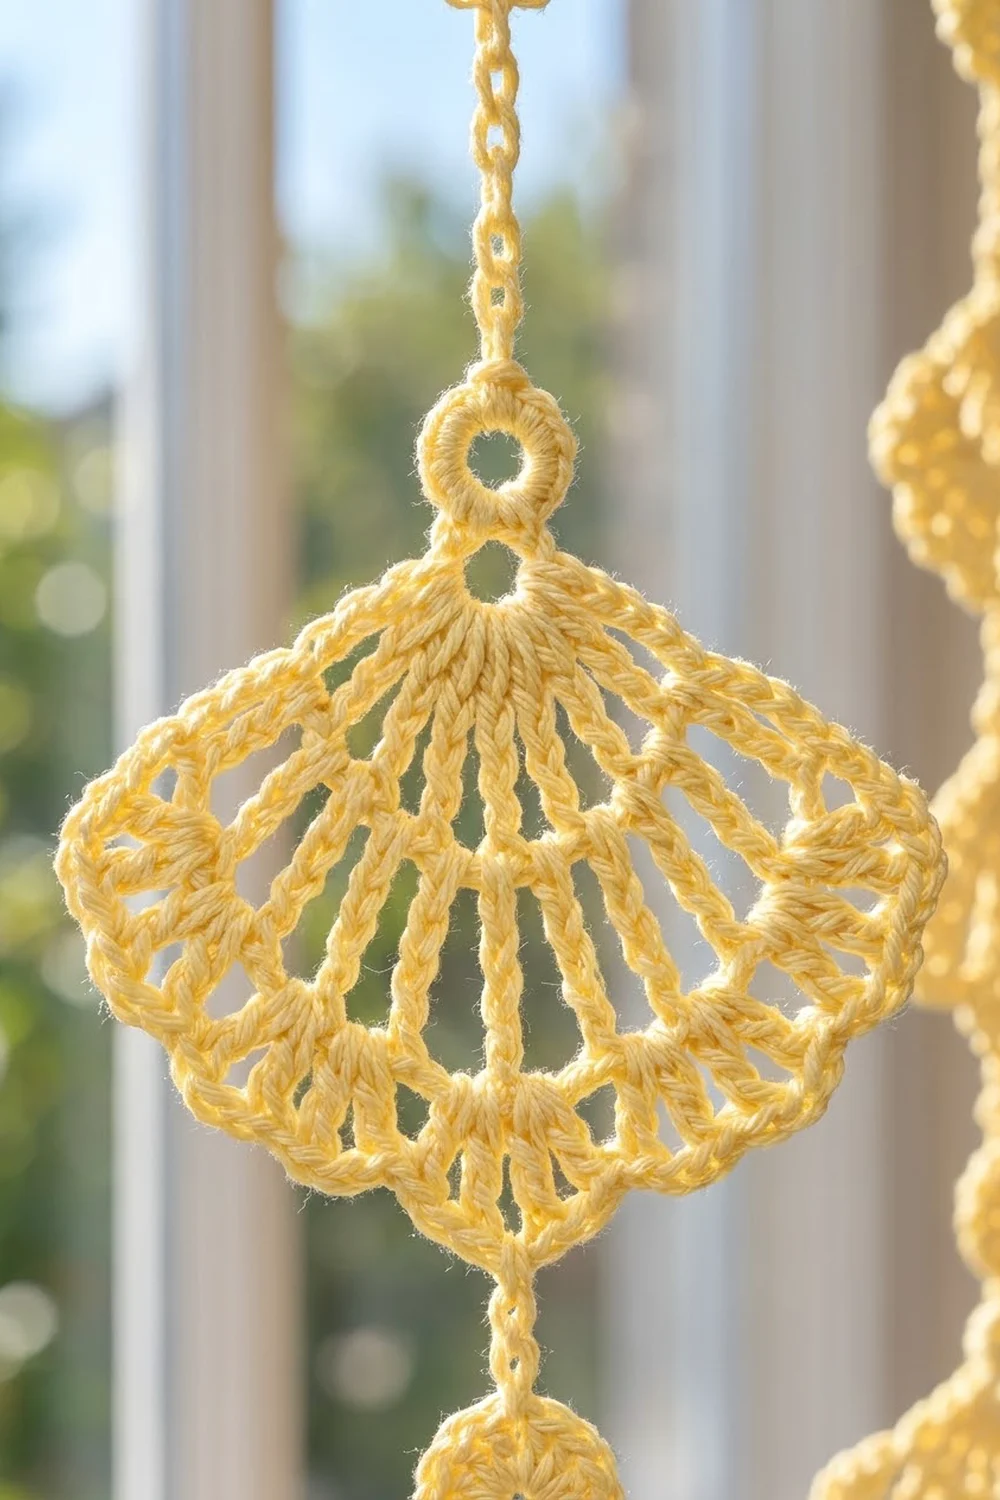
Fan Motif
Make 33. The fan is worked flat in turned rows outward from a small ring. It has a chain stem that points up when it hangs.
Foundation: Leave a 6 in (15.2 cm) tail and ch 9. Sl st in the 5th ch from the hook to form a ring. The 4 chains left below the ring are the stem, and the first chain you made is the stem tip.
Row 1: Ch 3 (counts as dc). Work 8 dc into the half of the ring opposite the stem. Turn. (9 dc)
Row 2 (open spokes): Ch 4 (counts as dc + ch 1). Dc in next dc, ch 1 7 times. Dc in the top of the turning ch. Turn. (9 dc, 8 ch-1 sps)
Row 3 (solid arc): Ch 3 (counts as dc). 2 dc in next ch-1 sp, then dc in next dc, 2 dc in next ch-1 sp 7 times. Dc in the 3rd ch of the turning ch-4. Turn.
Count: 9 dc (1 in each dc) + 16 dc (2 in each sp) = 25 dc.
Row 4 (long spokes): Ch 5 (counts as dc + ch 2) and sk the next st. Dc in next st, ch 2, sk next st 11 times. Dc in the top of the turning ch. Turn. (13 dc, 12 ch-2 sps)
Row 5 (scalloped edge): Ch 1. Sc in the first dc. Fan shell in next dc, sc in next dc 6 times, skipping all ch-2 sps. The last sc goes in the 3rd ch of the turning ch-5. Fasten off. (7 sc, 6 fan shells)
The 4th sc of Row 5 is the center of the fan’s lower edge. The next connector starts there.
Circle Motif
Make 27.
Rnd 1: Make a magic ring. Ch 3 (counts as dc) and work 11 dc in the ring. Sl st to the top of the ch-3. Pull the ring closed. (12 dc)
Rnd 2: Ch 1. Sc in the same st and 2 sc in the next st. Sc in next st, 2 sc in next st 5 times. Sl st to the first sc. Fasten off. (18 sc)
Sc 1 (where you joined) is the bottom of the circle. Sc 10 is the top. They sit exactly 9 sts apart on each side.
Tassels
Make 11. Wrap the yarn 20 times around the 2.75 in (7.0 cm) card. Slide an 8 in (20.3 cm) strand under the wraps at the top and tie it tightly. Leave both ends long, because you’ll use them to attach the tassel.
Slide the wraps off the card. Wrap a separate strand 6 times around the tassel, 0.4 in (1.0 cm) below the top, and knot it. Bury the ends inside the tassel. Cut the bottom loops and trim the tassel to 2.5 in (6.4 cm).
Make All Pieces
All pieces are Butter Yellow.
- Fans: 33 (11 strands × 3)
- Circles: 27 (6 Strand A × 2, plus 5 Strand B × 3)
- Tassels: 11
- Connectors: 60 (6 Strand A × 5, plus 5 Strand B × 6)
- Hanging chains: 11
Layout across the window, left to right:
POSITION: 1 2 3 4 5 6 7 8 9 10 11
STRAND:   A B A B A B A B A B  A
Each strand, from top to bottom:
STRAND A: CHAIN – FAN – CIRCLE – FAN – CIRCLE – FAN – TASSEL
STRAND B: CHAIN – CIRCLE – FAN – CIRCLE – FAN – CIRCLE – FAN – TASSEL
Strand B has an extra circle at the top. This drops each of its fans exactly 2 in (5.1 cm) below the matching Strand A fan, so neighbouring fans never overlap.
Joining
Connectors join each motif to the one below it. Every connector is ch 6, which measures 1 in (2.5 cm).
Method: Leave a 4 in (10.2 cm) tail and join the yarn with a sl st at the bottom point of the upper motif. Ch 6, then sl st into the top point of the lower motif. Fasten off and weave in all tails.
Stitch-to-stitch logic:
– Fan bottom: the 4th sc of Row 5
– Fan top: the stem tip
– Circle bottom: sc 1
– Circle top: sc 10
– Tassel: for the last connector, sl st through the tassel’s top tie loop, then knot the tie ends around the chain and bury them
Hanging chain: Join the yarn at the top of the first motif in each strand, which is the stem tip for Strand A and sc 10 for Strand B. Ch 12, which measures 2 in (5.1 cm). Fasten off and leave an 8 in (20.3 cm) tail.
Tension: Chain loosely and evenly. Tight connectors pull the fans crooked, so measure the first few connectors against a ruler.
Size checkpoint:
– A finished Strand A is 2 in chain + 3 fans × 2.75 in + 2 circles × 1 in + 5 connectors × 1 in + 2.5 in tassel = 19.75 in (50.2 cm).
– A finished Strand B is 2 + 8.25 + 3 + 6 + 2.5 = 21.75 in (55.2 cm).
Border: Scalloped Valance Header
The header is the border of this design. It is worked in turned rows from the top edge down, and its scallops line up with the strands.
Border gauge: 24 sts = 4 in (10.2 cm), so each 3 in (7.6 cm) strand slot is 18 sts.
Starting count: 11 strands × 18 sts = 198 sts, plus 1 closing st that finishes the last repeat. That gives 199 sts. No stitches are added between strands.
Row 1 (top edge): Ch 200. Sc in the 2nd ch from the hook and in each ch across. Turn. (199 sc)
Row 2: Ch 3 (counts as dc). Dc in each st across. Turn. (199 dc)
Row 3 (mesh): Ch 4 (counts as dc + ch 1) and sk the next st. Dc in next st, ch 1, sk next st 98 times. Dc in the top of the turning ch. Turn. (100 dc, 99 ch-1 sps)
Row 4: Ch 3 (counts as dc). Dc in each ch-1 sp and each dc across, ending in the 3rd ch of the turning ch-4. Turn.
Count: 100 dc + 99 sps = 199 dc.
Row 5: Ch 1. Sc in each st across. Turn. (199 sc)
Row 6 (loops): Ch 1. Sc in the first st. Ch 5, sk 5 sts, sc in next st 33 times. Turn. (34 sc, 33 ch-5 loops)
Row 7 (scallops): Ch 1 and sc in the first sc. Then work sc in next ch-5 loop, header shell in next ch-5 loop, sc in next ch-5 loop, ch 3 10 times. Work sc in next ch-5 loop, header shell in next ch-5 loop and sc in next ch-5 loop one more time. Sc in the last sc and turn. (24 sc, 11 header shells, 10 ch-3 sps)
Row 8 (picot edge): Ch 1 and sc in the first 2 sc. Work ch 1, picot group in each of next 6 ch-1 sps, ch 1, sc in next sc, 3 sc in next ch-3 sp, sc in next sc 10 times. Then work ch 1, picot group in each of next 6 ch-1 sps, ch 1, and sc in the last 2 sc. Fasten off. (66 picots: 6 for each of the 11 scallops)
Why the math works:
– Row 3: the mesh needs an odd count, and 199 is odd.
– Row 6: the loops need a multiple of 6 plus 1. 199 = 6 × 33 + 1.
– Row 7: every scallop uses 3 loops, so 33 loops ÷ 3 = 11 scallops, one for each strand.
– Spacing: each scallop’s center falls on st 10, 28, 46, and so on in 18-st steps. That puts the strands exactly 3 in (7.6 cm) apart, with 1.5 in (3.8 cm) at each edge.
Attach the strands: Thread each hanging-chain tail onto a needle. Sew it twice through the 4th (center) dc of the matching header shell, which sits between picots 3 and 4. Knot the tail and weave it in. Strand A goes under scallops 1, 3, 5, 7, 9 and 11.
Rings: Clip the 12 rings to the Row 1 edge at sts 1, 19, 37 and every 18 sts after that, ending at st 199. The rings end up 3 in (7.6 cm) apart.
Final Blocking
- Lay the curtain flat on blocking mats with the header at the top.
- Pin the header to 33.2 in × 2.5 in (84.3 cm × 6.4 cm), with one pin at each picot point.
- Open each fan to 3.5 in (8.9 cm) wide. Pin the stem straight and each shell tip out.
- Pin each circle flat at 1 in (2.5 cm).
- Straighten each strand so the connectors lie flat and measure 1 in (2.5 cm).
- Mist everything until it is damp but not soaked.
- Let it dry completely, for at least 12 hours.
- Unpin it, then brush the tassels out with your fingers.
Final Quality-Control Checklist
- The header measures 33.2 in (84.3 cm) wide and has 11 even scallops.
- Every strand hangs from the center dc of a scallop.
- Strands A and B alternate, starting and ending with A.
- Each fan has 6 shells and hangs straight from its stem tip.
- All 60 connectors are ch 6.
- Strand A measures 19.75 in (50.2 cm) and Strand B measures 21.75 in (55.2 cm).
- All tassels are trimmed to 2.5 in (6.4 cm).
- All tails are woven in.
Troubleshooting
- Fan cups instead of lying flat: your Row 3 is too tight. Go up a hook size for Rows 3–5.
- Fan ruffles: your shells are too loose. Tighten the ch-1 sps or use a smaller hook.
- Strand twists: the connector was joined to the wrong side of the motif. Re-join it from the right side.
- Header pulls narrower than the strand spacing: the Row 6 loops are tight. Rework them with looser chains.
- Fan hangs crooked: the connector isn’t in the center sc. Count again to the 4th sc of Row 5.
- Tassels are uneven: trim them again while they are damp, using the card as a guide.
Care
Hand wash in cool water with a mild detergent, roll the curtain in a towel and dry it flat, pinning the fans if needed. Don’t tumble dry.
Final Notes
The measurements build on each other. With a gauge of 24 dc = 4 in (10.2 cm), each fan is 3.5 in (8.9 cm) wide and each circle is 1 in (2.5 cm). Six-chain connectors of 1 in (2.5 cm) build strands of 19.75 in (50.2 cm) and 21.75 in (55.2 cm). Eleven strand slots of 18 sts plus 1 closing stitch give a 199-stitch header that is 33.2 in (84.3 cm) wide and 2.5 in (6.4 cm) deep. If you check each link in that chain as you go, the curtain hangs evenly with its fans staggered in the light.
Happy crocheting!