
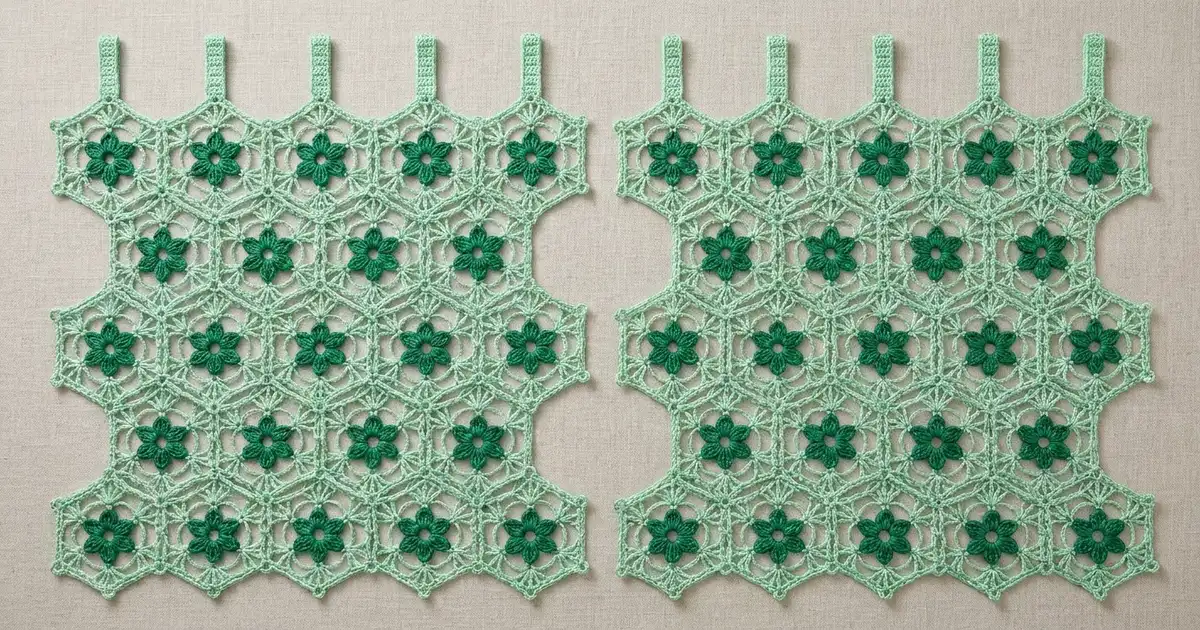
The Emerald Garden curtain is a tall lace panel made from joined hexagon motifs. Each hexagon has a deep emerald six-petal flower. It sits inside a mint-green web of chain arcs and tall fans, with a firm outline and picot corners. When the curtain hangs at a window, the flowers seem to float.
The look is fresh and a little vintage. Two greens do all the work: dark emerald for the flowers and soft mint for the lace. The pattern uses US crochet terms.
One finished panel measures 42.4 in (107.7 cm) wide. It is 84.8 in (215.4 cm) long from valley to valley along the zigzag edges, and 87.8 in (223.0 cm) from point to point, not counting the tabs. The photo shows a pair, so make two identical panels.
You make full hexagons in rounds and half hexagons in rows. You join them with flat slip stitch seams, then work a two-round border. Finally, you crochet loop tabs directly onto the top points.
Finished Size and Construction
- Finished panel size: 42.4 in x 84.8 in (107.7 cm x 215.4 cm) valley to valley; 87.8 in (223.0 cm) point to point
- Skill level: Intermediate
- Terminology: US crochet terms
- Yarn weight: DK (#3) cotton
- Hook: 3.5 mm (E-4)
- Number of pieces per panel: 143 full hexagons + 18 half hexagons = 161 pieces
- Layout: 19 rows. Odd rows have 8 full hexagons. Even rows have 7 full hexagons plus a half hexagon at each end.
- Full motif size: 6 in (15.2 cm) point to point, 5.2 in (13.2 cm) flat side to flat side, 3 in (7.6 cm) per side
- Size before border: 41.6 in x 84 in (105.7 cm x 213.4 cm) valley to valley; 87 in (221.0 cm) point to point
- Border depth: 0.4 in (1.0 cm), 2 rounds
Materials
Use a smooth mercerized or combed DK cotton of about 115 m per 50 g ball. Cotton keeps the lace crisp and washes well.
Per panel:
– Color A, emerald green (flowers): 4 balls, 200 g, about 460 m
– Color B, mint green (lace, joining, border, tabs): 13 balls, 650 g, about 1495 m
For the pair shown:
– Color A: 400 g (920 m)
– Color B: 1300 g (2990 m)
Tools:
– 3.5 mm (E-4) hook, plus a 4 mm hook for joining if needed
– Tapestry needle
– Stitch markers
– Rust-proof pins and blocking mats
– Measuring tape
These quantities include a margin of about 15% for swatching and gauge differences.
Abbreviations (US Terms)
ch = chain; sl st = slip stitch; sc = single crochet; hdc = half double crochet; dc = double crochet; tr = treble crochet; sc3tog = single crochet 3 together; sp = space; st(s) = stitch(es).
Special stitches
– Petal: (sc, hdc, 2 dc, tr, 2 dc, hdc, sc) in the same space = 9 sts.
– Fan: (tr, ch 2, tr, ch 2, tr) in the same stitch. The middle tr is the “center tr.”
Gauge and Checkpoints
Gauge: 20 sc = 4 in (10.2 cm), so 5 sc = 1 in (2.5 cm). This gauge controls the motif outline and the border.
Make one full motif first and check it at each stage:
- After Round 3: The flower is 2.25 in (5.7 cm) across.
- After Round 5: The motif is 4.75 in (12.1 cm) from one fan tip to the opposite fan tip.
- After Round 7: The motif is 6 in (15.2 cm) point to point and 5.2 in (13.2 cm) flat to flat, with 3 in (7.6 cm) sides.
If your motif is too big, go down half a hook size. If it’s too small, go up half a size. An error of 0.25 in (0.6 cm) per motif adds up to 2 in (5.1 cm) across the 8 motifs of the panel width.

Full Hexagon Motif (make 143 per panel)
Work in rounds with the right side facing. Do not turn.
Round 1 (A): Ch 6 and sl st to the first ch to form a ring. Ch 1, work 12 sc in the ring, and join. (12 sc)
Round 2: Ch 1, *sc in next sc, ch 3, skip next sc; repeat from * 5 more times, join. (6 sc, 6 ch-3 sps)
Round 3: *Sl st in next sc, Petal in next ch-3 sp; repeat from * 5 more times, join. (6 petals of 9 sts = 54 petal sts, plus 6 sl sts) Fasten off A.
The ring stays open and forms the center hole. The tr at the middle of each petal makes its rounded tip.
Round 4 (B): Work behind the petals. Join B with a sc into any Round 2 sc. *Ch 10, sc in next Round 2 sc; repeat from * 4 more times, ch 10, join. (6 sc, 6 ch-10 sps)
The sc sit between the petals. The ch-10 arcs pass behind the petals and show beyond them as an open ring.
Round 5: Ch 4 (counts as tr). Work (ch 2, tr) twice in the same sc to complete the first fan. Ch 3, sc in next ch-10 sp, ch 3. *Fan in next sc, ch 3, sc in next ch-10 sp, ch 3; repeat from * 4 more times. Join to the top of the beginning ch-4. (6 fans, 6 sc, 12 ch-3 sps)
Each fan points to a corner, and each petal points to the middle of a side.
Round 6: Sl st in the first ch-2 sp, then sl st in the center tr. Ch 1, *(sc, ch 5, sc) in center tr, ch 6, sc in next sc, ch 6; repeat from * 5 more times, join. (18 sc, 6 corner ch-5 sps, 12 ch-6 sps)
Round 7: Sl st in the first ch-5 sp. Ch 1, *(2 sc, ch 3, 2 sc) in corner ch-5 sp, 5 sc in next ch-6 sp, sc in next sc, 5 sc in next ch-6 sp; repeat from * 5 more times, join. Fasten off.
Stitch count: 90 sc and 6 ch-3 corner picots. Each side has 15 sc between corner picots (2 + 5 + 1 + 5 + 2). The ch-3 picot is the corner and isn’t counted as a side stitch.
Half Hexagon Motif (make 18 per panel)
This piece is half of a pointy-top hexagon, cut vertically through its top and bottom points. Work in rows and turn at the end of each row. Flip half of the pieces so they fit the opposite side edge.
Row 1 (A): Make a magic ring. Ch 1, work 7 sc in the ring, and pull the ring only partly closed so a half hole remains. Turn. (7 sc)
Row 2: Ch 1, sc in first sc, *ch 3, skip next sc, sc in next sc; repeat from * 2 more times. Turn. (4 sc, 3 ch-3 sps)
Row 3: Sl st in first sc, *Petal in next ch-3 sp, sl st in next sc; repeat from * 2 more times. (3 petals, 4 sl sts) Fasten off A.
Row 4 (B): Join B with a sc in the first Row 2 sc, working behind the sl st. *Ch 10, sc in next Row 2 sc; repeat from * 2 more times. Turn. (4 sc, 3 ch-10 sps)
Row 5: Ch 4 (counts as tr), ch 2, tr in first sc to make a half fan. Ch 3, sc in next ch-10 sp, ch 3. *Fan in next sc, ch 3, sc in next ch-10 sp, ch 3; repeat from * once more. Work (tr, ch 2, tr) in the last sc to make a half fan. Turn. (2 fans, 2 half fans, 3 sc)
Row 6: Ch 1, sc in first tr, ch 6, sc in next sc, ch 6. *(Sc, ch 5, sc) in center tr of next fan, ch 6, sc in next sc, ch 6; repeat from * once more. Sc in the top of the turning ch-4. Turn. (2 corner ch-5 sps, 6 ch-6 sps)
Row 7: Ch 1, 2 sc in first sc, 5 sc in next ch-6 sp, sc in next sc, 5 sc in next ch-6 sp. *(2 sc, ch 3, 2 sc) in corner ch-5 sp, 5 sc in next ch-6 sp, sc in next sc, 5 sc in next ch-6 sp; repeat from * once more. Work 2 sc in the last sc. Fasten off.
Stitch count: 45 sc (3 sides of 15 sc) and 2 corner picots. The straight cut edge is 6 in (15.2 cm) long, and the piece is 2.6 in (6.6 cm) deep.
Make All Pieces
Per panel:
– Full motifs: 143. Each uses about 2 m of A and 7 m of B.
– Half motifs: 18. Each uses about 1 m of A and 3.5 m of B.
Layout grid (F = full, H = half):
Row 1:   F F F F F F F F
Row 2:  H F F F F F F F H
Row 3:   F F F F F F F F
...alternate...
Row 18: H F F F F F F F H
Row 19:  F F F F F F F F
- Odd rows: 10 rows x 8 = 80 full motifs.
- Even rows: 9 rows x 7 = 63 full motifs, plus 9 x 2 = 18 half motifs.
Each row sits 4.5 in (11.4 cm) lower than the row above it.
Joining
Use a flat slip stitch join with B. Hold two motifs wrong sides together and work through the back loops of both.
Stitch-to-stitch logic:
– Shared sides: Join 15 sc to 15 sc with one sl st per pair, for 15 sl sts per seam.
– Inside corners: Where three motifs meet, sl st through all three ch-3 picots together.
– Side edges: Where a half motif meets a full motif, sl st the full motif’s picot to the half motif’s end sc.
– No extras: Never skip or add stitches in a seam.
Order: Join Row 1 side to side. Join each Row 2 motif to its two neighbors above, then to its neighbor on the left. Continue row by row.
Tension: Keep the sl sts as loose as your sc. Tight seams pucker the lace and narrow the panel. If needed, use the 4 mm hook for joining only.
Size checkpoint: After 3 rows, the strip should be 41.6 in (105.7 cm) wide and 15 in (38.1 cm) from the top points to the bottom points.
Border
The border uses the same gauge, 5 sc = 1 in (2.5 cm). Work with B, right side facing.
Round 1 (sc): Join with a sc in the top-left corner picot, then work around the panel:
- Each straight side edge (420 sc):
- 15 sc along each of the 10 full-motif vertical sides (150).
- 28 sc spaced evenly across each of the 9 half-motif cut edges (252).
- 1 sc at each of the 18 junctions where a full motif meets a half motif (18).
- 150 + 252 + 18 = 420.
- Top and bottom zigzag edges (271 sc each):
- 15 sc along each of the 16 slanted sides (240).
- 3 sc in each of the 8 point picots (24).
- 1 sc through each of the 7 joined valley picots (7).
- 240 + 24 + 7 = 271.
- 4 panel corners: 3 sc in each corner picot (12).
Join. Round 1 total: 420 + 420 + 271 + 271 + 12 = 1394 sc.
Round 2 (shaping): Ch 1.
– Straight sides: Sc in each st (420 per side).
– Top and bottom edges: Sc in each st, but work 3 sc in the center sc of each point. Work sc3tog over the 3 sts centered on each valley. That’s 250 sts worked one per stitch + 7 sc3tog + 16 extra at the points = 273 per edge.
– Corners: Sc in each st, with 3 sc in the center sc. That’s 3 sts worked one per stitch + 2 extra = 5 per corner.
Round 2 total: 420 + 420 + 273 + 273 + 20 = 1406 sts. Fasten off.
Why the math works: On each side, a two-row repeat is 15 + 1 + 28 + 1 = 45 sc over 9 in (22.9 cm), which is exactly 5 sc per inch. Along the zigzag edges, the border follows the motifs stitch for stitch. The points gain stitches and the valleys lose the same amount, like ripple shaping, so the edge lies flat.
Hanging tabs (make 8):
1. At each top point, join B in the second st before the center sc of Round 2.
2. Sc in the next 5 sts and turn.
3. Work rows of 5 sc until the tab measures 6 in (15.2 cm), about 28 rows.
4. Fold the tab to the back and sew it behind the point to form a 3 in (7.6 cm) loop.
Final Blocking
- Soak the panel in cool water for 15 minutes, then gently press out the water. Don’t wring it.
- Roll it in towels to remove more moisture.
- Lay it flat on mats, working in sections if needed.
- Pin the straight sides to 84.8 in (215.4 cm) and the width to 42.4 in (107.7 cm).
- Pin out every top and bottom point so the zigzag is even.
- Shape each petal and open each fan with your fingers.
- Let the panel dry completely before you unpin it.
Final Quality-Control Checklist
- Every full motif has 90 sc and 6 picots, and every half motif has 45 sc.
- All 161 pieces are in place, with half motifs only at the ends of even rows.
- Seams lie flat, with no gaps at the three-way corners.
- Each side edge has 420 sc in border Round 1.
- The blocked panel measures 42.4 in x 84.8 in (107.7 cm x 215.4 cm).
- All 8 tabs are the same size and firmly sewn.
- All tails are woven in through the solid sc outlines.
Troubleshooting
- Petals flop forward: Work Round 4 firmly behind the petals so the ring supports them.
- Motif cups: Your chains are too tight. Go up half a hook size for Rounds 4 to 6.
- Motif ruffles: Your chains are too loose. Go down half a hook size.
- Half motif’s cut edge is short: Check that Row 5 starts with ch 4.
- Panel narrows: Your joining sl sts are too tight. Use a larger hook for seams.
- Side border waves: Recount the 28 sc on each cut edge.
Care
Hand wash in cool water, or machine wash on a delicate cycle inside a mesh bag. Lay flat to dry and re-pin the points if needed.

Final Notes
Each measurement leads to the next:
– 5 sc per inch gives 15-stitch sides of 3 in (7.6 cm).
– Those sides give motifs 5.2 in (13.2 cm) flat to flat.
– 8 motifs give a width of 41.6 in (105.7 cm) before the border and 42.4 in (107.7 cm) after it.
– 19 rows spaced 4.5 in (11.4 cm) apart give 84 in (213.4 cm) valley to valley, or 84.8 in (215.4 cm) with the border.
Check your first motif carefully and the rest of the panel will follow.
Happy crocheting!