

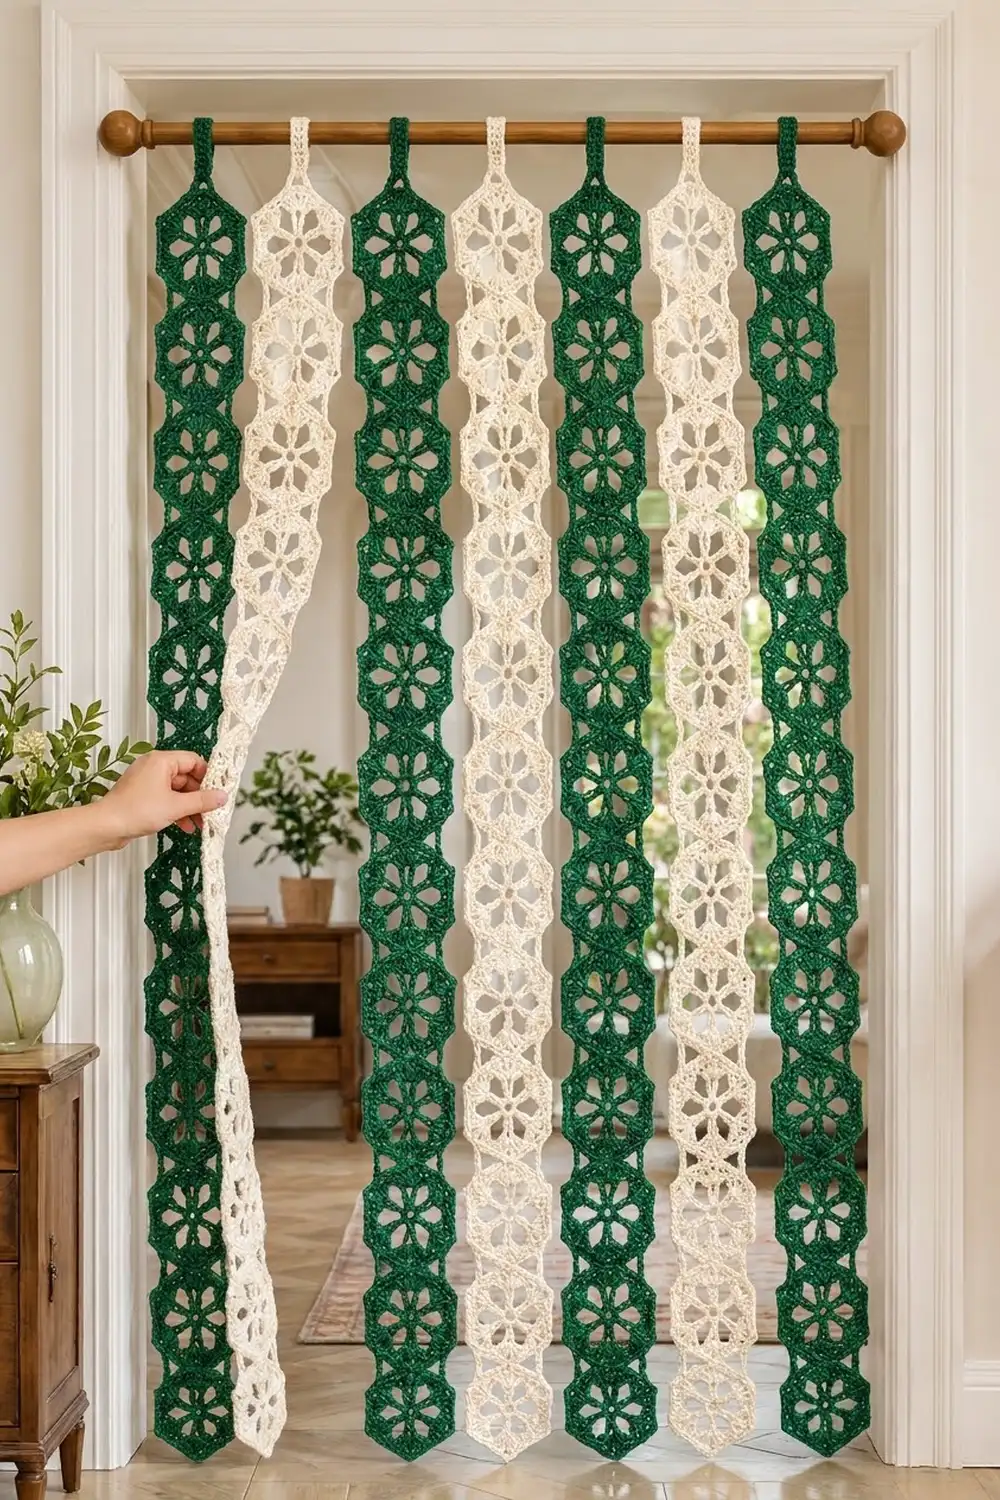
The Emerald Lattice Door Curtain is made of long strips of lacy hexagon motifs that hang from a wooden rod. Light comes through each motif’s open flower center while the strips still screen the doorway.
The design alternates deep emerald green and soft cream strips: four green and three cream. Each hexagon has a small center ring, six slim spokes and six open petal windows, framed by a solid band of double crochet with fan-shaped corners. Cotton yarn keeps the stitches crisp and helps the strips hang straight.
This pattern uses US crochet terms. Each finished strip measures 6.2 in (15.7 cm) wide at the points and 70.4 in (178.8 cm) long, plus a hanging tab. With the tab, the total drop is about 72.4 in (183.9 cm).
To build it, you work 98 hexagons in the round, join 14 of them into each vertical strip, add a single crochet border around every strip and finish each one with a tab that wraps around the rod.
Finished Size and Construction
- Finished strip size: 6.2 in x 70.4 in (15.7 cm x 178.8 cm), plus a 2 in (5.1 cm) folded tab
- Total drop: about 72.4 in (183.9 cm)
- Curtain width (7 strips, points touching): 43.4 in (110.2 cm)
- Skill level: Intermediate
- Terminology: US
- Yarn weight: DK (3), cotton or cotton blend
- Hook: 4.0 mm (G-6)
- Number of pieces: 98 hexagons (56 green, 42 cream), joined into 7 strips
- Layout: 7 separate strips of 14 hexagons each, with flat edges at the top and bottom
- Motif size: 5 in (12.7 cm) across the flats, 5.8 in (14.7 cm) point to point
- Strip size before border: 5.8 in x 70 in (14.7 cm x 177.8 cm)
- Border depth: 0.2 in (0.5 cm), 1 round
Materials
Use a smooth, mercerized or combed DK cotton. Cotton holds its shape, resists stretching and shows the open petals clearly. Avoid fuzzy or very stretchy yarns, because long strips will grow under their own weight.
- Color A, emerald green: 500 g / about 1,100 m
- Color B, cream: 400 g / about 880 m
These quantities include a margin of about 12–20% for swatching, joining and the borders.
Tools:
– 4.0 mm (G-6) crochet hook
– Tapestry needle
– Scissors
– Stitch markers
– Rigid tape measure
– Blocking mats and rust-proof pins
– Spray bottle
– Curtain rod at least 44 in (111.8 cm) long and no more than 1 in (2.5 cm) in diameter
Abbreviations (US Terms)
- ch – chain
- sl st – slip stitch
- sc – single crochet
- dc – double crochet
- tr – treble crochet
- sc2tog – single crochet 2 together
- sp – space
- st(s) – stitch(es)
- RS / WS – right side / wrong side
Special stitch – Corner group: work (2 dc, ch 2, 2 dc) in the stitch or space indicated.
Gauge and Checkpoints
Base gauge: 20 sc and 22 rows = 4 in (10.2 cm) in sc worked in rows.
Before starting the full project, make one test hexagon and measure it against these checkpoints:
- After Round 2: about 2.75 in (7.0 cm) across, from spoke tip to spoke tip
- After Round 4: 4.6 in (11.7 cm) across the flats
- After Round 5: 5 in (12.7 cm) across the flats and 5.8 in (14.7 cm) point to point
If your hexagon is more than 0.2 in (0.5 cm) too large, go down 0.5 mm in hook size. If it is too small, go up 0.5 mm. Any error in a single motif is multiplied by 14 down each strip: a hexagon that is 0.25 in (0.6 cm) too tall makes a strip 3.5 in (8.9 cm) too long.
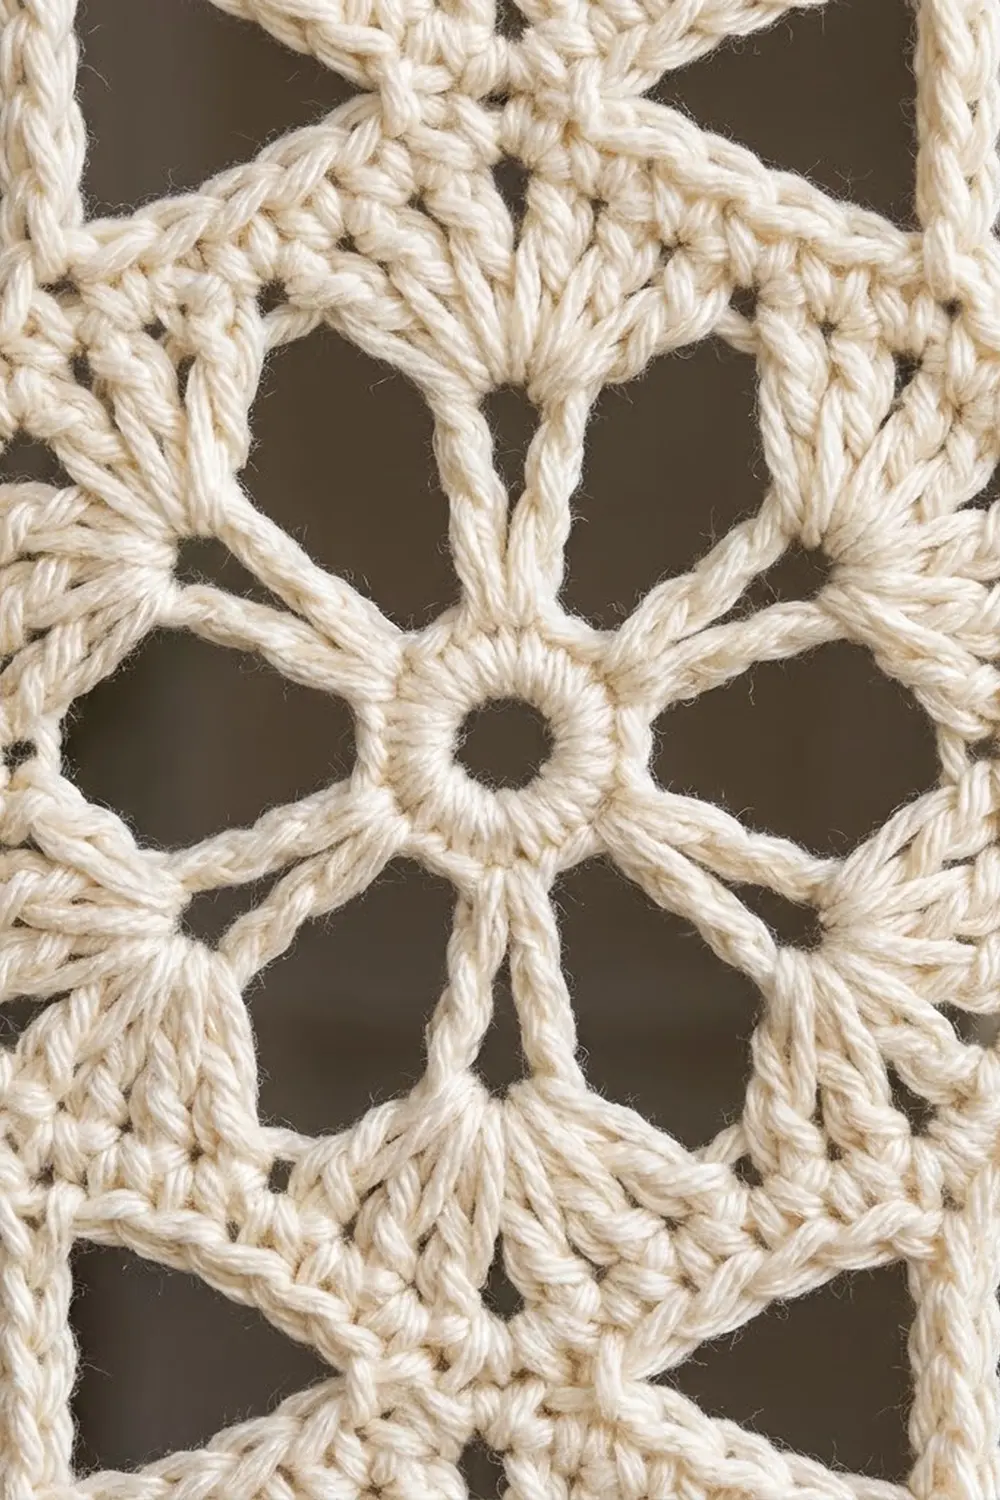
Hexagon Motif (make 98)
Start with a ch 6 and join with a sl st to form a ring.
Round 1: Ch 1, work 12 sc in the ring, then join with a sl st to the first sc. (12 sc)
Round 2 (spokes): Ch 4 (counts as tr), ch 4, skip the next sc. Tr in the next sc, ch 4, skip the next sc. Repeat from * 4 more times. Join with a sl st to the 4th ch of the beginning ch-4. (6 tr spokes, 6 ch-4 sps)*
Round 3 (corners and petals): Ch 3 (counts as dc), then work (dc, ch 2, 2 dc) in the same st. Ch 4. Work a Corner group in the top of the next tr, then ch 4. Repeat from * 4 more times. Join to the top of the beginning ch-3. (24 dc, 6 ch-2 corner sps, 6 ch-4 sps)*
Each ch-4 arc spans one open petal window. The ring, two spokes and the arc frame that window.
Round 4 (solid band): Sl st in the next dc and in the ch-2 sp. Ch 3 (counts as dc), then work (dc, ch 2, 2 dc) in the same sp. Dc in the next 2 dc, 4 dc in the ch-4 sp, and dc in the next 2 dc. *Work a Corner group in the next ch-2 sp, dc in the next 2 dc, 4 dc in the ch-4 sp, dc in the next 2 dc. Repeat from * 4 more times. Join to the top of the beginning ch-3.
(72 dc and 6 ch-2 sps: each repeat has 4 dc in the corner group plus 2 + 4 + 2 dc along the side = 12 dc, and 6 repeats x 12 = 72)
Round 5 (outline): Ch 1. Sc in the same st and in the next dc, then 3 sc in the ch-2 sp. *Sc in the next 12 dc, 3 sc in the ch-2 sp. Repeat from * 4 more times. Sc in the last 10 dc and join to the first sc. Fasten off and weave in the ends.
(90 sc: 72 sc worked one into each dc, plus 18 sc in the corner sps)
Side count: Each corner group has 3 sc: a side st, a center corner st and another side st. Between two center corner sts there are 1 + 12 + 1 = 14 sc. Each side therefore has 16 sts including both corner sts. Check: 6 sides x 14 + 6 corner sts = 90.
Make All Pieces
- Color A (green): 56 hexagons (4 strips x 14)
- Color B (cream): 42 hexagons (3 strips x 14)
Each strip is one column of 14 hexagons. Strip layout from left to right:
Strip:  1   2   3   4   5   6   7
Color:  A   B   A   B   A   B   A
Motifs: 14  14  14  14  14  14  14
Block all the hexagons to 5 in (12.7 cm) across the flats before joining. Hexagons of equal size make strips that hang straight.
Joining
Turn each hexagon so that it has a flat side at the top and bottom and points on the left and right. Join the bottom side of one hexagon to the top side of the next.
Method: Use the same color as the motifs. Hold two hexagons RS together with the edges lined up. Work through both layers, starting in the matching corner sts: sl st in each of the 16 sts across the side, ending in the opposite corner sts. Fasten off.
Stitch-to-stitch logic: Both sides have exactly 16 sts, so they match one for one. Nothing is added or skipped, and the seam does not ruffle or pull.
Tension: Keep the slip stitches loose, about the same height as a sc. Tight joins pull the motifs together and make the strip pucker. If needed, go up 0.5 mm in hook size for joining only.
Join 13 seams per strip.
Checkpoint: Each strip should measure 70 in (177.8 cm) long, plus or minus 1 in (2.5 cm), and 5.8 in (14.7 cm) wide at the points.
Border
Border gauge: One round of sc adds 0.2 in (0.5 cm) to each edge. The width at the points becomes 5.8 + 0.4 = 6.2 in (15.7 cm), and the length becomes 70 + 0.4 = 70.4 in (178.8 cm).
Each long edge of a strip is made of plain sts, outer points and V-notches:
- Each hexagon contributes 2 sides to a long edge. Those 2 sides share the point between them, so one hexagon gives 16 + 16 – 1 = 31 existing sts to the edge.
- One long edge therefore has 14 x 31 = 434 existing sts:
- 2 strip corners (the top corner of hexagon 1 and the bottom corner of hexagon 14)
- 26 notch sts (13 notches x 2 corner sts)
- 14 point sts
- 392 plain sts (14 hexagons x 28)
- Check: 2 + 26 + 14 + 392 = 434.
Border round: With RS facing, join the yarn to the top-right strip corner. Ch 1 and work 3 sc in the corner st.
- Top edge: Work 1 sc in each of the 14 plain sts (14 sc). Then work 3 sc in the top-left strip corner.
- Left long edge: Work 1 sc in each plain st, 3 sc in each point st, and 1 sc2tog in each notch, using the 2 joined corner sts.
- Count: 392 + (14 x 3) + 13 = 447 sc
- Then work 3 sc in the bottom-left strip corner.
- Bottom edge: 14 sc, then 3 sc in the bottom-right strip corner.
- Right long edge: Work it the same way as the left edge, for 447 sc.
- Join to the first sc and fasten off.
Round total: 447 + 447 + 14 + 14 + (4 corners x 3) = 934 sc
Why the math works:
– Working 1 sc in each plain st keeps the length unchanged.
– The 3 sc at each point add 2 sts to turn the outer angle without cupping.
– Each sc2tog takes 2 notch sts down to 1, so the inner angle stays crisp without a bulge.
– The added and removed sts balance out, so the edge lies flat.
Hanging Tab (1 per strip)
The top edge has 14 sc between its corner groups. With RS facing, skip the first 3 of those sc and join the yarn in the 4th.
Row 1: Ch 1, then sc in the same st and in the next 7 sts. (8 sc) This leaves 3 sc unworked on each side: 3 + 8 + 3 = 14.
Rows 2–22: Ch 1, turn, and sc in each st across. (8 sc)
The tab is now 1.6 in (4.1 cm) wide and 4 in (10.2 cm) long. Fold it to the WS and sl st Row 22 to the WS of Row 1 through all 8 sts. This makes a loop about 2 in (5.1 cm) tall that fits a rod up to 1 in (2.5 cm) in diameter.
Final Blocking
- Wet each strip in cool water, then gently press out the water. Do not wring it.
- Lay the strip flat on mats in sections of about 24 in (61.0 cm).
- Pin each hexagon to 5 in (12.7 cm) across the flats, checking each one with the tape measure.
- Pin the points out so the strip is 6.2 in (15.7 cm) wide.
- Open each petal window evenly with your fingers, and straighten the spokes.
- Keep the full strip length at 70.4 in (178.8 cm). Do not stretch it longer.
- Let it dry completely before unpinning and moving to the next section.
- Block the tabs flat and square.
Final Quality-Control Checklist
- [ ] There are 98 hexagons: 56 green and 42 cream.
- [ ] Every hexagon measures 5 in (12.7 cm) across the flats.
- [ ] Every hexagon has 90 sc in Round 5 and 16 sts per side.
- [ ] Each strip has 14 hexagons and 13 seams.
- [ ] Each seam is worked as 16 loose sl sts.
- [ ] Each border round has 934 sc, including 447 sc per long edge.
- [ ] The strips measure 6.2 x 70.4 in (15.7 x 178.8 cm).
- [ ] The tabs are centered, 8 sts wide and securely closed.
- [ ] All ends are woven in at least 1 in (2.5 cm) in two directions.
- [ ] The strips hang in the order A, B, A, B, A, B, A.
Troubleshooting
- The petals look closed or crowded: Your Round 2 trebles are too short. Pull up a taller loop on each treble, or check that you skipped 1 sc between spokes.
- The hexagon cups: Your tension is too tight in Round 4. Go up 0.5 mm in hook size, or work more loosely into the ch-4 arcs.
- The hexagon ruffles: You may have more than 12 dc per side. Recount, because each repeat should have 72 ÷ 6 = 12 dc.
- The strip curves sideways: The motifs are joined with a twist, or their sizes differ. Re-block the motifs to an equal size.
- The notches bunch: Make sure you used sc2tog across the 2 joined corner sts, not 2 separate sc.
- The strip grows after hanging: Cotton relaxes over time. Wet-block it, let it dry flat, and check your gauge on future strips.
Care
Hand wash or machine wash on a gentle cycle in cool water inside a laundry bag, then lay flat to dry and re-pin if needed. Do not hang the strips while they are wet.
Final Notes
The measurements build on each other at every stage:
- A 5 in (12.7 cm) hexagon with 16 sts per side
- 14 hexagons make a 70 in (177.8 cm) strip
- One border round brings it to 6.2 x 70.4 in (15.7 x 178.8 cm)
- An 8-stitch tab adds a 2 in (5.1 cm) loop, for a 72.4 in (183.9 cm) drop
If your first hexagon hits its checkpoints, every later stage will measure correctly too.
Happy crocheting!