

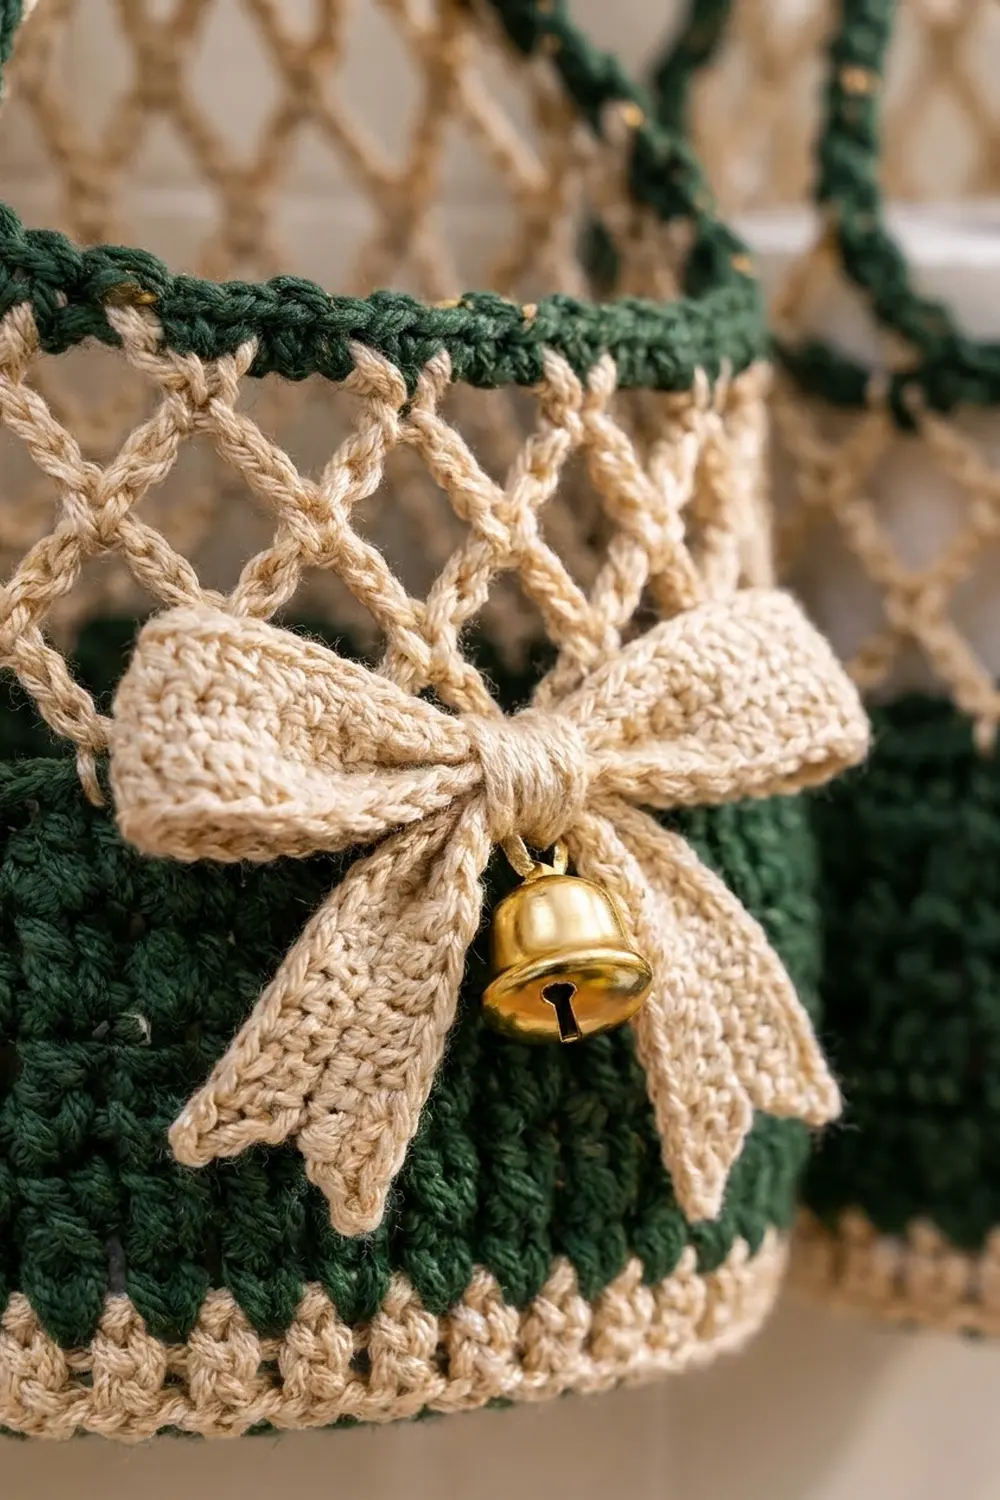
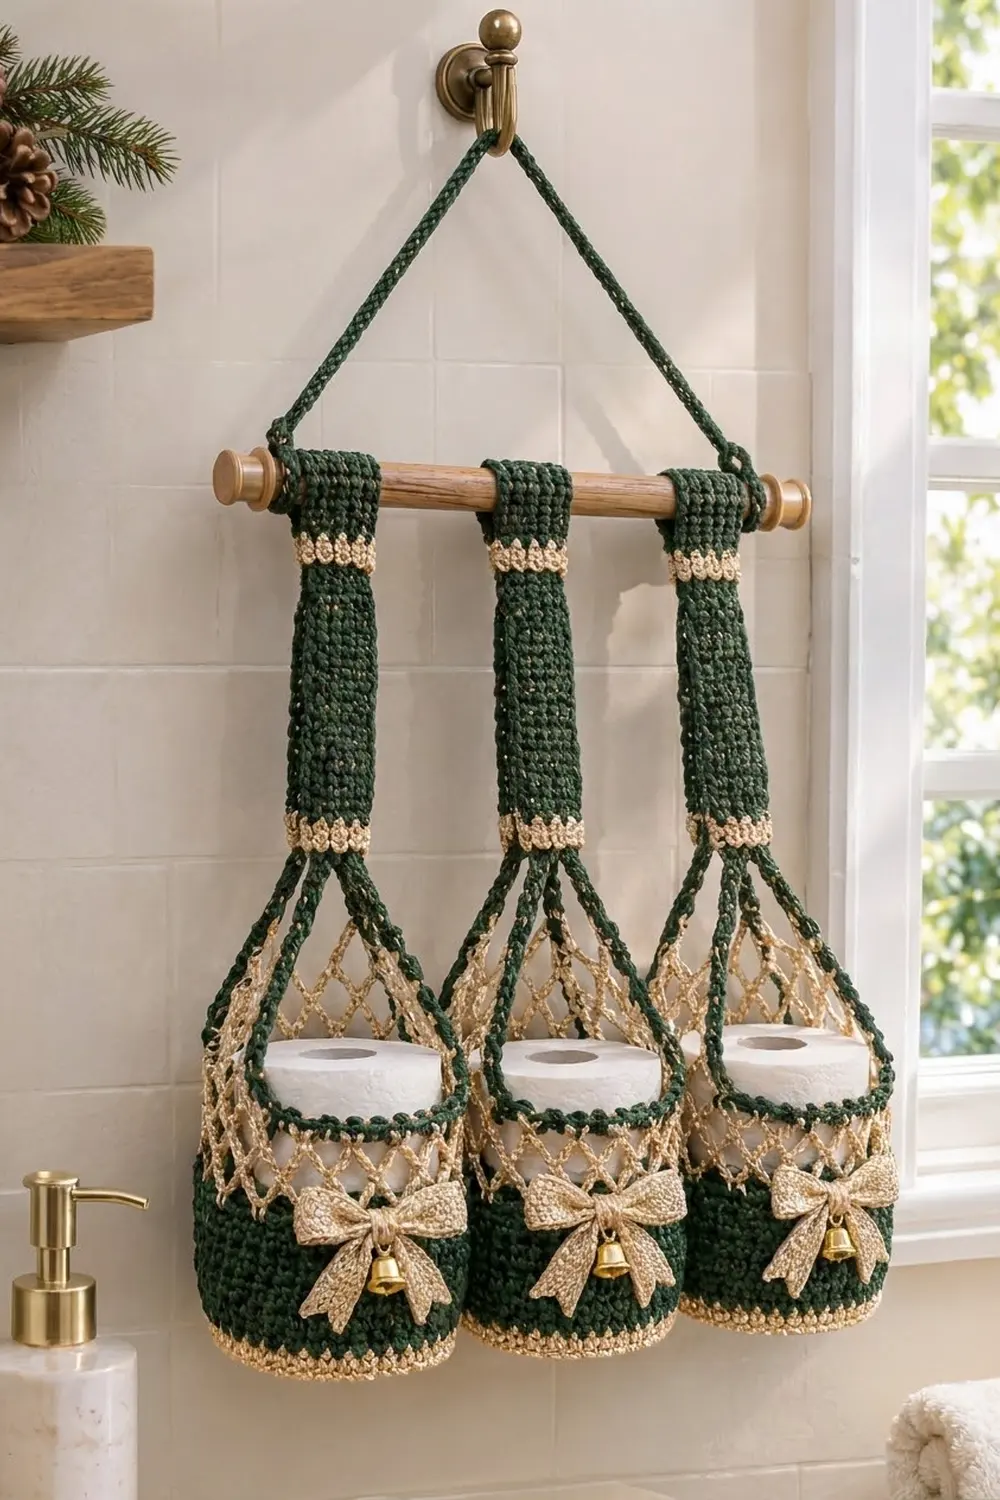
Bring a little holiday cheer to the bathroom with this set of four hanging toilet paper pockets. Each pocket has a solid forest-green base, an airy cream diamond mesh and a cream bow with a tiny gold jingle bell. All four hang side by side on a wooden dowel, and each one holds a standard roll.
The palette is classic and calm: deep evergreen with warm cream. Thin cream accents at the base and on the strap tie the colors together, and the open mesh keeps the pockets light while still holding the rolls securely.
This pattern uses US crochet terms. Each finished pocket is about 4.75 in (12.1 cm) wide and about 10 in (25.4 cm) tall when hung. The front opening is about 4 in (10.2 cm) high, and the back peak reaches about 7.6 in (19.3 cm) before the strap begins.
Each pocket is worked in one piece from the bottom up. You make a flat round base, turn up a solid wall and add two rounds of diamond mesh. Then you work a back panel in rows that narrows to a point, edge the whole opening in green and finish with a strap. The bows are made separately and sewn on. Finally, you slide the four pockets onto a dowel and add a hanging cord.
Finished Size and Construction
- Finished pocket size: about 4.75 in (12.1 cm) wide × 10 in (25.4 cm) tall when hung
- Skill level: Easy-intermediate
- Terminology: US crochet terms
- Yarn weight: Worsted (#4) cotton or cotton blend
- Hook: 4.0 mm (US G-6)
- Number of pieces: 4 pockets, 4 bows, 1 hanging cord
- Layout: 4 pockets in a single row on one dowel
- Pocket base: 60 sts around, about 4.75 in (12.1 cm) across
- Size before rim: front height about 3.6 in (9.1 cm)
- Rim depth: 2 rounds, about 0.4 in (1.0 cm)
Materials
Use a firm, smooth cotton or cotton blend. Cotton holds the pocket’s shape and resists stretching when the pocket is loaded. Avoid fuzzy acrylic, because it hides the mesh lattice.
- Color A, forest green: 120 g / about 228 m (bases, walls, rims, straps, cord)
- Color B, cream: 70 g / about 133 m (base trim, stripes, mesh, strap bands, bows)
These quantities include a safety margin of about 20%.
Tools:
– 4.0 mm (US G-6) crochet hook
– 4 gold jingle bells, 15 mm (0.6 in)
– Wooden dowel, 21 in (53.3 cm) long and 0.75 in (1.9 cm) across, with end caps
– Wall hook
– Tapestry needle, scissors and stitch markers
– Optional: fine gold metallic thread to hold with Color B for the bows
Abbreviations (US Terms)
- ch – chain
- sl st – slip stitch
- sc – single crochet
- inc – 2 sc in the same stitch
- sc2tog – single crochet 2 together
- BLO – back loop only
- sp – space
- st(s) – stitch(es)
- rev sc – reverse single crochet (crab stitch): work sc from left to right, inserting the hook into the next stitch to the right. It makes a twisted, beaded edge.
Mesh loop: ch 5, then sc in the next ch-5 sp, or in the stitch named in the instructions.
Gauge and Checkpoints
Gauge: 16 sc × 18 rounds = 4 in (10.2 cm) in sc.
Mesh gauge: one ch-5 loop spans 4 sts, which is 1 in (2.5 cm). Each mesh round adds about 0.6 in (1.5 cm) of height.
Make one complete pocket before starting the others, and check it against these measurements:
- After Round 10: the base is 4.75 in (12.1 cm) across.
- After Round 21: the wall is about 2.4 in (6.1 cm) tall.
- After Round 23: the pocket is about 3.6 in (9.1 cm) tall at the front.
- After the rim: the front is 4 in (10.2 cm) tall and the back peak is 7.6 in (19.3 cm).
If your base is too big, go down a hook size. If it is too small, go up a hook size. Test with a real roll after Round 21: it should slide in easily with about 0.25 in (0.6 cm) of ease.
Pocket Pattern (Make 4)
Base
With Color A, make a magic ring.
Rnd 1: 6 sc in the ring; join with sl st to the first sc. (6 sts)
Rnd 2: ch 1, inc in each st around; join. (12 sts)
Rnd 3: ch 1, (sc 1, inc) 6 times; join. (18 sts)
Rnd 4: ch 1, (sc 2, inc) 6 times; join. (24 sts)
Rnd 5: ch 1, (sc 3, inc) 6 times; join. (30 sts)
Rnd 6: ch 1, (sc 4, inc) 6 times; join. (36 sts)
Rnd 7: ch 1, (sc 5, inc) 6 times; join. (42 sts)
Rnd 8: ch 1, (sc 6, inc) 6 times; join. (48 sts)
Rnd 9: ch 1, (sc 7, inc) 6 times; join. (54 sts)
Rnd 10: ch 1, (sc 8, inc) 6 times; join. (60 sts)
Fasten off Color A. The base should lie flat and measure 4.75 in (12.1 cm) across.
Wall
Rnd 11 (turning round): Join Color B. Ch 1, sc in BLO of each st around; join. (60 sts) The unused front loops form a ridge for the base trim.
Rnd 12: ch 1, sc in each st around; join. (60 sts) Fasten off Color B.
Rnds 13–21: Join Color A. Ch 1, sc in each st around; join. (60 sts per round)
Fasten off. The wall measures about 2.4 in (6.1 cm) from the base fold.
Diamond Mesh
Rnd 22: Join Color B in any st. Ch 1, sc in the same st, ch 5, skip 3 sts, sc in the next st 14 times. Ch 5, skip 3 sts and join with sl st to the first sc. (15 sc, 15 ch-5 sps)
The math: 15 loops × 4 sts each = 60 sts, so the mesh uses every stitch of the wall.
Rnd 23: Sl st in the next 3 ch to reach the center of the first ch-5 sp. Ch 1, sc in the same sp. (Ch 5, sc in the next ch-5 sp) 14 times, ch 5 and join with sl st to the first sc. (15 sc, 15 ch-5 sps)
Each sc now sits in the center of a loop below, so the loops cross into diamonds. Number the ch-5 sps of Rnd 23 from 1 to 15, starting at the sp that holds the joining sc.
Back Panel (Rows)
The back is worked in turned rows. Each row has one fewer loop than the row before, which shapes the teardrop point.
Row 1: Sl st in the next 3 ch to reach the center of sp 1. Ch 1, sc in sp 1, then (ch 5, sc in the next ch-5 sp) 6 times, ending in sp 7. (6 loops) Turn.
Row 2: Sl st in the first 3 ch to reach the center of the first loop. Ch 1, sc in the same loop, then (ch 5, sc in the next loop) 5 times. (5 loops) Turn.
Rows 3–6: Repeat Row 2. You will have 4 loops after Row 3, 3 after Row 4, 2 after Row 5 and 1 after Row 6.
Fasten off. Sps 8–15 of Rnd 23 are the free front opening, which is 8 loops.
Border: Pocket Rim and Base Trim
Rim gauge: 4 sc per ch-5 loop, which matches the 4 sts per inch of the wall. Along each sloped side, use 3 sc per row end. Each mesh row steps in by half a loop, about 0.5 in (1.3 cm), and rises about 0.6 in (1.5 cm). That gives a slope of about 0.78 in (2.0 cm) per row, so 3 sc (0.75 in, 1.9 cm) keep the edge flat.
Rim Rnd 1: Join Color A in sp 8.
– Front: 4 sc in each of sps 8–15. (32 sts)
– First side: 3 sc in each row end of Rows 1–6. (18 sts)
– Top: 5 sc in the single loop of Row 6. (5 sts)
– Second side: 3 sc in each row end of Rows 6–1. (18 sts)
Join with a sl st. (73 sts)
The math: 32 + 18 + 5 + 18 = 73.
Rim Rnd 2: Ch 1, sc in each st around, but work sc2tog at both inner corners where the front meets a side. Join. (71 sts: front 31 + side 17 + top 5 + side 18, counting each corner sc2tog with the side that follows it)
The sc2tog stitches take up the extra fabric at the inner corners so they don’t ripple. Leave the yarn attached.
Strap
Row 1: Sl st across to the first of the 5 top sts. Ch 1, sc in each of the 5 top sts. (5 sts) Turn.
Row 2: Ch 1, sc 5. Turn.
Rows 3–4: Change to Color B. Ch 1, sc 5. Turn.
Rows 5–22: Change to Color A. Ch 1, sc 5. Turn.
The strap is 1.25 in (3.2 cm) wide and 4.9 in (12.4 cm) long. Leave a 12 in (30.5 cm) tail for sewing. Don’t sew the strap yet.
Base Trim
Turn the pocket upside down. Join Color B in any unused front loop of Rnd 10, ch 1 and rev sc in each front loop around. Join. (60 sts) This makes a beaded cream edge at the base fold.
Bow (Make 4)
All bow pieces use Color B, with gold thread held together if you like.
Bow band: Ch 26. Row 1: sc in the 2nd ch from the hook and in each ch across. (25 sts) Rows 2–5: ch 1, turn, sc 25.
The band measures 6.25 in (15.9 cm) × 1.1 in (2.8 cm). Fold both short ends to the center, overlapping them by 0.25 in (0.6 cm), and tack them in place.
Tails: Ch 13. Row 1: sc in the 2nd ch from the hook and across. (12 sts) Rows 2–3: ch 1, turn, sc 12.
The tail strip is 3 in (7.6 cm) × 0.7 in (1.8 cm). Fold it into a V and place it behind the bow.
Center wrap: Ch 7. Row 1: sc in the 2nd ch from the hook and across. (6 sts) Row 2: ch 1, turn, sc 6.
Wrap this piece around the center of the bow and the tails, cinching the middle, and sew the ends together at the back. Sew a bell to the front of the wrap.
The finished bow is about 3 in (7.6 cm) wide. Sew it to the center front of the green wall, over Rnds 15–19.
Make All Pieces
- Color A: 4 pocket bases, walls, rims and straps, plus 1 cord
- Color B: 4 sets of stripes, mesh, back panels, strap bands and base trims, plus 4 bows
Layout on the dowel, front view:
[cap]=====S1=====S2=====S3=====S4=====[cap]
          P1     P2     P3     P4
S = strap and P = pocket. Space the straps 5 in (12.7 cm) apart, center to center.
Joining: Hanging Assembly
The pockets are not sewn to each other. Each one hangs from its own strap.
- Fold Rows 5–22 of a strap over the dowel, toward the back.
- Whipstitch the last row of the strap to the top of Row 4, stitch to stitch, so all 5 sts line up with the 5 sts below. This makes a loop about 4 in (10.2 cm) around, which slides easily on a 0.75 in (1.9 cm) dowel.
- Keep your sewing tension firm but not tight. The 5 sts on top should lie flat, not gather.
- Repeat for all four pockets. Place the outer straps 3 in (7.6 cm) in from each end of the dowel. Leave 5 in (12.7 cm) between strap centers, so the pockets have a 0.25 in (0.6 cm) gap between them.
Hanging cord: With Color A, ch 121. Sl st in the back bump of the 2nd ch from the hook and in each ch across. (120 sts) The cord is about 30 in (76.2 cm) long.
Wrap each end twice around the dowel just inside the end caps, then sew it securely in place.
Size checkpoint: The pocket span is about 19.75 in (50.2 cm), and each pocket hangs about 10 in (25.4 cm) below the top of the dowel.
Final Blocking
- Dampen each pocket lightly with a spray bottle.
- Put a toilet roll wrapped in plastic inside the pocket to shape the cylinder.
- Pin the back panel flat and pull the mesh diamonds even. The back peak should measure 7.6 in (19.3 cm).
- Steam the bows lightly and pinch the loops into shape.
- Let everything dry completely, then remove the rolls.
Final Quality-Control Checklist
- Each base is 60 sts and 4.75 in (12.1 cm) across.
- The wall has 60 sts in every round, with no slanting.
- The mesh has 15 loops around, and all diamonds are aligned.
- The back panel has 6 rows, ending in 1 loop.
- Rim Rnd 1 has 73 sts and Rim Rnd 2 has 71 sts.
- The straps are 5 sts wide and sewn stitch to stitch.
- All four pockets are the same height on the dowel.
- The bows are centered and the bells are sewn on securely.
Troubleshooting
- The base cups or ruffles: Recount your increases. A base that cups needs a larger hook, and one that ruffles needs a smaller hook.
- The wall flares out: Keep your tension consistent. Don’t add stitches at the joins.
- The mesh twists: Make sure each sc goes into the center of a ch-5 sp, not around the chain.
- The front rim waves: Work 4 sc per loop, never 5.
- The side edges pucker: Keep to 3 sc per row end.
- The roll is loose: Make the next pocket with a hook one size smaller.
- The pockets hang crooked: Re-measure the strap spacing and sew each strap evenly.
Care
Hand wash in cool water, press out the excess water and dry flat with the pockets shaped around rolls. Take the bells off before washing if they might rust.
Final Notes
The measurements build on each other. Gauge of 4 sts per in gives a 60-stitch base 4.75 in (12.1 cm) across. That carries a 60-stitch wall and a 15-loop mesh, and the 6 back rows shape the teardrop. A 73-stitch rim settles to 71, and the 5-stitch strap loops over the dowel. Check each step against these numbers and your four pockets will match.
Happy crocheting!