

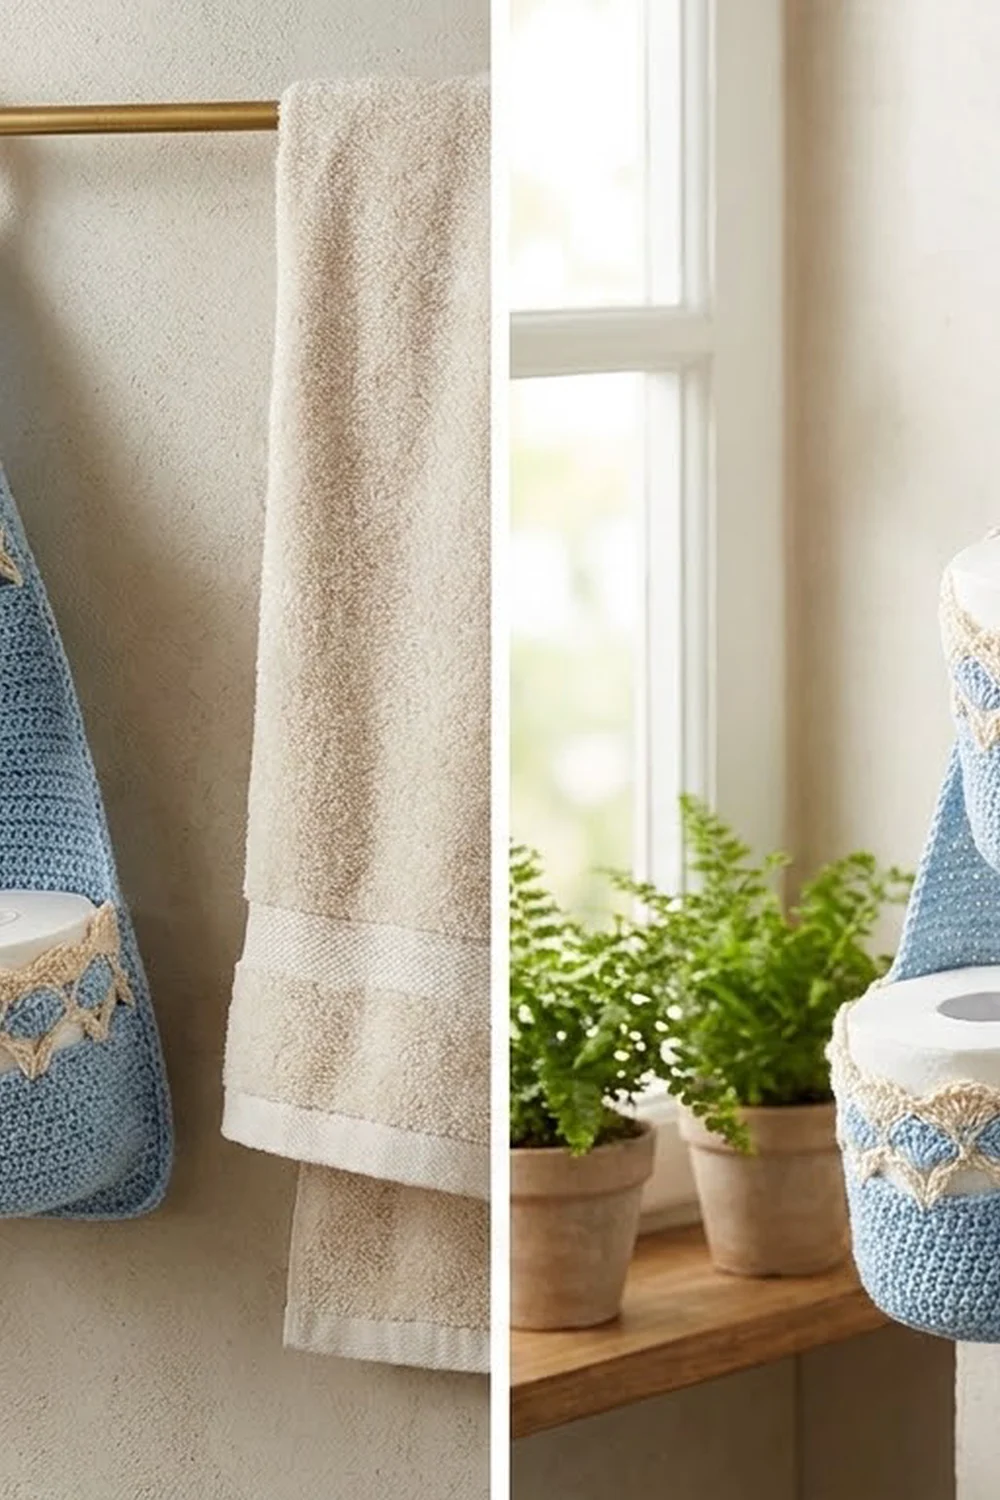
This hanging holder stores three spare rolls in plain sight and still looks pretty. A tapered light blue panel carries three round pockets, two at the bottom and one centered above. A strap at the top loops around a wooden ring so the holder hangs from a towel bar or hook.
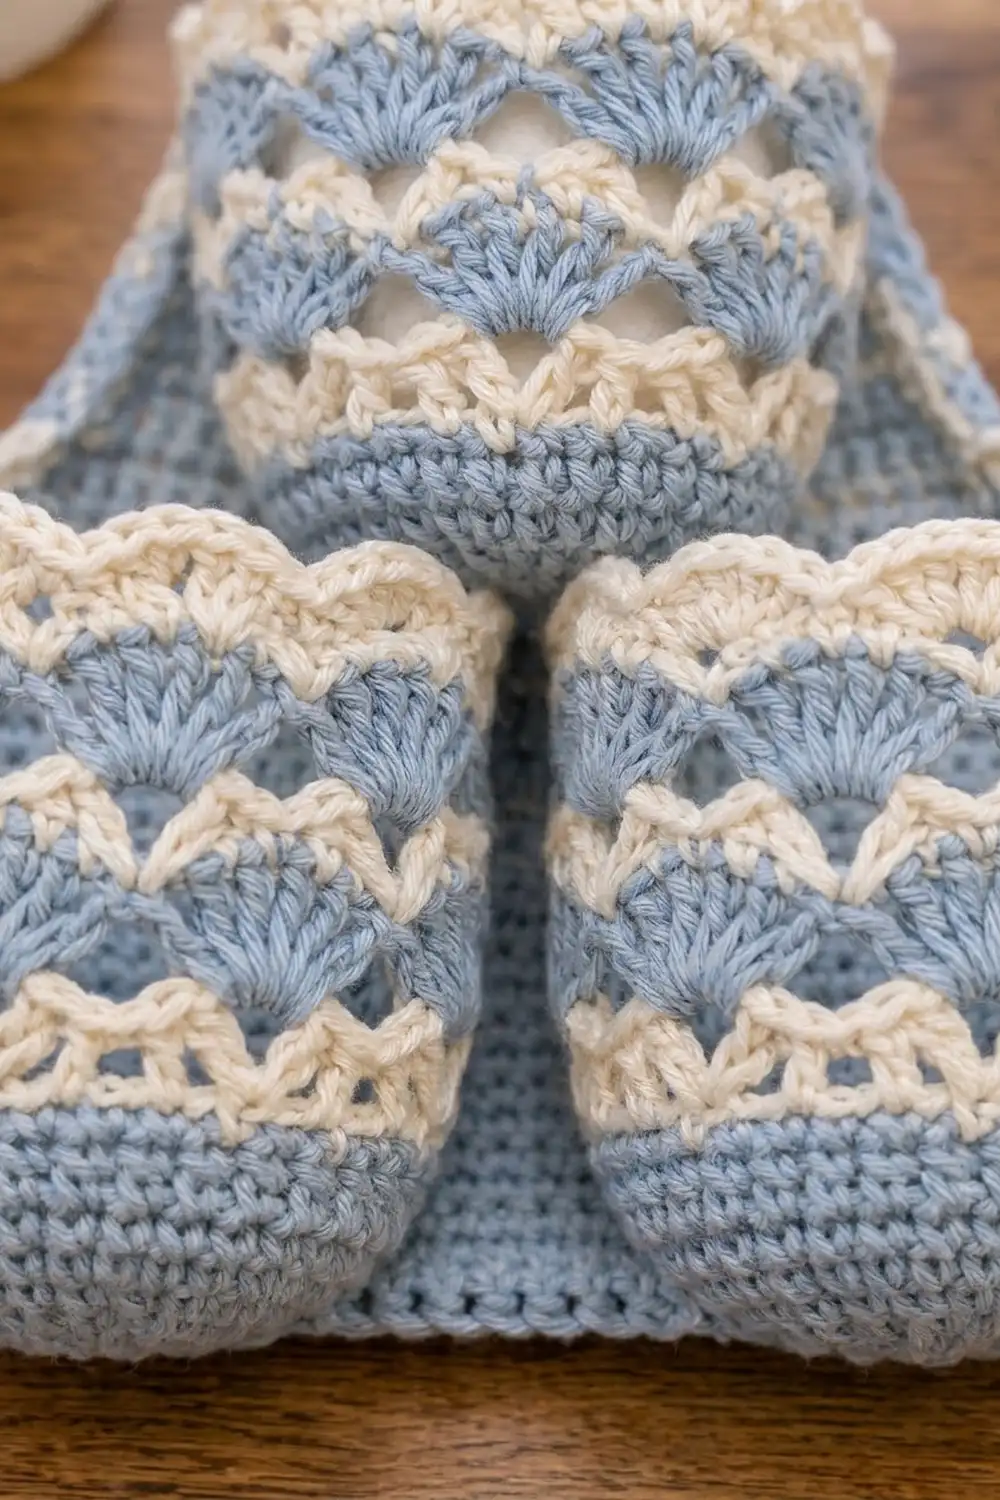
The pockets do the decorating. Each one has a solid blue base, then cream V-stitch lattice rounds alternating with staggered blue fan rounds, and a cream scalloped rim with one scallop over every fan. Soft blue and cream suit a bathroom all year and look especially fresh in winter.
The pattern uses US crochet terms. Finished, the holder is about 11 in (27.9 cm) wide and about 15 in (38.1 cm) tall including the ring. Each pocket is about 5 in (12.7 cm) wide when flattened against the panel and 3.75 in (9.5 cm) tall.
The construction is simple. Make three pockets in joined rounds from the base up. Work the back panel in rows from the bottom edge up, add a two-round border, and work the strap from the border. Then sew the pockets on and stitch the strap around the ring.
Finished Size and Construction
- Finished size: about 11 in (27.9 cm) wide x 15 in (38.1 cm) tall including the ring
- Skill level: Intermediate
- Terminology: US crochet terms
- Yarn weight: worsted (#4) cotton
- Hook: 4.5 mm (US 7)
- Number of pieces: 4 crocheted pieces (1 back panel, 3 pockets) plus 1 wooden ring
- Layout: 2 pockets side by side at the bottom, 1 pocket centered above them
- Pocket size: 5 in (12.7 cm) wide flattened x 3.75 in (9.5 cm) tall; base 4.75 in (12.1 cm) across
- Panel size before border: 10 in (25.4 cm) wide at the bottom, 2 in (5.1 cm) wide at the top, 10.25 in (26.0 cm) tall
- Border depth: 2 rounds, about 0.5 in (1.3 cm)
- Panel size after border: 11 in (27.9 cm) wide x 11.25 in (28.6 cm) tall, before the strap
Materials
Use a smooth worsted-weight cotton or cotton blend. Cotton holds the pocket shape, washes well, and stays crisp in a damp bathroom. Avoid fuzzy or very stretchy yarn, because heavy rolls will pull the pockets out of shape.
- Light blue (Color A): 120 g, about 230 m (panel, border, strap, pocket bases, fan rounds)
- Cream (Color B): 60 g, about 115 m (lattice rounds and rims)
These quantities include about a 15% margin for your gauge swatch and sewing.
Tools:
- 4.5 mm (US 7) crochet hook
- Wooden ring, 2.75 in (7.0 cm) across
- Tapestry needle
- 6 locking stitch markers
- Rust-proof pins
- Measuring tape
- Scissors
- Blocking mat or towel, and a spray bottle
Abbreviations (US Terms)
- ch = chain
- sl st = slip stitch
- sc = single crochet
- hdc = half double crochet
- dc = double crochet
- sc2tog = single crochet 2 together
- BLO = back loop only
- st(s) = stitch(es)
- sp = space
- rnd = round
Special stitches:
- V-st: (dc, ch 2, dc) in the same stitch.
- Fan: 7 dc in the same ch-2 space.
Gauge and Checkpoints
Gauge: 16 sc and 18 rows = 4 in (10.2 cm) in sc worked in rows.
Make one pocket first. It shows your gauge in the round and both stitch patterns, and every later measurement depends on it.
Checkpoints:
- Pocket Rnd 5 (30 sts): about 2.4 in (6.1 cm) across
- Pocket Rnd 10 (60 sts): 4.75 in (12.1 cm) across, lying flat
- Pocket Rnd 13: wall about 0.75 in (1.9 cm) tall
- Finished pocket: 3.75 in (9.5 cm) tall, rim about 5.25 in (13.3 cm) across
- Panel after Row 14: 10 in (25.4 cm) wide x 3.1 in (7.9 cm) tall
If the base is too big (over 5 in / 12.7 cm), go down to a 4 mm hook. If it is too small (under 4.5 in / 11.4 cm), go up to a 5 mm hook. Don’t add or skip increase rounds, because the pattern rounds need exactly 60 sts. If the base cups, your stitches are too tight. If it ruffles, they are too loose.
Pockets (Make 3)
Work in joined rounds with the right side facing throughout. Don’t turn.
Base
With Color A, make a magic ring.
Rnd 1: Ch 1, 6 sc in ring, sl st to first sc. (6)
Rnd 2: Ch 1, 2 sc in each st around, sl st to first sc. (12)
Rnd 3: Ch 1, sc in next st, 2 sc in next st; repeat from * around, sl st to first sc. (18)
Rnd 4: Ch 1, sc in next 2 sts, 2 sc in next st; repeat around, sl st to first sc. (24)
Rnd 5: Ch 1, sc in next 3 sts, 2 sc in next st; repeat around, sl st to first sc. (30)
Rnds 6–10: Continue the same way, working 1 more sc before each increase in each round. Rnd 6 has 36 sts, Rnd 7 has 42, Rnd 8 has 48, Rnd 9 has 54, and Rnd 10 has 60.
Check the base: it should be 4.75 in (12.1 cm) across.
Lower Wall
Rnd 11: Ch 1, sc in BLO of each st around, sl st to first sc. (60) This makes the ridge where the wall turns up from the base.
Rnds 12–13: Ch 1, sc in each st around, sl st to first sc. (60)
Fasten off Color A.
Shell Pattern
Each pattern repeat covers 6 sts of Rnd 13, so 60 sts give 10 repeats.
Rnd 14 (Color B): Join Color B with a sc in any st. Ch 2, skip 2 sts, V-st in next st, ch 2, skip 2 sts, sc in next st; repeat from * 8 more times. Then ch 2, skip 2 sts, V-st in next st, ch 2, skip the last 2 sts, and sl st to first sc. (10 sc + 10 V-sts) Fasten off.
Rnd 15 (Color A): Join Color A with a sl st in the ch-2 sp of any V-st. Ch 3 (counts as dc), 6 dc in the same sp. Sc in next sc, fan in ch-2 sp of next V-st; repeat from * 8 more times. Then sc in last sc and sl st to top of the ch-3. Skip the ch-2 sps on either side of each sc. (10 fans of 7 dc = 70 dc, plus 10 sc = 80 sts) Fasten off.
Rnd 16 (Color B): Join Color B with a sl st in any sc between fans. Ch 5 (counts as dc + ch 2), then dc in the same sc to finish the V-st. Ch 2, sc in 4th (center) dc of next fan, ch 2. V-st in next sc, ch 2, sc in center dc of next fan, ch 2; repeat from * 8 more times, then sl st to 3rd ch of beginning ch-5. (10 V-sts + 10 sc) Fasten off.
The new V-sts sit above the old sc, so the next fans land halfway between the first ones. That makes the staggered fans.
Rnd 17 (Color A): Work as Rnd 15. (80 sts: 70 dc + 10 sc) Fasten off.
Rim
Rnd 18 (Color B, trim round): Join Color B with a sc in any sc between fans. Sc in each dc and each sc around, sl st to first sc. (80 sts worked 1 per existing st + 0 extra = 80)
Rnd 19 (Color B, scallops): Ch 1, sc in the first st (the valley, above a between-fan sc). Skip next st, hdc in next st, dc in next st, 3 dc in next st, dc in next st, hdc in next st, skip next st, sc in next st. Repeat from * 8 more times. End the last repeat with “skip next st” and sl st to the first sc. (60 sts worked into + 20 extra from the 3-dc groups = 80: 10 sc + 10 scallops of 7 sts)
The 3-dc group in each scallop falls over the center of a fan in Rnd 17, so each scallop sits right above a fan.
Fasten off, leaving a 30 in (76.2 cm) tail of Color B for sewing. Weave in all other ends.
Checkpoint: the pocket is 3.75 in (9.5 cm) tall and about 5 in (12.7 cm) wide when flattened.
Back Panel
Work the panel in rows with Color A.
Foundation: Ch 41.
Row 1: Sc in 2nd ch from hook and in each ch across. (40)
Rows 2–14: Ch 1, turn, sc in each st across. (40)
Checkpoint: 10 in (25.4 cm) wide x 3.1 in (7.9 cm) tall.
Row 15 (decrease): Ch 1, turn, sc2tog, sc across to the last 2 sts, sc2tog. (38)
Row 16: Ch 1, turn, sc in each st across. (38)
Rows 17–46: Repeat Rows 15–16 fifteen more times. Each odd row ends with 2 fewer sts: Row 17 has 36, Row 21 has 32, Row 29 has 24, Row 37 has 16, and Row 45 has 8. Row 46 has 8.
There are 16 decrease rows in all (Rows 15–45), so 40 − 32 = 8.
Checkpoints:
- After Row 30 (24 sts): 6 in (15.2 cm) wide, 6.75 in (17.1 cm) tall
- After Row 46 (8 sts): 2 in (5.1 cm) wide, 10.25 in (26.0 cm) tall
Don’t fasten off. Go straight on to the border.
Make All Pieces
- Color A only: 1 back panel (the border and strap come next)
- Color A + Color B: 3 pockets
Layout (front view):
             ( ring )
             [strap ]
           /  panel   \
          / [Top pkt]  \
         /  [rows 20-36] \
  [Bottom L  ][Bottom R  ]
  [rows 2-18 ][rows 2-18 ]
Border
Border gauge: the same as the panel, 16 sc = 4 in (10.2 cm).
On each side edge, work 1 sc into the end of each row. On the sloped section, the edge moves in 1 st for every 2 rows, so each 2-row stretch of edge measures about 0.51 in (1.3 cm). That leaves room for 2 sc at gauge, so 1 sc per row end lies flat. On the 14 straight rows, 1 sc per row end is very slightly full, and blocking evens it out.
Each corner is a group of 3 sc. The side counts below are the sts between those corner groups.
Rnd 1: With the last loop of Row 46 on your hook, ch 1 and turn so the right side faces you.
- Top: 3 sc in the first st, sc in the next 6 sts, 3 sc in the last st.
- Left side: Sc in the end of each of Rows 45 down to 1. (45)
- Bottom: Working into the foundation chain, 3 sc in the first ch, sc in the next 38 ch, 3 sc in the last ch.
- Right side: Sc in the end of each of Rows 1 up to 45. (45)
Sl st to the first sc. The round has 4 corner groups of 3 (12 sts) plus 6 + 45 + 38 + 45 sts between corners, for 146 sts. Counted another way, 138 sts are worked 1 per existing st or row end (8 + 45 + 40 + 45), plus 8 extra corner sts, for 146.
Rnd 2: Ch 1, sc in each st around, working 3 sc in the center st of each corner group. Sl st to first sc. The round has 4 corner groups (12 sts) plus 8 + 47 + 40 + 47 sts between corners, for 154 sts. That is 146 + 8 extra.
Each side between corners gains 2 sts, one from each corner group, so the border lies flat and the corners stay square.
Checkpoint: 11 in (27.9 cm) wide x 11.25 in (28.6 cm) tall.
Strap
Row 1: Ch 1, turn, and sc in each of the 8 sts between the two top corner groups. (8)
Rows 2–14: Ch 1, turn, sc in each st across. (8)
The strap measures 2 in (5.1 cm) wide x 3.1 in (7.9 cm) long. Fasten off, leaving a 12 in (30.5 cm) tail.
Joining
Whipstitch each pocket on with its cream tail. The method is the same for all three.
Mark the panel:
- Place a marker between the 20th and 21st sts of Row 2. This is the center line.
- On Row 20 (34 sts), mark the center 20 sts, leaving 7 sts on each side.
Stitch-to-stitch logic: Flatten each pocket so that one-third of its base, 20 of the 60 Rnd 11 sts, forms a straight back edge. At 16 sts per 4 in (10.2 cm), 20 sts measure exactly 5 in (12.7 cm). That matches 20 panel sts, so you sew 1 pocket st to 1 panel st with no gathering. The other 40 sts of the base curve forward into a D shape that holds a roll.
- Bottom left pocket: Whipstitch its 20 back ridge sts to Row 2, sts 1–20. Sew the inner side straight up the center line through Rows 2–18. Sew the outer side up the panel edge through Rows 2–14 only. The top of the wall stands free past the sloped edge.
- Bottom right pocket: Do the same on sts 21–40, mirrored.
- Top pocket: Whipstitch its back edge to the 20 marked sts of Row 20. Sew both sides up through Row 33, where the panel is exactly 20 sts wide. Rows 34–36 of the wall stand free.
Tension: For each stitch, catch one loop from each piece and pull only until the pieces touch. Pulling hard makes the panel pucker.
Size checkpoint: The bottom pocket rims sit about 4.5 in (11.4 cm) above the bottom edge. The top pocket rim sits about 8.5 in (21.6 cm) above it.
Ring: Fold the strap through the ring to the back. Sew Row 14 to the back of the panel just below Row 1 of the strap, so the ring sits in a snug loop.
Final Blocking
- Weave in all remaining ends along stitches of the same color.
- Mist the whole holder until it is damp but not soaked.
- Lay it face up on a mat. Pin the panel to 11 in (27.9 cm) wide at the bottom and 11.25 in (28.6 cm) tall.
- Stuff each pocket with a toilet roll or a rolled towel so the round shape sets.
- Pin each scallop point outward so each rim is about 5.25 in (13.3 cm) across.
- Let it dry completely, then remove the pins and rolls.
Final Quality-Control Checklist
- Each pocket base measures 4.75 in (12.1 cm) and lies flat
- Every fan round has 10 fans, and the two fan rounds are staggered
- Every rim has 10 scallops, each centered over a fan
- The panel goes from 40 sts to 8 sts and measures 10.25 in (26.0 cm) before the border
- Border Rnd 2 has 154 sts and the corners lie flat
- Every pocket back seam is 20 sts long, and the pockets sit symmetrically
- The strap loop is secure and the ring hangs centered
- No loose ends show on the front
Troubleshooting
- Fans look crowded or ruffled: You probably worked into the ch-2 sps beside each sc. Skip them.
- Fans line up instead of staggering: In Rnd 16, the V-sts go in the sc between fans, not in the fan centers.
- Scallops are off-center: Start Rnd 18 in a between-fan sc so that Rnd 19 starts in a valley.
- Panel edges wave: Your border is too loose. Redo it with a 4 mm hook.
- A pocket sags when full: Add 2 or 3 tacking stitches from the back of the rim to the panel.
- The holder tilts: The pockets aren’t centered. Check the Row 2 and Row 20 markers.
Care
Hand wash in cool water, or machine wash on a gentle cycle in a mesh bag. Reshape while damp and dry flat with the pockets stuffed.
Final Notes
Every measurement follows from one gauge, 16 sc = 4 in (10.2 cm). The 60-st base is 4.75 in (12.1 cm) across, and 20 of its sts form a flat back edge of 5 in (12.7 cm). Two of those edges fill the 40-st, 10 in (25.4 cm) panel bottom. The panel tapers to 8 sts, and the 2-round border brings it to 11 in (27.9 cm) x 11.25 in (28.6 cm). The 8-st strap holds a 2.75 in (7.0 cm) ring, for a total height of about 15 in (38.1 cm).
Happy crocheting!