

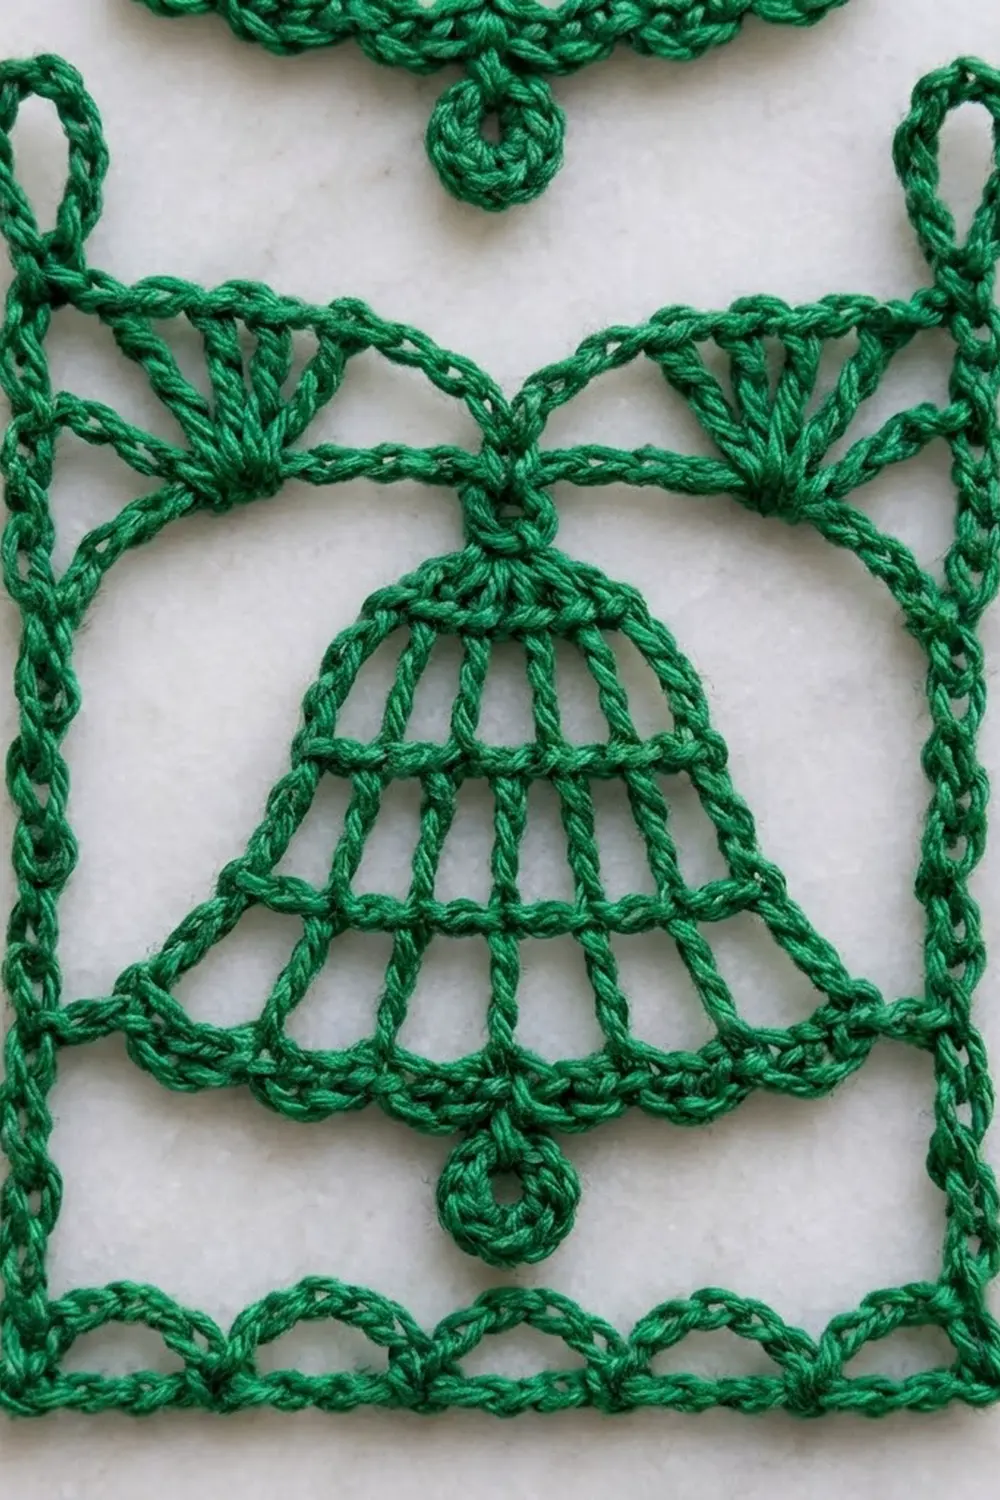
The Evergreen Bells curtain is made of open lace strips that hang side by side in a doorway. Each strip is a stack of bell blocks inside a firm frame. Each bell has a flared rim, an airy ladder body, a small ring clapper, and fan “leaves” in the corners above it.
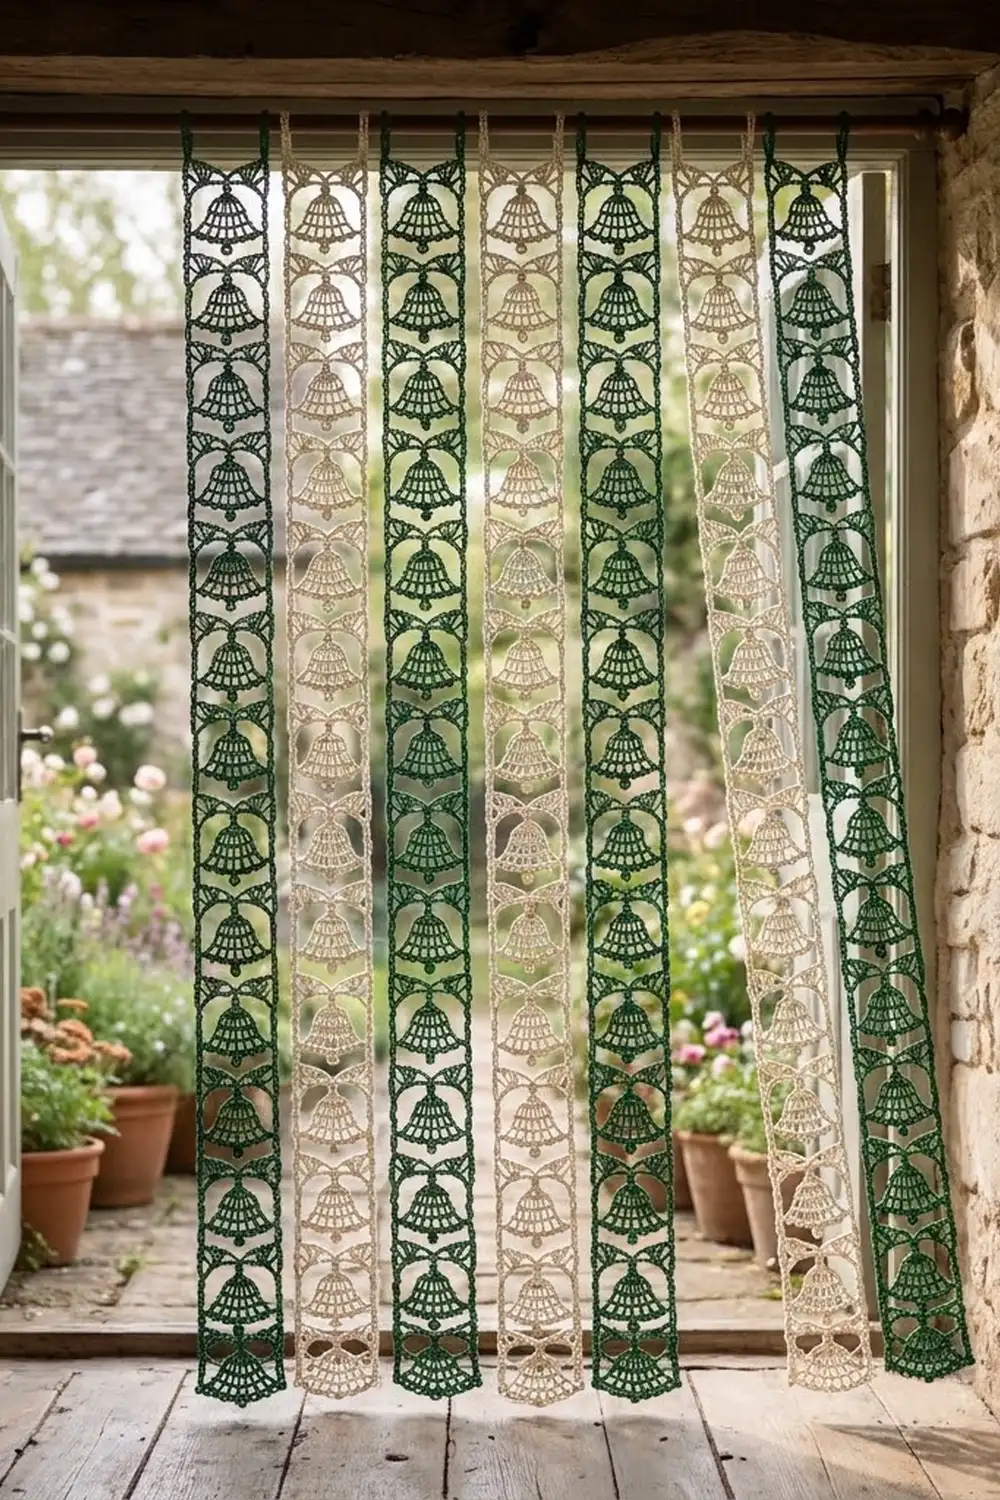
The sample has seven strips in two colors: four in deep evergreen and three in cream, alternating across the rod. Light shows through the ladder rows, and the solid rims and fans keep each bell easy to see from across a room. It looks like a holiday piece, but works year-round.
This pattern uses US crochet terms. Each finished strip measures 4.7 in (11.9 cm) wide by 75.5 in (191.8 cm) long, plus hanging loops that rise 2.4 in (6.1 cm). Seven strips with 0.5 in (1.3 cm) gaps fill a doorway about 36 in (91.4 cm) wide.
Each strip is worked in one piece from the bottom up, in short rows across its width. One 11-row bell block is repeated 17 times and capped with a single crochet row. A two-round single crochet border frames the strip, and two loops at the top corners slide onto the rod. The strips are never sewn to each other.
Finished Size and Construction
- Finished strip size: 4.7 x 75.5 in (11.9 x 191.8 cm), plus 2.4 in (6.1 cm) loops
- Skill level: Intermediate
- Terminology: US
- Yarn weight: DK / light (#3) cotton
- Hook: 3.5 mm (E-4)
- Number of pieces: 7 strips (4 green, 3 cream)
- Layout: 7 strips in one row, hung side by side, unjoined
- Size before border: 4.2 x 75 in (10.7 x 190.5 cm)
- Border depth: 0.25 in (0.6 cm) on every edge
- Curtain width as hung: 32.9 in (83.6 cm) of lace plus six 0.5 in (1.3 cm) gaps = 35.9 in (91.2 cm)
Materials
Use a smooth mercerized or combed cotton in DK weight, about 230 m per 100 g. Cotton holds the open bell shapes well after blocking and doesn’t stretch much while hanging. Avoid acrylic: a long hanging strip in acrylic will grow over time.
- Color A, evergreen: 350 g (about 805 m), enough for 4 strips
- Color B, cream: 275 g (about 633 m), enough for 3 strips
Each strip uses about 70 g (about 161 m). The quantities above include a margin of roughly 25% for your gauge swatch, border, and loops.
Tools:
– 3.5 mm (E-4) crochet hook
– Tapestry needle
– Stitch markers (4)
– Rust-proof pins and a long blocking surface (or a clean floor with towels)
– Spray bottle
– Tape measure
– Curtain rod up to 1.25 in (3.2 cm) in diameter
Abbreviations (US Terms)
- ch – chain
- sl st – slip stitch
- sc – single crochet
- dc – double crochet
- sk – skip
- sp(s) – space(s)
- st(s) – stitch(es)
- RS – right side
Special stitch – Clapper: (Sc, ch 5, sl st in the front loop of the sc just made). This forms a small chain ring that hangs from a single sc.
Turning chain: At the start of every dc row, ch 3 counts as the first dc.
Positions: Every row in this pattern spans 21 “positions.” A dc or sc fills 1 position. A ch-1 fills 1, a ch-2 fills 2, and so on. Counting positions is how you check that the strip stays straight.
Gauge and Checkpoints
Gauge: 20 dc and 10 dc rows = 4 in (10.2 cm), lightly blocked.
Test one block first. Work the foundation and Rows 1–11 of one block, then measure:
- Checkpoint 1: The foundation row measures 4.2 in (10.7 cm) wide.
- Checkpoint 2: One finished block measures 4.4 in (11.2 cm) tall.
- Checkpoint 3: After 2 blocks, the strip measures 8.8 in (22.4 cm) tall.
- Checkpoint 4: After 5 blocks, the strip measures 22 in (55.9 cm) tall.
- Checkpoint 5: After all 17 blocks, the strip measures 74.8 in (190.0 cm). The top sc row adds 0.2 in (0.5 cm), bringing it to 75 in (190.5 cm).
If your block is too big, go down to a 3.25 mm hook. If it’s too small, go up to a 3.75 mm hook. If only the height is off, check your turning chains: a loose ch 3 adds height to every row.
Main Pattern: One Strip
Make 1 strip at a time. All strips are worked the same way.
Foundation
Ch 22.
Bell Block (repeat 17 times)
Row 1 (divider): For block 1 only, sc in the 2nd ch from the hook and in each ch across. For blocks 2–17, ch 1, then sc in each st across Row 11 of the previous block. Turn. (21 sc)
Row 2 (scallops and clapper): Ch 3 (counts as dc), dc in next st. Ch 3, sk 3 sts, sc in next st. Ch 3, sk 2 sts, sc in next st. Ch 1, sk 1 st, Clapper in next st (the center st, position 11). Ch 1, sk 1 st, sc in next st. Ch 3, sk 2 sts, sc in next st. Ch 3, sk 3 sts, dc in last 2 sts. Turn.
(4 dc, 5 sc including the Clapper sc, 4 ch-3 sps, 2 ch-1 sps)
The ch-3 arches form the scalloped bottom edge of the block. Pull the Clapper ring toward you so it doesn’t get caught in the next row. The ring looks the same from both sides.
Row 3 (bell rim): Ch 3, dc in next dc. 3 dc in ch-3 sp, dc in sc, 2 dc in ch-3 sp, dc in sc, dc in ch-1 sp, dc in Clapper sc (behind the ring), dc in ch-1 sp, dc in sc, 2 dc in ch-3 sp, dc in sc, 3 dc in ch-3 sp, dc in last dc and in top of turning ch. Turn.
(21 dc: 2 + 3 + 1 + 2 + 1 + 1 + 1 + 1 + 1 + 2 + 1 + 3 + 2)
Row 4 (lower bell): Ch 3, dc in next st. Ch 2, sk 2 sts, dc in next st. Ch 1, sk 1 st, dc in next st. Repeat from * to * 6 more times. Ch 2, sk 2 sts, dc in last 2 sts. Turn.
(11 dc, 6 ch-1 sps, 2 ch-2 sps = 21 positions)
Row 5 (bell body): Ch 3, dc in next dc. Ch 4, then skip the ch-2 sp, the next dc, and the ch-1 sp. Dc in next dc. Ch 1, dc in next dc. Repeat from * to * 3 more times. Ch 4, skip the remaining bell sts and the ch-2 sp, then dc in last 2 sts. Turn.
(9 dc, 4 ch-1 sps, 2 ch-4 sps = 21 positions)
Row 6 (bell body): Ch 3, dc in next dc. Ch 4, dc in first bell dc. Ch 1, dc in next dc. Repeat from * to * 3 more times. Ch 4, dc in last 2 sts. Turn.
(9 dc, 4 ch-1 sps, 2 ch-4 sps = 21 positions)
Row 7 (shoulder): Ch 3, dc in next dc. Ch 6, then skip the ch-4 sp, the first bell dc, and the next ch-1 sp. Dc in next dc. Ch 1, dc in next dc (center). Ch 1, dc in next dc. Ch 6, skip the remaining bell sts and the ch-4 sp, then dc in last 2 sts. Turn.
(7 dc, 2 ch-1 sps, 2 ch-6 sps = 21 positions)
Row 8 (crown): Ch 3, dc in next dc. Ch 6, dc in next dc, dc in ch-1 sp, dc in center dc, dc in ch-1 sp, dc in next dc. Ch 6, dc in last 2 sts. Turn.
(9 dc, 2 ch-6 sps = 21 positions)
Row 9 (fan bases): Ch 3, dc in next dc. Ch 3, sc in ch-6 sp. Ch 3, sk 2 crown dc, sc in center crown dc. Ch 3, sc in ch-6 sp. Ch 3, dc in last 2 sts. Turn.
(4 dc, 3 sc, 4 ch-3 sps)
Row 10 (fans and knot): Ch 3, dc in next dc. Ch 1, 5 dc in next sc (fan). Ch 1, (dc, ch 1, dc) in center sc (knot). Ch 1, 5 dc in next sc (fan). Ch 1, dc in last 2 sts. Turn. Skip all ch-3 sps of Row 9.
(16 dc, 5 ch-1 sps: 2 + 1 + 5 + 1 + 3 + 1 + 5 + 1 + 2 = 21 positions)
Row 11 (block top): Ch 3, dc in next dc. Dc in ch-1 sp, dc in each of 5 fan dc. Ch 1, sk ch-1 sp. Sc in next dc, sc in ch-1 sp, sc in next dc. Ch 1, sk ch-1 sp. Dc in each of 5 fan dc, dc in ch-1 sp, dc in last 2 sts. Turn.
(16 dc, 3 sc, 2 ch-1 sps = 21 positions)
The fans fill the top corners as triangles. The 3 sc at center draw the knot in, which gives it the tied look between the fans.
Repeat Rows 1–11 another 16 times, for 17 blocks in total.
Top Row
After Row 11 of block 17, work Row 1 once more: ch 1, sc in each st across. Turn. (21 sc)
Don’t fasten off. The strip has 188 rows (17 × 11 + 1) and measures 4.2 x 75 in (10.7 x 190.5 cm).
Make All Pieces
- Color A (evergreen): 4 strips
- Color B (cream): 3 strips
Work the border on each strip right after its body, in the same color. Then block it as described below.
Layout (left to right across the rod):
| A | B | A | B | A | B | A |
Green strips sit at both outer edges, so the doorway is framed by the darker color.
Joining
These strips aren’t sewn to each other. They’re joined only by the rod, which keeps the curtain easy to walk through, wash, and rearrange. Hang them only after bordering and blocking.
Method: Slide the loops of each strip onto the rod in the layout order above, so that each strip hangs by its own two loops.
Spacing logic: Each strip is 4.7 in (11.9 cm) wide. Seven strips give 32.9 in (83.6 cm) of lace. Leave six gaps of 0.5 in (1.3 cm), for 3 in (7.6 cm) in total. The finished curtain is 35.9 in (91.2 cm) wide. For a wider doorway, increase the gaps evenly. Don’t stretch the strips.
Tension advice: Strips should hang straight under their own weight. If one swings or twists, re-block it. Don’t tie strips together, since they need to move independently.
Size checkpoint: All seven strips should hang level at the bottom, within 0.5 in (1.3 cm) of each other.
Border
Border gauge: Along row ends, aim for 19 sc per 4 in (10.2 cm). Lay the edge flat as you work. It shouldn’t ruffle or pucker.
Round 1: Ch 1. Along the top edge, work 3 sc in the first st, sc in each of the next 19 sts, and 3 sc in the last st. The middle sc of each 3-sc group is a corner st, so place a marker in it.
Turn the strip to work down the long side. Work 2 sc in the end of each dc row and 1 sc in the end of each sc row. Each block gives 21 sc (10 dc rows × 2 + 1 sc row). Over 17 blocks that’s 357 sc. Add 1 sc for the Top Row, for 358 sc between corners.
At the bottom, work 3 sc in the first foundation ch, sc in each of the next 19 ch, and 3 sc in the last ch. Mark both corners. Work up the second long side the same way, for 358 sc. Join with a sl st to the first sc.
Round 1 counts (each side includes its 2 corner sts):
– Top and bottom: 23 sc each (corner + 21 + corner)
– Long sides: 360 sc each (corner + 358 + corner)
– Total: 4 corners + 21 + 21 + 358 + 358 = 762 sc
Round 2: Ch 1. Sc in each sc around, working 3 sc in each marked corner sc. Move the markers to the new center corner sts. Join with a sl st.
Round 2 counts: 762 sc worked 1-per-st + 8 extra corner sc = 770 sc
– Top and bottom: 25 sc each
– Long sides: 362 sc each
– Check: 4 corners + 23 + 23 + 360 + 360 = 770
Why the math works: The body is 21 sts wide, so each short edge takes 21 sc between corners, with no extra sts. Along the long sides, 2 sc per dc row and 1 per sc row matches the 19 sc per 4 in border gauge to the 75 in (190.5 cm) length (358 ÷ 75 × 4 ≈ 19.1). Each round adds 2 sts per side, all at the corners, so the edges stay square.
Hanging loops: Sl st to the top-left corner sc. Ch 24, then sl st in the same corner sc. Work 30 sc into the loop and sl st to the corner. Fasten off. Join the yarn at the top-right corner sc and repeat. Each loop rises 2.4 in (6.1 cm) and fits a rod up to 1.25 in (3.2 cm) in diameter.
Final Blocking
- Weave in all ends along the side rails, never through the open bells.
- Wet the strip in cool water, then gently squeeze it out in a towel. Don’t wring it.
- Lay it flat and pin the long edges straight, 4.7 in (11.9 cm) apart.
- Pin the length to 75.5 in (191.8 cm), excluding the loops.
- In each block, pin the bell rim flat and slightly flared.
- Pull each Clapper ring down and pin it centered under the rim.
- Open each fan into a neat triangle, and pin the top of each scallop arch.
- Let the strip dry completely, then unpin it.
Final Quality-Control Checklist
- Every row spans 21 positions.
- Each strip has 17 bells, with all clappers hanging down.
- Strip size is 4.7 x 75.5 in (11.9 x 191.8 cm).
- Border Round 2 has 770 sc, with square corners.
- Both loops are covered with 30 sc and are firmly attached.
- All ends are woven into the rails.
- There are 4 green and 3 cream strips, in alternating order.
- All strip bottoms hang level.
Troubleshooting
Bell leans to one side: You’ve skipped the wrong number of positions in Row 5 or 7. Count the positions to the center dc from both edges.
Strip narrows over time: Your turning chains are too tight, or the last st is landing in the wrong place. Always work the final dc into the top of the turning ch.
Clapper is lost behind the rim: Pull the ring forward before you work Row 3, and pin it downward when you block.
Long edge ruffles: Use 2 sc per dc row end and no more. If it still ruffles, try 3 sc across every 2 dc row ends for one block’s length, then check against the border gauge.
Fans are cupping: Your Row 11 is too tight. Work the 5 fan-top dc a little looser.
Strips are different lengths: Your gauge varied between colors. Re-block the long strip shorter, or remove 1 block.
Care
Hand wash in cool water with mild soap, then lay flat and re-pin to block. Hang dry strips straight onto the rod.
Final Notes
The measurement chain is simple. The 4.2 in (10.7 cm) foundation and the 4.4 in (11.2 cm) block set the body at 4.2 x 75 in (10.7 x 190.5 cm). The two-round border takes it to 4.7 x 75.5 in (11.9 x 191.8 cm), and the loops add 2.4 in (6.1 cm). Seven strips with 0.5 in (1.3 cm) gaps hang 35.9 in (91.2 cm) wide. Check your gauge in the first block, and the remaining 16 blocks will follow.
Happy crocheting!