

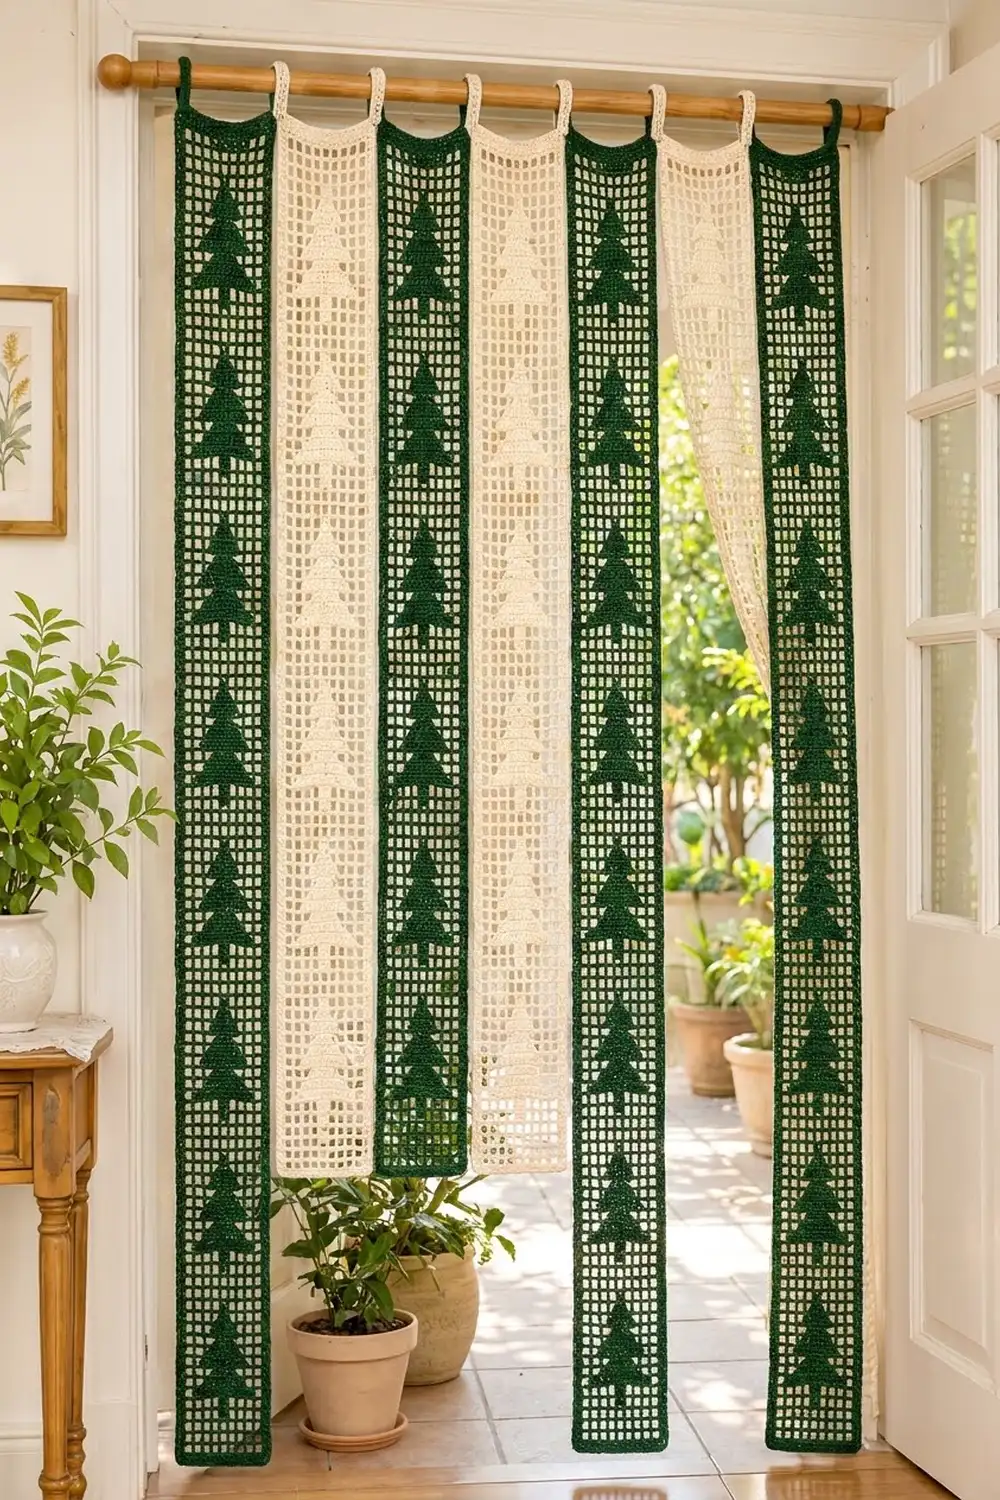
This curtain brings a quiet winter forest to a doorway. Seven long filet crochet strips hang side by side from a rod. Each one has an open grid and a column of solid pine trees stacked from top to bottom. The strips alternate deep forest green and soft cream, and light passes through every open mesh.
The style is simple and graphic. Each tree has a single-block trunk and three tiers that step in toward a pointed tip. The strips are not sewn together, so they part easily when you walk through. Each strip hangs from two narrow tabs at its top corners.
This pattern uses US crochet terms. Each finished strip measures 6 in (15.2 cm) wide by 72 in (182.9 cm) long before the tabs. With the tab loops, each strip hangs about 74.25 in (188.6 cm) long.
You work each strip from the bottom up in rows of filet mesh, so the trees grow upright as you go. Next you add one round of single crochet as a frame, then work two tabs off the top edge and fold them into loops. Make four green strips and three cream strips.
Finished Size and Construction
- Strip size: 6 in × 72 in (15.2 cm × 182.9 cm), plus tab loops of 2.25 in (5.7 cm)
- Skill level: Easy–Intermediate (repetitive filet charting)
- Terminology: US
- Yarn weight: DK / light worsted (#3) cotton
- Hook: 4.0 mm (G-6)
- Number of pieces: 7 separate strips (4 green, 3 cream)
- Layout: strips hang side by side and are not joined
- Strip size before border: 5.5 in × 71.5 in (14.0 cm × 181.6 cm)
- Border depth: 0.25 in (0.6 cm) per edge
- Grid: 11 meshes wide × 143 rows tall, with 10 trees per strip
Materials
Use a smooth mercerized or combed cotton in DK weight. It shows clean mesh lines, holds the trees crisp and doesn’t stretch much under its own weight. That matters for a long hanging piece. Avoid acrylics with a lot of drape, because they lengthen over time.
- Forest green: 640 g / about 1,344 m (4 strips at 160 g / 336 m each)
- Cream: 480 g / about 1,008 m (3 strips at 160 g / 336 m each)
These quantities include a margin of about 10% for the gauge swatch and small tension differences.
Tools:
– 4.0 mm (G-6) crochet hook
– Tapestry needle
– Stitch markers
– Rust-proof pins and a long blocking surface (foam mats or a carpeted floor with a towel)
– Measuring tape
– Curtain rod up to 1.25 in (3.2 cm) in diameter
Abbreviations (US Terms)
- ch – chain
- sc – single crochet
- dc – double crochet
- st(s) – stitch(es)
- sp – space
- RS / WS – right side / wrong side
Special stitches:
– Mesh (open square): ch 2, skip 2 sts (or the ch-2 sp), dc in next dc.
– Block (filled square): for a block over a mesh, work 2 dc in the ch-2 sp, then dc in the next dc. For a block over a block, dc in each of the next 3 dc.
– Turning mesh: ch 5 at the start of a row. This counts as 1 dc plus ch 2. End each row with a dc in the 3rd ch of the previous turning ch-5.
Every row is 11 squares wide, which is 34 sts counted as 12 dc posts plus 11 two-stitch fillings. Whether a square is open or solid, the row count never changes.
Gauge and Checkpoints
Gauge: 4 meshes = 2 in (5.1 cm) wide, and 4 rows = 2 in (5.1 cm) tall. Each square measures 0.5 in (1.3 cm) each way.
Test before you commit. Work Rows 1–17 (three open rows, one full tree and three open rows) as your test piece, then measure:
- After Row 3: 5.5 in (14.0 cm) wide × 1.5 in (3.8 cm) tall
- After Row 17: 8.5 in (21.6 cm) tall
- After Row 73 (halfway): 36.5 in (92.7 cm) tall
- After Row 143: 71.5 in (181.6 cm) tall
- After the border: 6 in × 72 in (15.2 cm × 182.9 cm)
If your piece is too big: go down to a 3.75 mm hook, or shorten the turning chain to ch 4 if only the edges flare. If it’s too small: go up to a 4.5 mm hook. If the rows are too short but the width is right, pull up the loops of your dc a little taller. Square meshes keep the trees in proportion.
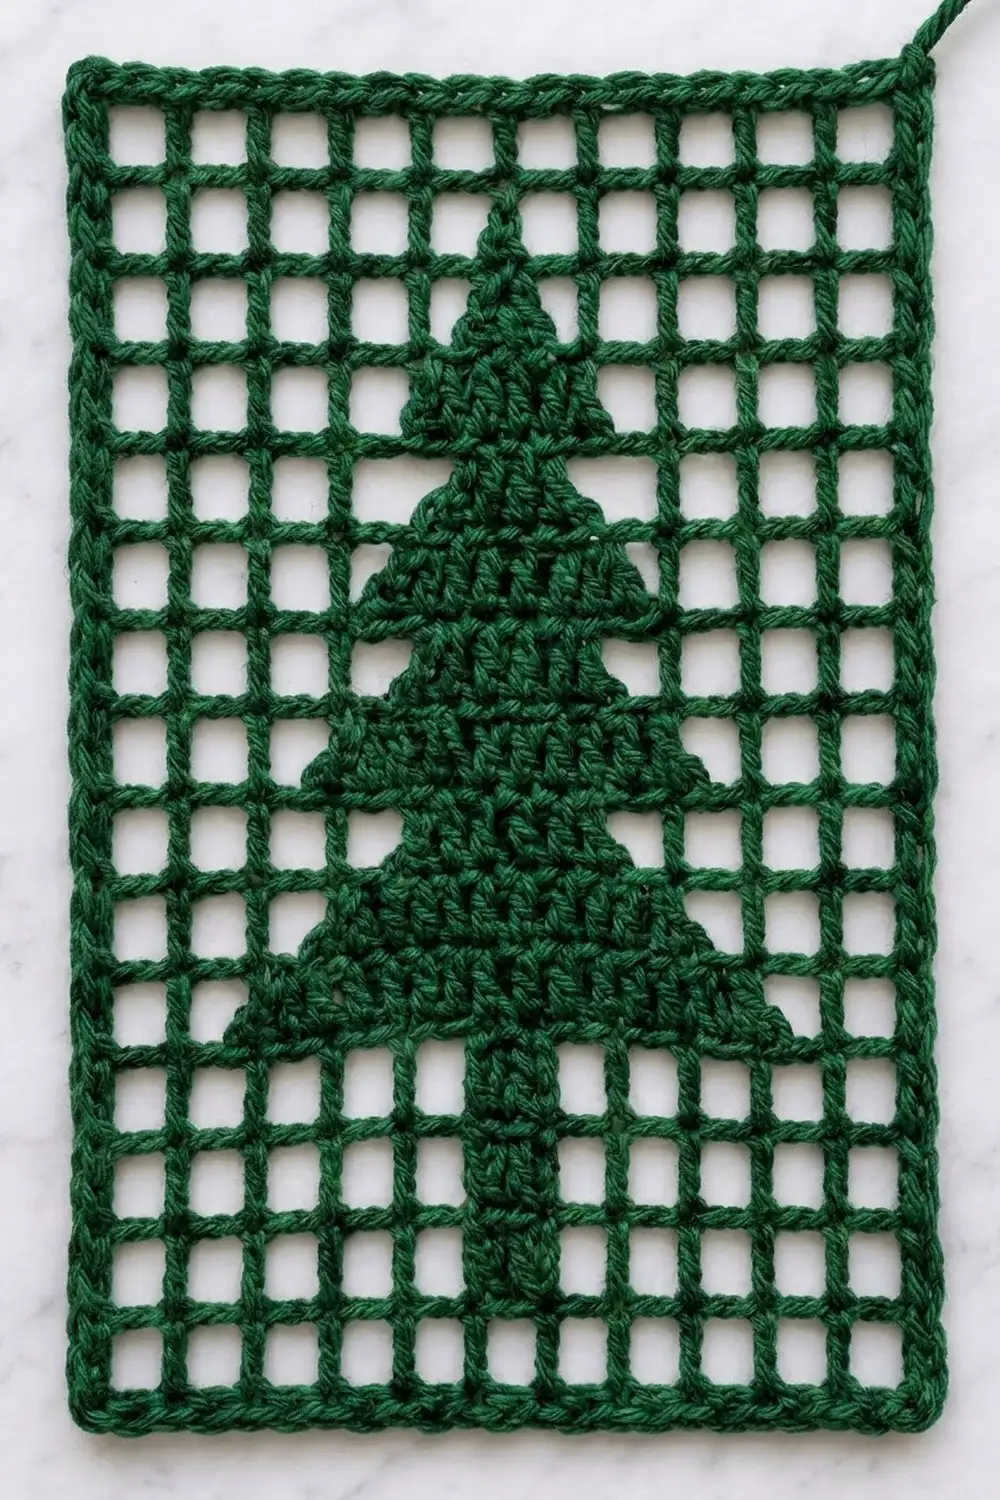
Strip Pattern (Make 7)
Foundation: Ch 38.
Row 1 (RS): Dc in 8th ch from hook. Ch 2, skip 2 ch, dc in next ch. Repeat from * across. Turn. (11 meshes; 34 sts)
Rows 2–3: Ch 5 (counts as dc + ch 2). Dc in next dc, ch 2. Repeat from * 9 more times, then dc in 3rd ch of turning ch. Turn. (11 meshes; 34 sts)
Tree Repeat (Rows 4–17)
Each line below reads from edge to edge. Because every tree row is symmetrical, it reads the same in both directions. Start every row with the turning mesh, which counts as the first mesh.
- Row 4 (trunk): 5 meshes, 1 block, 5 meshes. (34 sts)
- Row 5 (trunk): 5 meshes, 1 block, 5 meshes. (34 sts)
- Row 6 (bottom tier base): 1 mesh, 9 blocks, 1 mesh. (34 sts)
- Row 7: 2 meshes, 7 blocks, 2 meshes. (34 sts)
- Row 8: 3 meshes, 5 blocks, 3 meshes. (34 sts)
- Row 9 (middle tier base): 2 meshes, 7 blocks, 2 meshes. (34 sts)
- Row 10: 3 meshes, 5 blocks, 3 meshes. (34 sts)
- Row 11: 4 meshes, 3 blocks, 4 meshes. (34 sts)
- Row 12 (top tier base): 3 meshes, 5 blocks, 3 meshes. (34 sts)
- Row 13: 4 meshes, 3 blocks, 4 meshes. (34 sts)
- Row 14 (tip): 5 meshes, 1 block, 5 meshes. (34 sts)
- Rows 15–17: 11 meshes. (34 sts)
The tiers step out to their widest row and then narrow by one square on each side per row (9-7-5, 7-5-3, 5-3-1). This gives each tree three stacked triangles, a slight overlap at each tier base and a single-block point. The tree is 9 squares (4.5 in / 11.4 cm) wide and 11 rows (5.5 in / 14.0 cm) tall. With its three open rows, one repeat takes 14 rows, or 7 in (17.8 cm).
Rows 18–143: Repeat Rows 4–17 nine more times, for 10 trees in total. Don’t fasten off. Row 143 is an open row of 34 sts.
Row check: 3 + (14 × 10) = 143 rows. At 0.5 in (1.3 cm) per row, that gives 71.5 in (181.6 cm).
Make All Pieces
- Forest green: 4 strips
- Cream: 3 strips
Layout from left to right as you face the doorway:
| G | C | G | C | G | C | G |
  1   2   3   4   5   6   7
Make each strip from the same pattern with no changes. Keep each strip’s working yarn from a single dye lot, because the long strips hang side by side and show any color shift.
Hanging (No Joining)
The strips are not joined. That’s what makes this a pass-through curtain. Each strip finishes with its own border and tabs, and you slide all seven onto the rod in the layout order above.
Because no seams are added, the border math for each strip is self-contained. No stitches are added or shared between pieces. Laid edge to edge, the seven strips cover 42 in (106.7 cm). On a standard 36 in (91.4 cm) doorway, they bunch slightly on the rod, which gives a soft, full look. For a wider doorway, space the tabs evenly along the rod and let small gaps show between the strips.
Tension tip: before you hang the strips, lay all seven next to each other and compare their lengths. They should all be within 0.5 in (1.3 cm) of each other. If one runs long, block it a little narrower and longer, or a little wider and shorter, until it matches.
Border
Border gauge: 2 sc per dc row-end = 4 sc per 1 in (2.5 cm) of side edge. The top and bottom edges take 1 sc per stitch, or 34 sc across 5.5 in (14.0 cm).
Round 1 (RS): Ch 1 and work all around the strip as follows.
- Top edge: 3 sc in the first st, sc in the next 32 sts, 3 sc in the last st. That’s 34 + 4 extra = 38 sc.
- Left side: work 2 sc around each row-end post down the side, for 143 × 2 = 286 sc.
- Bottom edge: working along the underside of the foundation chain, 3 sc in the first base ch, sc in the next 32 base ch, 3 sc in the last base ch. That’s 34 + 4 extra = 38 sc. Row 1 has 34 base chains: 1 under the first dc plus 3 for each of the 11 meshes.
- Right side: 2 sc around each row-end post, for 286 sc.
- Join with a sl st to the first sc. (648 sc total)
Why the math works: each dc row is about 0.5 in (1.3 cm) tall, and 2 sc span that height without pulling in or rippling. On the top and bottom edges, working 1 sc per stitch keeps the 5.5 in (14.0 cm) width unchanged. The 4 extra sc on each of those edges (2 at each corner) turn the corners without cupping. The border adds 0.25 in (0.6 cm) on every edge: 5.5 + 0.5 = 6 in (15.2 cm), and 71.5 + 0.5 = 72 in (182.9 cm).
Hanging Tabs
Number the 38 top-edge sc from right to left as 1–38. Stitches 1–3 make up the right corner, and stitches 36–38 make up the left corner.
Right tab: Join yarn with RS facing in sc 2, the center of the corner.
– Row 1: Ch 1, sc in the same st and the next 3 sts. Turn. (4 sc)
– Rows 2–18: Ch 1, sc in each sc across. Turn. (4 sc)
Fasten off and leave a 10 in (25.4 cm) tail. The tab measures about 0.6 in (1.5 cm) wide × 4.5 in (11.4 cm) long.
Left tab: Join yarn in sc 34 and work Rows 1–18 the same way over sc 34–37. This leaves 28 sc open between the tabs, and the tabs sit level with each edge.
Fold each tab to the WS and whipstitch its last row to the back of the border, just below its own base. This forms a loop about 2.25 in (5.7 cm) tall that fits a rod up to 1.25 in (3.2 cm) across. Weave in all ends.
Final Blocking
- Soak each strip in cool water for 15 minutes, then press out the water. Don’t wring.
- Roll it in a towel to remove the extra water.
- Lay it flat on mats and pin the bottom corners first, 6 in (15.2 cm) apart.
- Gently ease it to 72 in (182.9 cm) long and pin the top corners.
- Pin along both long sides every 6 in (15.2 cm), with the edges straight.
- Nudge the trees so their centers line up in a straight vertical column.
- Square the meshes with your fingertips. Each one should measure 0.5 in (1.3 cm).
- Let it dry fully, then hang it right away so gravity finishes the job.
Final Quality-Control Checklist
- [ ] Each strip has 143 rows and 10 trees.
- [ ] Every row holds 11 squares (34 sts), and the edges are straight.
- [ ] The trees are centered, with 1 open column at the widest tier.
- [ ] The border has 648 sc, with 38 / 286 / 38 / 286 sc per side.
- [ ] The tabs are 4 sc wide and 18 rows long, sewn flat on the WS.
- [ ] Each strip measures 6 in × 72 in (15.2 cm × 182.9 cm).
- [ ] All seven strips are within 0.5 in (1.3 cm) of each other in length.
- [ ] The colors alternate G-C-G-C-G-C-G on the rod.
Troubleshooting
The trees look squat or stretched: your meshes aren’t square. Adjust your dc height or your hook size, then compare against the Row 17 checkpoint.
The strip slants or narrows: count 11 squares at the end of each row. The most common mistake is forgetting the final dc in the turning chain.
A tree is off-center: check the meshes on each side. They should always be equal, for example 3, 5, 3.
The border ripples: work 2 sc per row-end, not 3. If it pulls in, try a slightly looser hook for the border only.
A tab twists: sew it down flat with the tab’s RS facing outward, and check that both tabs line up.
The strip lengthens after hanging: this is normal with cotton. Re-wet it, block it shorter and let it dry flat.
Care
Hand wash in cool water with mild soap, press out the water in a towel and dry flat to the blocked size. Don’t tumble dry, because heat and weight distort long filet strips.
Final Notes
The whole curtain depends on one simple chain of measurements. One square is 0.5 in (1.3 cm), so 11 squares give 5.5 in (14.0 cm) across, and 143 rows give 71.5 in (181.6 cm) tall. The 648-stitch border adds 0.25 in (0.6 cm) on every edge, for a finished strip of 6 in × 72 in (15.2 cm × 182.9 cm). The tabs add 2.25 in (5.7 cm) of loop. If your squares match at Row 17, everything after that will fall into place.
Happy crocheting!