

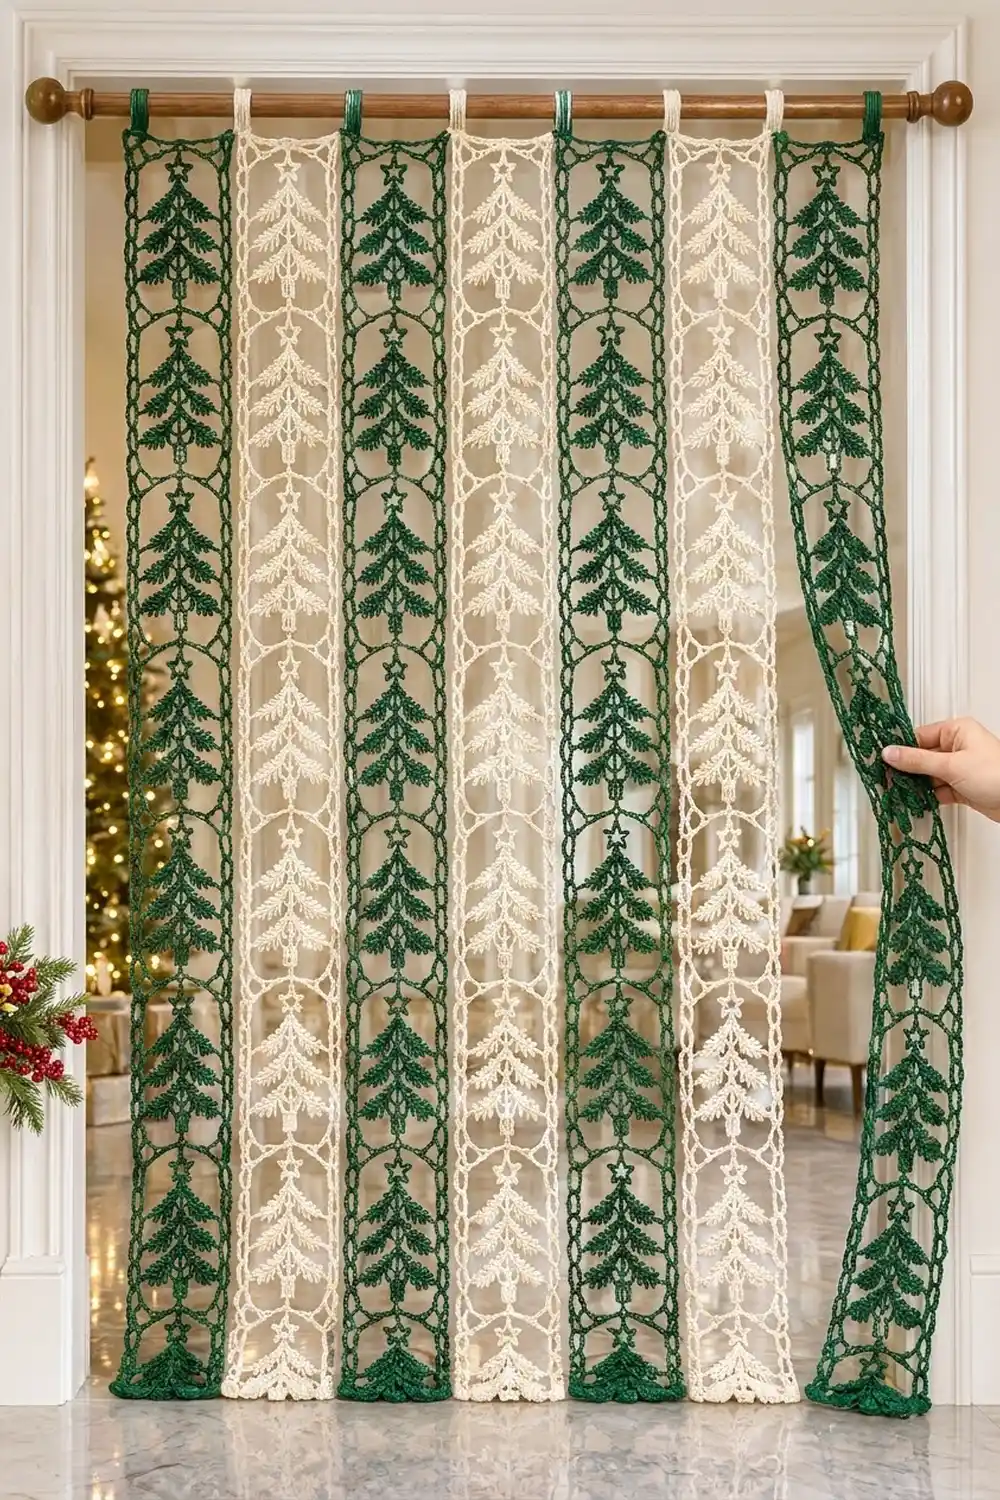
This curtain turns a doorway into a quiet winter forest. It is made of seven narrow lace strips, each one a tall column of fir trees with star tips, framed by chain-loop ladders. Light passes through the open mesh, so the room behind still glows while the trees take center stage.
The colorway alternates deep forest green and soft cream, with green strips at both outer edges. Because the strips are not joined, they move freely, and you can walk through the curtain or tie strips back.
This pattern uses US crochet terms. Each finished strip measures 5.0 in (12.7 cm) wide by 81.4 in (206.8 cm) long, not counting the hanging tab. With seven strips hung edge to edge, the curtain is 35.0 in (88.9 cm) wide.
Each strip is worked in rows from the bottom up. A 16-row tree repeat is worked 10 times between a solid foundation row and a solid top row. Next, a single round of single crochet edges the strip, and a folded tab is worked at the top so the strip can slide onto a rod.
Finished Size and Construction
- Finished strip size: 5.0 in x 81.4 in (12.7 cm x 206.8 cm)
- Finished curtain width: 35.0 in (88.9 cm), with 7 strips touching
- Skill level: Intermediate
- Terminology: US
- Yarn weight: DK (#3) mercerized cotton
- Hook: 4.0 mm (G-6)
- Number of pieces: 7 strips (4 green, 3 cream)
- Layout: 7 strips side by side, not joined
- Strip size before border: 4.6 in x 81.0 in (11.7 cm x 205.7 cm)
- Border depth: 0.2 in (0.5 cm) on every side
- One tree repeat: 16 rows = 8.0 in (20.3 cm)
Materials
Choose a smooth mercerized cotton or cotton blend. It shows stitch definition well, holds the picots crisp, and doesn’t stretch much when it hangs. Avoid acrylic for this project, because long acrylic strips tend to grow in length over time.
- Color A, forest green: 500 g / 1,150 m (4 strips)
- Color B, cream: 400 g / 920 m (3 strips)
Each strip uses about 110 g / 253 m. The quantities above include a margin of about 10–15% for your gauge swatch and any differences in tension.
Tools:
– 4.0 mm (G-6) crochet hook
– Tapestry needle
– Locking stitch markers
– Measuring tape
– Blocking mats and rust-proof pins
– Spray bottle
– Curtain rod up to 3/4 in (1.9 cm) in diameter (or see the tab note to fit a thicker rod)
Abbreviations (US Terms)
- ch – chain
- sl st – slip stitch
- sc – single crochet
- dc – double crochet
- sk – skip
- st(s) – stitch(es)
- RS / WS – right side / wrong side
Special stitches:
- Picot: ch 3, sl st in the top of the dc just made. A picot is not counted as a stitch.
- Popcorn (pc): 5 dc in the same st, drop the loop from the hook, insert the hook front to back in the first dc of the group, pick up the dropped loop and pull it through. A popcorn counts as 1 st.
Position counting: Every stitch and every chain in the row below counts as one position. When a row says “dc in each of 15 positions,” work into chains as well as stitches.
Gauge and Checkpoints
Gauge: 20 sts and 8 rows of dc = 4 in (10.2 cm). That is 5 sts and 2 rows per inch.
Test one piece first. Before you start a full strip, work the Foundation Row, one full repeat (Rows 1–16), and the Top Row. This sample is 18 rows tall and should measure 4.6 in x 9.0 in (11.7 cm x 22.9 cm). Pin it out flat, mist it, and let it dry before you measure.
Checkpoints:
– After the Foundation Row: 23 sts, 4.6 in (11.7 cm) wide
– After the first repeat: 8.5 in (21.6 cm) long
– After 5 repeats: 40.5 in (102.9 cm) long
– After 10 repeats: 80.5 in (204.5 cm) long
– After the Top Row: 81.0 in (205.7 cm)
– After the border: 5.0 in x 81.4 in (12.7 cm x 206.8 cm)
If your sample is too big, go down a hook size, to 3.75 mm. If it is too small, go up to 4.5 mm. Length matters most here. A difference of 1/4 in (0.6 cm) per repeat adds up to 2.5 in (6.4 cm) over 10 repeats, so fix row height before you continue.
Strip Pattern (make 7)
Every row has 23 sts:
– Left frame: 1 edge dc + ch-3 ladder = 4 positions
– Center panel: 15 positions
– Right frame: ch-3 ladder + 1 edge dc = 4 positions
The frame instructions are the same in every row, so the center instructions below are written inside brackets.
Frame row format: Ch 3 (counts as dc), ch 3, sk 3, [center 15], ch 3, sk 3, dc in top of turning ch. Turn.
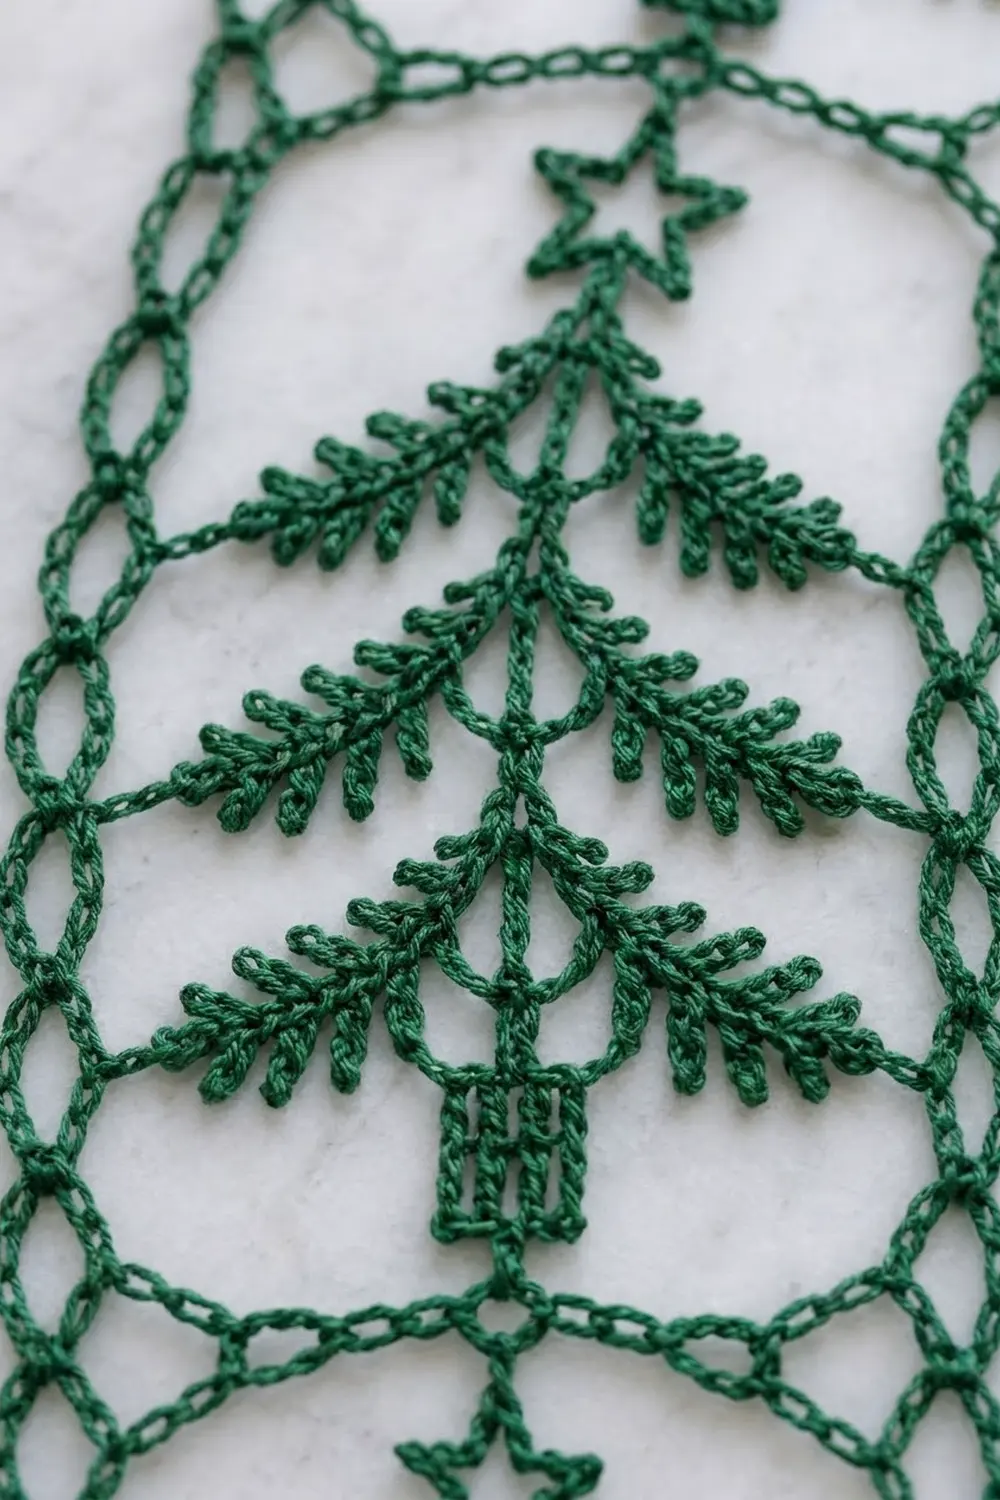
The ch-3 ladders stack row over row and form the looped chain columns along both long edges.
Foundation Row
Ch 25. Dc in the 4th ch from the hook (the skipped chains count as 1 dc), then dc in each remaining ch. Turn. (23 sts)
Tree Repeat (Rows 1–16)
Trunk
Row 1 (RS): Frame, [ch 6, sk 6, dc in next 3, ch 6, sk 6]. (23 sts: center 6 + 3 + 6 = 15)
Row 2: Frame, [ch 6, sk 6, dc in next 3 dc, ch 6, sk 6]. (23 sts)
These two rows form the solid square trunk block.
Tier 1 (widest)
Row 3: Frame, [dc in each of 15 positions, working a picot after the 2nd, 4th, 6th, 8th, 10th, 12th, and 14th dc]. (23 sts, 7 picots)
Row 4: Frame, [ch 2, sk 2, dc in next 11, working a picot after the 2nd, 4th, 6th, 8th, and 10th dc, ch 2, sk 2]. (23 sts: center 2 + 11 + 2 = 15, 5 picots)
Row 5: Frame, [ch 4, sk 4, dc in next 7, picot after the 2nd, 4th, and 6th dc, ch 4, sk 4]. (23 sts: center 4 + 7 + 4 = 15, 3 picots)
Tier 2
Row 6: Frame, [ch 1, sk 1, dc in next 13, picot after every 2nd dc, ch 1, sk 1]. (23 sts: center 1 + 13 + 1 = 15, 6 picots)
Row 7: Frame, [ch 3, sk 3, dc in next 9, picot after the 2nd, 4th, 6th, and 8th dc, ch 3, sk 3]. (23 sts: center 3 + 9 + 3 = 15, 4 picots)
Row 8: Frame, [ch 5, sk 5, dc in next 5, picot after the 2nd and 4th dc, ch 5, sk 5]. (23 sts: center 5 + 5 + 5 = 15, 2 picots)
Tier 3 (narrowest)
Row 9: Frame, [ch 2, sk 2, dc in next 11, picot after every 2nd dc, ch 2, sk 2]. (23 sts, 5 picots)
Row 10: Frame, [ch 4, sk 4, dc in next 7, picot after the 2nd, 4th, and 6th dc, ch 4, sk 4]. (23 sts, 3 picots)
Row 11: Frame, [ch 6, sk 6, dc in next 2, picot, dc in next 1, ch 6, sk 6]. (23 sts: center 6 + 3 + 6 = 15, 1 picot)
Each tier steps in from the full width to 3 dc. This creates the stacked triangle silhouette, and the picots stand out like needles along the branches.
Star
Row 12: Frame, [ch 6, sk 6, dc in next 3, ch 6, sk 6]. (23 sts) This row is the tip of the tree.
Row 13: Frame, [ch 6, sk 6, dc in next st, picot, pc in next st, dc in next st, picot, ch 6, sk 6]. (23 sts: center 6 + 1 + 1 + 1 + 6 = 15)
Row 14: Frame, [ch 6, sk 6, dc in next dc, dc in top of pc, picot, dc in next dc, ch 6, sk 6]. (23 sts)
The popcorn forms the body of the star. The two side picots in Row 13 and the top picot in Row 14 form its points.
Arch
Row 15: Frame, [ch 7, sk 7, sc in next st, ch 7, sk 7]. (23 sts: center 7 + 1 + 7 = 15)
Row 16: Frame, [ch 7, sk 7, sc in sc, ch 7, sk 7]. (23 sts)
These two rows form the open chain arches above each star. Rows 1–16 make one tree, 8.0 in (20.3 cm) tall.
Work Rows 1–16 a total of 10 times (160 rows).
Top Row
Ch 3 (counts as dc), dc in each of the next 22 positions. (23 sts) Do not fasten off.
The strip is now 162 rows long, which is 81.0 in (205.7 cm) at 2 rows per inch.
Make All Pieces
- Color A (green): 4 strips
- Color B (cream): 3 strips
Hang the strips left to right in this order:
| A | B | A | B | A | B | A |
 5.0  5.0  5.0  5.0  5.0  5.0  5.0 in
 = 35.0 in (88.9 cm) total
Make all four green strips before you start on cream. That keeps your tension steady within each color.
Joining (Hanging Tabs)
The strips are not joined to each other. Each one hangs on its own from a tab, which lets the curtain part and sway. The “join” for this project is between each strip and the rod, and the tab is worked after the border (see below).
Stitch logic: The top edge has 23 border sc. The tab is centered on that edge: 5 sc + 13 tab sc + 5 sc = 23.
Tension: Keep the tab rows slightly firm. The tab carries the full weight of the strip, and loose stitches will stretch.
Size checkpoint: A flat tab is 2.6 in (6.6 cm) wide and 3.0 in (7.6 cm) long. Folded, it makes a loop 1.5 in (3.8 cm) deep.
Border
Border gauge: 5 sc = 1 in (2.5 cm), matching the strip’s stitch gauge. Corners are ch-2 spaces and are not counted as stitches, so each side count below is sc only.
Border Round (RS): Continuing from the Top Row, ch 1 and turn so the RS faces you.
- Top edge: Sc in each of the 23 sts. (23 sc) Ch 2 for the corner.
- First long side: Work down the row ends, alternating 2 sc around one row end and 3 sc around the next. 162 rows = 81 pairs x 5 sc = 405 sc. Ch 2 for the corner.
- Bottom edge: Sc in each of the 23 foundation chains. (23 sc) Ch 2 for the corner.
- Second long side: Repeat the 2-sc/3-sc pattern up the row ends. (405 sc) Ch 2, then join with a sl st to the first sc.
Round total: 23 + 405 + 23 + 405 = 856 sc and 4 ch-2 corners.
Why the math works: A dc row is 0.5 in (1.3 cm) tall, and 5 sc fill 1 in (2.5 cm). So 2 rows (1 in) take exactly 5 sc. That gives 81 in x 5 = 405 sc per side. The top and bottom edges keep their 23 sts, so 23 / 5 = 4.6 in (11.7 cm). The border adds 0.2 in (0.5 cm) on each side, which brings the strip to 5.0 in x 81.4 in (12.7 cm x 206.8 cm).
Hanging Tab:
- Row 1: With RS facing, sk the first 5 sc of the top edge. Join yarn in the 6th sc, ch 1, sc in the same sc and in the next 12 sc. Turn. (13 sc)
- Rows 2–12: Ch 1, sc in each sc. Turn. (13 sc)
Fasten off and leave a 12 in (30.5 cm) tail. Fold the tab to the WS and whipstitch the last row to the base of Row 1.
Thicker rod? Every 2 extra tab rows adds 0.5 in (1.3 cm) to the loop.
Final Blocking
- Weave in all ends along the dc trunks or the edge dc so they stay hidden.
- Lay one strip RS up on blocking mats. Work in sections if your mats are short.
- Pin each long edge straight at 5.0 in (12.7 cm) wide.
- Pin out every picot so it points outward.
- Open each chain arch and ladder loop into a neat curve.
- Mist evenly until damp, but not soaked.
- Let the strip dry completely before unpinning.
- Hang the strip for 24 hours, then measure again. It should be 81.4 in (206.8 cm) long.
Final Quality-Control Checklist
- Every row has 23 sts, with 15 in the center panel
- All 10 trees per strip have 3 tiers, a trunk, and a star
- Picot counts per tier are 7/5/3, 6/4/2, and 5/3/1
- Ladder loops line up straight on both edges
- The border has 23 + 405 + 23 + 405 sc
- The tab is centered, with 5 sc free on each side
- All 7 strips match in length within 1/2 in (1.3 cm)
- The color order is A-B-A-B-A-B-A
Troubleshooting
Trees lean to one side: Sk counts are off. Recount the center 15 positions on the row before the lean.
Edges ripple: You’re working too many sc per row end. Keep strictly to the 2-sc/3-sc alternation.
Strip is shorter than its neighbors: Row height varies between strips. Block all strips together and pin them to a matching length.
Picots curl backward: Pull the sl st snug against the dc and pin the picots during blocking.
Popcorn looks flat: Make sure all 5 dc go into one st, and push the popcorn to the RS.
Tab stretches: Go down one hook size for the tab only.
Care
Hand wash in cool water with mild soap, press out the water in a towel, and dry flat. Re-pin the picots if needed. Do not hang the strips while wet.
Final Notes
Each strip follows one measurement chain:
– 23 sts = 4.6 in (11.7 cm) wide
– Each 16-row tree = 8.0 in (20.3 cm)
– 10 trees + 2 solid rows = 81.0 in (205.7 cm)
– The border brings each strip to 5.0 in x 81.4 in (12.7 cm x 206.8 cm)
– 7 strips span 35.0 in (88.9 cm)
Check your sample against that chain and every strip will hang evenly.
Happy crocheting!