

These curtain panels are made from small evergreen trees, each hanging in its own open chain frame. Light comes through the lattice and through a row of eyelets at the top of every tier, so the panels look like a forest of tiny trees against the window.
The pair is worked in one color, a deep teal green. Each tree has three tiers. The tall-stitch fans give vertical ribs, and the single-crochet rims make clean steps between tiers. A small square trunk finishes each tree. The style is graphic and a little Scandinavian. The panels suit the holidays but can stay up all winter.
This pattern uses US crochet terms. Each finished panel measures 32 1/2 x 72 1/4 in (82.6 x 183.5 cm), plus 2 1/2 in (6.4 cm) hanging tabs.
Here is the order of work. First you make 80 identical trees in rows from the top down. Next you build a chain lattice that catches each tree by its tip loop and its trunk. Finally you add a solid top band with tabs and a single-crochet edging along the sides and bottom.
Finished Size and Construction
- Finished panel size: 32 1/2 x 72 1/4 in (82.6 x 183.5 cm), plus 2 1/2 in (6.4 cm) tabs, for an overall length of 74 3/4 in (189.9 cm)
- Skill level: Intermediate
- Terminology: US
- Yarn weight: Worsted (#4)
- Hook: 5 mm (H-8)
- Number of pieces: 80 trees (40 per panel), plus lattice and border on each panel
- Layout: 4 columns x 10 rows per panel
- Piece size: each tree is 6 1/4 in (15.9 cm) wide at the bottom tier and 7 in (17.8 cm) long from the top of the loop to the bottom of the trunk
- Cell size: 8 x 7 in (20.3 x 17.8 cm)
- Size before border: 32 x 70 in (81.3 x 177.8 cm)
- Border depth: top band 2 in (5.1 cm) plus 2 1/2 in (6.4 cm) tabs; side and bottom edging 1/4 in (0.6 cm)
Materials
Pick a smooth, firm worsted yarn in cotton, a cotton blend, or acrylic. Curtains hang under their own weight, so avoid yarns with a lot of stretch, such as superwash wool. A yarn with good stitch definition shows the ribs best.
- Deep teal green: 700 g, about 1,330 m (seven 100 g / 190 m skeins) for the pair
- Each tree uses about 10 m. The lattice and border use about 175 m per panel.
Tools:
– 5 mm (H-8) hook
– 5.5 mm (I-9) hook, only if your chains run tight
– Tapestry needle
– Locking stitch markers
– Rust-proof pins and blocking mats, or a clean carpet covered with a sheet
– Tape measure
These quantities include a margin of about 15% for the gauge tree and any tension differences.
Abbreviations (US Terms)
- ch – chain
- sl st – slip stitch
- sc – single crochet
- dc – double crochet
- tr – treble crochet
- sp – space
- st(s) – stitch(es)
- tch – turning chain
- RS – right side
Special stitch – join chain (jch): Insert the hook from front to back through the center (3rd) sc of the last trunk row of the tree above. Then insert it through the hanging loop of the tree below, if there is one. Yarn over and draw through everything on the hook. One jch counts as 1 ch.
Gauge and Checkpoints
- 16 sc and 18 sc rows = 4 in (10.2 cm)
- One dc row is about 1/2 in (1.3 cm) tall, and one tr row is about 3/4 in (1.9 cm).
- 16 ch = 4 in (10.2 cm). Your chains must match your sc gauge, because the border places 1 sc in every chain.
Make one tree first. Check it against these numbers:
- After Row 4 (Tier 1 rim): 2 3/4 in (7.0 cm) wide
- After Row 7 (Tier 2 rim): 4 1/4 in (10.8 cm) wide
- After Row 10 (Tier 3 rim): 6 1/4 in (15.9 cm) wide, with the body (Rows 1–10) about 4 3/4 in (12.1 cm) tall
- Finished tree: 7 in (17.8 cm) from the top of the loop to the bottom of the trunk
Next, chain 32 and measure it. It should be 8 in (20.3 cm).
If the tree comes out too big, go down a hook size. If it is too small, go up a size. If only the chain is off, switch to the 5.5 mm hook for chains only.
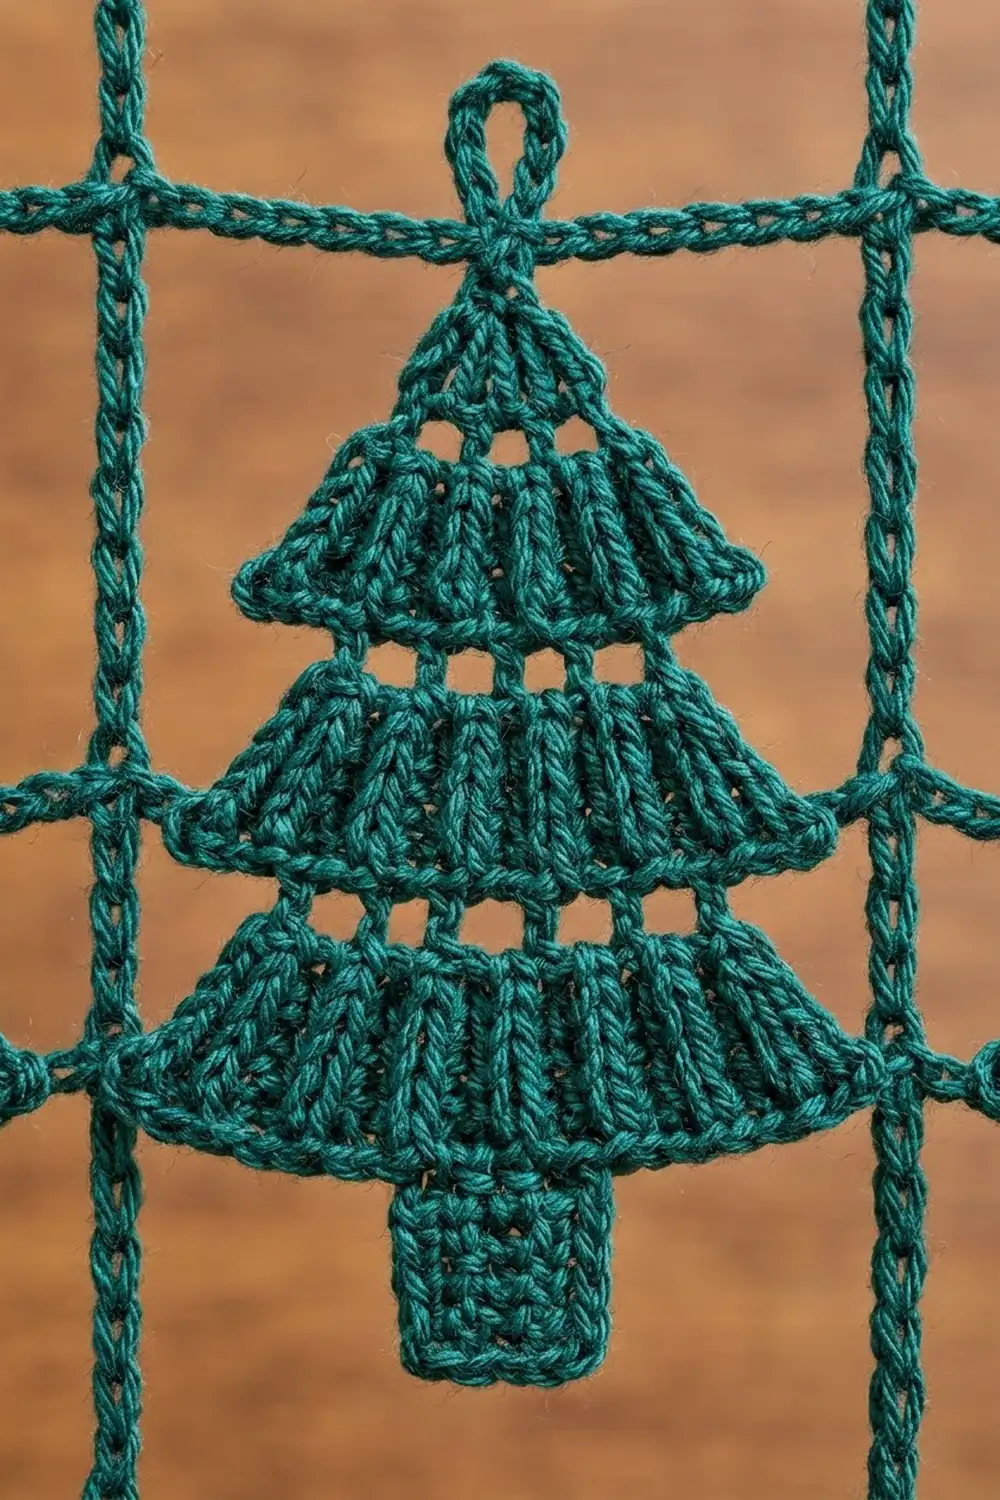
Tree Motif (make 80)
Each tree is worked flat in rows from the top down, starting with the hanging loop.
Loop and Row 1: Ch 7, sl st in the first ch to form a ring (this is the hanging loop). Ch 2, 3 sc in the 2nd ch from the hook. (3 sc)
Tier 1
Row 2 (eyelet): Ch 4 (counts as dc + ch 1), turn, dc in the first sc, ch 1, dc in the next sc, ch 1, (dc, ch 1, dc) in the last sc. (5 dc, 4 ch-1 sps)
Row 3 (fan): Ch 4 (counts as tr), turn. Tr in the next ch-1 sp, tr in the next dc, tr in the next ch-1 sp, 3 tr in the center dc, tr in the next ch-1 sp, tr in the next dc, tr in the next ch-1 sp, tr in the 3rd ch of the tch. (11 tr)
Row 4 (rim): Ch 1, turn, sc in each st across. (11 sc)
Tier 2
Row 5 (eyelet): Ch 4 (counts as dc + ch 1), turn, skip the next sc. *Dc in the next sc, ch 1, skip the next sc; repeat from * 3 more times. Dc in the last sc. (6 dc, 5 ch-1 sps)
Row 6 (fan): Ch 4 (counts as tr), turn. [2 tr in the next ch-1 sp, tr in the next dc] twice, 3 tr in the center ch-1 sp, [tr in the next dc, 2 tr in the next ch-1 sp] twice, tr in the 3rd ch of the tch. (17 tr)
Row 7 (rim): Ch 1, turn, sc in each st across. (17 sc)
Tier 3
Row 8 (eyelet): Ch 4 (counts as dc + ch 1), turn, skip the next sc. *Dc in the next sc, ch 1, skip the next sc; repeat from * 6 more times. Dc in the last sc. (9 dc, 8 ch-1 sps)
Row 9 (fan): Ch 4 (counts as tr), turn. *2 tr in the next ch-1 sp, tr in the next dc; repeat from * 6 more times. 2 tr in the last ch-1 sp, tr in the 3rd ch of the tch. (25 tr)
Row 10 (rim): Ch 1, turn, sc in each st across. (25 sc)
Each fan row adds more stitches than its eyelet row has spaces, and that is what makes the tier flare. The sc rim then firms up the edge. You get 11, 17, and 25 rim stitches: three widening steps.
Trunk
Row 11: Turn. Sl st in each of the first 10 sc, ch 1, sc in each of the next 5 sc. Leave the last 10 sc unworked. (5 sc)
Rows 12–17: Ch 1, turn, sc in each sc across. (5 sc)
Fasten off and weave in the ends. The trunk is 1 1/4 in (3.2 cm) wide and 1 1/2 in (3.8 cm) tall. Add it up: loop 3/4 in (1.9 cm) + body 4 3/4 in (12.1 cm) + trunk 1 1/2 in (3.8 cm) = 7 in (17.8 cm), which is exactly one cell height.
Make All Pieces
- Deep teal green: 80 trees (40 per panel)
Steam-block every tree flat before joining. Lay out each panel like this (T = tree, | = vertical bar, — = horizontal line):
—— Line 0 (top) ——————————
| T | T | T | T |   Row 1
—— Line 1 ————————————————
| T | T | T | T |   Row 2
   ... repeat ...
| T | T | T | T |   Row 10
—— Line 10 (bottom) ——————
Joining: The Chain Lattice
Each panel is joined with chain lines worked one after another, starting at the top. Every cell is 32 ch wide and 28 ch tall.
Line 0: Ch 1 (the edge point). *Ch 15, jch through the loop of the next Row 1 tree, ch 15, ch 1 (divider point); repeat from * 3 more times. That gives 1 + (4 x 32) = 129 ch. Do not fasten off.
Lines 1–9: These lines alternate direction, the same way you would turn a row.
- Edge bar: Ch 28. The 28th ch is the edge point of the new line.
- *Ch 15, then jch through the trunk of the tree above and the loop of the tree below. Ch 15, ch 1 (divider point).
- Bar: Ch 27, sl st in the matching divider point of the line above, then sl st back down each of the 27 bar chains. Repeat from * 3 more times. On the 4th repeat, the bar becomes the far edge bar.
Each line has 129 ch points. Each vertical bar is 27 ch plus 1 sl st, which makes 28 links, the same length as the edge bar. The sl sts going back down wrap the bars into the twisted cords you see between the columns.
Line 10: Work it the same way as Lines 1–9, but the jch catches only the trunks. Fasten off.
Tension: Chain at the same tension you use for sc. Bars that are too tight pucker the cells, and bars that are too loose let the trees sag.
Checkpoint after Line 2: The lattice should be 32 in (81.3 cm) wide and 14 in (35.6 cm) tall. When finished it should be 32 x 70 in (81.3 x 177.8 cm).
Border
Border gauge: 16 sc = 4 in (10.2 cm). Your chain gauge matches this, so 1 sc per chain lies flat.
Top Band
Work across the top loops of Line 0.
Row 1: With the RS facing, join at the right edge point, ch 1, sc in each of the 129 ch. (129 sc)
Rows 2–9: Ch 1, turn, sc in each sc. (129 sc) The band is 2 in (5.1 cm) deep and about 32 1/4 in (81.9 cm) wide.
Row 10 (tabs): Ch 1, turn, sc in the first sc, ch 20, sl st in the same sc. *Sc in each of the next 16 sc, ch 20, sl st in the last sc made; repeat from * 7 more times. That gives 1 + (8 x 16) = 129 sc and 9 loops. Each loop is 2 1/2 in (6.4 cm) tall. Fasten off.
Side and Bottom Edging
Join at the left edge, just below the band.
- Left side: Sc in each of the next 279 chain points of the edge bars.
- Bottom left corner: 3 sc in the corner point.
- Bottom: Sc in each of the next 127 ch of Line 10.
- Bottom right corner: 3 sc in the corner point.
- Right side: Sc in each of the next 279 chain points, up to the band.
Total: 279 + 3 + 127 + 3 + 279 = 691 sc. Fasten off.
Why the math works:
– Width: 4 cells x 32 ch = 128, plus the 1 starting edge point, gives 129. That count carries straight into the band and the tab spacing (1 + 8 x 16).
– Each side: 10 cells x 28 ch = 280 points. The last one is the corner, which belongs to the corner group, so 279 single stitches remain.
– Bottom: 129 points minus 2 corners leaves 127.
No extra stitches are added at the seams. The edging adds 1/4 in (0.6 cm) on each side and along the bottom, so the panel finishes at 32 1/2 x 72 1/4 in (82.6 x 183.5 cm).
Final Blocking
- Lay the panel flat on mats or a sheet-covered carpet.
- Pin the four corners to 32 1/2 x 72 1/4 in (82.6 x 183.5 cm).
- Pin the top of each vertical bar every 7 in (17.8 cm) so the cells come out square.
- Smooth each tree so its tiers fan out evenly and the trunk hangs straight.
- Mist thoroughly, or steam gently from above for acrylic without touching the iron to the yarn.
- Leave it to dry completely, then unpin.
- Repeat for the second panel.
Final Quality-Control Checklist
- Every tree has 11, 17, and 25 rim sc and a trunk 5 sc wide.
- Every jch catches both the trunk and the loop.
- All bars are 28 links long, and all lines are 129 ch.
- The band has 129 sc and 9 evenly spaced loops.
- The edging totals 691 sc.
- Both panels measure the same size.
- All ends are woven in securely.
Troubleshooting
- Tiers ruffle too much: Your tr are too loose. Go down a hook size for the fan rows only.
- Tiers cup: Your rim sc are too tight. Loosen up or go up a hook size for the rim rows.
- Trees sag below the cell: Shorten the trunk by one row, or tighten the hanging loop to ch 6.
- Lattice narrower than the band: Your chains are tight. Re-chain with the 5.5 mm hook.
- Edging waves: Your sc are larger than your chains. Go down a hook size for the edging.
- Bars twist unevenly: Keep the sl sts going back down at the same tension on every bar.
Care
Hand wash in cool water and dry flat, reshaping the cells while damp. Do not hang the panels wet, because the weight will stretch them.
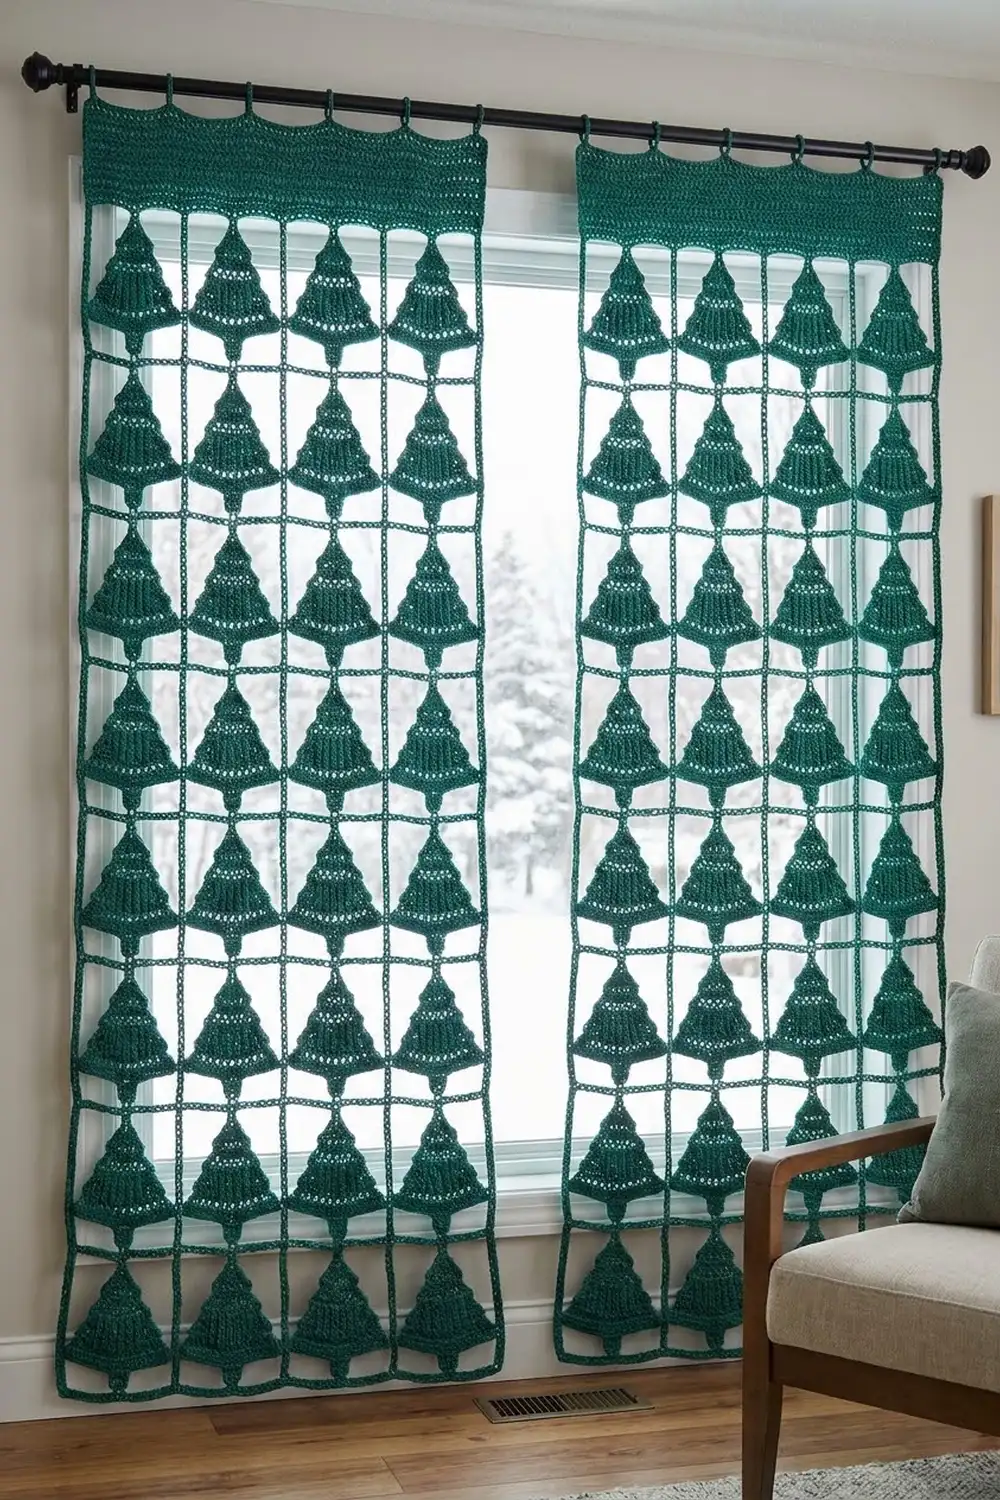
Final Notes
Here is the measurement chain that holds the design together:
- The gauge of 16 sc and 16 ch per 4 in (10.2 cm) gives trees 6 1/4 in (15.9 cm) wide and 7 in (17.8 cm) long.
- Those trees fit 8 x 7 in (20.3 x 17.8 cm) cells of 32 x 28 ch.
- Ten rows by four columns make a 32 x 70 in (81.3 x 177.8 cm) lattice.
- The band and edging finish it at 32 1/2 x 72 1/4 in (82.6 x 183.5 cm), plus the tabs.
Check the measurements at each stage and the two panels will hang evenly side by side.
Happy crocheting!