

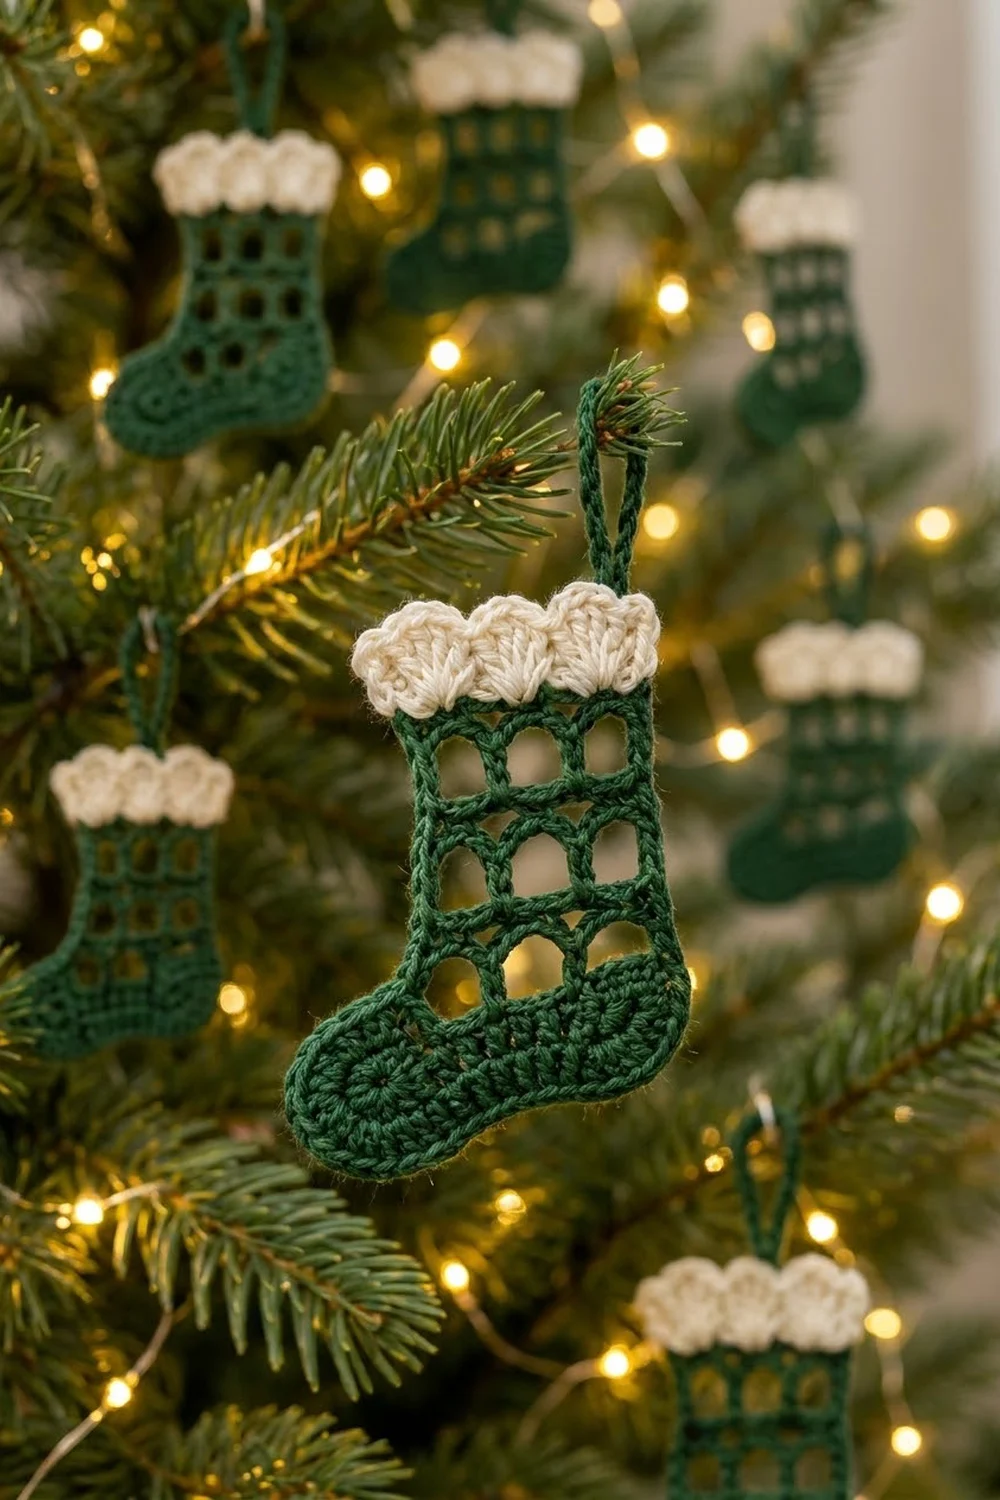
This little stocking ornament is made for the tree. It has a solid forest-green foot, an open lattice leg and a soft cream shell cuff. With light behind it, the windows look like a tiny paned lantern among the branches.
The design uses two colors. Deep evergreen makes the foot and lattice, and creamy white makes the scalloped cuff. The style is classic and a little vintage, and it suits both a traditional tree and a minimalist one.
The pattern uses US crochet terms. The finished ornament is about 4.5 in (11.4 cm) tall without the loop and 3.5 in (8.9 cm) wide across the foot. The hanging loop adds about 1.5 in (3.8 cm).
Construction is simple. You crochet the foot as an oval in rounds around a foundation chain. Then you work the lattice leg in rows straight off the top edge of the foot, add a 2-row cream cuff, and finish with a chain hanging loop. It is one flat piece, so there is nothing to sew.
Finished Size and Construction
- Finished size: 4.5 in (11.4 cm) tall × 3.5 in (8.9 cm) wide, without the loop
- Skill level: Easy / advanced beginner
- Terminology: US crochet terms
- Yarn weight: DK (light worsted, weight 3), cotton or cotton blend
- Hook: 3.5 mm (E-4)
- Number of pieces: 1
- Layout: Single flat stocking: foot, then lattice leg, then cuff
- Foot size: 3.5 in (8.9 cm) long × 1.25 in (3.2 cm) tall
- Size before cuff: 3.75 in (9.5 cm) tall
- Leg width: 2.25 in (5.7 cm)
- Cuff depth: 0.75 in (1.9 cm), flaring to about 2.5 in (6.4 cm) wide
Materials
Yarn: Use a smooth, mercerized or matte DK cotton. Cotton keeps the window shapes crisp and holds up well to blocking. Acrylic also works, but the lattice will look softer and may need more pinning.
- Color A, forest green: 10 g, about 25 m (27 yd)
- Color B, cream: 5 g, about 12 m (13 yd)
These quantities include a margin for your swatch and tails. One ornament uses a little less than this.
Tools:
- 3.5 mm (E-4) crochet hook
- Tapestry needle
- 2 stitch markers
- Scissors
- Blocking mat and rustproof pins
- Spray bottle with water
- Optional: fabric stiffener for a very crisp lattice
Abbreviations (US Terms)
- ch – chain
- sl st – slip stitch
- sc – single crochet
- hdc – half double crochet
- dc – double crochet
- sk – skip
- sp – space
- st(s) – stitch(es)
- RS / WS – right side / wrong side
Special stitch – Shell: work 5 dc in the same stitch.
Gauge and Checkpoints
Gauge: 18 sc and 20 rows = 4 in (10.2 cm). The same thing at a smaller scale is 9 sc = 2 in (5.1 cm).
Exact gauge is not critical for an ornament. Still, it decides whether the windows come out square and whether the leg sits neatly on the foot. Make one ornament first and check it at each stage below before you make a batch.
Checkpoints:
- After Foot Round 1: about 2.75 in (7.0 cm) long × 0.5 in (1.3 cm) tall.
- After Foot Round 3: about 3.5 in (8.9 cm) long × 1.25 in (3.2 cm) tall. The oval should lie flat.
- After Lattice Row 2: about 2 in (5.1 cm) tall in total at the heel side.
- After Lattice Row 8: about 3.75 in (9.5 cm) tall. The leg should be 2.25 in (5.7 cm) wide, and each window about 0.5 in (1.3 cm) square.
- After the cuff: 4.5 in (11.4 cm) tall.
If your piece is too big, try a 3.25 mm (D-3) hook. Also check that your chains aren’t loose, because loose ch-2 spaces make wide, sagging windows.
If your piece is too small or the foot cups, try a 3.75 mm (F-5) hook. Tight dc posts also make short, squat windows.

Pattern
Part 1: Foot (Color A)
You work the foot in joined rounds around both sides of a foundation chain. Do not turn between rounds. The first end you work becomes the heel.
Foundation: With Color A, ch 12.
Round 1: 3 sc in 2nd ch from hook (heel end), sc in next 9 ch, 3 sc in last ch (toe end). Rotate and work along the opposite side of the foundation chain: sc in next 9 ch. Join with sl st to first sc.
(3 + 9 + 3 + 9 = 24 sts)
Round 2: Ch 1 (does not count as a stitch). 2 sc in each of next 3 sts (heel), sc in next 9 sts, 2 sc in each of next 3 sts (toe), sc in next 9 sts. Join.
(6 + 9 + 6 + 9 = 30 sts)
Round 3: Ch 1. [Sc in next st, 2 sc in next st] 3 times (heel), sc in next 9 sts, [sc in next st, 2 sc in next st] 3 times (toe), sc in next 9 sts. Join.
(9 + 9 + 9 + 9 = 36 sts)
Fasten off and weave in the ends. The heel increases stack into a small circular pattern, as in the finished ornament.
Lay the foot RS up with the heel on the left and the toe on the right. The long straight side at the top is the top edge, and it has 9 sts. Find where the top edge meets the toe curve, count 2 sts into the toe curve, and place a marker in that stitch. Then count 2 sts into the heel curve from the other end of the top edge and place the second marker there.
From marker to marker there are 2 + 9 + 2 = 13 sts. The leg is built on these 13 sts.
Part 2: Lattice Leg (Color A)
You work the leg in turned rows. RS rows run from the toe side toward the heel.
Row 1 (RS, 4 foot windows): Join Color A with sl st in the marked toe-side stitch. Ch 3 (counts as dc). [Ch 2, sk next 2 sts, dc in next st] 4 times. The last dc lands in the marked heel-side stitch.
(5 dc + 8 ch = 13 sts; 4 windows)
Row 2 (WS, full bar): Ch 1, turn. Sc in first dc, [2 sc in next ch-2 sp, sc in next dc] 4 times. The last sc goes in the top of the turning ch-3.
(1 + 12 = 13 sc)
This bar closes the tops of all 4 foot windows. Each window gets a slightly arched top because 2 sc are packed into each ch-2 space.
Row 3 (RS, start leg, 3 windows): Turn. Sl st in each of the first 4 sts. Ch 3 (counts as dc in the 4th st). [Ch 2, sk next 2 sts, dc in next st] 3 times.
(4 dc + 6 ch = 10 sts; 3 windows. Sts 1–3 on the toe side stay unworked.)
The slip stitches move the leg toward the heel. The 4th stitch of Row 2 sits directly above a Row 1 dc, so the leg’s posts continue the columns from below.
Row 4 (WS, bar): Ch 1, turn. Sc in first dc, [2 sc in next ch-2 sp, sc in next dc] 3 times. The last sc goes in the top of the turning ch-3.
(10 sc)
Row 5 (RS, windows): Ch 3 (counts as dc), turn. [Ch 2, sk next 2 sts, dc in next st] 3 times.
(4 dc + 6 ch = 10 sts; 3 windows)
Row 6: Repeat Row 4. (10 sc)
Row 7: Repeat Row 5. (10 sts; 3 windows)
Row 8: Repeat Row 4. (10 sc)
You now have 4 tiers of windows: 4 along the foot and 3 rows of 3 in the leg. Row 8 ends at the top corner on the toe side.
Hanging loop: Do not fasten off. Ch 20, then sl st in the last sc of Row 8 to close the loop. Fasten off and weave in the end firmly along the bar.
Checkpoint: The piece is 3.75 in (9.5 cm) tall and the leg is 2.25 in (5.7 cm) wide.
Border: Shell Cuff (Color B)
The cuff is the only border on this piece. It is worked across the 10 top stitches of Row 8 and nowhere else.
Border gauge: One hdc row is about 0.3 in (0.8 cm) tall. One shell row is about 0.45 in (1.1 cm) tall. Together they add 0.75 in (1.9 cm).
Cuff Row 1 (RS, band): With RS facing, join Color B with sl st in the first sc of Row 8 at the toe-side corner, right next to the loop. Ch 2 (does not count). Hdc in the same st and in each st across.
(10 worked 1-per-existing-st + 0 added = 10 hdc)
Cuff Row 2 (WS, shells): Ch 1, turn. Sc in first st, [sk next st, 5 dc in next st, sk next st, sc in next st] 3 times.
(4 sc + 15 dc = 19 sts; 3 shells)
Fasten off and weave in the ends.
Why the math works: Each shell repeat uses 3 stitches (skip, shell, skip), and every repeat ends with an sc. One starting sc plus 3 repeats × 3 sts uses 1 + 9 = 10 sts, which matches the 10-stitch top edge exactly. The 5 dc in each shell spread over a 3-stitch footprint, so the cuff flares gently to about 2.5 in (6.4 cm), just wider than the 2.25 in (5.7 cm) leg. That gives the rounded scalloped look without ruffling. The shells sit at stitches 3, 6 and 9, so each one is centered over a window column.
Final Blocking
- Weave in every tail before blocking. Hide tails in the solid bars, not across the windows.
- Lightly spray the ornament until it is damp but not dripping.
- Lay it RS up on the blocking mat, with the heel on the left.
- Pin the foot outline first: 3.5 in (8.9 cm) long and 1.25 in (3.2 cm) tall, with smooth curves at both ends.
- Pin the leg sides straight and parallel, 2.25 in (5.7 cm) apart.
- Put a pin through each window to open it into a square of about 0.5 in (1.3 cm).
- Pin the top of each of the 3 shells to round out the scallops.
- Pin the hanging loop flat so it dries smooth.
- Let it dry completely. If you want a stiffer ornament, brush on diluted fabric stiffener while it is pinned.
Final Quality-Control Checklist
- Foot Round 3 has 36 sts and lies flat without cupping.
- Row 1 has 4 windows and Row 2 has 13 sc.
- The leg rows have 3 windows each, with 10 sts per row.
- The leg posts line up vertically with the foot-row posts.
- Cuff Row 1 has 10 hdc and Cuff Row 2 has 3 even shells (19 sts).
- The ornament measures 4.5 in (11.4 cm) tall × 3.5 in (8.9 cm) wide.
- The hanging loop is firmly anchored at the top corner on the toe side.
- No tails show through the windows.
Troubleshooting
Foot cups into a bowl: Your rounds are too tight, or an increase was missed. Recount for 36 sts, or go up a hook size.
Foot ruffles: You have extra increases. Check that the ends of Round 3 have 9 sts each.
Leg leans toward the toe: You skipped the slip stitches in Row 3, or used the wrong number. There should be exactly 4 sl sts.
Windows are tall and narrow: Your dc is loose or your chains are tight. Loosen the chains slightly.
Windows sag at the top: Use exactly 2 sc per ch-2 space in the bar rows.
Shells look crowded: Make sure you skip 1 st on each side of every shell.
Loop twists: Block it pinned flat, or anchor it with a few extra sl sts.
Care
Hand wash in cool water, press out the moisture in a towel, and reshape it flat to dry. Store it flat between sheets of tissue so the lattice and scallops keep their shape.
Final Notes
This stocking depends on a short chain of measurements. The 36-stitch foot oval gives you a 13-stitch top edge. That edge carries 4 foot windows, which narrow to a 10-stitch leg with 3 windows per row. The 10 top stitches then hold exactly 3 cream shells. If you hit 3.5 in (8.9 cm) at the foot, 3.75 in (9.5 cm) after Row 8 and 4.5 in (11.4 cm) after the cuff, every ornament in your batch will match. Make one, hang it in the light and check the windows, then make a whole set.
Happy crocheting!