

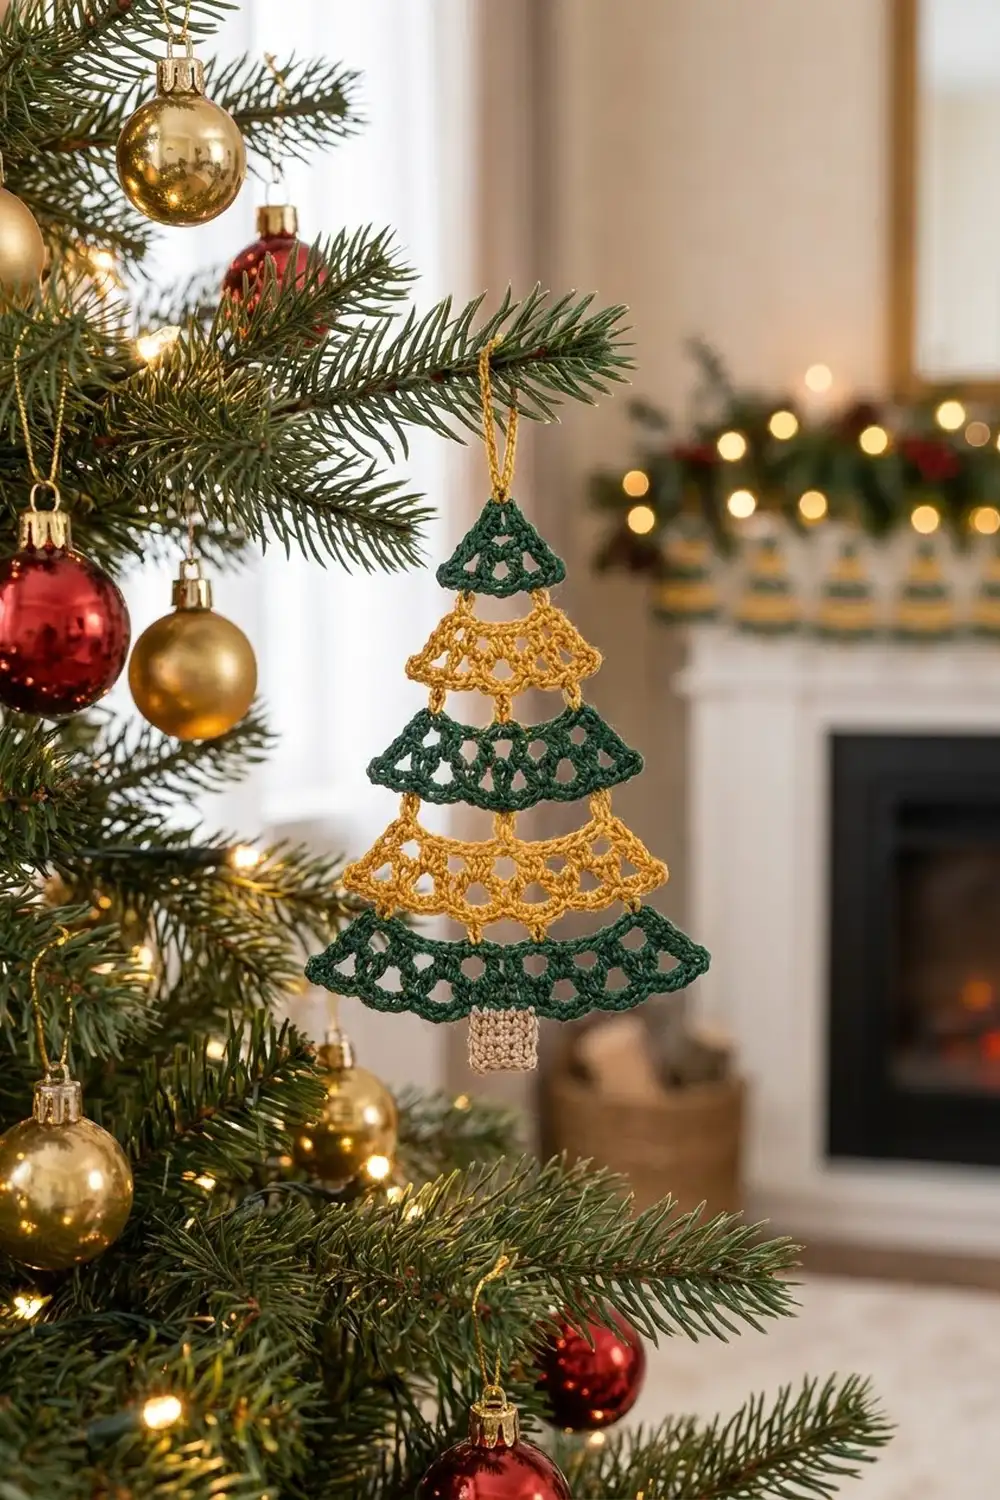
This Christmas tree ornament stacks five lacy tiers in alternating forest green and mustard gold. Short gold chain links hold the tiers together, and a small beige trunk finishes the bottom. The lower edge of each tier is a row of rounded scallops, so the tree looks like layered garland when light comes through the openings.
The style is classic with a little heirloom feel. Use crisp cotton and the stitches stay sharp, the scallops hold their curve, and the ornament hangs flat on a branch or a mantel garland.
The pattern uses US crochet terms. The finished ornament measures about 3 3/4 in (9.5 cm) wide and 7 in (17.8 cm) tall without the hanging loop, or about 8 1/4 in (21.0 cm) tall including the loop.
You make a small granny-style triangle for the top, then four tiers worked in rows: a single crochet top edge, a V-stitch row, a row of chain arches, and a scallop edging. A tiny single crochet square forms the trunk. Gold chain links join the tiers, the trunk is sewn on, and a chain loop is added at the tip.
Finished Size and Construction
- Finished size: 3 3/4 in (9.5 cm) wide x 7 in (17.8 cm) tall; 8 1/4 in (21.0 cm) including the loop
- Skill level: Easy-intermediate
- Terminology: US crochet terms
- Yarn weight: DK (#3) cotton
- Hook: 3.25 mm (US D/3)
- Number of pieces: 6 (5 tiers + 1 trunk), plus a hanging loop worked on afterward
- Layout: one vertical stack: Tier 1 at the top, Tier 5 at the bottom, trunk below
- Piece sizes (widest point): Tier 1: 1 1/2 in (3.8 cm) per side; Tier 2: 2 1/4 in (5.7 cm); Tier 3: 2 3/4 in (7.0 cm); Tier 4: 3 1/4 in (8.3 cm); Tier 5: 3 3/4 in (9.5 cm); trunk: 3/4 in (1.9 cm) square
- Tier depth before border: 3/4 in (1.9 cm)
- Border (scallop edging) depth: 1/4 in (0.6 cm), so each finished tier is 1 in (2.5 cm) deep
Materials
Choose a smooth mercerized or combed DK cotton, about 120 m per 50 g (2.4 m per gram). Cotton gives clean stitch definition and holds the scallops better than soft acrylic.
- Forest green (Tiers 1, 3, 5): 8 g, about 19 m
- Mustard gold (Tiers 2, 4, links, loop): 6 g, about 14 m
- Light beige (trunk): 2 g, about 5 m
These amounts include a margin for a gauge swatch and weaving in ends. A single 50 g ball of each color is enough for many ornaments.
Tools
– 3.25 mm (US D/3) crochet hook
– Tapestry needle
– Scissors
– Stitch marker
– Ruler or tape measure
– Blocking mat and rust-proof pins
– Spray bottle with water
Abbreviations (US Terms)
- ch – chain
- sl st – slip stitch
- sc – single crochet
- dc – double crochet
- sk – skip
- sp(s) – space(s)
- RS – right side
- V-st – (dc, ch 1, dc) in the same stitch
Special stitch – V-st: Work 1 dc, ch 1, then 1 dc into the same stitch. The ch-1 makes a small opening at the center of each V.
Gauge and Checkpoints
Gauge: 22 sc and 22 rows = 4 in (10.2 cm) in sc with a 3.25 mm hook.
Gauge matters more than usual here, because the links only hang straight when each tier’s width matches the tier above it. Before making the whole tree, make Tier 1 and Tier 5 as test pieces.
Checkpoints:
– Tier 1, Round 1: about 1 in (2.5 cm) per side
– Tier 1, Round 2: 1 1/2 in (3.8 cm) per side
– Row 1 (top edge) widths: Tier 2: 1 1/4 in (3.2 cm); Tier 3: 1 5/8 in (4.1 cm); Tier 4: 2 in (5.1 cm); Tier 5: 2 3/8 in (6.0 cm)
– Each tier after Row 3: 3/4 in (1.9 cm) deep
– Each tier after the edging: 1 in (2.5 cm) deep
Too big? Change to a 3.0 mm hook. Too small? Change to a 3.5 mm hook. Do not change the stitch counts. The joining and trunk placement depend on them.
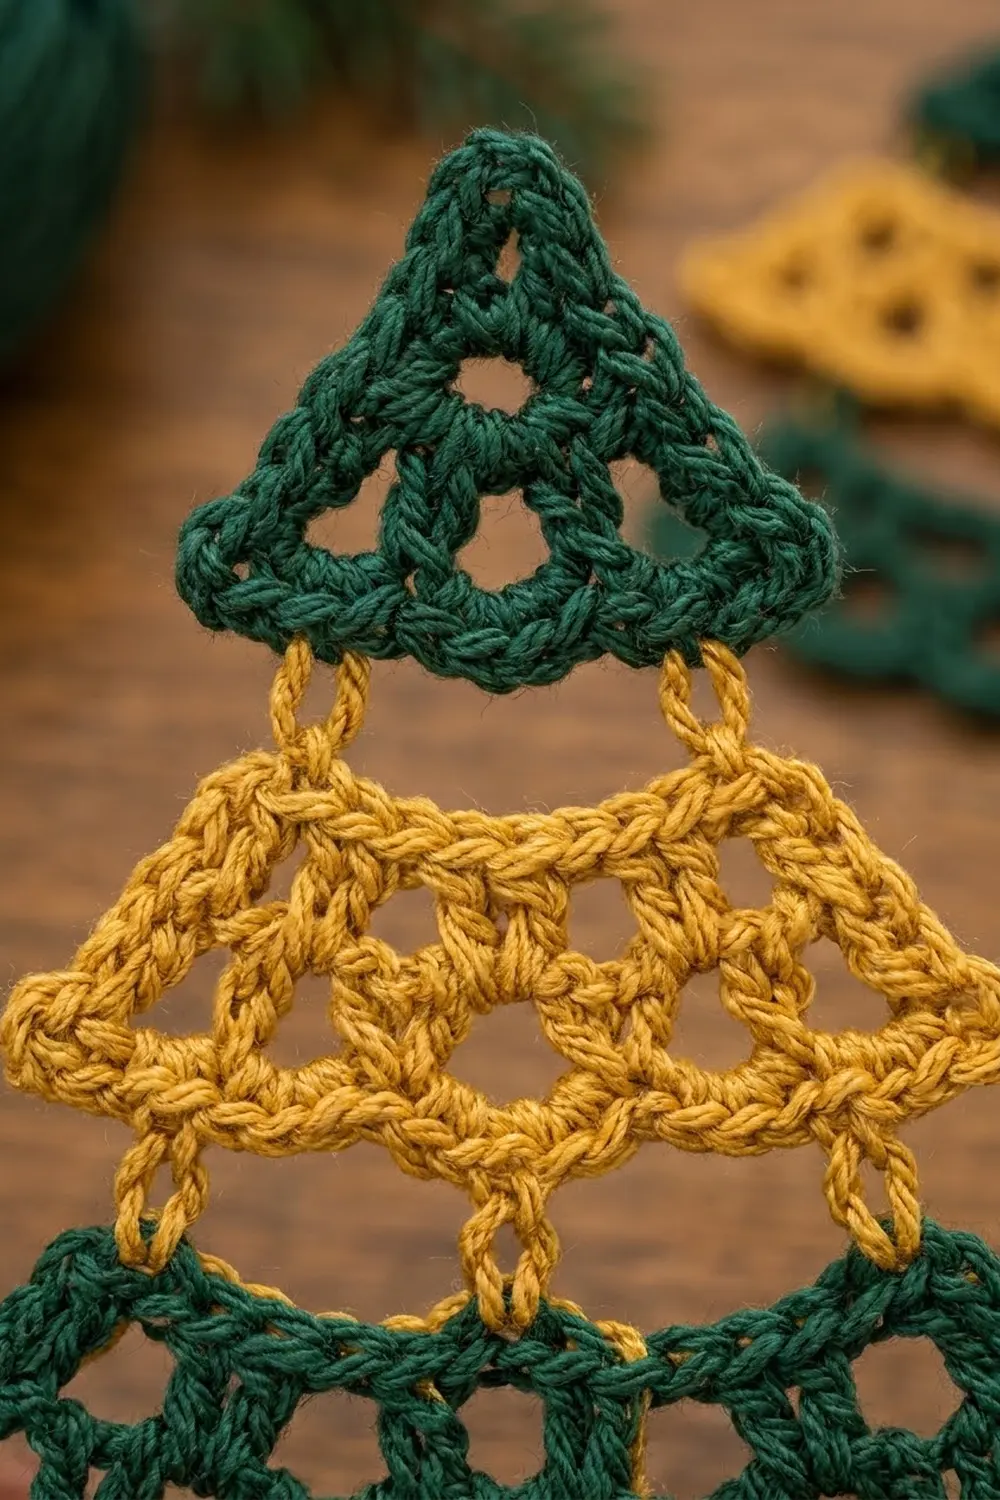
Tier 1 – Top Triangle (Forest Green)
Round 1: Ch 4, sl st in the first ch to form a ring. Ch 3 (counts as dc), 2 dc in ring, ch 2, (3 dc in ring, ch 2) twice, sl st in top of beginning ch-3 to join.
Stitch count: 9 dc and 3 ch-2 corner sps. The ring stays open as the small center hole.
Round 2: Ch 1, sc in the same st and in the next 2 dc, (2 sc, ch 2, 2 sc) in the next ch-2 sp, sc in the next 3 dc, (2 sc, ch 2, 2 sc) in the next ch-2 sp; repeat from * once more, sl st in the first sc to join.
Stitch count: 21 sc and 3 ch-2 corner sps; 7 sc per side (2 + 3 + 2). Corner ch-2 sps are not counted as stitches.
Fasten off and weave in the ends. Tier 1 is complete. Its Round 2 acts as its finished edge.
Tiers 2–5 – Scalloped Tiers
All four tiers follow the same four rows. The only difference is the foundation length. Work Rows 1–3 here, then complete Row 4 (the scallop edging) as given in the Border section before joining.
| Tier | Color | Foundation | Row 1 sc | V-sts | Arches |
|---|---|---|---|---|---|
| 2 | Gold | ch 8 | 7 | 4 | 3 |
| 3 | Green | ch 10 | 9 | 5 | 4 |
| 4 | Gold | ch 12 | 11 | 6 | 5 |
| 5 | Green | ch 14 | 13 | 7 | 6 |
Foundation: Ch the number shown for your tier.
Row 1 (RS, top edge): Sc in the 2nd ch from the hook and in each ch across. Turn.
Stitch count: Tier 2: 7 sc; Tier 3: 9 sc; Tier 4: 11 sc; Tier 5: 13 sc.
This row is always an odd number, so the V-sts land on both end stitches in the next row.
Row 2 (V-stitch row): Ch 4 (counts as dc and ch 1), dc in the first sc (first V-st made), sk the next sc, V-st in the next sc; repeat from * across, ending with a V-st in the last sc. Turn.
Stitch count: Tier 2: 4 V-sts (8 dc, 4 ch-1 sps); Tier 3: 5 V-sts (10 dc, 5 ch-1 sps); Tier 4: 6 V-sts (12 dc, 6 ch-1 sps); Tier 5: 7 V-sts (14 dc, 7 ch-1 sps).
The V-sts fan out from the narrow top edge, so the tier starts to widen and the gaps over the skipped sc form the small openings.
Row 3 (arch row): Ch 1, sc in the first ch-1 sp, ch 5, sc in the ch-1 sp of the next V-st; repeat from * across, working the last sc into the ch-1 sp made by the beginning ch-4. Turn. Do not fasten off.
Stitch count: Tier 2: 4 sc, 3 ch-5 arches; Tier 3: 5 sc, 4 arches; Tier 4: 6 sc, 5 arches; Tier 5: 7 sc, 6 arches.
Checkpoint: The tier should be about 3/4 in (1.9 cm) deep. Continue straight into Row 4 under Border.
Trunk (Light Beige)
Foundation: Ch 5.
Row 1: Sc in the 2nd ch from the hook and in each ch across. Turn. (4 sc)
Rows 2–4: Ch 1, sc in each sc across. Turn. (4 sc per row)
Fasten off, leaving a 10 in (25.4 cm) tail for sewing. The square should be 3/4 in (1.9 cm) on each side.
Make All Pieces
Make one of each piece:
- Forest green: Tier 1, Tier 3, Tier 5 (3 pieces)
- Mustard gold: Tier 2, Tier 4 (2 pieces), plus 8 links and 1 loop worked during assembly
- Light beige: 1 trunk
Layout (top to bottom):
        [loop - gold]
        [Tier 1 - green]
          |       |
        [Tier 2 - gold]
          |       |
        [Tier 3 - green]
          |       |
        [Tier 4 - gold]
          |       |
        [Tier 5 - green]
            [trunk]
Each “|” is one gold ch-3 link.
Joining
The tiers hang from one another on chain links. They are not sewn edge to edge, so each tier keeps its scalloped hem free.
Link logic: Each gap has 2 links. Each link goes from an end stitch of the lower tier’s Row 1 (top edge) to an end point on the upper tier’s bottom edge:
- Tier 1 to Tier 2: the two bottom corner ch-2 sps of Tier 1 connect to the first and last sc of Tier 2’s Row 1.
- Tiers 2–5: the first and last sl st of the upper tier’s scallop edging connect to the first and last sc of the lower tier’s Row 1.
To make one link: With RS facing, use gold to join with a sl st to the first sc of the lower tier’s Row 1. Ch 3, then sl st into the matching point on the upper tier. Fasten off. Repeat at the other end, then repeat for all four gaps (8 links total).
These points line up by design. The distance between the end sl sts on each upper tier is close to the width of the next tier’s Row 1, so the links hang nearly vertical.
Tension: Make the ch-3 at the same tension as your other chains. Tight links pull the tiers together and the scallops overlap; loose links make the tree droop.
Trunk: Center the trunk below the 4th (middle) sl st of Tier 5’s edging. Whipstitch its 4-stitch top edge to that sl st and the nearest sc on each side, about 3/4 in (1.9 cm) of edge in total.
Hanging loop: With gold, join with a sl st in Tier 1’s top corner ch-2 sp, ch 14, sl st in the same sp. Fasten off. The loop hangs about 1 1/4 in (3.2 cm) above the tip.
Size checkpoint: Tiers 1–5 with links: 6 1/4 in (15.9 cm) tall. With the trunk: 7 in (17.8 cm). Width at Tier 5: 3 3/4 in (9.5 cm).
Border – Scallop Edging (Tiers 2–5)
On Tiers 2–5, the border is the scallop edging along the bottom. Work it as Row 4 right after Row 3, before you join the tiers.
Border gauge: Each scallop is about 1/2 in (1.3 cm) wide and 1/4 in (0.6 cm) deep. The end V-sts add about 3/8 in (1.0 cm) at each side, which brings the tiers to 2 1/4, 2 3/4, 3 1/4, and 3 3/4 in (5.7, 7.0, 8.3, and 9.5 cm) wide.
Row 4 (scallop edging): Ch 1, sl st in the first sc, 7 sc in the next ch-5 arch, sl st in the next sc; repeat from * across. Fasten off and weave in the ends.
Counts along the bottom edge:
– Tier 2: 3 scallops = 21 sc + 4 sl sts
– Tier 3: 4 scallops = 28 sc + 5 sl sts
– Tier 4: 5 scallops = 35 sc + 6 sl sts
– Tier 5: 6 scallops = 42 sc + 7 sl sts
Tier 1 edge (for reference): Round 2 is its finished edge, with 7 sc per side and ch-2 corners, so it gets no extra border.
Why the math works: A ch-5 arch is 5 chains long, and 7 sc gives it 2 extra stitches. That makes the arch curve into a firm, rounded scallop that doesn’t ruffle. A full 10 sc would ruffle, and 5 sc would pull the arch straight. The sl sts land on the Row 3 sc, and there is always 1 more sc than arches, so every tier begins and ends on a sl st. Those end sl sts are the link points used in Joining.
Final Blocking
- Weave in all remaining ends along stitches of the same color.
- Lay the ornament face up on a blocking mat.
- Spray it lightly until it is damp but not soaked.
- Pin the tip of Tier 1 and the center of the trunk so the tree measures 7 in (17.8 cm) from tip to trunk bottom.
- Pin each tier’s two lower corners so the tiers are level and centered.
- Pin each scallop into a smooth curve, one pin at each sl st.
- Straighten the links so each gap is 1/4 in (0.6 cm).
- Let it dry completely, then unpin.
Final Quality-Control Checklist
- Tier 1 has 7 sc per side and an open center.
- Row 1 counts are 7, 9, 11, and 13 sc.
- Scallop counts are 3, 4, 5, and 6.
- Colors alternate green, gold, green, gold, green from top to bottom.
- There are 8 gold links in total, 2 per gap, and all hang vertical.
- The trunk is centered below Tier 5’s middle sl st.
- The hanging loop is secure at the tip.
- Size is 3 3/4 in x 7 in (9.5 cm x 17.8 cm).
- No ends show on the RS.
Troubleshooting
- Scallops ruffle: Your tension is loose on the sc. Work them more firmly, or use 6 sc per arch on a very loose tension.
- Scallops cup or pull flat: The arches are too tight. Loosen the ch-5.
- Links slant inward: The lower tier is narrower than planned. Check the Row 1 count and gauge.
- The tree leans: One link is longer than the other. Remake it at matching tension.
- The tier curls upward: Block it with extra pins along Row 1.
- The trunk twists: Sew it through both loops, keeping it centered on the middle sl st.
Care
Hand wash in cool water with mild soap, press out the water in a towel, and dry flat, reshaping the scallops. Store flat between layers of tissue so the tiers don’t crush.
Final Notes
The measurement chain is short and tidy:
- Gauge: 22 sc = 4 in (10.2 cm)
- Tier 1: 7 sc per side, 1 1/2 in (3.8 cm)
- Tier tops: 7 to 13 sc, from 1 1/4 to 2 3/8 in (3.2 to 6.0 cm)
- Each tier is 1 in (2.5 cm) deep; each link adds 1/4 in (0.6 cm)
- The trunk adds 3/4 in (1.9 cm), for a 7 in (17.8 cm) tree
If those numbers check out at each stage, the finished ornament will be 3 3/4 in (9.5 cm) wide with straight, even links. One ornament takes an evening. A row of them makes a nice mantel garland or a set of gift toppers.
Happy crocheting!