

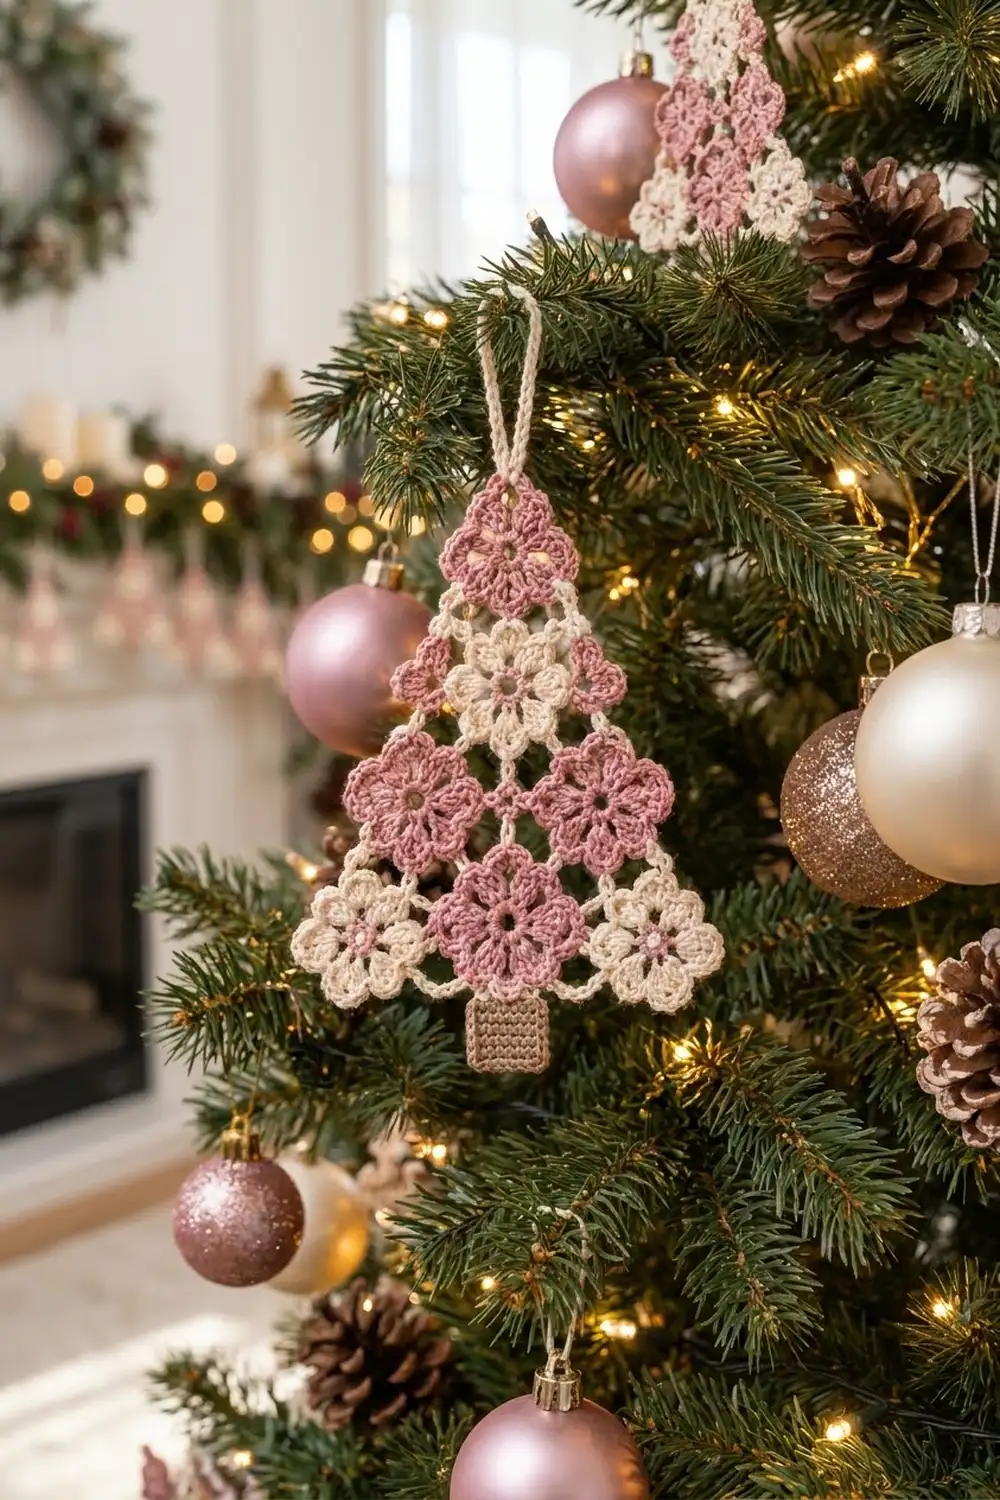
This little tree is made of lace flowers. Seven six-petal blossoms in dusty rose and cream are joined into a triangle, and a cream chain edge outlines the shape. A small tan trunk sits at the bottom, and a cream loop at the top lets it hang.
It has a soft vintage look that works well among pink and gold baubles, warm fairy lights, or a fresh green garland. The pink-and-cream checkerboard keeps the tree airy, and the open lattice lets the light through.
This pattern uses US crochet terms. The finished ornament measures about 5.5 in (14.0 cm) wide and 5.5 in (14.0 cm) tall including the trunk, plus a 1.25 in (3.2 cm) hanging loop.
Construction overview: You make one cream flower first. You then join the other six flowers to it with a join-as-you-go method at the petal tips. Next you anchor two small pink petal wedges, work a two-round cream border around the whole triangle, sew on the trunk, and add the loop.
Finished Size and Construction
- Finished size: 5.5 in (14.0 cm) wide x 5.5 in (14.0 cm) tall including the trunk, not counting the loop
- Skill level: Intermediate
- Terminology: US crochet terms
- Yarn weight: Fingering (#1), mercerized cotton
- Hook: 2.25 mm (B-1)
- Number of pieces: 10 (7 flowers, 2 petal wedges, 1 trunk)
- Layout: 4 tiers of flowers (1, 1, 2, 3), plus wedges beside tier 2
- Flower size: 1.5 in (3.8 cm) across, measured from petal tip to petal tip
- Size before border: about 5 in (12.7 cm) wide x 4.5 in (11.4 cm) tall
- Border depth: about 0.25 in (0.6 cm)
Materials
Use a smooth mercerized cotton in fingering weight, about 170 m per 50 g. Cotton keeps the petals crisp and holds its shape well after blocking.
- Color A, dusty rose: 10 g / 34 m (4 flowers and 2 wedges)
- Color B, cream: 10 g / 34 m (3 flowers, border and loop)
- Color C, light tan: 3 g / 10 m (trunk)
These amounts include a margin of about 20 percent for swatching and joining.
Tools:
– 2.25 mm (B-1) crochet hook
– Tapestry needle
– Scissors
– Rust-proof pins and a blocking mat
– Spray bottle with water
– Ruler or tape measure
Abbreviations (US Terms)
- ch: chain
- sl st: slip stitch
- sc: single crochet
- hdc: half double crochet
- dc: double crochet
- sk: skip
- sp(s): space(s)
- st(s): stitch(es)
- RS: right side
Special stitches
- Petal: (sc, hdc, 3 dc, ch 2, 3 dc, hdc, sc) worked in the same space. This makes 10 sts and one ch-2 tip sp.
- Joining petal: (sc, hdc, 3 dc, ch 1, sl st in the ch-2 tip sp of the neighbor’s petal, ch 1, 3 dc, hdc, sc) worked in the same space. It still has 10 sts. The ch 1, sl st, ch 1 replaces the ch-2 tip.
Gauge and Checkpoints
Make one complete flower before you start the tree and block it lightly.
- After Rnd 1: the ring measures 0.5 in (1.3 cm) across.
- After Rnd 2: the motif measures 0.875 in (2.2 cm) across.
- After Rnd 3: the flower measures 1.5 in (3.8 cm) from tip to tip.
- Sc gauge (used for the border and trunk): 7 sc = 1 in (2.5 cm), so 28 sc = 4 in (10.2 cm).
If your flower is smaller than 1.375 in (3.5 cm), go up one hook size. If it is larger than 1.625 in (4.1 cm), go down one hook size. Each flower that is off by 0.125 in (0.3 cm) changes the tree’s width by roughly 0.5 in (1.3 cm), so getting the swatch right matters.
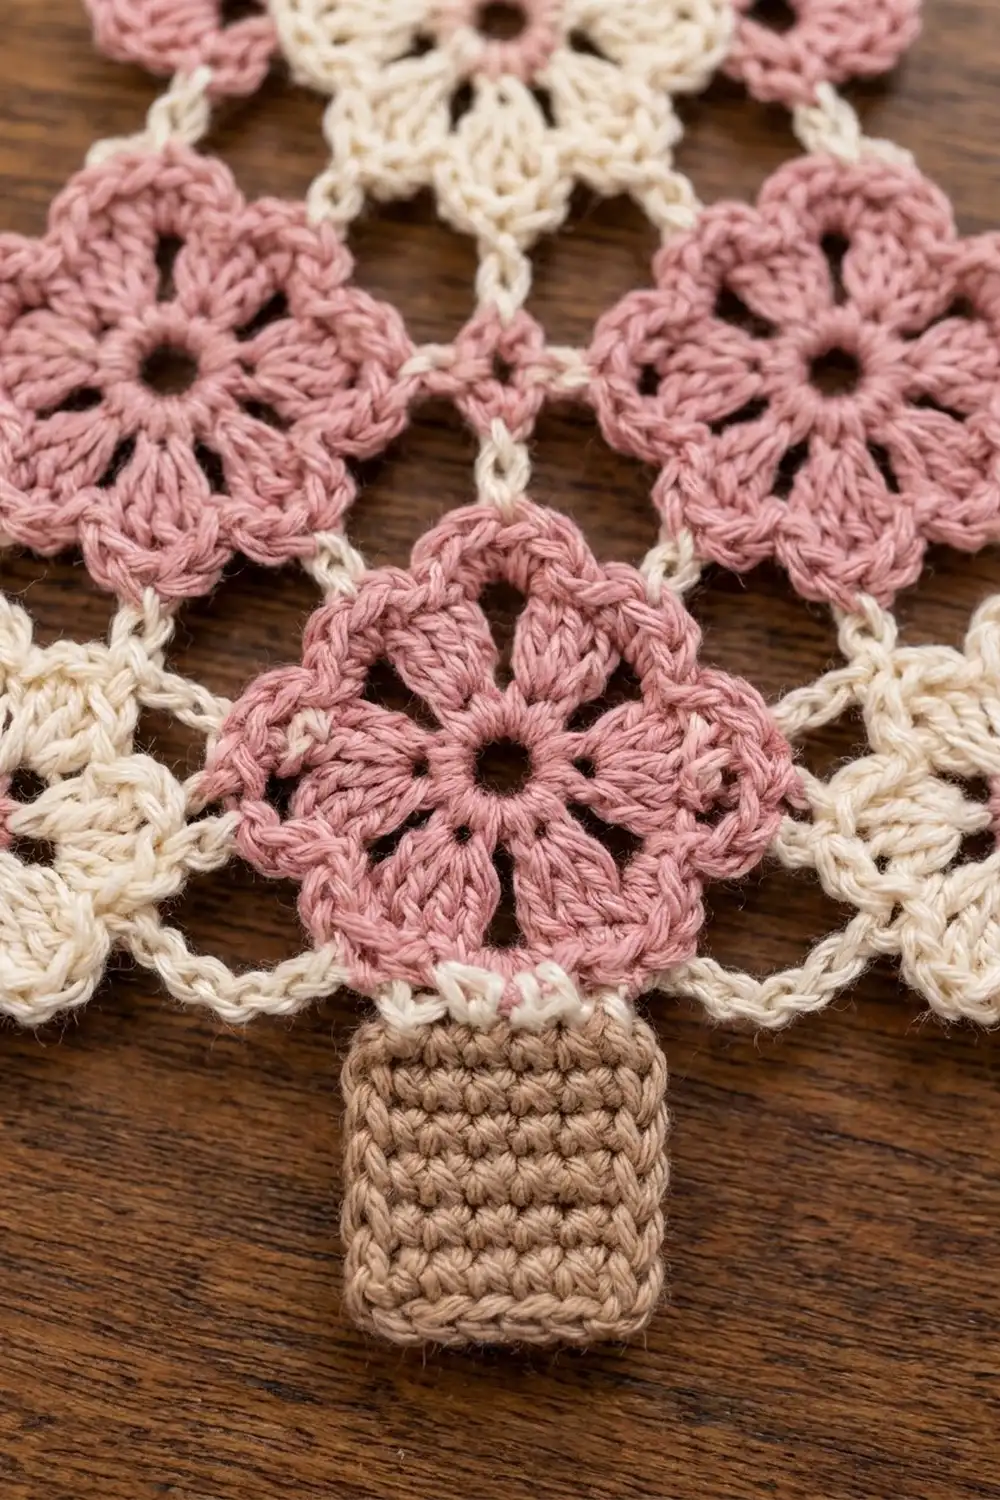
Flower Motif (Basic)
Use this for the first flower. Every other flower uses the same Rnds 1 and 2.
Rnd 1: Ch 5 and sl st in the first ch to form a ring. Ch 3 (counts as dc), then work 17 dc in the ring. Sl st to the top of the beginning ch-3. (18 dc)
Rnd 2: Ch 1. Sc in the same st, ch 4, sk 2 dc. Sc in the next dc, ch 4, sk 2 dc; repeat from * 4 more times. Sl st to the first sc. (6 sc, 6 ch-4 sps)*
Rnd 3: Sl st in the first ch-4 sp. Work a Petal in each ch-4 sp around, then sl st to the first sc. (6 petals: 60 sts and 6 ch-2 tip sps)
Fasten off and weave in the ends.
Petal positions: Lay the flower RS up with one tip pointing straight up. The six tips then sit at 12, 2, 4, 6, 8 and 10 o’clock. All joins below use these clock positions.
Make All Pieces
Quantities per color
- Color A (pink): 4 flowers and 2 petal wedges
- Color B (cream): 3 flowers
- Color C (tan): 1 trunk
Layout grid
Tier 1:            P1
Tier 2:      wL    C2    wR
Tier 3:         P3L   P3R
Tier 4:      C4L   P4M   C4R
                   trunk
P = pink flower, C = cream flower, w = pink wedge.
Joining (Join-As-You-Go)
Method: Work Rnds 1 and 2 of each new flower as usual. On Rnd 3, work ordinary Petals until you reach a petal that has to touch a neighbor. Work that one as a Joining Petal, then go back to ordinary Petals. Each join links one tip to one tip, so the stitch count for each flower stays at 60 sts.
Stitch-to-stitch logic: Hold the finished flower behind the new one, with both RS facing you. Rotate the finished flower until the tip you need lines up with the petal you are working. Insert the hook from front to back under the full ch-2 tip. Make sure no petal twists.
Order of work
- C2 (cream): Work a Basic Flower.
- P1 (pink): Join 1 petal to C2’s 12 o’clock tip. P1 now sits on top.
- P3L (pink): Join 1 petal to C2’s 8 o’clock tip.
- P3R (pink): Join 1 petal to C2’s 4 o’clock tip.
- P4M (pink): Join 3 petals in a row. The first goes to P3L’s 4 o’clock tip, the second to C2’s 6 o’clock tip, and the third to P3R’s 8 o’clock tip.
- C4L (cream): Join 1 petal to P3L’s 8 o’clock tip.
- C4R (cream): Join 1 petal to P3R’s 4 o’clock tip.
That makes 8 tip joins in total.
Petal wedges (make 2, Color A): Ch 4 and sl st in the first ch to form a ring. Sl st in C2’s 2 o’clock tip sp for wR, or its 10 o’clock tip sp for wL. Then work one Petal into the ring, with its tip pointing outward. Sl st to the first sc and fasten off. (10 sts and 1 ch-2 tip sp per wedge)
Tension advice: Keep the ch 1 on each side of a joining sl st as loose as an ordinary chain. If the joins are tight, the flowers cup and the triangle pulls in.
Size checkpoint: Pin the joined tree flat without stretching it. It should measure about 5 in (12.7 cm) across Tier 4 and 4.5 in (11.4 cm) from P1’s top tip to the bottom of Tier 4.
Border
Border gauge: 7 sc = 1 in (2.5 cm). Work the border in Color B.
Anchor points: These are the outer tips that the border catches, listed clockwise from the top.
- Right side (6 anchors): P1 12 o’clock (top corner), P1 2 o’clock, wR tip, P3R 2 o’clock, C4R 2 o’clock, C4R 4 o’clock (corner)
- Bottom (7 anchors, sharing the two corners): C4R 4 o’clock, C4R 6 o’clock, P4M 4 o’clock, P4M 6 o’clock, P4M 8 o’clock, C4L 6 o’clock, C4L 8 o’clock (corner)
- Left side (6 anchors, sharing the two corners): C4L 8 o’clock, C4L 10 o’clock, P3L 10 o’clock, wL tip, P1 10 o’clock, P1 12 o’clock
That gives 16 different anchors: 3 corners and 13 single anchors.
Border Rnd 1: Join B in P1’s 12 o’clock tip sp and work (sc, ch 2, sc) in it.
- Right side: *Ch 6, sc in the next anchor tip; repeat from * 3 more times (to C4R 2 o’clock). Ch 6, then work (sc, ch 2, sc) in the C4R 4 o’clock tip.
- Bottom: *Ch 5, sc in the next anchor tip; repeat from * 4 more times (to C4L 6 o’clock). Ch 5, then work (sc, ch 2, sc) in the C4L 8 o’clock tip.
- Left side: *Ch 6, sc in the next anchor tip; repeat from * 3 more times (to P1 10 o’clock). Ch 6, then sl st to the first sc.
Count for Rnd 1: 19 sc (13 single anchors plus 2 at each of the 3 corners), 10 ch-6 bridges, 6 ch-5 bridges and 3 corner ch-2 sps.
Border Rnd 2: Sl st into the top corner ch-2 sp and ch 1. Work 3 sc in that ch-2 sp. Then work 1 sc in each sc, 6 sc in each ch-6 bridge, 5 sc in each ch-5 bridge, and 3 sc in each remaining corner ch-2 sp. Sl st to the first sc and fasten off.
Counts per side for Rnd 2. Each 3-sc corner group is counted separately.
- Right side: 6 anchor sc + (5 bridges x 6) = 36 sc
- Bottom: 7 anchor sc + (6 bridges x 5) = 37 sc
- Left side: 36 sc
- Corners: 3 x 3 = 9 sc
- Total: 36 + 37 + 36 + 9 = 118 sc
Check this a second way: 19 sc over sc + 60 sc in the ch-6 bridges + 30 sc in the ch-5 bridges + 9 corner sc = 118.
Why the math works: At 7 sc per inch, each diagonal side has 36 sc plus half of each corner group, about 39 sc in all. That comes to 5.6 in (14.2 cm), which matches the slanted side of a triangle 5.5 in (14.0 cm) wide and 4.75 in (12.1 cm) tall. The bottom edge has about 40 sc, which is 5.7 in (14.5 cm), so it lies flat without ruffling or pulling in. The longer ch-6 bridges are on the slanted sides because the gaps between tips are wider there.
Trunk (Color C): Ch 6. Sc in the 2nd ch from the hook and in each ch across. (5 sc) Rows 2–6: Ch 1, turn, sc in each st across. (5 sc) The trunk measures 0.75 in (1.9 cm) square. Fasten off and leave a long tail. Sew the top edge to the 5 center sc of the bottom edge: the 19th sc (the one over P4M’s 6 o’clock anchor) and 2 sc on each side of it.
Hanging loop (Color B): Join B in the center sc of the top corner group. Ch 20 and sl st in the same st. Ch 1 and work 26 sc into the loop, then sl st to the base. Fasten off. The loop is about 1.25 in (3.2 cm) long.
Final Blocking
- Weave in all ends along the backs of the petals.
- Soak the ornament in cool water for 10 minutes, then press out the water in a towel.
- Pin the 3 corners to make a triangle 5.5 in (14.0 cm) wide x 4.75 in (12.1 cm) tall.
- Pin each flower’s ch-2 tips outward so the petals open evenly.
- Pin the trunk square at 0.75 in (1.9 cm).
- If you like a stiffer finish, spray lightly with fabric starch.
- Let it dry completely, at least 12 hours, before you unpin it.
Final Quality-Control Checklist
- Each flower has 18 dc, 6 ch-4 sps and 6 petals of 10 sts each.
- All 8 tip joins and both wedge anchors are secure and untwisted.
- The tiers go pink; cream; pink, pink; cream, pink, cream.
- Border Rnd 2 has 36 / 37 / 36 sc per side plus 9 corner sc, for 118 in total.
- The trunk is centered under P4M.
- The loop is centered at the top corner.
- The ornament is 5.5 in (14.0 cm) wide x 5.5 in (14.0 cm) tall including the trunk.
Troubleshooting
- Petals curl forward: Your Rnd 2 chains are too tight. Loosen them or use ch 5.
- The tree twists after joining: One flower was joined with its WS facing you. Undo that join and redo it with both RS facing you.
- The border ruffles: Your bridges are too long for your tension. Use ch 5 on the sides and ch 4 on the bottom, and adjust the Rnd 2 sc counts to match.
- The border pulls the tree into a curve: Go up a hook size for the border only.
- The trunk leans: Re-sew it, centering it on the 19th bottom sc.
Care
Hand wash in cool water with mild soap, press out the water in a towel, and dry flat. Store the ornament flat or hanging, away from damp.
Final Notes
The measurements build on each other. A 1.5 in (3.8 cm) flower gives a joined tree about 5 in (12.7 cm) wide and 4.5 in (11.4 cm) tall. The 0.25 in (0.6 cm) border brings it to 5.5 in (14.0 cm) x 4.75 in (12.1 cm), and the 0.75 in (1.9 cm) trunk makes the finished height 5.5 in (14.0 cm). If you check your flower first, the rest of the ornament should come out to these sizes.
Happy crocheting!