

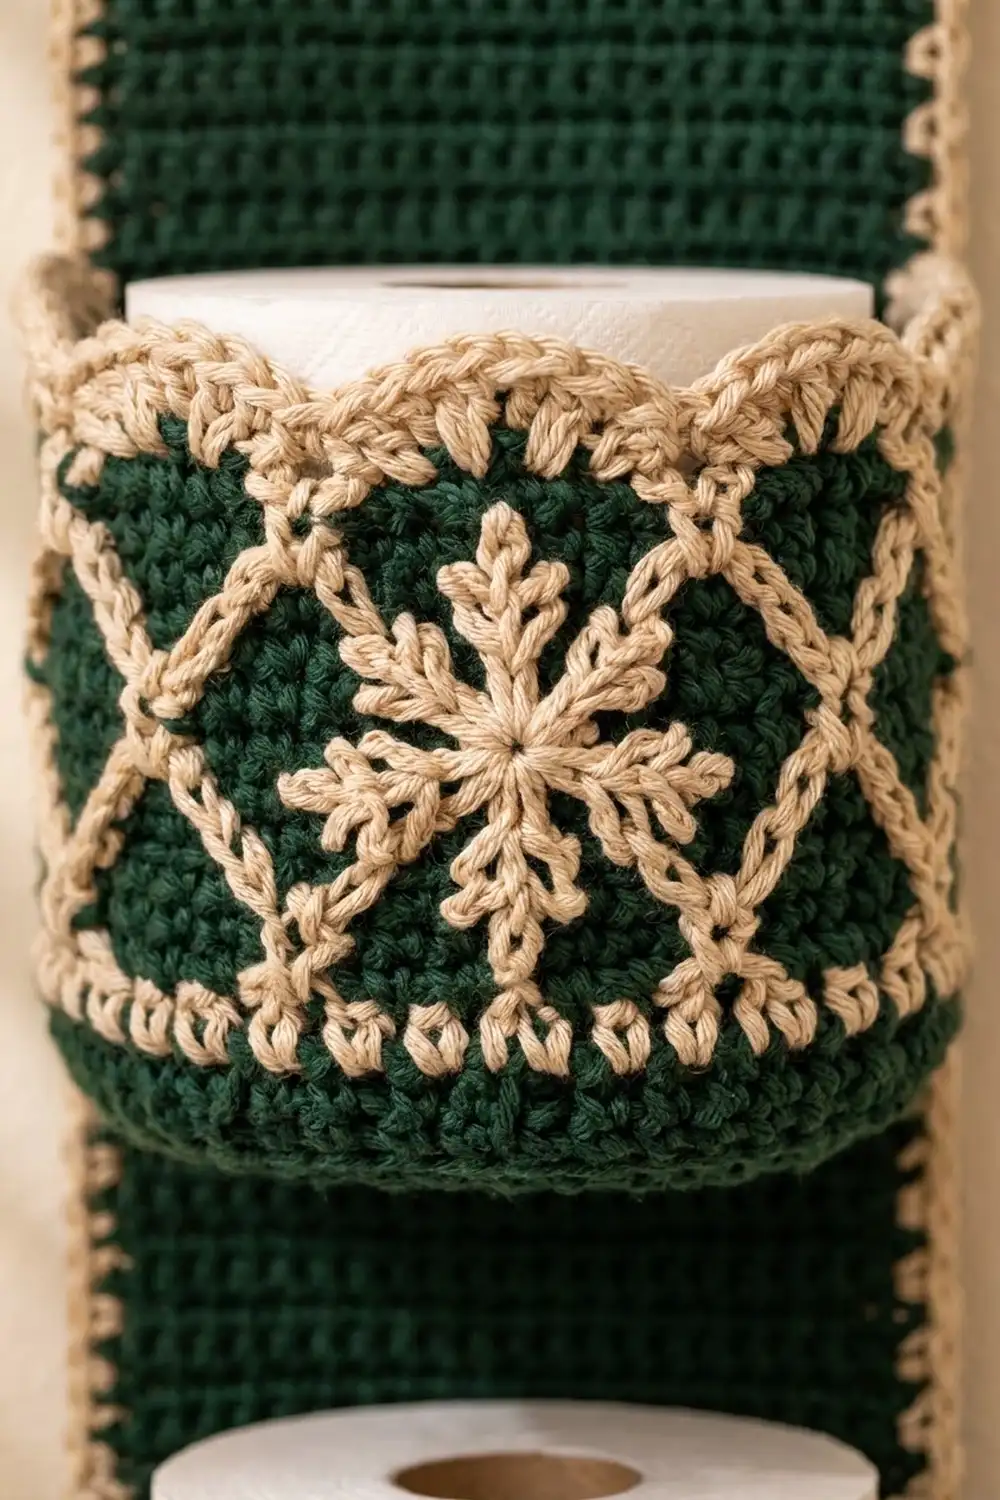
This hanging holder stores three spare rolls in a long, narrow strip that hangs from a towel bar or hook. It’s made in deep forest green with warm cream details. Each pocket has a raised diamond lattice, a snowflake at the center front, and a scalloped shell rim, so it suits a winter or holiday bathroom without looking like a novelty piece.
The pattern uses US crochet terms. The finished backing panel is 7 in (17.8 cm) wide and 23 in (58.4 cm) long, plus the hanging loops. Each pocket measures 5 to 5.25 in (12.7 to 13.3 cm) across the base and about 3.6 in (9.1 cm) tall to the top of the scallops.
The panel is worked flat in rows of single crochet and edged with two rounds of cream. Each pocket starts with a flat circle, then turns upward through the back loops to form the wall. The lattice and snowflake go on afterward in surface slip stitch, which keeps the colorwork simple and easy to correct. Last, you sew the pockets to the panel and add two edged straps for hanging.
Finished Size and Construction
- Finished panel size: 7 in x 23 in (17.8 cm x 58.4 cm), not counting the loops
- Skill level: Intermediate
- Terminology: US crochet terms
- Yarn weight: Worsted (#4)
- Hook: 5.0 mm (H-8)
- Number of pieces: 6 (1 panel, 3 pockets, 2 straps)
- Layout: 3 pockets stacked in one vertical column on the panel
- Pocket size: 5 to 5.25 in (12.7 to 13.3 cm) across, about 3.6 in (9.1 cm) tall
- Panel size before border: 6 in x 22 in (15.2 cm x 55.9 cm)
- Border depth: 0.5 in (1.3 cm) on each side
Materials
Use a smooth worsted-weight acrylic or cotton-acrylic blend with about 180 m per 100 g. A firm, smooth yarn gives clean single crochet and makes the surface slip stitch lines stand out. Avoid fuzzy or very soft yarns, because the pockets need some structure to stay upright.
- Color A, Forest Green: 250 g (450 m)
- Color B, Cream: 100 g (180 m)
These amounts include a margin of about 15%. That covers a gauge swatch and a little extra for the lattice.
Tools:
– 5.0 mm (H-8) crochet hook
– Tapestry needle
– 4 to 6 locking stitch markers
– Scissors
– Measuring tape
– Rust-proof pins and a blocking mat or towel
– One standard toilet paper roll, to test the pocket fit
Abbreviations (US Terms)
- ch – chain
- sc – single crochet
- dc – double crochet
- sl st – slip stitch
- st(s) – stitch(es)
- sk – skip
- inc – 2 sc in the same st
- BLO – back loop only
- rnd(s) – round(s)
- sp – space
Special stitch: Surface slip stitch (surface sl st). Hold Color B behind the fabric, which means inside the pocket. Insert the hook from front to back through the fabric in the gap between two stitches, then pull up a loop. Insert the hook at the next point on your line, pull up a loop, and pull it through the loop on the hook. Keep the loops the same height as the stitches underneath so the line lies flat and doesn’t pucker.
Shell: 5 dc in the same st.
Gauge and Checkpoints
Gauge: 16 sc and 18 rows = 4 in (10.2 cm) in sc rows. That works out to 4 sts and 4.5 rows per inch (2.5 cm).
Make one pocket base before you start anything else. It’s the fastest way to check both your gauge and the fit around a real roll.
Checkpoints:
– Pocket base, after Rnd 11 (66 sts): 5 to 5.25 in (12.7 to 13.3 cm) across. A roll should sit on it with a little room all around.
– Pocket wall, after Rnd 25: 3.1 in (7.9 cm) tall from the cream turning round.
– Panel, after Row 99: 6 in x 22 in (15.2 cm x 55.9 cm).
– Panel after border: 7 in x 23 in (17.8 cm x 58.4 cm).
If your pieces are too big, go down to a 4.5 mm hook. If they are too small, go up to a 5.5 mm hook. Check the pocket against the roll again before you go on. A pocket that’s too tight will stretch the lattice out of shape.
Pattern: Backing Panel
Use Color A.
Foundation: Ch 25.
Row 1: Sc in the 2nd ch from the hook and in each ch across. Turn. (24 sts)
Rows 2–99: Ch 1 (this does not count as a st), sc in each st across. Turn. (24 sts)
Checkpoint: 6 in x 22 in (15.2 cm x 55.9 cm). Fasten off and weave in the ends.
Pattern: Pocket
Use Color A. Join each round with a sl st to the first sc and ch 1. The ch 1 does not count as a st. Joined rounds give clean color changes. Place a marker in the first st of every round. That st is the center back of the pocket.
Base
Rnd 1: Make a magic ring, work 6 sc into it, and join. (6 sts)
Rnd 2: Inc in each st around. (12 sts)
Rnd 3: Sc 1, inc; repeat around. (18 sts)
Rnd 4: Sc 2, inc; repeat around. (24 sts)
Rnd 5: Sc 3, inc; repeat around. (30 sts)
Rnd 6: Sc 4, inc; repeat around. (36 sts)
Rnd 7: Sc 5, inc; repeat around. (42 sts)
Rnd 8: Sc 6, inc; repeat around. (48 sts)
Rnd 9: Sc 7, inc; repeat around. (54 sts)
Rnd 10: Sc 8, inc; repeat around. (60 sts)
Rnd 11: Sc 9, inc; repeat around. (66 sts)
Checkpoint: The base should measure 5 to 5.25 in (12.7 to 13.3 cm) across and lie flat. Change to Color B in the final sl st of Rnd 11.
Wall
Rnd 12 (turning round, Color B): Sc in the BLO of each st around. (66 worked 1 per st + 0 added = 66 sts) The unworked front loops make a ridge at the bottom edge, and the cream band sits just above it. Change to Color A.
Rnds 13–24 (Color A): Sc in each st around. (66 sts each round)
Rnd 25 (Color B): Sc in each st around. (66 sts)
Checkpoint: The wall measures 3.1 in (7.9 cm) from Rnd 12 through Rnd 25. The green section, Rnds 13–24, measures about 2.7 in (6.9 cm).
Rnd 26 (scallop edge, Color B): Ch 1, sc in the first st, [sk 2 sts, shell in the next st, sk 2 sts, sc in the next st] 10 times, sk 2 sts, shell in the next st, sk the last 2 sts, then join to the first sc. That uses 1 + (10 x 6) + 5 = 66 sts, so the round has 11 shells and 11 sc (11 sc + 55 dc = 66 sts). Fasten off.
Diamond Lattice
The lattice goes on the green section, Rnds 13–24, using Color B in surface sl st. Count around from the marked center-back st. Place a marker at st 1, 7, 13, 19, 25, 31, 37, 43, 49, 55, and 61 of Rnd 13. That gives you 11 starting points, 6 sts apart.
Right-leaning lines: Start at each marker on Rnd 13. Work 1 surface sl st up each round and 1 st to the right each round until you reach Rnd 24. Each line covers 12 rounds and moves 12 sts to the right.
Left-leaning lines: Start at the same 11 markers and work the same way, moving 1 st to the left each round.
That makes 22 lines in total. Lines from neighboring markers cross every 3 rounds: first on Rnd 16 (at sts 4, 10, 16 and so on), then on Rnd 19 (back above the starting markers), then on Rnd 22. Each diamond ends up 6 sts wide and 6 rounds tall, which is about 1.5 in x 1.3 in (3.8 cm x 3.3 cm). You get 11 diamonds around and two full tiers high, the same layout shown on the pockets.
Snowflake
Front center is st 34. One full diamond is centered on Rnd 19 at st 34, so the snowflake goes there. With Color B, work each part out from that center point in surface sl st:
- Vertical spokes: Work straight up 5 rounds to Rnd 24, then straight down 5 rounds to Rnd 14.
- Diagonal spokes: Work four more spokes, each moving 3 rounds up or down and 4 sts left or right. That gives you a six-spoke star.
- Branches: On each spoke, two-thirds of the way out, add a V of 2 short lines, each 1 st long, angled outward.
The finished snowflake measures about 2.5 in (6.4 cm) across. Each spoke is about 1.25 in (3.2 cm) long. Weave all the ends in on the inside of the pocket.
Pattern: Straps (Make 2)
Use Color A. Ch 9.
Row 1: Sc in the 2nd ch from the hook and in each ch across. Turn. (8 sts)
Rows 2–27: Ch 1, sc in each st across. Turn. (8 sts)
Checkpoint: 2 in x 6 in (5.1 cm x 15.2 cm). Fasten off. You’ll edge the straps in the Border section.
Make All Pieces
| Piece | Quantity | Colors |
|---|---|---|
| Backing panel | 1 | A, with B border |
| 3 | A, with B trim, lattice, and snowflake | |
| Strap | 2 | A, with B edging |
Layout (front view, top to bottom):
 [Strap]  gap  [Strap]
+---------------------+
|   (open space)      |
|   [ Pocket 3 ]      |
|   (7 in spacing)    |
|   [ Pocket 2 ]      |
|   (7 in spacing)    |
|   [ Pocket 1 ]      |
|   1 in margin       |
+---------------------+
Joining
Finish the border (below) before you sew on the pockets. That way the pocket positions are measured from a finished edge.
Placement: Measure up from the bottom of the green panel, not counting the border. Mark where each pocket base sits:
- Pocket 1: 1 in (2.5 cm)
- Pocket 2: 8 in (20.3 cm)
- Pocket 3: 15 in (38.1 cm)
The bases are 7 in (17.8 cm) apart. The top pocket’s scallops end at about 18.6 in (47.2 cm), which leaves 3.4 in (8.6 cm) of open panel above it for the roll to stick out.
Stitch-to-stitch logic: The back of each pocket is the 16 sts centered on the marker, sts 59–66 and 1–8. Those 16 sts measure 4 in (10.2 cm) at gauge, which fits inside the 6 in (15.2 cm) green panel with 1 in (2.5 cm) to spare on each side.
- Pin the 16 back sts of Rnd 12 in a straight horizontal line at the marked base height.
- Pin the 16 back sts of Rnd 25 in a straight line 3.1 in (7.9 cm) higher.
- Whipstitch each line with Color A. Make 1 stitch through each pocket st and the panel st directly behind it, so the 16 pocket sts match 16 panel sts.
- Add a short vertical tack at the center back between the two lines so the wall lies flat against the panel.
Tension: Pull each stitch snug, but not so tight that the panel puckers. Lay the panel flat after each pocket and check that the edges are still straight.
Straps: Line each edged strap up with an outer edge of the panel, leaving about 2 in (5.1 cm) of open space between them. Sew 1 in (2.5 cm) of one end to the front of the top border. Loop the strap over the bar, then sew 1 in (2.5 cm) of the other end to the back.
Size checkpoint: After joining, the panel should still measure 7 in x 23 in (17.8 cm x 58.4 cm). The loops add about 2 in (5.1 cm) above it.
Border
Border gauge: The border uses the same sc gauge, 4 sts per inch. Along the row ends, work 8 sc for every 9 rows. That matches 4.5 rows per inch to 4 sts per inch, so the edges stay flat.
Panel Border (Color B)
Rnd 1: Join Color B in the top right corner.
- Top edge: Sc in each of the 24 sts.
- Corner: Ch 1.
- Side edge: Work 88 sc evenly into the 99 row ends, 8 sc per 9 rows (99 ÷ 9 = 11 groups, 11 x 8 = 88).
- Corner: Ch 1.
- Bottom edge: Sc in each of the 24 foundation loops.
- Corner: Ch 1.
- Second side edge: Work 88 sc the same way.
- Corner: Ch 1, then join.
Count: (48 worked 1 per st across the top and bottom) + (176 worked into row ends) = 224 sc, plus 4 ch-1 corner spaces. Per side: 24 / 88 / 24 / 88.
Rnd 2: Ch 1. Sc in each sc, and work (sc, ch 1, sc) in each corner space. Join. Count: (224 worked 1 per st) + (8 added at the corners) = 232 sc. Per side, including the 2 corner sc on each side: 26 / 90 / 26 / 90. Check: 26 + 90 + 26 + 90 = 232. Fasten off.
Why the math works: The side count of 88 sts at 4 sts per inch gives 22 in (55.9 cm), the same as 99 rows at 4.5 rows per inch. The top count of 24 sts gives 6 in (15.2 cm). Corners only grow on Rnd 2, so each side adds exactly 1 st per corner. Two border rounds add 0.5 in (1.3 cm) on each side, which brings the panel to 7 in x 23 in (17.8 cm x 58.4 cm).
Strap Edging (Color B, 1 Round)
Work 8 sc across each short end. Work 24 sc along each long side, which is 27 rows: 3 groups of 9 rows, 8 sc per group. Ch 1 at each corner. Count: (16 worked 1 per st across the ends) + (48 worked into row ends) = 64 sc, plus 4 ch-1 corner spaces. Each finished strap measures about 2.5 in x 6.5 in (6.4 cm x 16.5 cm).
Final Blocking
- Weave in all the remaining ends along stitches of the same color.
- Lay the panel face up on a towel and pin it to 7 in x 23 in (17.8 cm x 58.4 cm). Keep the pockets upright.
- Put a toilet paper roll in each pocket so the pocket holds a round shape.
- Hold a steamer or steam iron about 1 in (2.5 cm) above the fabric and steam it. Do not press. Pressing flattens the lattice and can melt acrylic.
- Pinch each scallop into a neat fan while the fabric is still warm.
- Let it dry completely, at least 2 hours, before you unpin it.
Final Quality-Control Checklist
- The panel measures 7 in x 23 in (17.8 cm x 58.4 cm) with square corners.
- Border Rnd 2 has 26 / 90 / 26 / 90 sts.
- Each pocket has 66 sts on its wall rounds and 11 even shells on top.
- Each pocket has 22 lattice lines, and they cross on Rnds 16, 19, and 22.
- Each snowflake is centered on st 34 at Rnd 19.
- The pocket bases sit at 1, 8, and 15 in (2.5, 20.3, and 38.1 cm).
- The pockets are level with each other and centered on the panel.
- The straps are sewn securely, with a gap of about 2 in (5.1 cm) between them.
- A roll slides in and out easily.
Troubleshooting
The pocket base ruffles. Your tension may be loose, or the increases are stacking. Go down one hook size, and stagger the increases on every other round.
The pocket base cups before Rnd 11. Your tension is tight. Go up one hook size.
The lattice puckers the wall. Your surface slip stitches are too short. Pull each loop up to the height of the sc under it.
The diagonal lines drift. Re-count from the center-back marker and place markers on Rnd 16 to check the crossing points.
The panel edges wave. You have too many border sts. Pull the border out and go back to 8 sc per 9 rows.
The panel edges pull in. You have too few border sts. Count each side again: it should be 88 on Rnd 1.
The pockets tilt forward. Add another tack in the center back, halfway between the two sewing lines.
Care
Hand wash in cool water, press out the water in a towel, and lay flat to dry with the pockets stuffed into shape. Do not tumble dry.

Final Notes
Each measurement leads to the next. The gauge of 16 sc and 18 rows = 4 in (10.2 cm) gives a 66-st pocket base 5 to 5.25 in (12.7 to 13.3 cm) across and a 3.1 in (7.9 cm) wall. The lattice repeat of 6 sts by 6 rounds fits 11 times around that wall. The panel’s 24 sts by 99 rows measures 6 in x 22 in (15.2 cm x 55.9 cm). The border’s 88 sts per side keeps it flat and brings it to 7 in x 23 in (17.8 cm x 58.4 cm). If you check each stage as you go, the pockets will hang level and hold their rolls neatly.
Happy crocheting!