

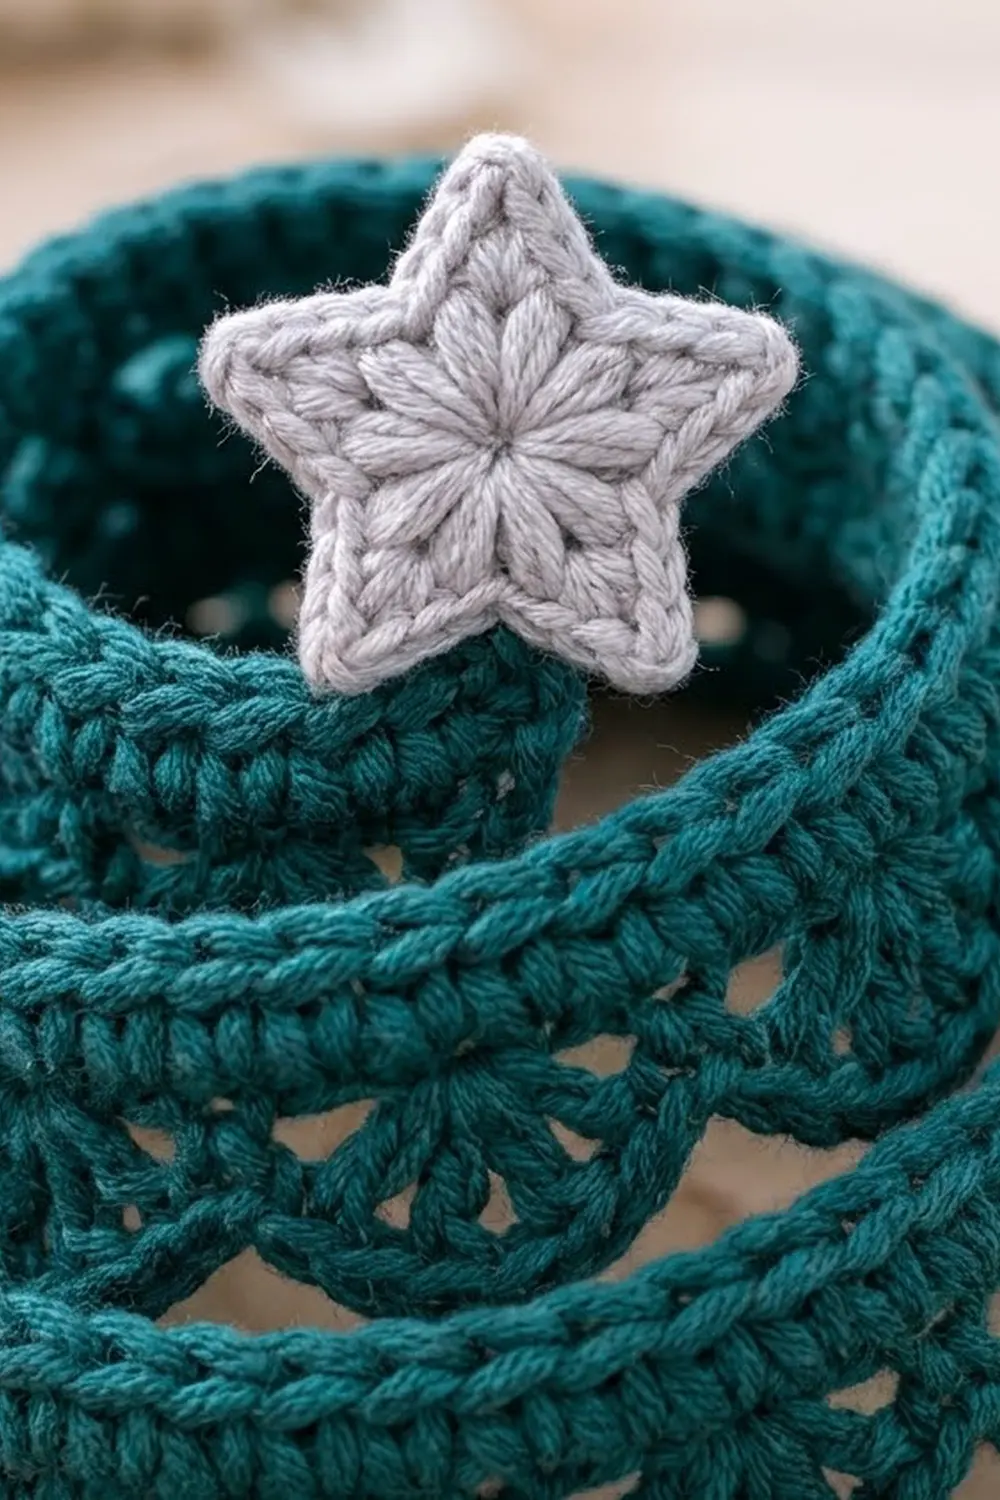
The Evergreen Swirl Tree is a small sculptural Christmas tree made from one long crocheted ribbon. You coil a deep teal strip into a cone so that each lacy fan edge rests on the band below it, which gives the tree a soft, layered silhouette. A small puffy silver-gray star finishes the tip.
The style is cozy and Scandinavian-inspired. It looks good on a mantel, a windowsill or a holiday table. The ribbed band gives the tree its body, and the open fan scallops let light show through between the coils.
This pattern uses US crochet terms. The finished tree is about 7.75 in (19.7 cm) tall and about 6 in (15.2 cm) across the base. With the star it stands about 9.5 in (24.1 cm) tall.
Construction is simple. First you crochet one straight strip: a foundation row, three ribbed rows and a two-row fan edging. Then you coil the strip into a cone and tack it in place. The star is two small layers joined around the edge and lightly stuffed, then sewn to the tip.
Finished Size and Construction
- Finished size: 7.75 in (19.7 cm) tall, 6 in (15.2 cm) base diameter; 9.5 in (24.1 cm) tall with the star
- Skill level: Easy-intermediate
- Terminology: US crochet terms
- Yarn weight: Worsted (#4)
- Hooks: 4.5 mm (US 7) for the tree; 3.5 mm (US E-4) for the star
- Number of pieces: 1 tree strip + 2 star layers (3 pieces)
- Layout: One strip coiled into 5 coils (a spiral cone), with the star on top
- Strip size: 54.25 in x 1.75 in (137.8 cm x 4.4 cm)
- Size before border: 54.25 in x 1 in (137.8 cm x 2.5 cm)
- Border (fan edging) depth: 0.75 in (1.9 cm)
- Star size: 2 in (5.1 cm) point to point
Materials
Choose a smooth, firm worsted yarn. Cotton or a cotton-acrylic blend holds its shape best and shows the fan spokes clearly. Avoid fuzzy or very soft acrylics, because the cone needs some body to stand.
- Color A, deep teal: 55 g / 100 m
- Color B, pale silver-gray: 6 g / 11 m
These quantities include a margin of about 25% for swatching and tacking.
Tools:
- 4.5 mm (US 7) and 3.5 mm (US E-4) crochet hooks
- Tapestry needle
- 4 stitch markers
- Small pinch of polyester fiberfill
- 57 in (144.8 cm) of 18-gauge plastic-coated craft wire (optional, recommended)
- Fabric stiffener (optional)
- Rustproof pins
- Scissors
Abbreviations (US Terms)
- ch: chain
- sl st: slip stitch
- sc: single crochet
- hdc: half double crochet
- dc: double crochet
- tr: treble crochet
- BLO: back loop only
- MR: magic ring
- sp: space
- st(s): stitch(es)
Foundation single crochet (fsc): Ch 2. Insert hook in the 2nd ch from the hook, yarn over and pull up a loop, yarn over and pull through 1 loop (this is the “chain”), then yarn over and pull through 2 loops (this is the “sc”). For each following fsc, insert the hook under the 2 loops of the previous “chain” and repeat. Fsc lets you set the strip length without counting a long chain.
Fan: (Dc, ch 1) 6 times in the same st, then dc once more in that st. That makes 7 dc and 6 ch-1 sps.
Gauge and Checkpoints
Gauge: 16 sts and 16 rows of sc BLO = 4 in (10.2 cm) with the 4.5 mm hook.
Test one piece first. Before starting the long strip, make a test section:
- Work 25 fsc (4 x 6 + 1).
- Work Rows 2–6 below on those 25 sts.
Checkpoints:
- After the band rows: The section should measure 6.25 in x 1 in (15.9 cm x 2.5 cm).
- After the fan edging: There should be 4 fans, each 1.5 in (3.8 cm) wide, and the full width should be 1.75 in (4.4 cm).
If your section is too big (fans wider than 1.5 in / 3.8 cm), go down half a hook size. If it is too small, go up half a size. The fan depth matters less than the length, because the length decides the diameter of each coil.
The Tree Strip
Use Color A and the 4.5 mm hook.
Row 1: Work 217 fsc. Turn. (217 sts)
Place a marker every 50 sts to make counting easier. The count must be a multiple of 6 plus 1.
Row 2: Ch 1 (does not count as a st), sc BLO in each st across. Turn. (217 sts)
Row 3: Ch 1, sc BLO in each st across. Turn. (217 sts)
Row 4: Ch 1, sc BLO in each st across. Turn. (217 sts)
Checkpoint: The band should measure 54.25 in x 1 in (137.8 cm x 2.5 cm). Working through the back loops leaves raised ridges that give the band its rope-like texture. Do not fasten off; the fan edging continues from here.
Border: Fan Scallop Edging
The fan edging is worked along the long edge you just finished. When the tree is coiled, this edge becomes the lower edge of each coil.
Border gauge: Each fan pattern repeat uses 6 sts of Row 4 and measures 1.5 in (3.8 cm) wide by 0.75 in (1.9 cm) deep.
Row 5 (fans):
- Ch 1. Sc in the first st.
- Skip 2 sts, work a Fan in the next st, skip 2 sts, sc in the next st. Repeat from * to the end.
You should have 36 fans and 37 sc. That is 289 sts in total (37 sc + 252 dc), plus 216 ch-1 sps. Turn.
Row 6 (rim):
- Ch 1. Sl st in the first sc.
- Around the next fan, sc in each dc and each ch-1 sp, then sl st in the next sc. Repeat from * to the end.
Each fan gets 13 sc (7 dc + 6 sps). The row totals 468 sc (36 x 13) plus 37 sl st. Fasten off, leaving a 24 in (61 cm) tail for tacking.
Why the math works:
- The sc sit on stitches 1, 7, 13 and so on up to 217 (every 6th stitch + 1), and the fans sit on stitches 4, 10, 16 and so on, centered between them.
- So 217 = 6 x 36 + 1 gives exactly 36 full repeats, with an sc at both ends.
- Each repeat is 6 sts, and at 4 sts per inch that is 1.5 in (3.8 cm). That means 36 fans x 1.5 in = 54 in of fans, plus the half-stitch at each end, matches the 54.25 in (137.8 cm) band.
- The rim’s 13 sc per fan let each scallop curve into a firm half-circle without ruffling.
Optional wire: Weave the craft wire along Row 3, in and out every 2 sts. Bend 0.5 in (1.3 cm) back at each end so the wire cannot poke through. The wire is hidden inside the ridges and lets you bend each coil into a smooth circle.
The Star (Make 2 Layers)
Use Color B and the 3.5 mm hook.
Rnd 1: In a MR, ch 1, work 10 sc. Join with a sl st to the first sc. (10 sts)
Rnd 2: Ch 1, 2 sc in each st around. Join. (20 sts)
Rnd 3 (points):
- Sc in the next st.
- (Hdc, dc) in the next st.
- (Tr, ch 2, tr) in the next st.
- (Dc, hdc) in the next st.
- Repeat steps 1–4 around, then join.
This makes 5 points. Each point has 7 sts, for a total of 35 sts plus 5 ch-2 sps. Fasten off the first layer. On the second layer, do not fasten off.
Petal embroidery (front layer only): Use a 12 in (30.5 cm) strand of Color B to embroider 5 lazy-daisy petals. Start each petal at the ring and reach it toward a point. This makes the raised flower center.
Make All Pieces
| Piece | Color | Quantity |
|---|---|---|
| Tree strip | A (teal) | 1 |
| Star layer | B (silver-gray) | 2 |
Layout (vertical stack, top to bottom):
        [ STAR ]
      coil 5 (2 fans)
     coil 4 (5 fans)
    coil 3 (7 fans)
   coil 2 (10 fans)
  coil 1 (12 fans)  <- base
The fan counts add up to the full strip: 12 + 10 + 7 + 5 + 2 = 36 fans.
Joining and Assembly
Joining the star layers:
- Hold the two layers wrong sides together, with the embroidered layer facing you. Use the live loop of the second layer.
- Rnd 4: Ch 1. Working through both layers, sc in each st and work (sc, ch 1, sc) in each ch-2 point sp. Stuff lightly before you close the last point. Join.
The round totals 45 sc (35 + 10) plus 5 ch-1 sps. The star should measure 2 in (5.1 cm) point to point.
Coiling the tree:
Make the tree stitch to stitch, counting fans, not by eye. Start at the beginning end of the strip with the fans hanging down.
- Coil 1: Bend the first 12 fans into a ring. Overlap the starting end 0.5 in (1.3 cm) under the strip and stitch it down. The ring should measure about 5.75 in (14.6 cm) across inside the band and 6 in (15.2 cm) outside.
- Coil 2: Lift the strip and spiral it inward over the next 10 fans. The tip of each scallop should rest about 0.25 in (0.6 cm) down the outside of the band below. Sew the center dc of each fan to a ridge of the band below with the yarn tail.
- Coil 3: Spiral over 7 fans. This coil is about 3.25 in (8.3 cm) across.
- Coil 4: Spiral over 5 fans. This coil is about 2.5 in (6.4 cm) across.
- Coil 5: Spiral over the last 2 fans and tuck the end into the center. This tip is about 1 in (2.5 cm) across.
Tension advice: Use small, snug tacking stitches through the ridge only, not through the whole band, so the stitches stay hidden. Don’t pull hard, or the scallops will flatten.
Size checkpoint: The coiled tree should stand 7.75 in (19.7 cm) tall: 1.75 in (4.4 cm) for the base coil plus 4 coils x 1.5 in (3.8 cm) each. If it is too tall, overlap the scallops a little more. If it is too short, overlap them less.
Attaching the star: Sew the two lower legs of the star to the inside of coil 5, so the star stands upright and sits about 0.25 in (0.6 cm) into the tip. That gives the total height of 9.5 in (24.1 cm).
Final Blocking
- Mist the tree lightly with water, or brush it with diluted fabric stiffener for a firmer cone.
- Stand it over a paper cone or a rolled towel shaped to match the coil diameters.
- Pin the scallops so each one sits as a round half-circle and the spokes are evenly spaced.
- Reshape each coil into a true circle. If you used wire, bend it gently.
- Press the star flat between your palms and pinch each point sharp.
- Let the tree dry completely, usually 12–24 hours, before removing the support.
Final Quality-Control Checklist
- 217 sts in each band row
- 36 fans, each with 7 dc and 6 open spaces
- 13 sc on the rim of every fan
- Coil fan counts of 12, 10, 7, 5 and 2
- Base 6 in (15.2 cm) across; tree 7.75 in (19.7 cm) tall
- Star 2 in (5.1 cm) across, with even points
- No tacking stitches or wire showing on the outside
- Tree stands level without leaning
Troubleshooting
- Fans ruffle: Your rim is too tight or has extra sc. Recount to 13 sc per fan.
- Fans cup inward: Your dc are too tight. Use a hook half a size larger for Row 5 only.
- Tree leans: One coil is off-center. Re-tack that coil so its center lines up over the base.
- Coils slide down: Add a second tacking stitch at every other fan, or add wire.
- Strip is too short to finish coil 5: Make coil 1 with 11 fans and coil 2 with 9 fans, which leaves room for the tip.
- Star is floppy: Add a little more stuffing, or stiffen the star separately.
Care
Dust the tree gently or spot clean it with a damp cloth. Do not machine wash it, especially if it contains wire or stiffener, and store it upright in a box so the coils keep their shape.

Final Notes
Every measurement in this pattern links to the next:
- A gauge of 16 sts = 4 in (10.2 cm) gives 217 sts = 54.25 in (137.8 cm).
- That length divides into 36 fans of 1.5 in (3.8 cm) each.
- The fans split into coils of 12, 10, 7, 5 and 2.
- The coils produce a 6 in (15.2 cm) base and a 7.75 in (19.7 cm) cone.
- The 2 in (5.1 cm) star brings the total height to 9.5 in (24.1 cm).
If your gauge matches, every coil will come out right. Happy crocheting!