

This curtain turns a plain window into a winter forest. Each panel is a lace grid of small tiered Christmas trees, stacked in columns and tied together with fine chain strands so daylight comes through every gap.
The whole piece uses one color, a deep spruce teal, which keeps the look calm and modern rather than busy. Each tree has a little tip loop, three ridged tiers with stepped ledges, a row of tiny eyelets between the tiers, and a small square trunk.
This pattern uses US crochet terms. One finished panel measures 42 in (106.7 cm) wide by about 95.1 in (241.6 cm) long, not counting the hanging tabs. The photo shows a matching pair, so you make two panels.
The construction is simple to repeat. Each column of 8 trees is worked in one continuous strand from top to bottom. Six columns are then tied together sideways with short chains. A single crochet band with hanging tabs is worked across the top last.
Finished Size and Construction
- Finished size (one panel): 42 in (106.7 cm) wide x 95.1 in (241.6 cm) long, excluding the tabs
- Pair shown: 2 panels, 84 in (213.4 cm) total width
- Skill level: Intermediate
- Terminology: US
- Yarn weight: Worsted (#4)
- Hook: 5.0 mm (H-8)
- Number of pieces: 48 tree motifs per panel (96 for the pair)
- Layout: 6 columns x 8 rows per panel
- Piece size: each tree is 6 in (15.2 cm) wide x 10 in (25.4 cm) tall
- Size before border: 41 in (104.1 cm) wide x 94 in (238.8 cm) long
- Border depth: top band about 1.1 in (2.8 cm), plus 5 in (12.7 cm) tab loops
Materials
Pick a smooth worsted yarn with good stitch definition, so the ridges and eyelets show clearly. Cotton or a cotton blend hangs heavier and straighter. Acrylic is lighter and easier to wash.
- Deep teal (one panel): 420 g, about 770 m (842 yd)
- Deep teal (pair): 840 g, about 1,540 m (1,684 yd)
These amounts include roughly a 15% margin for your gauge swatch, joining ties, and weaving in ends. Buy all the yarn from one dye lot.
Tools:
– 5.0 mm (H-8) crochet hook
– Tapestry needle
– Stitch markers
– Scissors
– Tape measure
– Blocking mats or a large clean floor area, plus rust-proof pins
– Spray bottle
– Curtain rod, up to 1.25 in (3.2 cm) in diameter
Abbreviations (US Terms)
- ch – chain
- sl st – slip stitch
- sc – single crochet
- hdc – half double crochet
- dc – double crochet
- BLO – back loop only
- sk – skip
- sp – space
- st(s) – stitch(es)
- fsc – foundation single crochet
Special stitch – fsc: Ch 2, insert your hook in the 2nd ch from the hook, yarn over and pull up a loop, yarn over and draw through 1 loop (this is the “chain”), then yarn over and draw through 2 loops (this is the “sc”). For each next fsc, insert your hook into the “chain” of the stitch you just made and repeat.
Pattern note: Work every dc row and the hdc row in BLO. This makes the raised horizontal ridge lines between rows. A ch-3 at the start of a row counts as 1 dc. On the next row, work into the top ch of that ch-3.
Gauge and Checkpoints
- Dc in BLO: 14 sts x 8 rows = 4 in (10.2 cm)
- Sc: 16 sts x 18 rows = 4 in (10.2 cm)
- Chain: 4 ch = 1 in (2.5 cm)
Make one full tree before you start a column. Lay it flat without stretching it and check these measurements:
- After Row 5: 2.6 in (6.6 cm) wide at the bottom of tier 1, and 2.75 in (7.0 cm) tall
- After Row 11: 4.3 in (10.9 cm) wide at the bottom of tier 2, and 5.5 in (14.0 cm) tall
- After Row 17: 6 in (15.2 cm) wide, and 8.5 in (21.6 cm) tall
- After Row 24: about 10 in (25.4 cm) tall in total
If your tree is wider than 6 in (15.2 cm), go down half a hook size. If it is narrower, go up half a size. A difference of only 0.25 in (0.6 cm) per tree grows to 1.5 in (3.8 cm) across a 6-column panel, so it is worth getting this right.
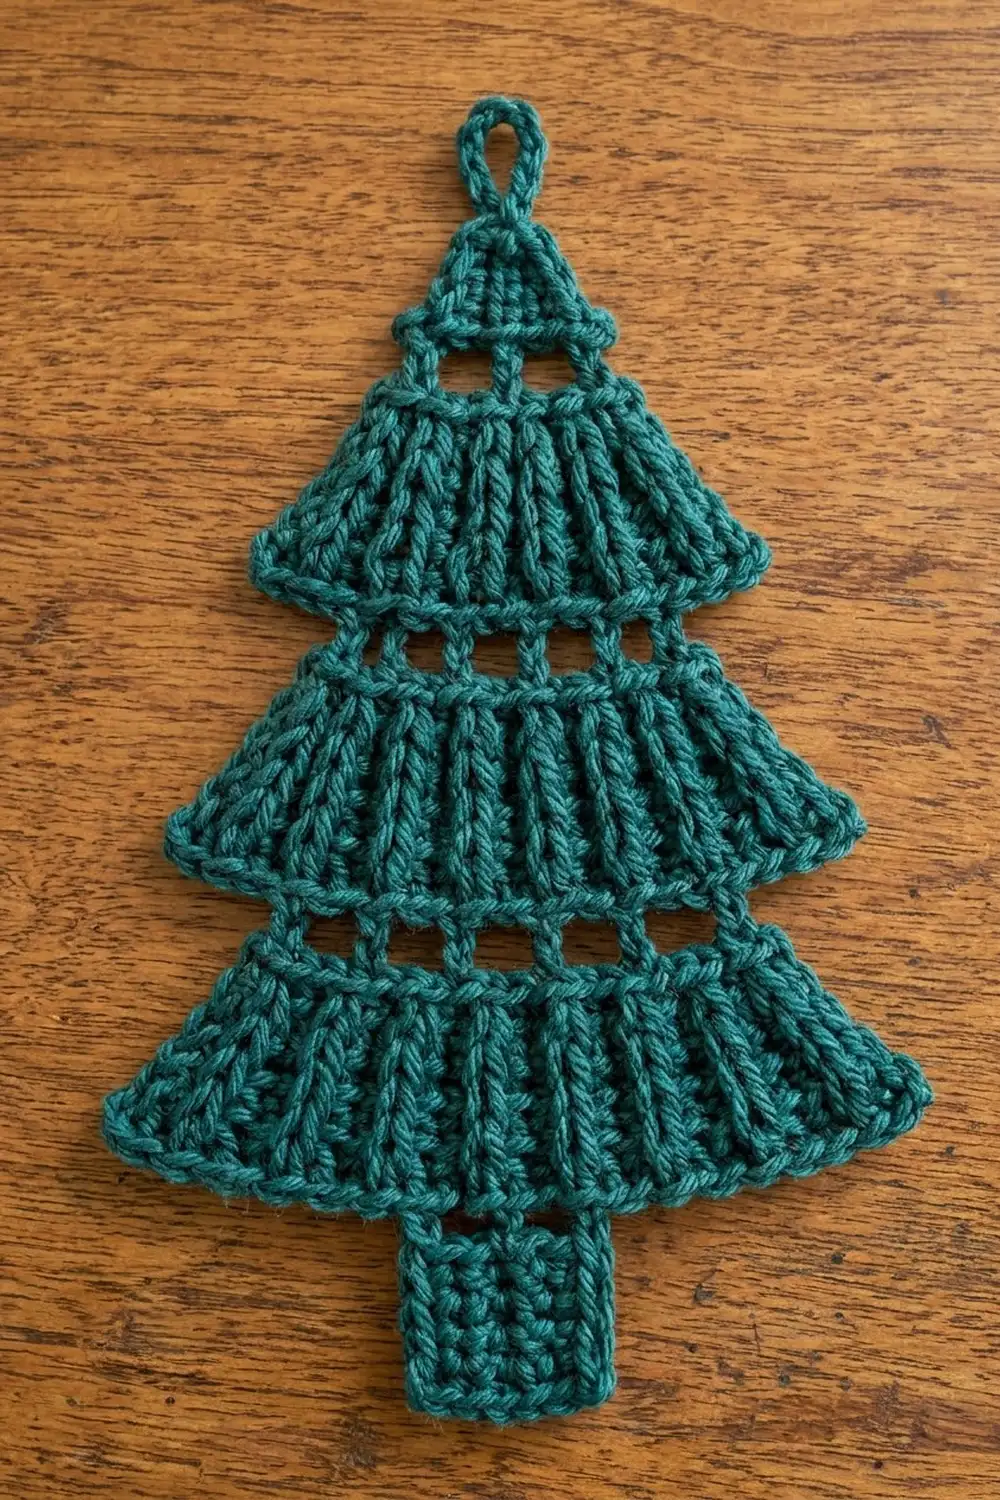
Tree Motif
Each tree is worked flat from the tip down, turning at the end of every row.
Tip Loop
Ch 6 and sl st in the first ch to form a ring. The top half of this ring stays open and becomes the hanging loop.
Tier 1
Row 1: Ch 3 (counts as dc), work 2 dc in the ring, turn. (3 dc)
Row 2: Ch 3, dc in the first st, dc in the next st, work 2 dc in the top of the turning ch, turn. (5 dc)
Row 3: Ch 3, dc in the first st, dc in each st to the last st, work 2 dc in the last st, turn. (7 dc)
Row 4: Repeat Row 3. (9 dc)
Row 5 (eyelet divider): Ch 1, sc in the first st, then ch 1, sk the next st, sc in the next st; repeat from * 3 more times, turn. (5 sc + 4 ch-1 sps = 9 sts)
Tier 2
Row 6: Sl st in the first 2 sts (the sc and the ch-1 sp). Ch 3 (counts as dc), dc in the next 6 sts, and leave the last st unworked. Turn. (7 dc)
Skipping 1 st at each side makes the stepped ledge. The bottom of tier 1 sticks out about 0.3 in (0.8 cm) past the top of tier 2.
Row 7: Repeat Row 3. (9 dc)
Row 8: Repeat Row 3. (11 dc)
Row 9: Repeat Row 3. (13 dc)
Row 10: Repeat Row 3. (15 dc)
Row 11 (eyelet divider): Ch 1, sc in the first st, then ch 1, sk the next st, sc in the next st; repeat from * 6 more times, turn. (8 sc + 7 ch-1 sps = 15 sts)
Tier 3
Row 12: Sl st in the first 3 sts. Ch 3 (counts as dc), dc in the next 10 sts, and leave the last 2 sts unworked. Turn. (11 dc)
Tier 3 starts at 3.1 in (7.9 cm) wide, so the ledge on each side is about 0.6 in (1.5 cm).
Row 13: Repeat Row 3. (13 dc)
Row 14: Repeat Row 3. (15 dc)
Row 15: Repeat Row 3. (17 dc)
Row 16: Repeat Row 3. (19 dc)
Row 17: Repeat Row 3. (21 dc)
Row 18 (hem): Ch 2 (does not count as a st), hdc in BLO in each st across, turn. (21 hdc)
Trunk
Row 19: Sl st loosely in the first 8 sts. Ch 1, sc in the next 5 sts, and leave the last 8 sts unworked. Turn. (5 sc)
You now have 8 unworked sts, then 5 trunk sts, then 8 unworked sts, for 21 in total. The trunk sits exactly in the center.
Rows 20–24: Ch 1, sc in each st across, turn. (5 sc)
The trunk measures 1.25 in (3.2 cm) wide x 1.3 in (3.3 cm) tall.
Make All Pieces
Work each column in one continuous strand, so that 8 trees are linked from top to bottom.
Column strip:
- Work Tree 1, Rows 1–24.
- Make the link: ch 1, then sl st in the next 2 sts so your hook sits at the center (3rd) trunk st.
- Ch 14, then sl st in the 6th ch from the hook to form the next tip ring. This leaves an 8-ch link between the trees, about 2 in (5.1 cm) long.
- Work Rows 1–24 of the next tree into the new ring. Work the Row 1 dc on the side of the ring opposite the link chain.
- Repeat steps 2–4 until you have 8 trees. After the 8th trunk, fasten off.
Before you go on, check the length. One column measures 8 x 10 in + 7 x 2 in = 94 in (238.8 cm).
Quantities:
– Deep teal: 6 column strips of 8 trees, which is 48 trees per panel
– For the pair: 12 strips, which is 96 trees
Layout (one panel):
TOP BAND  [==== 168 sts, 12 tabs ====]
Row 1:   T - T - T - T - T - T
         |   |   |   |   |   |
Row 2:   T - T - T - T - T - T
         |   |   |   |   |   |
 ...     (repeat to Row 8)
Row 8:   T - T - T - T - T - T

T = tree    | = 8-ch link    - = side ties
Joining
Each pair of side-by-side trees is joined with two short chain ties.
Method: Lay the 6 strips flat and side by side, with their right sides up and the trees lined up row by row. Keep 7 in (17.8 cm) between the centers of neighboring columns.
Hem tie (at Row 18): Join the yarn with a sl st at the right corner of the Row 18 hem on the left-hand tree. Ch 4, then sl st into the left corner of the Row 18 hem on the right-hand tree. Fasten off. This fills the 1 in (2.5 cm) gap between trees that are 6 in (15.2 cm) wide.
Divider tie (at Row 11): Join the yarn at the right end of Row 11 on the left-hand tree. Ch 11, then sl st into the left end of Row 11 on the right-hand tree. Fasten off.
The tier 2 bottoms are 4.3 in (10.9 cm) wide, which leaves a gap of about 2.7 in (6.9 cm). Eleven chains measure 2.75 in (7.0 cm), so the tie fits that gap.
Stitch logic: Each tie connects corner to corner only. Do not work into the side edges of the dc rows, because that would pull the tiers out of shape.
Total ties per panel: 5 gaps x 8 rows x 2 ties = 80 ties. Leave 6 in (15.2 cm) tails and weave them into the hem or eyelet row.
Tension: Chain at the same tension you used for your gauge. A tie that is too tight makes the trees overlap. A tie that is too loose lets the lace sag between the columns.
Size checkpoint: The tied panel should measure 41 in (104.1 cm) wide (6 x 6 in plus 5 x 1 in) and 94 in (238.8 cm) long.
Border (Top Hanging Band)
Only the top edge gets a border. The sides and bottom are left open so the tree outlines stay visible.
Border gauge: 16 sc = 4 in (10.2 cm), which is 4 sts per inch.
Row 1: Work 168 fsc. After the 14th fsc of each 28-st section, sl st into the tip loop of the top tree in that column, then keep going. You will make 6 joins, at sts 14, 42, 70, 98, 126, and 154. The sl sts are not counted, and the row ends 14 sts after the last join. Turn. (168 sc)
Row 2: Ch 1, sc in each st across, turn. (168 sc)
Row 3: Repeat Row 2. (168 sc)
Row 4 (tab row): Ch 1, then sc in the next 7 sts, ch 20, sc in the next 7 sts; repeat from * 11 more times, turn. (168 sc + 12 ch-20 loops)
Row 5 (tab trim): Ch 1, then sc in the next 7 sc, work 22 sc in the ch-20 loop, sc in the next 7 sc; repeat from * 11 more times. Fasten off. (168 sc worked 1 per existing st + 264 sc added in the loops = 432 sc)
Why the math works:
- Band width: Each column takes up 7 in (17.8 cm) of the band, and 7 x 4 = 28 sts. So 6 columns x 28 sts = 168 sts = 42 in (106.7 cm).
- Tip loops: Each tip sits at the center of its section, with 14 sts on each side.
- Overhang: The band is 1 in (2.5 cm) wider than the tied trees, so it sticks out 0.5 in (1.3 cm) past each outer edge.
- Tabs: 12 tab repeats x 14 sts = 168, so the tabs come out exactly even. Each tab is 3.5 in (8.9 cm) from the next, and the outer tabs are 7 sts in from each edge.
- Tab loops: The 22 sc in each loop keep the 5 in (12.7 cm) loop from cupping and slide easily over a rod up to 1.25 in (3.2 cm) across.
Final Blocking
- Lay the panel flat on mats or a clean floor, right side up. Work one section at a time if you need to.
- Pin the top band straight to 42 in (106.7 cm).
- Pin the center of each column so the trunks and links run in a straight vertical line.
- Pin the tier corners of each tree so it measures 6 in (15.2 cm) at Row 17, with the ledges sitting flat.
- Check that every tie is straight and level with its neighbors.
- Mist the panel until it is damp, not soaked.
- Leave it to dry completely before unpinning. Cotton may take up to 24 hours.
Final Quality-Control Checklist
- Every tree has 21 sts at Row 17 and a centered 5-st trunk.
- The ledges are symmetrical, with 1 st skipped per side at tier 2 and 2 sts per side at tier 3.
- Each column has 8 trees and 7 links of 8 ch.
- There are 80 ties, each worked corner to corner.
- The top band has 168 sts, 6 tip joins, and 12 tabs.
- The panel measures 42 in (106.7 cm) x 95.1 in (241.6 cm).
- All tails are woven in and not visible from the front.
- For the pair, check that both panels match within 0.5 in (1.3 cm).
Troubleshooting
- Tiers curl or cup: Your BLO rows are too tight. Go up half a hook size, or loosen your dc.
- Hem ruffles: You may have worked hdc into the turning ch twice. Count again to 21.
- Trunk is off-center: Re-count the 8 sl sts on Row 19.
- Trees twist within a column: Make sure Row 1 is worked on the side of the ring opposite the link.
- Panel is too long: Shorten each link to ch 6. That removes 0.5 in (1.3 cm) per link, or 3.5 in (8.9 cm) per panel.
- Ties sag: Redo those ties with 1 fewer chain.
Care
Hand wash in cool water, press out the water gently, and lay flat to dry. Acrylic versions can go through a gentle machine cycle inside a mesh laundry bag.

Final Notes
Everything in this pattern follows from one measurement chain. A tree 6 in (15.2 cm) wide plus a 1 in (2.5 cm) tie gives a 7 in (17.8 cm) column spacing. Six columns give 42 in (106.7 cm), which is 168 band sts. Eight trees at 10 in (25.4 cm) plus seven links at 2 in (5.1 cm) give 94 in (238.8 cm). Adding the 1.1 in (2.8 cm) band brings the panel to 95.1 in (241.6 cm). If your first tree matches the gauge, everything after it will fit.
Happy crocheting!