

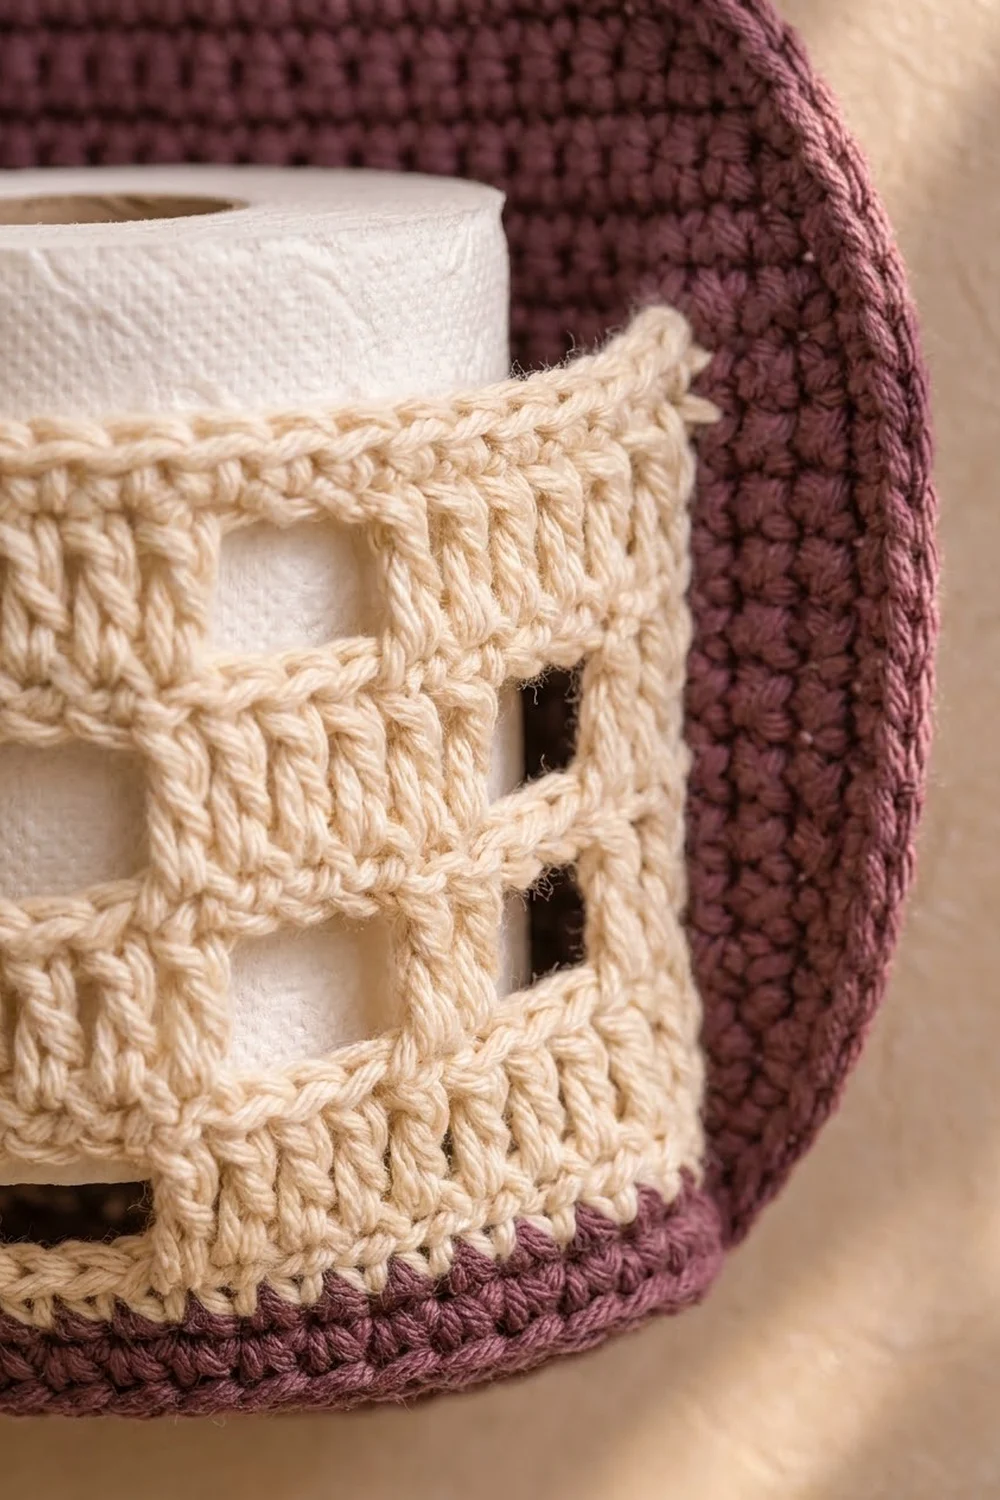
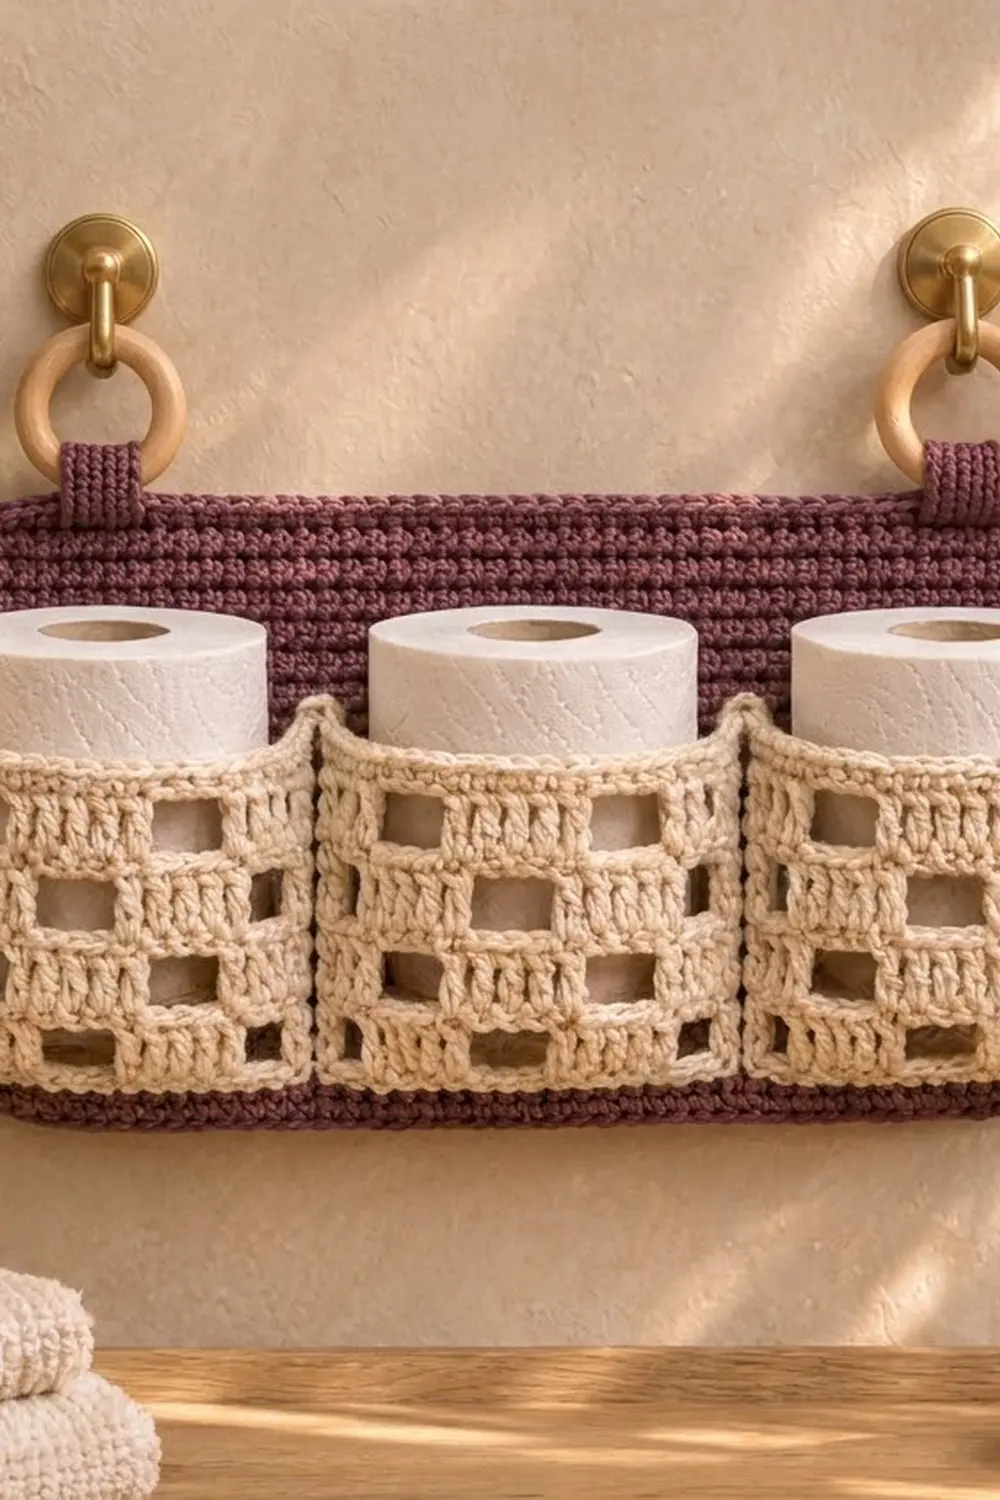
This wall organizer holds three spare toilet rolls and keeps them in plain sight. A plum single crochet backing with rounded ends sits behind a cream filet-mesh pocket strip. Staggered square windows give the pockets a light lattice look, and two plum tabs hang the piece from wooden rings.
The colors are a deep plum and a warm cream. The style is clean and slightly vintage, with a crisp outline. All instructions use US crochet terms.
The finished holder measures 18 in (45.7 cm) wide by 9 in (22.9 cm) tall. Each pocket opening sits over 5.5 in (14.0 cm) of the backing.
You will work the backing in shaped rows, then add a three-round border. Next you work one long filet strip, gather-sew it onto the backing and stitch two divider lines to make three pockets. The tabs go on last.
Finished Size and Construction
- Finished size: 18 in (45.7 cm) wide x 9 in (22.9 cm) tall
- Skill level: Advanced beginner
- Terminology: US
- Yarn weight: Worsted (#4), cotton or cotton blend
- Hook: 5.0 mm (H-8)
- Number of pieces: 4 crocheted pieces (1 backing, 1 pocket strip, 2 tabs) plus 2 wooden rings
- Layout: 3 pockets side by side, all formed from one strip
- Backing size before border: 17 in (43.2 cm) x 8 in (20.3 cm)
- Pocket strip size: 25 in (63.5 cm) x about 3.5 in (8.9 cm)
- Border depth: about 0.5 in (1.3 cm)
Materials
Yarn: Use a smooth worsted-weight cotton. It holds its shape under the weight of the rolls and copes with bathroom humidity. Acrylic also works, but it will stretch more.
- Plum: 130 g (about 220 m) for the backing, border, tabs and the pocket base row
- Cream: 60 g (about 100 m) for the pocket strip
These quantities include a safety margin of roughly 15–20%.
Tools:
– 5.0 mm (H-8) crochet hook
– Tapestry needle
– 6–8 locking stitch markers
– Two 2 in (5.1 cm) unfinished wooden rings
– Rust-proof pins and a blocking mat
– Measuring tape
– Scissors
Abbreviations (US Terms)
- ch – chain
- sc – single crochet
- dc – double crochet
- sl st – slip stitch
- sc2tog – single crochet 2 together
- sp – space
- st(s) – stitch(es)
Filet terms used here:
– Block (over stitches): dc in each of the next 3 sts.
– Block (over a space): 2 dc in the ch-2 sp, then dc in the next dc.
– Space: ch 2, skip 2 sts (or skip the ch-2 sp), dc in the next dc.
Each square, whether block or space, uses 3 stitches. A row of 33 squares plus the turning chain (ch 3 counts as the first dc) is 100 sts.
Gauge and Checkpoints
- Sc gauge: 16 sc and 18 rows = 4 in (10.2 cm)
- Dc gauge: 16 dc and 8 rows = 4 in (10.2 cm)
Make a tab first, because it works as a gauge swatch. It should measure 1.5 in (3.8 cm) wide and 4 in (10.2 cm) long after 18 rows. If it is wider or longer, go down half a hook size. If it is narrower or shorter, go up half a size.
Checkpoints:
– Backing Row 6: 17 in (43.2 cm) wide
– Backing Row 18: 4 in (10.2 cm) tall
– Backing Row 36: 8 in (20.3 cm) tall
– Pocket strip Row 1: 25 in (63.5 cm) long
– Pocket strip finished: about 3.5 in (8.9 cm) tall
If the backing is too wide by more than 0.25 in (0.6 cm), the pocket mapping will drift. Frog it and change hooks rather than blocking it into shape.
Backing Panel
With plum, ch 57.
Row 1: Sc in 2nd ch from hook and in each ch across, turn. (56 sc)
Row 2: Ch 1, 2 sc in each of first 2 sts, sc in next 52 sts, 2 sc in each of last 2 sts, turn. (60 sc)
Row 3: Ch 1, 2 sc in first st, sc in next 58 sts, 2 sc in last st, turn. (62 sc)
Row 4: Ch 1, 2 sc in first st, sc in next 60 sts, 2 sc in last st, turn. (64 sc)
Row 5: Ch 1, 2 sc in first st, sc in next 62 sts, 2 sc in last st, turn. (66 sc)
Row 6: Ch 1, 2 sc in first st, sc in next 64 sts, 2 sc in last st, turn. (68 sc)
Checkpoint: the backing should now measure 17 in (43.2 cm) across.
Rows 7–31: Ch 1, sc in each st across, turn. (68 sc each row; 25 rows)
Row 32: Ch 1, sc2tog, sc in next 64 sts, sc2tog, turn. (66 sc)
Row 33: Ch 1, sc2tog, sc in next 62 sts, sc2tog, turn. (64 sc)
Row 34: Ch 1, sc2tog, sc in next 60 sts, sc2tog, turn. (62 sc)
Row 35: Ch 1, sc2tog, sc in next 58 sts, sc2tog, turn. (60 sc)
Row 36: Ch 1, sc2tog twice, sc in next 52 sts, sc2tog twice. (56 sc)
Do not fasten off. Continue with the border (see Border below), then come back to attach the pocket.
The shaping mirrors itself. Rows 1–6 and 32–36 each step 3 sts per side (6 sts total) over the curve, which makes the rounded short ends.
Pocket Strip
With plum, ch 101.
Base row: Sc in 2nd ch from hook and in each ch across. (100 sc) Fasten off plum.
Join cream in the first st, ready to work across.
Row 1 (solid): Ch 3 (counts as dc), dc in each st across, turn. (100 dc = 33 blocks)
Row 2 (Pattern A): Ch 3. Then work this 11-square sequence 3 times: block, block, space, block, block, space, block, block, space, block, block. Turn. (82 dc + 9 ch-2 sps = 100 sts)
Row 3 (Pattern B): Ch 3. Then work this 11-square sequence 3 times: block, space, block, block, space, block, space, block, block, space, block. Turn. (76 dc + 12 ch-2 sps = 100 sts)
The A windows fall at squares 3, 6 and 9 of each pocket section. The B windows fall at squares 2, 5, 7 and 10. They never overlap, so the windows stagger in a lattice.
Row 4: Repeat Row 2. (82 dc + 9 ch-2 sps)
Row 5: Repeat Row 3. (76 dc + 12 ch-2 sps)
Row 6 (solid): Ch 3, work a block in every square. (100 dc)
Row 7: Ch 1, sc in each st across. (100 sc) Fasten off and leave a long tail.
Checkpoint: 25 in (63.5 cm) long, about 3.5 in (8.9 cm) tall.
Sts 34 and 67 are full-height dc columns: squares 11/12 and 22/23 are blocks in every row. These two columns are your divider lines.
Hanging Tabs (Make 2)
With plum, ch 7.
Row 1: Sc in 2nd ch from hook and in each ch across, turn. (6 sc)
Rows 2–18: Ch 1, sc in each st, turn. (6 sc)
Fasten off and leave a 12 in (30.5 cm) tail. Each tab measures 1.5 in (3.8 cm) x 4 in (10.2 cm).
Make All Pieces
- Plum: 1 backing, 2 tabs, plus the base row of the pocket strip
- Cream: Rows 1–7 of the pocket strip
- Wooden rings: 2
Pocket layout (front view):
 ____________________________________________
(  [ tab ]                        [ tab ]    )
(                                            )
(  | Pocket 1  | Pocket 2  | Pocket 3  |     )
(  | 11 squares| 11 squares| 11 squares|     )
(  |___________|___________|___________|     )
(____________________________________________)
Joining
Method: Whipstitch with plum yarn and a tapestry needle, through the backing’s front loops only, so nothing shows on the back.
Placement: Put the strip’s plum base row along backing Row 6. The pocket covers backing sts 2–67 and leaves 1 st free at each side.
Stitch-to-stitch logic (bottom edge): Each pocket section has 33 strip sts gathered onto 22 backing sts. That is 3 strip sts to every 2 backing sts, repeated 11 times.
- Pocket 1: strip sts 1–33 onto backing sts 2–23
- Pocket 2: strip sts 34–66 onto backing sts 24–45
- Pocket 3: strip sts 67–99 onto backing sts 46–67; sew strip st 100 into backing st 67 along with st 99
This gives 8.25 in (21.0 cm) of strip over 5.5 in (14.0 cm) of backing per pocket. The extra 2.75 in (7.0 cm) of ease lets each pocket bow out around a roll.
Sides: Sew the strip’s left row ends up backing column 2, and its right row ends up column 67, from Row 6 to Row 21. That is 16 rows, about 3.5 in (8.9 cm).
Dividers: Pin strip column 34 over backing column 24 and strip column 67 over backing column 46. Whipstitch each column straight up from Row 6 to Row 21.
Tension: Pull each stitch snug but not tight. The backing should stay flat with no puckers.
Checkpoint: Lay the piece flat. Each pocket opening should measure 5.5 in (14.0 cm) across where it is sewn down.
Border
The border is worked in plum straight from Row 36 of the backing. Ideally, work it before sewing on the pocket.
Border gauge: 4 sc = 1 in (2.5 cm), the same as the body.
Round 1: Ch 1. Work as follows:
– Top edge: sc in each of the 56 sts of Row 36.
– First short end: sc in each row end down to Row 1, working 2 sc in the row ends of Rows 36, 35, 2 and 1. That gives 36 row ends + 4 extra sts = 40 sc.
– Bottom edge: sc in each of the 56 foundation-chain loops.
– Second short end: repeat the first short end. (40 sc)
Join with sl st to the first sc. (56 + 40 + 56 + 40 = 192 sc)
Round 2: Ch 1. Sc in each st along the top (56 sc). On each short end, work 2 sc in the 2nd st and in the 39th st and 1 sc in each remaining st (42 sc). Sc in each st along the bottom (56 sc). Join. (56 + 42 + 56 + 42 = 196 sc)
Round 3: Sl st loosely in each st around. (196 sl st) Fasten off and weave in.
Why the math works: The top and bottom edges are worked 1 sc per stitch, so 56 sts stay 14 in (35.6 cm). That matches the straight part of Rows 1 and 36 exactly, so the long edges cannot ruffle or pull.
Each short end runs along two curves plus a straight stretch, about 10.3 in (26.2 cm) in total. At gauge that would be 41 sts, so 40 sts eases the curve in slightly and keeps it flat.
Round 2 sits about 0.22 in (0.6 cm) farther out, which makes the outer curve about 1.4 in (3.6 cm) longer around the whole piece. The 4 increases add 1 in (2.5 cm), which keeps the edge firm. Round 3 adds a crisp, raised outline.
Attaching the tabs: Thread each tab through a wooden ring and fold it in half so the ends meet. On the back of the backing, center the tabs over sts 6–11 and 46–51 of Row 36. Each tab should overlap the back by 1 in (2.5 cm). Sew both layers down along all three sides.
Final Blocking
- Fill a spray bottle with cool water.
- Lay the holder face up on a blocking mat.
- Pin the backing to 18 in (45.7 cm) x 9 in (22.9 cm), easing the rounded ends into smooth curves.
- Mist evenly until damp, not soaked.
- Slide a rolled hand towel into each pocket so the fronts dry with a gentle curve.
- Square the filet windows with your fingertips.
- Let it dry completely, usually 12–24 hours.
- Unpin and remove the towels.
Final Quality-Control Checklist
- Finished size: 18 in (45.7 cm) x 9 in (22.9 cm)
- Both rounded ends match in shape
- Border lies flat with no ruffles or cupping
- All three pockets are 5.5 in (14.0 cm) wide at the base
- Divider seams are straight and vertical
- Filet windows are staggered and open
- Tabs are level and placed symmetrically
- No stitches show on the front of the backing
- All ends are woven in securely
Troubleshooting
Backing curls at the ends: The increases are too tight. Work the Rows 2–6 increases more loosely, or go up a hook size for those rows only.
Border ruffles: Skip the Round 2 increases.
Border cups or pulls: Add 1 extra sc on each curve in Round 1.
Pockets lie flat with no room for rolls: Check that you gathered 3 strip sts into every 2 backing sts, not 1 to 1.
Windows look slanted: Make the ch-2 spaces tighter, and block them square.
Holder tilts on the wall: Re-center the tabs so each one sits 5 sts in from its end of Row 36.
Rolls fall out: The pockets are too loose. Add 1 more sc row to the strip’s top edge so it tightens slightly.
Care
Hand wash cool and lay flat to dry, reshaping while damp. Avoid hanging the holder while it is wet, because the weight will stretch it.
Final Notes
The size depends on each measurement matching the next. Gauge of 16 sts = 4 in (10.2 cm) gives a 17 in (43.2 cm) x 8 in (20.3 cm) backing. The border brings it to 18 in (45.7 cm) x 9 in (22.9 cm). The 25 in (63.5 cm) strip gathers 3:2 into three 5.5 in (14.0 cm) pockets. If you check each stage as you go, the finished holder will match.
Happy crocheting!