

This lace mat is a soft field of tiny blue flowers set in an open diamond lattice. Each flower has five rounded cornflower-blue petals around a small cream center. Thin blue chain loops cross between the flowers to form a light, airy mesh.
The look is vintage and delicate, but the work is simple and repetitive. All instructions use US crochet terms.
The finished mat measures 15 x 9 in (38.1 x 22.9 cm) after blocking. It is made from 28 small square flower motifs, 7 across and 4 down. The motifs are joined as you go on their last round, and a three-round border of corded chain loops finishes the edge.
You make one flower and check its size. Then you join each new motif to its neighbors while you work its final round. No sewing is needed.
Finished Size and Construction
- Finished size: 15 x 9 in (38.1 x 22.9 cm)
- Skill level: Intermediate
- Terminology: US crochet terms
- Yarn weight: Super Fine (#1), fingering-weight mercerized cotton
- Hook: 2.75 mm (US C-2)
- Number of pieces: 28 flower motifs, joined into one panel
- Layout: 7 motifs across x 4 motifs down
- Motif size: 2 x 2 in (5.1 x 5.1 cm)
- Size before border: 14 x 8 in (35.6 x 20.3 cm)
- Border depth: 0.5 in (1.3 cm) on every side
Materials
Choose a smooth, mercerized fingering-weight cotton with about 170 m per 50 g. It gives crisp stitch definition, blocks well, and keeps the chain loops from getting fuzzy.
- Color A, cream (flower centers): 10 g / 34 m
- Color B, light cornflower blue (petals, lattice, border): 50 g / 170 m
These amounts include a safety margin of about 20 to 30 percent.
Tools:
- 2.75 mm (US C-2) crochet hook
- Tapestry needle
- Scissors
- Stitch marker
- Blocking mat and rustproof pins
- Spray bottle with clean water
- Measuring tape
Abbreviations (US Terms)
- ch – chain
- sl st – slip stitch
- sc – single crochet
- hdc – half double crochet
- dc – double crochet
- sk – skip
- sp – space
- st(s) – stitch(es)
- MR – magic ring
Special technique – join-as-you-go (JAYG) loop join:
– To replace a ch-5 loop: ch 2, sl st into the center ch of the matching loop on the finished motif, ch 2.
– To replace a ch-7 corner loop: ch 3, sl st into the center ch of the neighbor’s corner loop (or into the existing corner join point), ch 3.
Joined loops have the same total length as unjoined loops, so the motifs stay flat.
Gauge and Checkpoints
Gauge is measured on one motif instead of a swatch. Make one complete motif (Rounds 1–5, no joining), block it lightly, and measure.
- After Round 1: cream center about 0.4 in (1.0 cm) across
- After Round 3: flower about 1.25 in (3.2 cm) across, petal tip to petal tip
- After Round 5: motif 2 x 2 in (5.1 x 5.1 cm) when pinned square
- Border gauge: 8 sc = 1 in (2.5 cm) along the edge
If your motif is too big: Use a 2.5 mm hook or tighten your chains. Loose chains are the most common reason lace motifs come out too big.
If your motif is too small: Use a 3.0 mm hook.
Even 0.25 in (0.6 cm) extra per motif adds up to 1.75 in (4.4 cm) across 7 motifs, so check now.
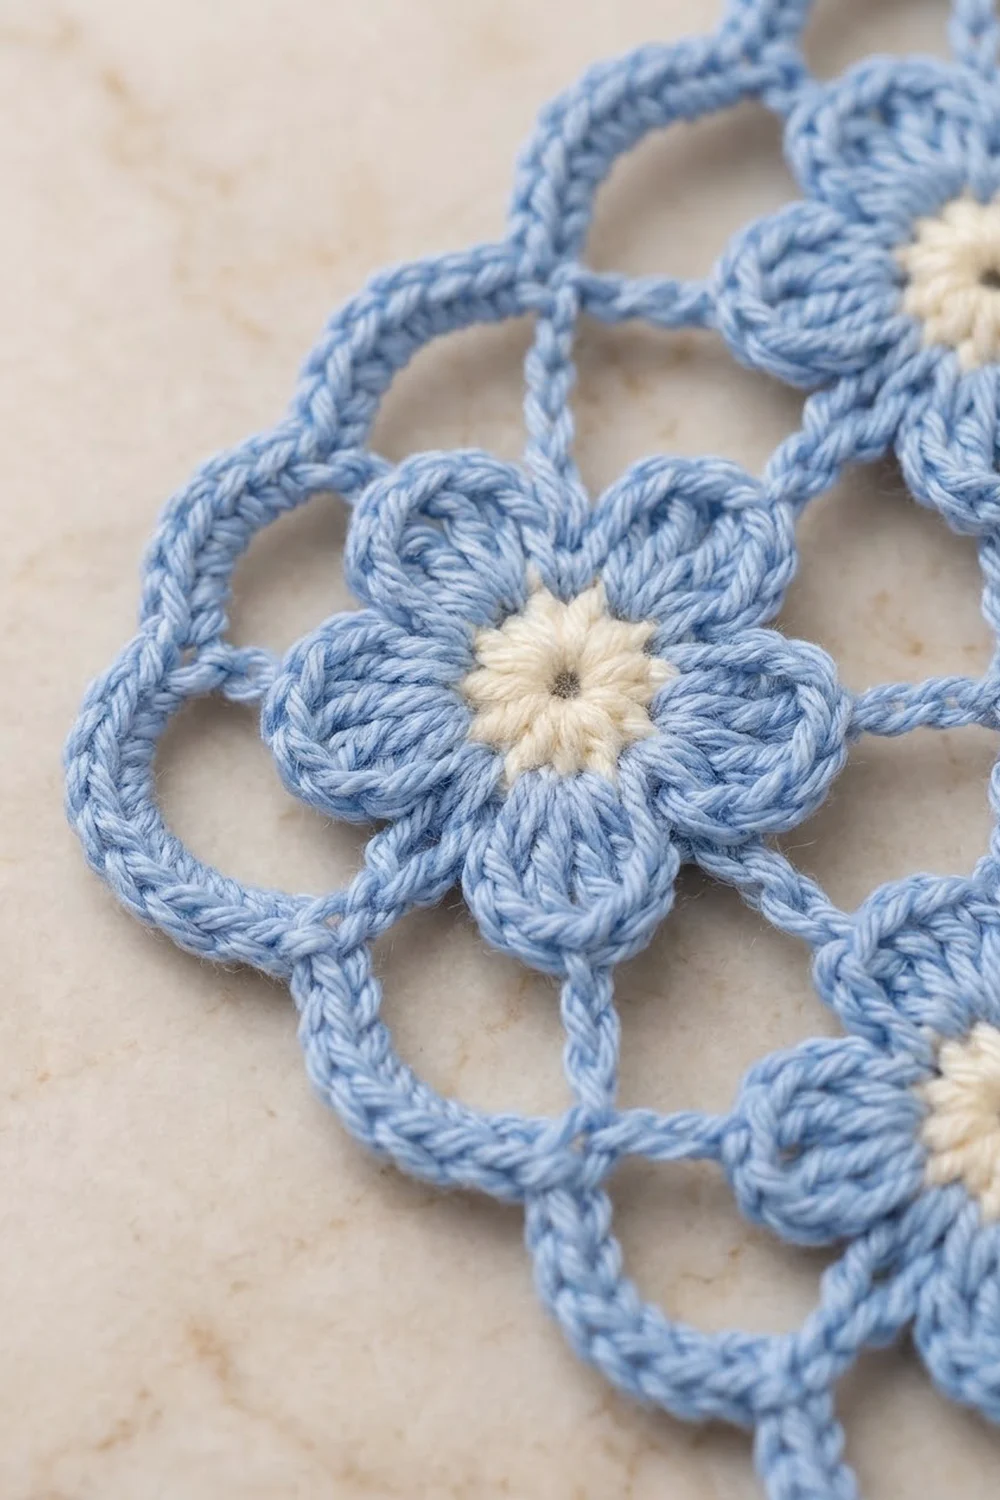
Flower Motif
Make 28 motifs. Work the first motif all the way through. Join every later motif on Round 5.
Center (Color A)
Round 1: Make a MR, ch 1 (does not count as a st), 10 sc in ring, sl st to first sc. Pull the ring tightly closed. Fasten off Color A. (10 sc)
Petals (Color B)
Round 2: Join Color B in any sc, ch 3 (counts as dc), dc in same st, 2 dc in each remaining sc around, sl st to top of beginning ch-3. (20 dc)
Round 3 (petal round): (Hdc, 2 dc) in next st, (2 dc, hdc) in next st, sl st in each of next 2 sts; repeat from * 4 more times. The last sl st lands in the joining st of Round 2. (5 petals; 40 sts = 30 petal sts + 10 sl sts)*
Each petal has 6 sts. The petal tip is the space between its 2nd and 3rd dc.
Lattice Frame (Color B)
Round 4: Sl st in next hdc and next 2 dc. Ch 1, sc in sp at petal tip, ch 5, sc in first sl st between petals, ch 5; sc in sp at next petal tip, ch 5, sc in first sl st between petals, ch 5; repeat from * 3 more times, sl st to first sc. (10 sc, 10 ch-5 loops)*
Number the loops 1 to 10 in working order. Loop 1 is the one right after the first sc.
Round 5 (squaring round): Sl st in next 3 ch to reach the center of loop 1. Ch 1, then:
- Sc in loop 1, ch 5, sc in same loop 1, ch 5, sc in loop 2, ch 7 (corner 1).
- Sc in loop 3, ch 5, sc in loop 4, ch 5, sc in loop 5, ch 7 (corner 2).
- Sc in loop 6, ch 5, sc in same loop 6, ch 5, sc in loop 7, ch 7 (corner 3).
- Sc in loop 8, ch 5, sc in loop 9, ch 5, sc in loop 10, ch 7 (corner 4).
- Sl st to first sc. Fasten off.
(12 sc, 8 ch-5 loops, 4 ch-7 corner loops)
Working 2 sc into loops 1 and 6 turns the 10 loops of the five-petal flower into 12 anchor points. This gives a square frame with 2 ch-5 side loops between 2 corner loops on each side.
Weave in the ends. Pin the first motif to 2 x 2 in (5.1 x 5.1 cm) and confirm your gauge before you continue.
Make All Pieces
- Color A centers: 28
- Color B petals and frames: 28
- Total motifs: 28
All motifs are the same (F = flower motif):
ROW 1: F F F F F F F
ROW 2: F F F F F F F
ROW 3: F F F F F F F
ROW 4: F F F F F F F
Joining
For each new motif, work Rounds 1–4 as written, then join on Round 5 using the JAYG loop join. Work Row 1 from left to right, then Row 2 from left to right, and so on.
- Row 1, motif 1: no joins.
- Row 1, motifs 2–7: join on 1 side (to the motif on the left).
- Rows 2–4, first motif: join on 1 side (to the motif above).
- Rows 2–4, motifs 2–7: join on 2 sides (above, then left).
One-side join: Work Round 5 as written through the sc in loop 7. Hold the new motif beside the finished motif, both right side up. Then: ch 3, sl st in center ch of the neighbor’s corner loop, ch 3, sc in loop 8, ch 2, sl st in the neighbor’s next ch-5 loop, ch 2, sc in loop 9, ch 2, sl st in the neighbor’s next ch-5 loop, ch 2, sc in loop 10, ch 3, sl st in the neighbor’s next corner loop, ch 3, sl st to first sc. Fasten off.
Two-side join: Work Round 5 as written through the sc in loop 5.
Join to the motif above: ch 3, sl st in its corner loop (or the existing join point), ch 3, sc in loop 6, ch 2, sl st in its next ch-5 loop, ch 2, sc in same loop 6, ch 2, sl st in its next ch-5 loop, ch 2, sc in loop 7, ch 3, sl st in the shared four-way join point, ch 3, sc in loop 8.
Join to the motif on the left: ch 2, sl st in its ch-5 loop, ch 2, sc in loop 9, ch 2, sl st in its next ch-5 loop, ch 2, sc in loop 10, ch 3, sl st in its next corner loop, ch 3, sl st to first sc. Fasten off.
How the joins match up: Each ch-5 side loop joins to one ch-5 side loop on the neighbor, and each corner joins to the neighbor’s corner. Where four motifs meet, always sl st into the same join point so all four corners meet at one spot. These crossing points form the diamond lattice.
Tension: Keep the joining sl sts as relaxed as your chains. A tight sl st pulls the loops into points and makes the mesh pucker.
Size checkpoint: Row 1 should measure 14 in (35.6 cm) when gently pinned. The panel should measure 14 x 8 in (35.6 x 20.3 cm) before the border.
Border
Border gauge: 8 sc = 1 in (2.5 cm), so 16 sc cover one 2 in (5.1 cm) motif side.
Along the outer edge, each motif shows half of one corner loop (a ch-3 segment), then 2 ch-5 loops, then half of the next corner loop (another ch-3 segment). At the 4 corners of the mat, the corner loop is free (a full ch-7).
Per motif side: 3 + 5 + 5 + 3 = 16 sc. This already includes the sts worked into both corner loops. The ch-2 corner sps are extra and are not counted as sts.
Round 1: Join Color B in the free top-left corner loop. Ch 1, (3 sc, ch 2, 3 sc) in same loop. The first 3 sc count toward the left edge.
- Top edge: *5 sc in each of next 2 ch-5 loops, 3 sc in ch-3 segment before the join, 3 sc in ch-3 segment after the join (skip the join sl st); repeat from * 5 more times, 5 sc in each of next 2 ch-5 loops, (3 sc, ch 2, 3 sc) in corner loop.
- Right edge: Work as for the top edge, but repeat from * only 2 more times.
- Bottom edge: Work as for the top edge.
- Left edge: Work as for the right edge, but end with 5 sc in each of the last 2 ch-5 loops, then sl st to first sc.
Counts:
– Top and bottom: 3 + (6 x 16) + 10 + 3 = 112 sc each.
– Left and right: 3 + (3 x 16) + 10 + 3 = 64 sc each.
– Total: 352 sc + 4 ch-2 corner sps.
Round 2 (loop round): Sl st in next 2 sc and into the corner ch-2 sp. Ch 1, (sc, ch 5, sc) in same sp.
- Top edge: Ch 5, sk 2 sts, sc in next st; (ch 5, sk 3 sts, sc in next st) 27 times; ch 5, sk last st, (sc, ch 5, sc) in corner sp.
- Right edge: Ch 5, sk 2 sts, sc in next st; (ch 5, sk 3 sts, sc in next st) 15 times; ch 5, sk last st, (sc, ch 5, sc) in corner sp.
- Bottom edge: Work as for the top edge.
- Left edge: Work as for the right edge, but end with ch 5, sk last st, sl st to first sc.
Counts:
– Top and bottom: 28 sc and 29 ch-5 loops each.
– Left and right: 16 sc and 17 ch-5 loops each.
– Corners: 2 sc and 1 ch-5 loop each.
– Total: 96 sc and 96 ch-5 loops.
Round 3 (corded round): Sl st in next ch-5 loop. Ch 1, 7 sc in each ch-5 loop around, sl st to first sc. Fasten off. (96 x 7 = 672 sc)
Why the math works:
– Each motif side gives exactly 16 sc, so the edges are 7 x 16 = 112 sc and 4 x 16 = 64 sc. No extra sts are added at the seams.
– Both edge counts divide by 4, which matches the 4-st spacing of Round 2. On each edge, every st is used once: 2 + 28 + (27 x 3) + 1 = 112 and 2 + 16 + (15 x 3) + 1 = 64.
– At 8 sc per inch, 112 sc = 14 in (35.6 cm) and 64 sc = 8 in (20.3 cm), so the border fits the panel and lies flat.
– The three border rounds add 0.5 in (1.3 cm) on each side, for a finished size of 15 x 9 in (38.1 x 22.9 cm).
Final Blocking
- Weave in all remaining ends along the chain paths so they stay hidden.
- Soak the mat in cool water for 10 minutes. Press out the water by rolling it in a towel; do not wring it.
- Lay it right side up on the blocking mat. Pin the 4 corners to 15 x 9 in (38.1 x 22.9 cm).
- Pin the panel at every motif seam, every 2 in (5.1 cm), 0.5 in (1.3 cm) in from the outer edge.
- Pin the center of each Round 3 loop outward so the scallops open evenly.
- Nudge each flower flat and straighten the lattice crossings.
- Let the mat dry completely, at least 24 hours, before you unpin it.
Final Quality-Control Checklist
- 28 motifs, 7 across and 4 down.
- Every flower has 5 petals and a closed cream center.
- Every four-way corner is joined at a single point.
- No twisted or skipped joins.
- Border Round 1: 112 sc on the top and bottom edges, 64 sc on each side edge.
- Border Round 2: 96 ch-5 loops.
- The mat measures 15 x 9 in (38.1 x 22.9 cm) and lies flat.
- All ends are woven in and trimmed.
Troubleshooting
Motifs cup: Your Round 4–5 chains are too tight. Loosen them, or use a hook half a size larger for those rounds.
The mesh ripples: Your chains are too loose. Use a hook half a size smaller for Round 5.
There’s a hole in the cream center: Pull the magic ring tail firmly before you weave it in.
The border waves: Recount Round 1. Each motif side should get exactly 16 sc.
The border pulls in: Use a hook 0.25 mm larger for the border.
Corners look messy: Sl st into the same join point every time.
Care
Hand wash in cool water with mild soap, roll in a towel, and dry flat, reshaping as needed. If it creases, press lightly through a cloth.
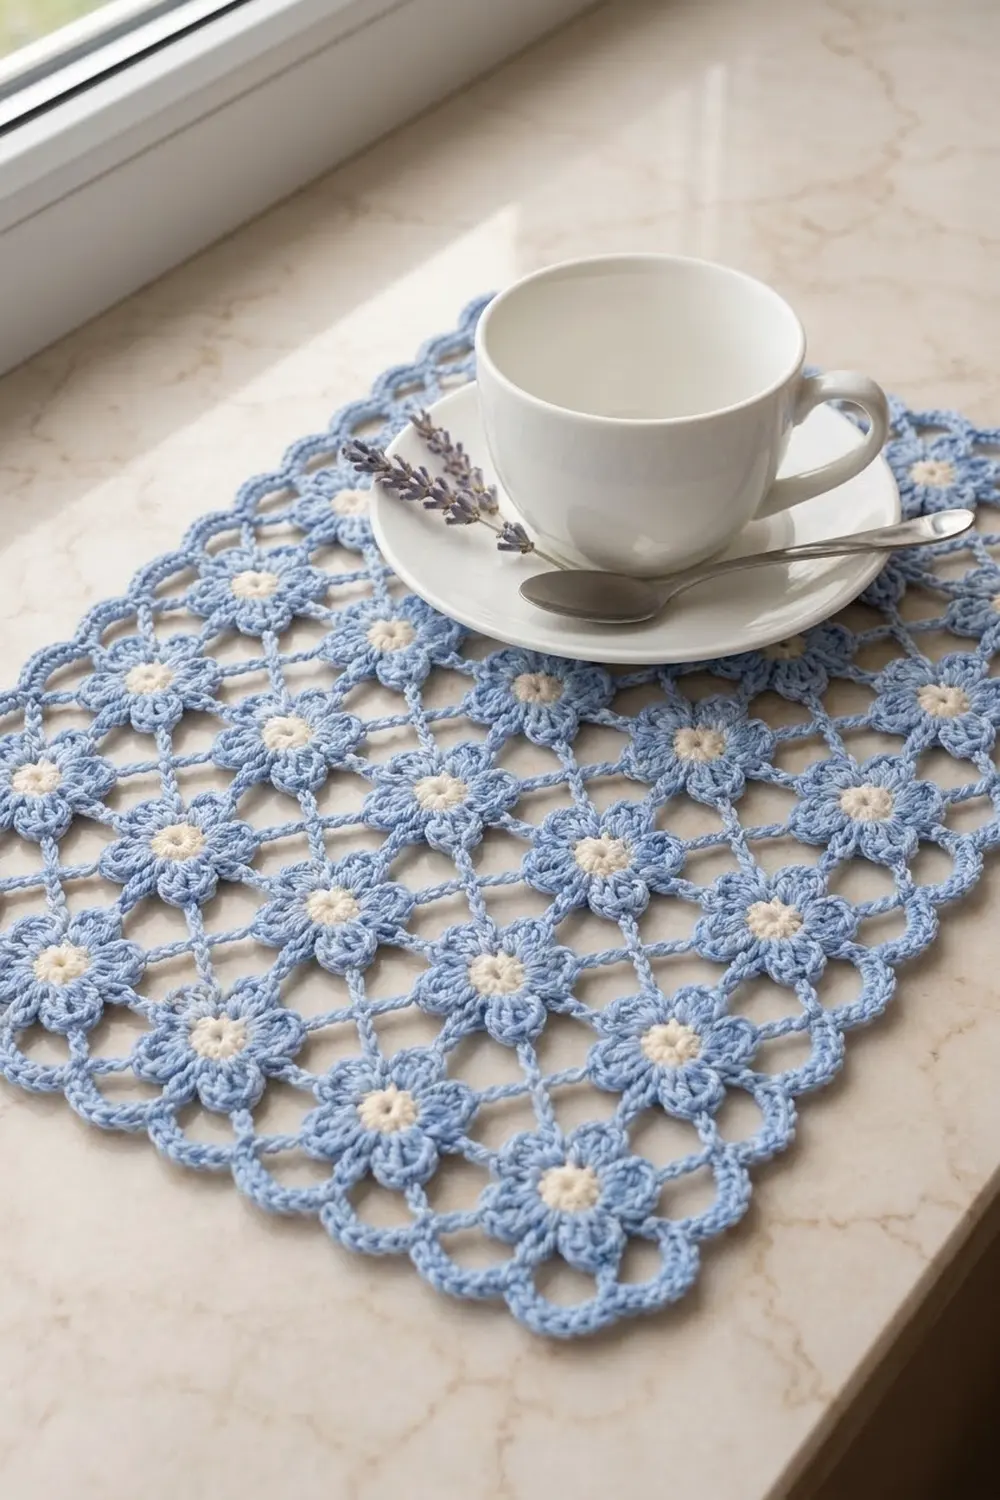
Final Notes
The measurement chain: one motif is 2 in (5.1 cm) and takes 16 border sc per side. Seven motifs make 14 in (35.6 cm) and 112 sc, and four motifs make 8 in (20.3 cm) and 64 sc. The 0.5 in (1.3 cm) border brings the mat to 15 x 9 in (38.1 x 22.9 cm). Check your first motif and keep your joins relaxed, and the lattice will come together evenly.
Happy crocheting!