

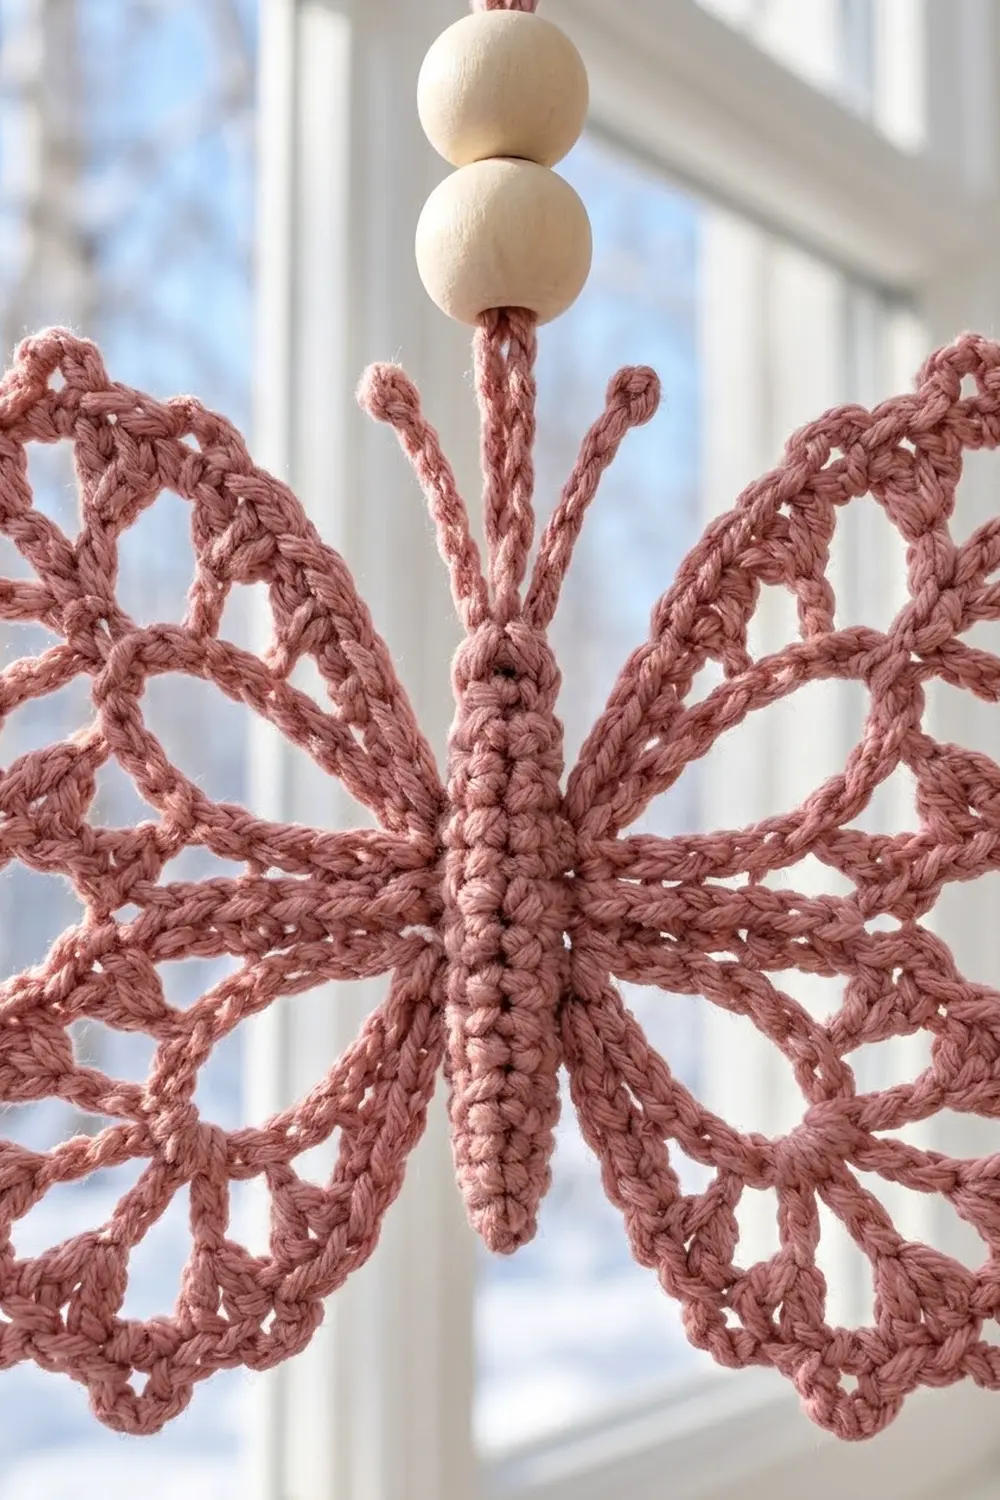
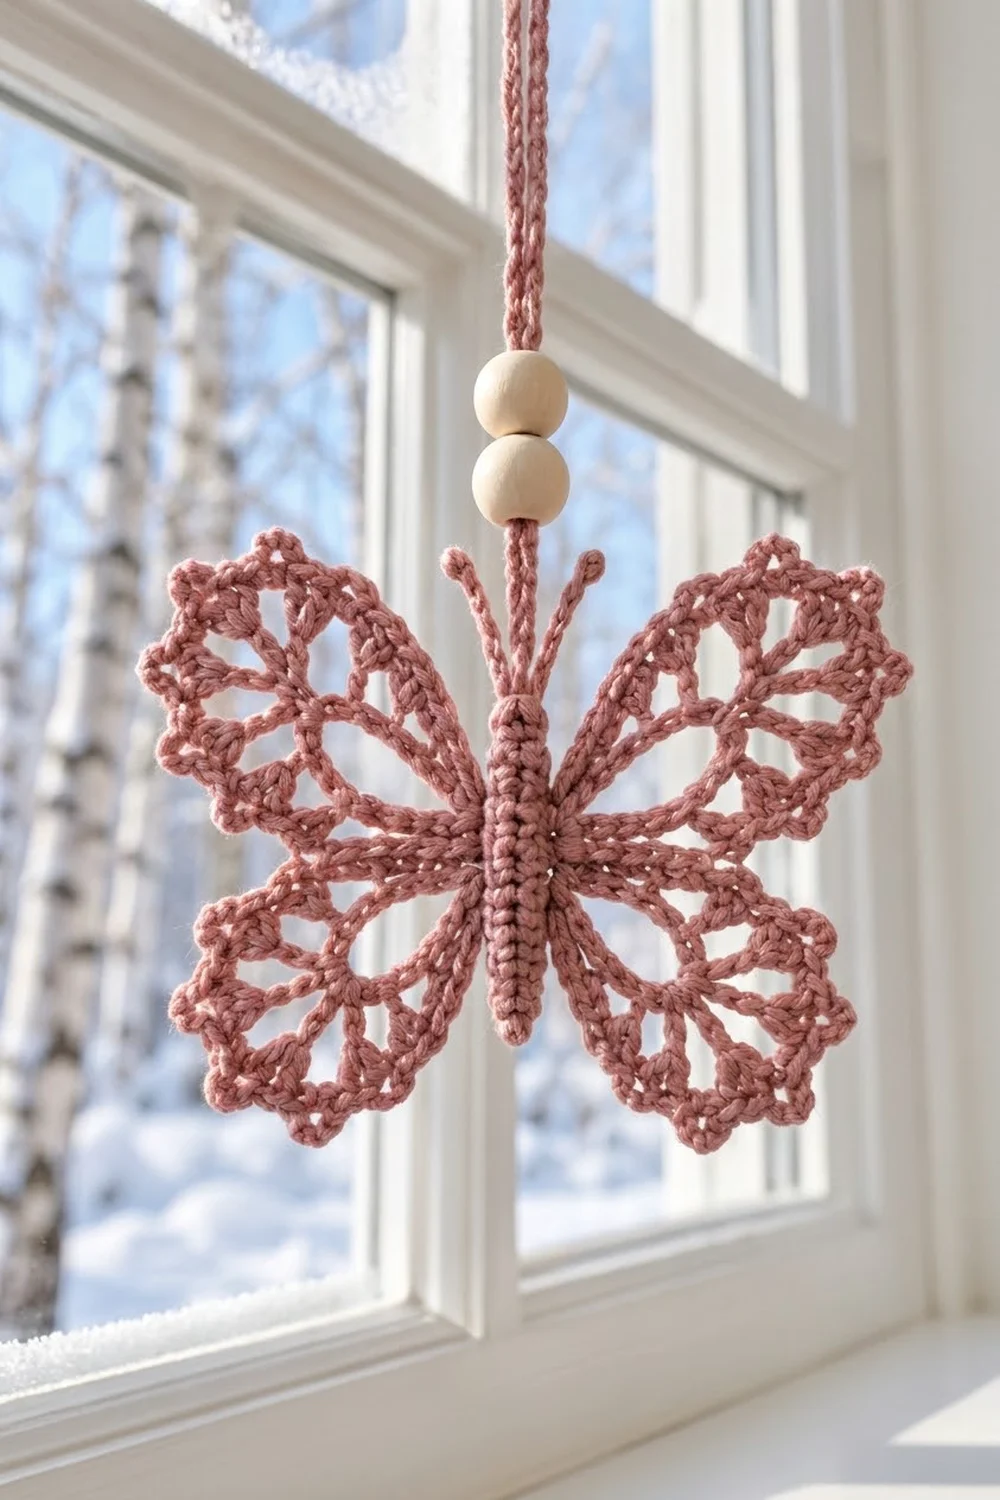
This lacy butterfly is made to hang in a window. It has four open wings, a narrow ridged body, two thin antennae, and a crocheted cord with two natural wooden beads above the body. With light behind it, the open “windows” in each wing show clearly against the glass.
The sample uses one color only, a soft dusty rose. A single color keeps attention on the shape: rounded petal-like wing sections, a scalloped outer edge with a picot every few stitches, and a calm, Scandinavian look that suits a winter window as well as a spring one.
The pattern uses US crochet terms. The finished butterfly measures 4 in (10.2 cm) wide and 3.5 in (8.9 cm) tall, not counting antennae. The hanging cord adds about 8 in (20.3 cm) before it is finished.
Construction is simple. First you work the body back and forth in rows. Next you work each wing directly off the body’s side edge: a base row, long chain loops, then sc packed into the loops to form petals. One continuous border round goes around the whole butterfly, adds the picot edge, and works the antennae as it passes the top of the body. The cord is made separately, threaded through the beads, and sewn on.
Finished Size and Construction
- Finished size: 4 in (10.2 cm) wide x 3.5 in (8.9 cm) tall, without antennae
- Skill level: Advanced beginner
- Terminology: US crochet terms
- Yarn weight: Sport weight (#2) mercerized cotton
- Hook: 2.75 mm (C-2)
- Number of pieces: 1 butterfly (body and 4 wings worked as one piece) plus 1 separate hanging cord
- Layout: Single motif. No assembly grid.
- Body size: 0.5 in (1.3 cm) wide x 1.75 in (4.4 cm) long
- Size before border: 3.5 in (8.9 cm) wide x 3 in (7.6 cm) tall
- Border depth: 0.25 in (0.6 cm) on every edge
- Antennae: about 1.25 in (3.2 cm) long each
Materials
Yarn. Choose a smooth, mercerized sport weight cotton, around 150 m per 50 g. Mercerized cotton shows stitches crisply, keeps its shape after blocking, and won’t fuzz in sunlight. Soft acrylic or wool blends tend to make the petals floppy.
- Dusty rose: 15 g, about 45 m (butterfly about 9 g, cord about 3 g, plus margin)
These amounts include a margin for a gauge swatch and weaving in ends. To make a set of several butterflies, plan on 12 g (about 36 m) for each extra one.
Tools and notions:
- 2.75 mm (C-2) crochet hook
- 2 natural wooden beads, 12 mm (0.5 in), with holes at least 4 mm wide
- Tapestry needle
- Scissors
- Stitch marker
- Blocking mat and rust-proof pins
- Spray bottle with water (optional: light spray starch)
Abbreviations (US Terms)
- ch – chain
- sl st – slip stitch
- sc – single crochet
- BLO – back loop only
- st(s) – stitch(es)
- RS – right side
- [ ] – repeat the bracketed steps the stated number of times
Special stitch – picot: ch 3, sl st in the 3rd ch from hook (the first of those 3 ch). This makes a small round bump that sits on top of the edge.
Gauge and Checkpoints
Gauge: 6 sc and 7 rows = 1 in (2.5 cm) in sc with a 2.75 mm hook.
Since this is a single small piece, the body is your gauge test. Work it first and measure before you start any wing.
Checkpoints:
- After the body (Row 12): 0.5 in (1.3 cm) wide x 1.75 in (4.4 cm) long.
- After the upper wings (Row 3): each upper wing reaches 1.5 in (3.8 cm) out from the body edge when lightly smoothed flat.
- After the lower wings (Row 3): each lower wing reaches 1.25 in (3.2 cm) out from the body edge.
- Before the border: 3.5 in (8.9 cm) wide x 3 in (7.6 cm) tall.
- After the border and blocking: 4 in (10.2 cm) wide x 3.5 in (8.9 cm) tall.
If your body is too big, go down to a 2.5 mm hook. If it is too small, go up to a 3 mm hook. A difference of 0.125 in (0.3 cm) on the body grows to about 0.5 in (1.3 cm) across the finished wings, so fix gauge now.
Body
The body is a narrow strip. Working through the back loops gives it raised horizontal ridges on both sides.
Ch 4.
Row 1: Sc in 2nd ch from hook and in next 2 ch. (3 sc)
Rows 2–12: Ch 1, turn, sc in BLO of each st across. (3 sc)
Fasten off and weave in the ends. Lay the body flat: Row 1 is the bottom (the tail) and Row 12 is the top (the head). Each long edge has 12 row ends, one per row.
Checkpoint: 3 sc wide x 12 rows = 0.5 in (1.3 cm) x 1.75 in (4.4 cm).
Upper Wings
Each upper wing sits on the top 6 row ends of one long edge (Rows 7–12).
Upper right wing
Row 1: With RS facing, join yarn with sl st in the Row 12 row end on the right edge. Ch 1, sc in same row end and in each of the next 5 row ends, working down to Row 7. (6 sc)
Row 2: Ch 1, turn, sc in first sc, [ch 15, sc in next sc] 5 times. (6 sc, 5 ch-15 loops)
Row 3: Ch 1, turn, [19 sc in next ch-15 loop] 5 times, sl st in last sc. (95 sc)
Fasten off. Each loop is now a rounded petal of 19 sc with an open teardrop-shaped center. The five petals fan out from the body like the ribs of a wing.
Upper left wing: Work the same, but join in the Row 7 row end on the left edge and work up to Row 12. Rows 1–3 are the same. (95 sc)
Checkpoint: Smooth each upper wing into a fan. It should reach 1.5 in (3.8 cm) out from the body.
Lower Wings
Each lower wing sits on the bottom 6 row ends of one long edge (Rows 1–6). The lower wings are smaller, so the loops are shorter.
Lower right wing
Row 1: With RS facing, join yarn in the Row 6 row end on the right edge. Ch 1, sc in same row end and in each of the next 5 row ends, working down to Row 1. (6 sc)
Row 2: Ch 1, turn, sc in first sc, [ch 11, sc in next sc] 5 times. (6 sc, 5 ch-11 loops)
Row 3: Ch 1, turn, [15 sc in next ch-11 loop] 5 times, sl st in last sc. (75 sc)
Fasten off.
Lower left wing: Work the same, but join in the Row 1 row end on the left edge and work up to Row 6. (75 sc)
Checkpoint: Each lower wing reaches 1.25 in (3.2 cm) from the body. The whole butterfly now measures 3.5 in (8.9 cm) wide x 3 in (7.6 cm) tall. Weave in all wing ends before starting the border so they don’t get in the way.
Border with Antennae
The border is one continuous round. It forms the scalloped picot edge and works both antennae while crossing the top of the body.
Border gauge: the border is one sc tall plus the picots, so it adds 0.25 in (0.6 cm) to every outer edge. That is 0.5 in (1.3 cm) to the total width and the total height.
Petal repeats used below:
- Upper petal (19 sts): skip 1 sc, [sc in next 3 sc, picot] 5 times, sc in next 2 sc, skip 1 sc.
- Lower petal (15 sts): skip 1 sc, [sc in next 3 sc, picot] 4 times, sc in next sc, skip 1 sc.
The skipped first and last sc of each petal sit where two petals meet. Skipping them pulls the edge in slightly between petals, which deepens the scallops.
Round 1:
- Top of body and first antenna: With RS facing, join with sl st in the first sc of Row 12, at the corner next to the upper left wing. Ch 11, sl st in 2nd ch from hook and in next 9 ch (10 sl st), sl st in same sc of Row 12.
- Top center: Sl st in next sc (center of Row 12).
- Second antenna: Sl st in last sc of Row 12, ch 11, sl st in 2nd ch from hook and in next 9 ch, sl st in same sc.
- Upper right wing: Work the upper petal repeat across all 5 petals. (85 sc, 25 picots)
- Lower right wing: Work the lower petal repeat across all 5 petals. (65 sc, 20 picots)
- Bottom of body: Sl st in each of the 3 free loops of the foundation chain. (3 sl st)
- Lower left wing: Work the lower petal repeat across all 5 petals. (65 sc, 20 picots)
- Upper left wing: Work the upper petal repeat across all 5 petals. (85 sc, 25 picots)
- Join with sl st to the first sl st. Fasten off and weave in the end.
Round totals: 300 sc, 90 picots, 6 sl st on the body (3 top, 3 bottom), and 2 antennae.
Why the math works:
- Upper petal: 1 skipped + (5 x 3 = 15) + 2 + 1 skipped = 19, which matches the 19 sc in each upper petal. 5 petals x 19 = 95, which matches Row 3.
- Lower petal: 1 skipped + (4 x 3 = 12) + 1 + 1 skipped = 15, which matches the 15 sc in each lower petal. 5 petals x 15 = 75, which matches Row 3.
- Worked sc: upper wing 5 x 17 = 85, lower wing 5 x 13 = 65. 2 x (85 + 65) = 300.
- Picots: 2 x (25 + 20) = 90.
- Every Row 3 stitch is used exactly once, so the border lies flat without gathering or stretching.
Hanging Cord
Ch 61.
Row 1: Sl st in 2nd ch from hook and in each ch across. (60 sl st)
Fasten off, leaving a 6 in (15.2 cm) tail. The cord measures about 8 in (20.3 cm).
Finishing the cord:
- Thread the tail onto a tapestry needle and pass it, followed by the cord end, through both wooden beads.
- Sew the tail end of the cord to the back of the center sc of Row 12, between the antennae.
- Tie a single overhand knot in the cord 1 in (2.5 cm) above the body. Slide the beads down to rest on the knot.
- Fold the top 1.5 in (3.8 cm) of the cord down into a loop. Sew it closed with the starting tail.
The finished cord rises about 6.5 in (16.5 cm) above the body. Adjust the starting chain to make it longer or shorter.
Final Blocking
- Lightly spray the butterfly with water until it is damp, not wet.
- Lay it RS up on the blocking mat. Pin the body straight first, 1.75 in (4.4 cm) long.
- Fan out the upper wings. Pin the tip of each upper petal so the wings measure 4 in (10.2 cm) across from outer edge to outer edge.
- Fan out the lower wings. Pin the bottom petals so the total height from upper wing tops to lower wing bottoms is 3.5 in (8.9 cm).
- Pin each picot outward so it shows as a clear bump.
- Smooth each petal so the teardrop opening is centered and open.
- Shape the antennae into a gentle V with a slight outward curl at the tips.
- If you want it stiffer, mist lightly with starch. Leave it pinned until fully dry, 4–6 hours.
Final Quality-Control Checklist
- Body is 3 sts wide and 12 rows long, with ridges on both faces.
- Each upper wing has 5 petals of 19 sc. Each lower wing has 5 petals of 15 sc.
- Every petal has an open teardrop center.
- Border count: 25 picots on each upper wing, 20 on each lower wing, 90 in total.
- Both antennae are 10 sl st long and sit on the outer sts of Row 12.
- Finished size is 4 in (10.2 cm) x 3.5 in (8.9 cm).
- The left and right sides mirror each other.
- Beads rest on the knot 1 in (2.5 cm) above the body. The hanging loop is secure.
- All ends are woven in on the wrong side.
Troubleshooting
Petals ruffle or twist. Your sc are too loose for the loop. Tighten tension, or work 1 fewer sc in each loop. If you do, remove 1 sc from the border repeat too (for example, end with sc in next 1 sc instead of 2 on upper petals).
Petals pucker or curl inward. The loop chain is too tight. Chain more loosely, or go up a hook size for Row 2 only.
Petals overlap and hide the openings. Block more firmly in a wider fan, or work the outer ch-15 loops on each upper wing as ch-14.
Wings are uneven left to right. Count the Row 1 sc on each wing. Each wing needs exactly 6, one per row end.
Antennae droop. Work the sl sts firmly, mist them with starch, and dry them pinned.
Beads slide up the cord. Make the knot under them a double knot.
Border ruffles. Check that you skip the first and last sc of each petal.
Care
Hand wash in cool water with mild soap, press out the water in a towel, and re-block flat to dry. Keep away from direct radiator heat. Wipe the wooden beads dry instead of soaking them.
Final Notes
Here is the full measurement chain. A gauge of 6 sc and 7 rows per 1 in (2.5 cm) gives a body of 0.5 in (1.3 cm) x 1.75 in (4.4 cm). Upper wings reach 1.5 in (3.8 cm) out and lower wings 1.25 in (3.2 cm), for 3.5 in (8.9 cm) x 3 in (7.6 cm) before the border. The 0.25 in (0.6 cm) picot border brings it to 4 in (10.2 cm) x 3.5 in (8.9 cm). Finally the 8 in (20.3 cm) cord with its two beads finishes the ornament.
If you check those numbers at each stage, the butterfly will hang flat and even in the window. Make one in dusty rose to match the sample, or make a few and hang them at different heights.
Happy crocheting!