

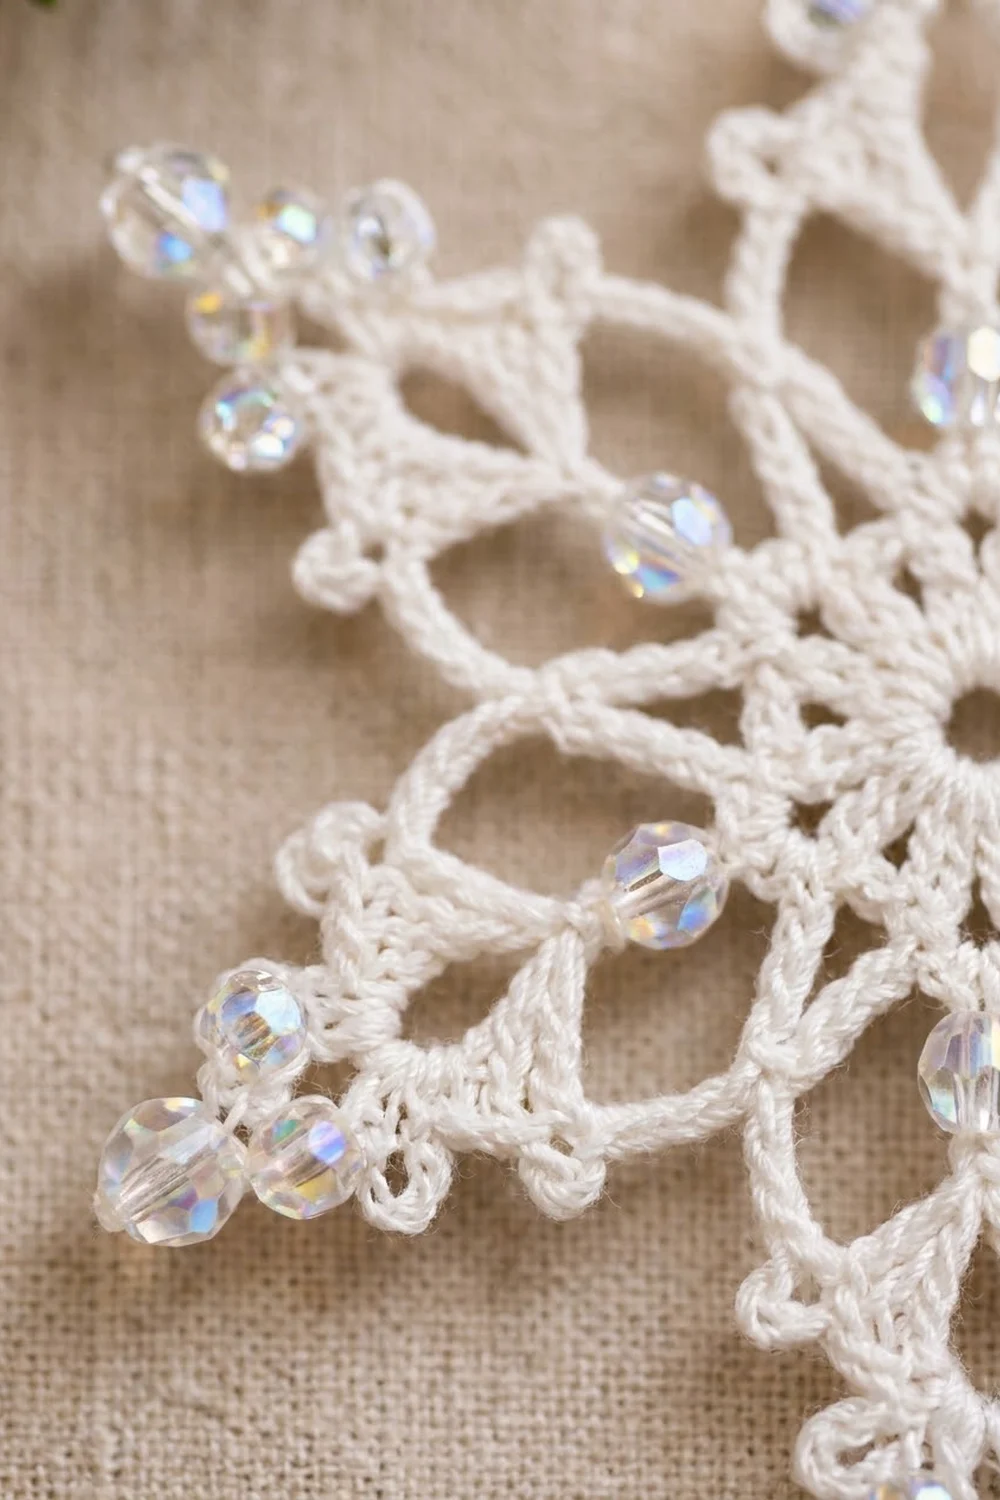
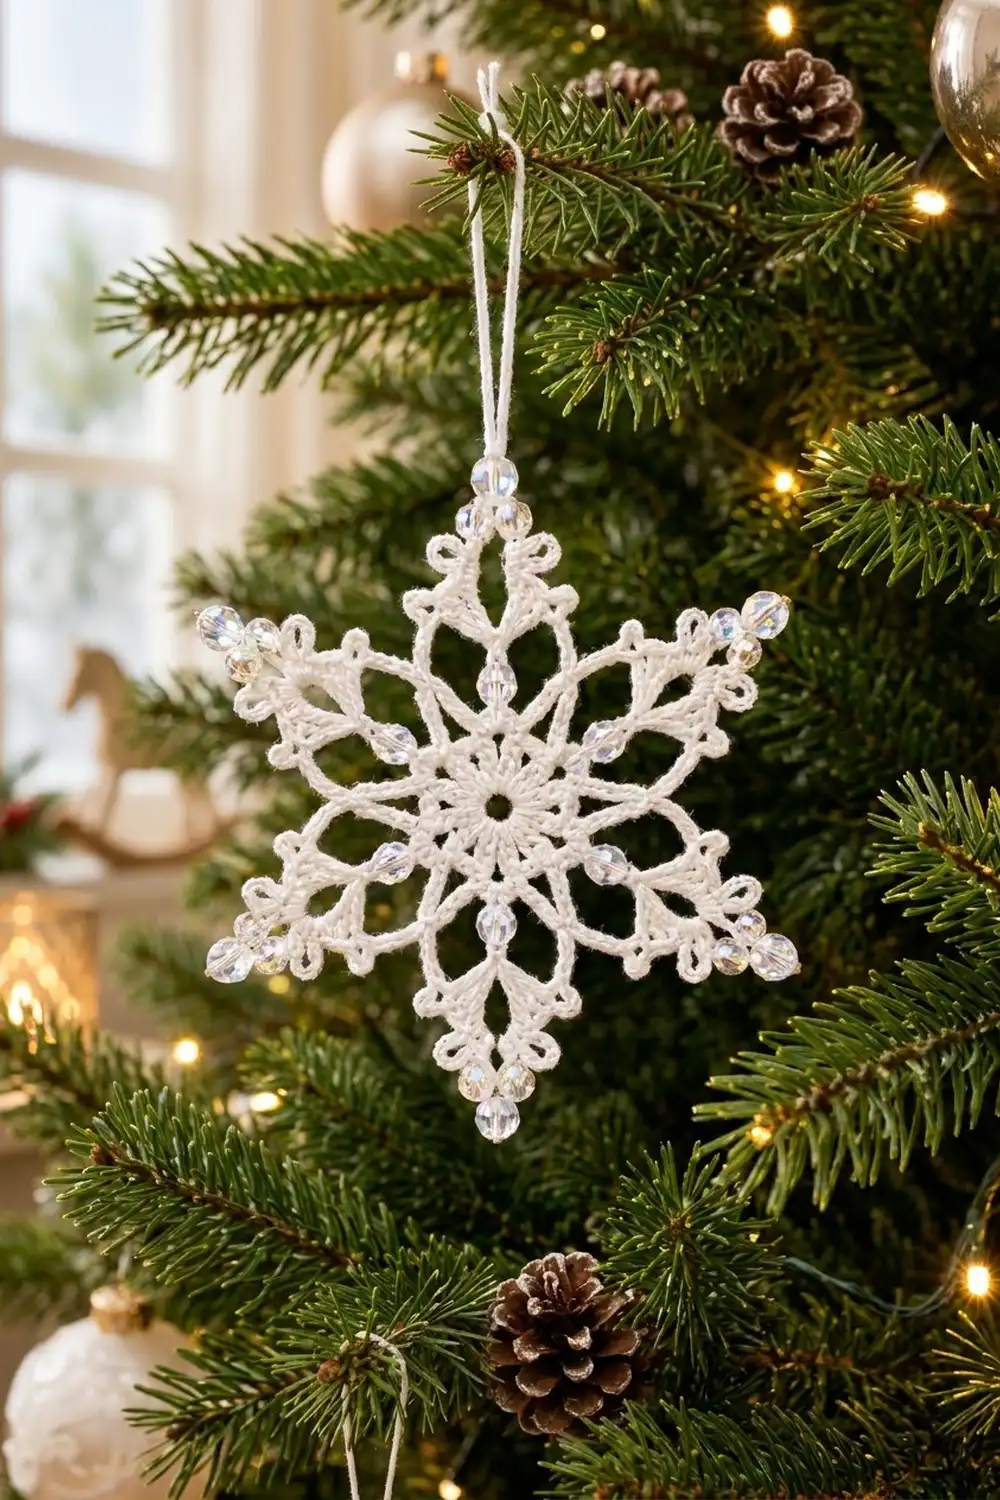
The Frost Crystal Snowflake is a six-pointed lace ornament worked in crisp white thread, with clear iridescent beads at every point. It is a small, delicate decoration that catches the light on a tree branch, in a window, or tied onto a gift.
The colors are simple: bright white cotton thread and clear AB beads that flash pale rainbow tones. Each arm ends in a fan of three bead picots. One bead floats in the open center of each arm, and each side shoulder has a bead picot. A single bead marks each valley between arms.
This pattern uses US crochet terms. The finished snowflake measures 4.5 in (11.4 cm) from one point to the opposite point after blocking. It is one single piece.
You work it in six joined rounds from a small center ring. Rounds 1–2 build a solid center, Rounds 3–5 open into six lacy arms, and Round 6 is the beaded edging that shapes the points. You string all the beads onto the thread before you start, and you add a separate thread loop for hanging at the end.
Finished Size and Construction
- Finished size: 4.5 in (11.4 cm) point to point, blocked
- Skill level: Intermediate (fine thread, beads)
- Terminology: US crochet terms
- Yarn weight: Size 10 cotton crochet thread (Lace, 0)
- Hook: 1.75 mm steel hook
- Number of pieces: 1
- Layout: Single six-pointed motif, worked in the round
- Piece size: 4.5 in (11.4 cm) point to point
- Size before border (after Round 5): 3.5 in (8.9 cm) point to point
- Border depth (Round 6): 0.5 in (1.3 cm) added at each point
Materials
Choose a mercerized cotton thread in size 10. It has a slight sheen, holds starch well, and gives this snowflake sharp stitch definition. Avoid fuzzy or acrylic threads, because they will not block into crisp points.
For beads, choose smooth glass or acrylic rounds with an AB coating. The coating gives the rainbow shimmer you see in candlelight or tree lights. Glass beads are heavier and help the points hang straight. Acrylic beads are lighter and work well if your tree branches are thin.
Thread
- White, size 10 cotton: about 5 g / 18 m (20 yd)
Beads
- 42 clear AB round beads, 4 mm, plus 4–6 spares (about 48 total)
- The bead holes must pass doubled size 10 thread. Test a few before you buy a full pack.
Tools
- 1.75 mm steel crochet hook
- Big-eye beading needle or a dental floss threader (for stringing the beads)
- Tapestry needle for weaving in ends
- Rustproof pins and a foam blocking board
- Fabric stiffener or spray starch
- Scissors
- 10 in (25.4 cm) of extra white thread for the hanging loop
The thread and bead quantities include a small margin for a gauge test and spare beads.
Abbreviations (US Terms)
- ch – chain
- sl st – slip stitch
- sc – single crochet
- dc – double crochet
- sp(s) – space(s)
- sk – skip
- st(s) – stitch(es)
- rep – repeat
- * * – repeat the instructions between asterisks as directed
Special stitches
- Bead chain (bch): Slide 1 bead up the thread until it touches the hook. Yarn over beyond the bead and pull through the loop on the hook. The bead is now locked inside this chain.
- Bead picot (bp): Ch 2, bch, ch 2, sl st in the first of these 5 ch. This makes a small loop with the bead sitting at its tip.
- Picot (p): Ch 3, sl st in the third ch from hook.
Stringing the beads: Before Round 1, thread the big-eye needle with the working end of the thread. String all 42 beads plus 2 spares. Push them back along the thread, 3–4 ft (91.4–121.9 cm) away from the hook, and slide one forward only when a bead stitch calls for it.
Gauge and Checkpoints
Gauge controls the finished size, but small differences are easy to fix. Work Rounds 1–2 first and measure before you continue.
- Gauge: Rounds 1–2 = 1.25 in (3.2 cm) across.
Measurement checkpoints (unblocked, laid flat and lightly pressed):
- After Round 1: 0.75 in (1.9 cm) across
- After Round 2: 1.25 in (3.2 cm) across
- After Round 3: 1.75 in (4.4 cm) point to point
- After Round 4: 2.5 in (6.4 cm) point to point
- After Round 5: 3.5 in (8.9 cm) point to point
- After Round 6 and blocking: 4.5 in (11.4 cm) point to point
If your center is too big (over 1.4 in / 3.6 cm after Round 2), change to a 1.5 mm hook.
If your center is too small (under 1.1 in / 2.8 cm after Round 2), change to a 2.0 mm hook.
A difference of 0.25 in (0.6 cm) at Round 2 grows to about 0.9 in (2.3 cm) at the finished points, so it is worth checking now.
Pattern
Join every round with a sl st. Work every round on the right side, and do not turn.
Center ring: Ch 6, sl st in the first ch to form a ring. The ring opening is about 0.375 in (1.0 cm).
Round 1: Ch 3 (counts as dc), 17 dc in ring, sl st in top of beginning ch-3. (18 dc)
Check: 0.75 in (1.9 cm) across. If the ring gaps, gently pull the starting tail to tighten it.
Round 2: Ch 3 (counts as dc), dc in next 2 sts, ch 3, *dc in next 3 sts, ch 3*; rep from * to * 4 more times, sl st in top of beginning ch-3. (18 dc in 6 groups of 3, 6 ch-3 sps)
Check: 1.25 in (3.2 cm) across. Each ch-3 sp marks where an arm will grow.
Round 3: Sl st in next 2 dc and into the next ch-3 sp. Ch 3 (counts as dc), (dc, ch 2, 2 dc) in same sp, ch 4, sk next 3 dc, *(2 dc, ch 2, 2 dc) in next ch-3 sp, ch 4, sk next 3 dc*; rep from * to * 4 more times, sl st in top of beginning ch-3. (24 dc, 6 ch-2 point sps, 6 ch-4 valley sps)
Check: 1.75 in (4.4 cm) point to point. You should see six small V-shaped points.
Round 4 (valley beads): Sl st in next dc and into the ch-2 sp. Ch 3 (counts as dc), (dc, ch 3, 2 dc) in same sp, ch 3, (sc, bch, sc) in next ch-4 sp, ch 3, *(2 dc, ch 3, 2 dc) in next ch-2 sp, ch 3, (sc, bch, sc) in next ch-4 sp, ch 3*; rep from * to * 4 more times, sl st in top of beginning ch-3. (24 dc, 12 sc, 6 beads, 6 ch-3 point sps, 12 ch-3 side sps)
Each valley bead should sit on the front of the work. If one slips to the back, push it through with your fingertip before you move on.
Check: 2.5 in (6.4 cm) point to point.
Round 5 (arms and spoke beads): Sl st in next dc and into the ch-3 point sp. Ch 3 (counts as dc), (dc, ch 2, bch, ch 2, 2 dc) in same sp, ch 5, sc in next ch-3 sp, ch 5, sk the valley group, sc in next ch-3 sp, ch 5, *(2 dc, ch 2, bch, ch 2, 2 dc) in next ch-3 point sp, ch 5, sc in next ch-3 sp, ch 5, sk the valley group, sc in next ch-3 sp, ch 5*; rep from * to * 4 more times, sl st in top of beginning ch-3. (24 dc, 12 sc, 6 beads, 18 ch-5 sps)
The beaded ch-2/bch/ch-2 loop in each arm holds that arm’s spoke bead. The middle ch-5 of each repeat arches over the valley bead, so the bead peeks out from inside a small lace petal.
Check: 3.5 in (8.9 cm) point to point. Total beads used so far: 12.
Bead handling tips: Keep the strung beads on your lap, away from the hook hand, so they do not tangle in your tension fingers. Slide them forward only a few at a time; a long run of loose beads near the hook wears the thread. If the thread starts to fuzz from the beads rubbing it, move the beads back and work from a fresh section.
Border (Round 6: Beaded Points)
Round 6 is the edging. It covers each ch-5 sp with sc, adds a bead picot on each arm shoulder, and builds a three-bead fan at every point.
Border gauge: One ch-5 sp filled with 6 sc and 1 bp measures about 0.75 in (1.9 cm) along the edge. Each point fan adds 0.5 in (1.3 cm) beyond the Round 5 point.
Round 6: Ch 1, sc in same st as join and in next dc. *Ch 4, bp, ch 1, bp, ch 1, bp, ch 4, sk the beaded point loop, sc in next 2 dc. In next ch-5 sp work 3 sc, bp, 3 sc. In next ch-5 sp (the valley) work 2 sc, p, 2 sc. In next ch-5 sp work 3 sc, bp, 3 sc. Sc in next 2 dc.* Rep from * to * 5 more times, leaving out the final 2 sc on the last repeat. Sl st in first sc. Fasten off, leaving a 6 in (15.2 cm) tail.
Counts per arm repeat:
- Left arm edge: 2 sc
- Point fan: 3 bp
- Right arm edge: 2 sc
- First shoulder sp: 6 sc, 1 bp
- Valley sp: 4 sc, 1 p
- Second shoulder sp: 6 sc, 1 bp
- Per repeat: 20 sc, 5 bp, 1 p
Round 6 totals: 120 sc, 30 bp, 6 p. Beads used in this round: 30.
Bead total check: 6 (Round 4) + 6 (Round 5) + 30 (Round 6) = 42 beads.
Why the math works: A ch-5 sp in size 10 thread holds about 6 sc and still lies flat. The shoulder sps get exactly 6 sc, so the edge stays smooth. A bead picot sits on top of the sc and adds height but no width, so it does not make the edge ruffle. The valley sp gets only 4 sc, which pulls it in slightly and deepens the V between arms. The point fan skips over the spoke loop, so the spoke bead hangs freely in the open center of the arm, just under its three-bead tip.
Hanging loop: Fold the 10 in (25.4 cm) strand in half. Pull the fold through the ch-1 sp between the first and second bp of one point fan. Pass the ends through the fold and pull snug. Then knot the ends together about 4 in (10.2 cm) from the snowflake.
Final Blocking
- Weave in all ends along the back of the sc and dc stitches. Do not trim them yet.
- Soak the snowflake in fabric stiffener. If you are using starch instead, dampen the snowflake now and starch it heavily before it dries.
- Gently squeeze out the extra liquid. Do not wring the snowflake.
- Draw a 4.5 in (11.4 cm) circle on paper and divide it into six equal 60-degree sections. Cover it with plastic wrap on your blocking board.
- Lay the snowflake right side up, centered on the circle.
- Pin each point fan at the circle line, with one pin through the middle bp.
- Pin each valley picot straight toward the center so the V stays sharp.
- Pin each shoulder bp outward so the side loops open evenly.
- Use your fingertips to shape each lace petal into a clean oval.
- Let the snowflake dry completely, for at least 12 hours.
- Remove the pins and trim the woven ends close to the work.
Final Quality-Control Checklist
- The snowflake measures 4.5 in (11.4 cm) point to point.
- All six arms are the same length, within 0.125 in (0.3 cm).
- All 42 beads are in place: 6 in the valleys, 6 spoke beads, and 30 in bead picots.
- Every bead sits on the right side.
- Every point fan shows 3 beads, evenly spread.
- Each spoke bead hangs centered inside its arm.
- The valleys form sharp V shapes, and the shoulders lie flat without ruffling.
- The center ring is closed and round.
- No ends show on the front.
- The hanging loop is centered on one point and knotted securely.
Troubleshooting
I ran out of beads before the end. Cut the thread and string more beads onto the working end. Rejoin with a sl st where you stopped, and hide both tails in nearby sc.
Beads keep slipping to the back. Pull the bead snug against the hook before you yarn over. After each round, push any stray bead to the front.
The edge ruffles. You probably have extra sc in a ch-5 sp. Count 6 sc in each shoulder sp and 4 sc in each valley sp.
The snowflake cups instead of lying flat. Your dc stitches are tighter than your chains. Loosen the chains in Rounds 3–5 or go up 0.25 mm in hook size.
The points are floppy. Use full-strength stiffener and let the snowflake dry completely while pinned.
The bead holes are too tight for the thread. Switch to beads with larger holes, because forcing the thread through will fray it.
Care
Hand wash in cool water only if needed, then block again with stiffener. Store flat between sheets of tissue paper so the points do not bend.
Final Notes
The measurement chain for this snowflake is short and easy to track. The center reaches 1.25 in (3.2 cm) after Round 2, and the arms reach 3.5 in (8.9 cm) after Round 5. The beaded border adds 0.5 in (1.3 cm) at each point, for a finished size of 4.5 in (11.4 cm). If your Round 2 checkpoint matches, the rest will follow.
Make one for your tree, a few as gift tags, or a single ornament for a window. The clear beads will catch every bit of light.
Happy crocheting!