

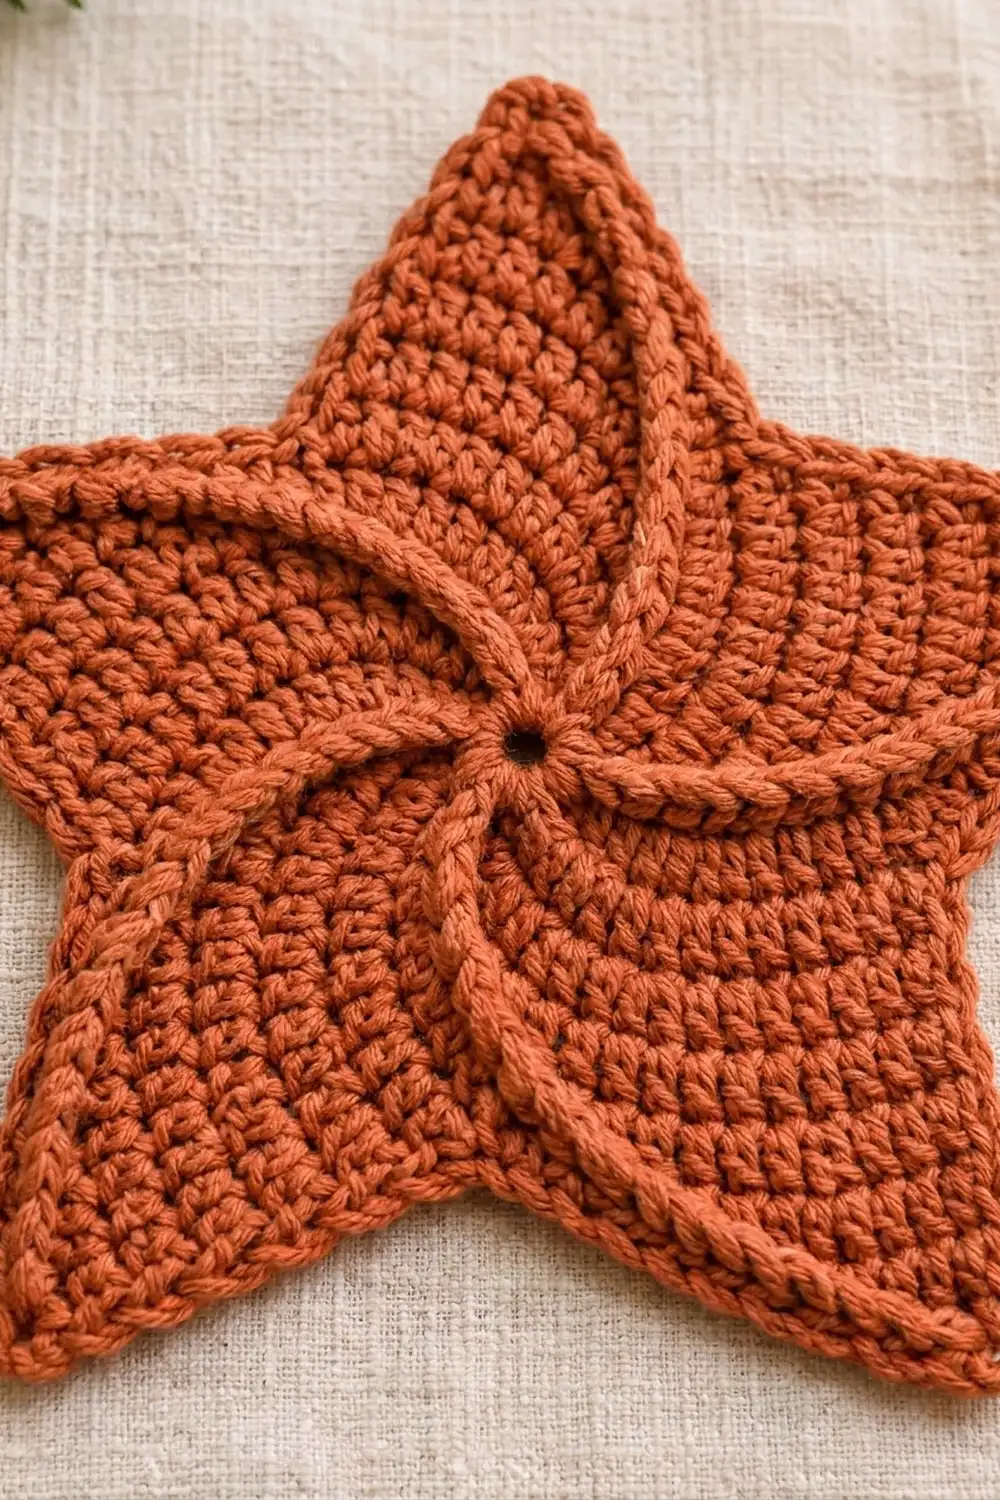
This Pinwheel Swirl Star is a single flat star motif that works as a coaster, a festive table decoration, or a simple ornament. Five raised ridges spiral out from a small open center, so the star looks like it’s turning. The swirl is easy to see and the outline stays crisp.
The sample uses one solid color, a warm terracotta rust. That color looks good with greenery, gold, and natural linen, but any smooth solid will show the swirl ridges clearly. Variegated yarns tend to hide them, so a solid is best.
All instructions use US crochet terms. The finished star measures about 8 in (20.3 cm) wide from tip to tip and 7.75 in (19.7 cm) tall, including the border.
You’ll make it in four stages. First you work a round center disc in half double crochet. Next you work five points in short rows straight off the disc. Then a two-round border tidies the outline and sharpens the tips. Last, five surface-slip-stitch ridges create the swirl.
Finished Size and Construction
- Finished size: 8 in (20.3 cm) tip to tip across, 7.75 in (19.7 cm) tall
- Skill level: Easy–Intermediate
- Terminology: US crochet terms
- Yarn weight: Worsted (#4), cotton or cotton blend
- Hook: 5.0 mm (H-8)
- Number of pieces: 1 (single motif, no joining)
- Layout: Center disc + 5 points worked directly from the disc
- Center disc size: 3.2 in (8.1 cm) diameter
- Size before border: 7.6 in (19.3 cm) across, 7.25 in (18.4 cm) tall
- Border depth: 0.25 in (0.6 cm)
Materials
Yarn: Use a smooth worsted-weight cotton or cotton blend. Cotton holds the star’s sharp points, keeps the ridges crisp, and stands up to warm mugs if you use the star as a coaster. Acrylic also works but gives a softer outline.
- Terracotta (main color): 35 g, about 65 m (71 yd)
This amount includes a margin of about 20 percent for your gauge swatch and for working the ridges with the yarn held double.
Tools:
– 5.0 mm (H-8) crochet hook
– Tapestry needle
– Stitch markers (at least 5)
– Scissors
– Measuring tape or ruler
– Blocking mat and rust-proof pins
– Spray bottle
Abbreviations (US Terms)
- ch – chain
- sl st – slip stitch
- sc – single crochet
- hdc – half double crochet
- sc2tog – single crochet 2 together
- hdc2tog – half double crochet 2 together
- BLO – back loop only
- MR – magic ring
- st(s) – stitch(es)
- RS / WS – right side / wrong side
Special stitch – Surface slip stitch (surface sl st): Hold the working yarn behind the fabric. Insert the hook from front to back through the fabric, then pull up a loop through the fabric and through the loop already on the hook. Each surface sl st sits on top of the fabric like a chain stitch. Repeat along a planned path to build a raised ridge.
Gauge and Checkpoints
Gauge: 14 hdc and 10 rows/rounds = 4 in (10.2 cm). Each hdc row or round is about 0.4 in (1.0 cm) tall.
Make one full star before you commit to a set. Because the star is one piece, your first star is your real gauge test.
Checkpoints:
– After Round 1: about 0.8 in (2.0 cm) across
– After Round 2: about 1.6 in (4.1 cm) across
– After Round 4: about 3.2 in (8.1 cm) across, lying flat
– Each point after Row 6: about 2.4 in (6.1 cm) long from the disc edge to the tip, about 2.3 in (5.8 cm) wide at the base
– Before border: 7.6 in (19.3 cm) tip to tip across
– After border: 8 in (20.3 cm) tip to tip across
If your disc is too big (over 3.4 in, or 8.6 cm), go down to a 4.5 mm hook. If it’s too small (under 3 in, or 7.6 cm), go up to a 5.5 mm hook. If the disc ruffles, your stitches are too loose for the increases, so go down a hook size. If it cups, go up one size.
Center Disc
Join each round with a sl st to the first hdc. The ch 2 at the start of each round does not count as a stitch.
Round 1: Make a MR, ch 2, work 10 hdc into the ring. Pull the ring closed but leave a small open hole about 0.25 in (0.6 cm) wide. Join. (10 sts)
Round 2: Ch 2, 2 hdc in each st around. Join. (20 sts)
Round 3: Ch 2, hdc in next st, 2 hdc in next st; repeat from * 9 more times. Join. (30 sts)
Round 4: Ch 2, hdc in next 2 sts, 2 hdc in next st; repeat from * 9 more times. Join. (40 sts)
Divide Round 4 into 5 sections of 8 sts each. Place a marker in the first st of each section, starting with the st where you joined. Each section becomes one point.
Checkpoint: The disc lies flat at 3.2 in (8.1 cm) across.
Points
Each point is worked in rows into the 8 sts of one section. The ch 2 at the start of each row does not count as a stitch.
Point 1
Don’t fasten off after Round 4.
Row 1 (RS): Ch 2, hdc in each of the next 8 sts (the first section), turn. (8 sts)
Row 2 (WS): Ch 2, hdc2tog, hdc in next 4 sts, hdc2tog, turn. (6 sts)
Row 3: Ch 2, hdc in each st across, turn. (6 sts)
Row 4: Ch 2, hdc2tog, hdc in next 2 sts, hdc2tog, turn. (4 sts)
Row 5: Ch 2, hdc2tog twice, turn. (2 sts)
Row 6: Ch 2, hdc2tog. (1 st) Fasten off.
The single st in Row 6 is the tip.
Points 2–5
With RS facing, join yarn with a sl st in the marked first st of the next section on Round 4. Work Rows 1–6 exactly as for Point 1, then fasten off. Repeat for the remaining sections.
Checkpoint: You have 5 points, each 2.4 in (6.1 cm) long. Each point’s side edge has 6 row ends: Rows 1–5 plus the Row 6 tip st. Measured across, the star is about 7.6 in (19.3 cm) tip to tip and 7.25 in (18.4 cm) tall. Weave in all ends from the points now, before the border covers them.
Border
Border gauge: Work 2 sc into each hdc row end. Two sc measure about 0.53 in (1.3 cm), a little wider than one 0.4 in (1.0 cm) hdc row. That small excess lets the edge stretch around the slanted point sides without pulling.
Border Round 1: With RS facing, join yarn at a valley (the dip between two points), choosing the valley between Point 5 and Point 1.
- Ch 1. Work sc2tog across the valley: put the first leg in the Row 1 row end of Point 5 and the second leg in the Row 1 row end of Point 1.
- *Work 2 sc into each row end of Rows 2–5 going up the point (8 sc). Work 3 sc in the Row 6 tip st. Work 2 sc into each row end of Rows 5–2 going down the other side (8 sc).
- Sc2tog across the next valley: first leg in the Row 1 row end of the point you just finished, second leg in the Row 1 row end of the next point.*
- Repeat from * to * 3 more times. Then work the last point’s sides and tip once more without a final sc2tog, and join to the first sc2tog with a sl st.
Per point: 1 valley sc2tog + 8 side sc + 3 tip sc + 8 side sc = 20 sts.
Total: 5 points × 20 sts = 100 sts
Why the math works: Each valley sc2tog uses 2 row ends, one from each neighboring point, but counts as only 1 st. That’s why there are 5 valley sts in total, not 10. The 3 sc at each tip already include the tip corner, so the corner isn’t counted again in the 8 side sts. Each side sits between a tip and a valley and gets exactly 8 sc from its 4 remaining row ends. The decrease pulls each valley into a clean V, and the increase sharpens each tip.
Border Round 2: Ch 1. Work a sl st in the BLO of each st around, keeping the tension relaxed and even. In the center sc of each 3-sc tip, work (sl st, ch 1, sl st) to keep the point sharp. Join to the first sl st and fasten off.
Count: 100 sl sts + 5 tip ch-1 sps.
This round creates the raised, chain-like rim shown in the photo. The finished border adds 0.25 in (0.6 cm) all around. The star now measures 8 in (20.3 cm) tip to tip across and 7.75 in (19.7 cm) tall.
Swirl Ridges
Each ridge is worked in surface sl st with the yarn held double, which gives the rounded, rope-like look. Work with RS facing and the center hole toward you. Each ridge curves clockwise as it moves outward.
Before you start, mark the path for each ridge with a removable marker in each stop:
- Round 1: the 1st st of the section
- Round 2: the 3rd st of the same section
- Round 3: the 5th st of the same section
- Round 4: the 8th st, the last st of the section, right where it meets the next section
- Point: the 2nd st in from the edge on Rows 1–5 of the point that rises from the next section, then the Row 6 tip
Ridge 1:
- Cut a strand about 40 in (101.6 cm) long and fold it in half. Hold the doubled yarn behind the work.
- Pull up a loop through the center hole, right next to the Round 1 stop.
- Work 2 surface sl sts per round through Rounds 1–4, angling from stop to stop. That’s 8 sts.
- Continue up the point with 1 surface sl st per row in the 2nd st in from the edge, through Rows 1–5 (5 sts). Work 1 more surface sl st into the base of the tip, just inside the border (1 st).
- Total per ridge: 14 surface sl sts.
- Fasten off on the back.
Ridges 2–5: Repeat in each remaining section.
The finished ridges should start evenly around the center hole, curve smoothly, and end just below each tip. Keep your loops at the same length as the fabric stitches. Loops that are too tight pucker the star, and loops that are too loose sag. Weave in all ends on the WS, splitting the plies so the ends don’t work loose.
Final Blocking
- Lightly mist the star until it’s evenly damp, not soaked.
- Lay it RS up on a blocking mat.
- Pin the center hole as a round opening about 0.25 in (0.6 cm) wide.
- Pin each of the 5 tips so it sits 4.25 in (10.8 cm) from the center. That gives 8 in (20.3 cm) tip to tip across.
- Pin each valley so it sits evenly between its neighboring tips. Use a pin to set a crisp V.
- Run a finger along each ridge to round it up and straighten its curve.
- Leave it to dry completely, at least 12 hours, before unpinning.
Final Quality-Control Checklist
- [ ] Round 4 has exactly 40 sts, in 5 sections of 8
- [ ] Each point ends in a single Row 6 tip st
- [ ] Border Round 1 has 100 sts, 20 per point
- [ ] Each tip has 3 sc and a (sl st, ch 1, sl st) on top
- [ ] All 5 valleys form clean, matching V shapes
- [ ] All 5 ridges start at the center hole and curve the same way
- [ ] Each ridge has 14 surface sl sts and ends just under its tip
- [ ] The star measures 8 in (20.3 cm) across and 7.75 in (19.7 cm) tall
- [ ] All ends are woven in on the WS
Troubleshooting
The center disc ruffles. Your tension is loose for the increases. Go down 0.5 mm, or check that Round 4 has exactly 40 sts.
The center disc cups. Your tension is tight. Go up 0.5 mm.
The points lean or twist. Make sure the decreases are at both ends of Rows 2 and 4. A missing decrease on one side tilts the point.
The tips are blunt. Check that Row 6 is a single hdc2tog, and don’t skip the ch 1 in Border Round 2.
The border ripples. Work 2 sc per row end, not 3, and don’t skip the valley sc2tog.
The border pulls tight. Loosen your sl st tension in Round 2, or work that round with a hook 0.5 mm larger.
The ridges pucker the fabric. Pull up each surface sl st loop to the full height of a stitch. Undo and redo any tight section.
The ridges look thin. Make sure the yarn is held double.
The center hole is too large. Before working Round 2, weave the MR tail around Round 1 to snug the hole.
Care
Hand wash cool and lay flat to dry, pinning the points again if they need it. Cotton stars can handle a warm iron through a pressing cloth, but don’t press the ridges flat.

Final Notes
Here is the measurement chain this pattern depends on:
- A 14-hdc, 10-row gauge gives a 3.2 in (8.1 cm) center disc of 40 sts.
- Each 8-st section becomes a 2.4 in (6.1 cm) point.
- The points bring the star to 7.6 in (19.3 cm) across.
- A 100-st border adds 0.25 in (0.6 cm) all around, for a finished 8 in (20.3 cm) by 7.75 in (19.7 cm) star.
If each checkpoint matches, the next stage will fit. Make one star as a coaster, or make several and arrange them loose down a table as in the photo. Each one stands on its own.
Happy crocheting!