

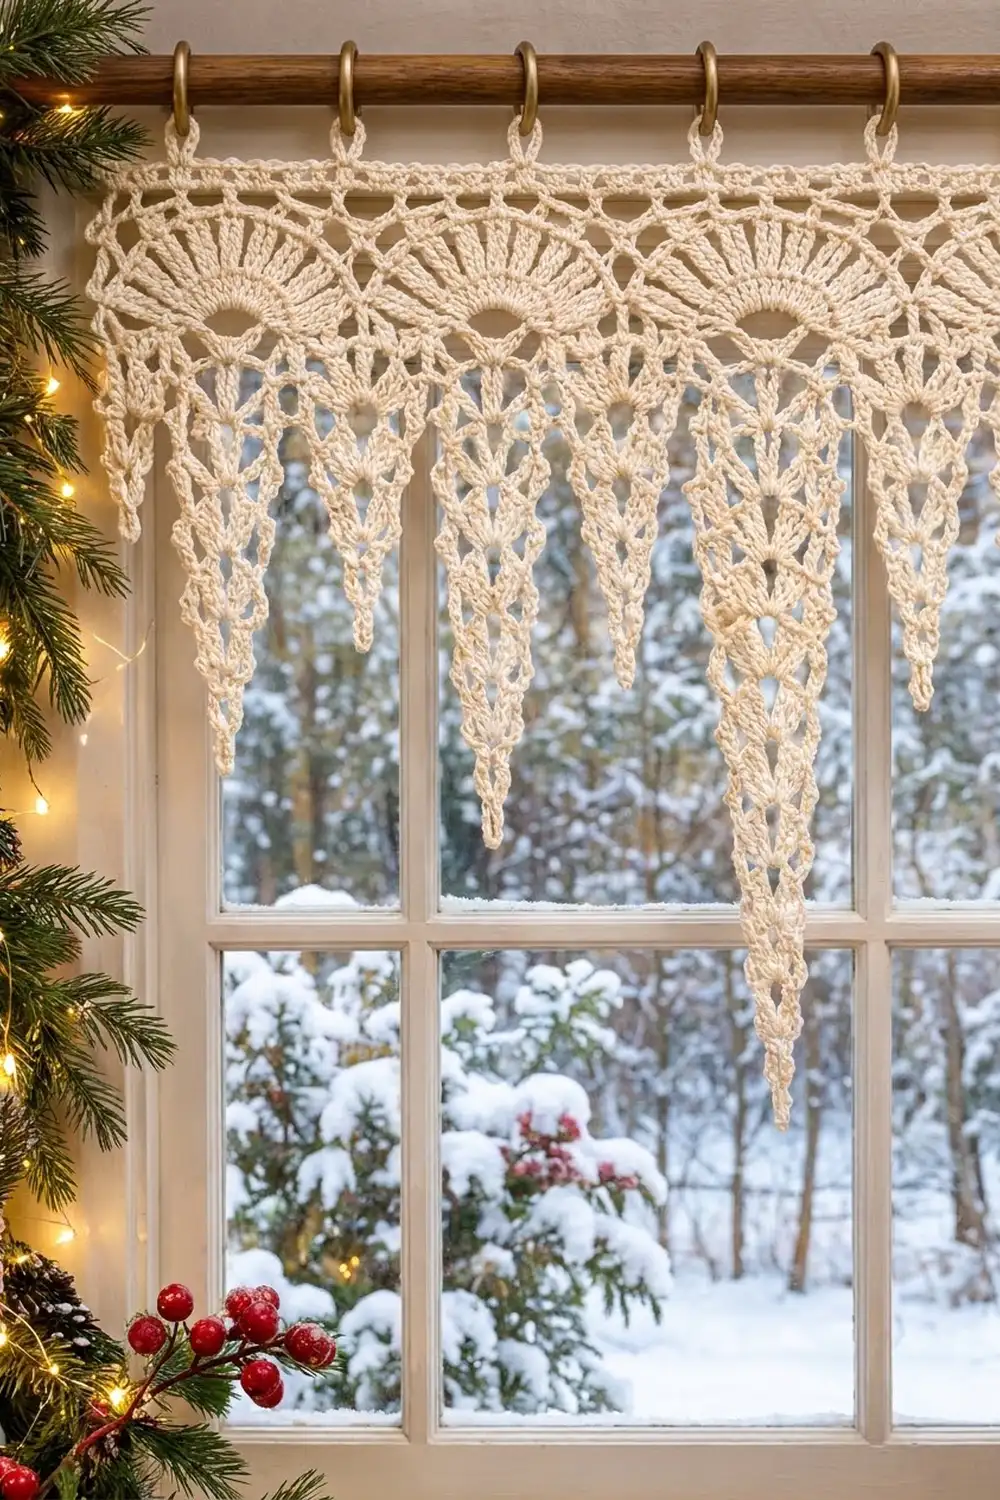
The Frost Fan Icicle Valance is a lace window topper that looks like a row of icicles catching winter light. Nine pointed icicles hang from a neat heading. Each one has an open mesh, a column of small shells up its center and a fan that spreads across its top. The center icicle is the longest, and large and small points alternate outward on each side.
It is worked in one ivory cotton, so the lace texture carries the design. The style is light and wintry, and it suits a farmhouse, cottage or Scandinavian room. It looks especially good against frosted glass or snowy views. The pattern uses US crochet terms throughout.
The finished valance measures 41.5 in (105.4 cm) wide. It is 8.4 in (21.3 cm) deep at the center point, not counting the hanging loops.
Construction overview: Each icicle is worked bottom-up in rows, starting at the tip and widening to a flat top. You make three motif sizes, sew their top corners together, and then work a four-row heading across the full width. The last heading row adds the hanging loops.
Finished Size and Construction
- Finished size: 41.5 in (105.4 cm) wide × 8.4 in (21.3 cm) deep at the center, plus 0.75 in (1.9 cm) hanging loops
- Skill level: Intermediate
- Terminology: US
- Yarn weight: Sport (2), mercerized cotton
- Hook: 3.25 mm (US D-3)
- Number of pieces: 9 motifs (4 Large, 1 Long Center, 4 Small)
- Layout: 1 row of 9 motifs, joined at their top corners
- Large motif: 5.5 in (14.0 cm) wide × 5.0 in (12.7 cm) long
- Long Center motif: 5.5 in (14.0 cm) wide × 7.4 in (18.8 cm) long
- Small motif: 3.5 in (8.9 cm) wide × 3.4 in (8.6 cm) long
- Size before heading: 41.5 in (105.4 cm) × 7.4 in (18.8 cm)
- Heading depth: 1.0 in (2.5 cm)
Materials
Yarn: Use a smooth, mercerized sport-weight cotton. Mercerized cotton shows the stitches clearly and holds its shape after blocking. Avoid fuzzy blends, because they blur the mesh and the fan detail.
- Ivory/cream: 100 g, about 300 m (328 yd)
The quantity includes a margin of roughly 25% for your gauge swatch, sewing tails and any small differences in tension.
Tools:
– 3.25 mm (US D-3) crochet hook
– Tapestry needle
– Scissors
– Rustproof pins
– Blocking mats or a folded towel
– Spray bottle
– Measuring tape
Abbreviations (US Terms)
- ch – chain
- sl st – slip stitch
- sc – single crochet
- dc – double crochet
- sp(s) – space(s)
- tch – turning chain
- st(s) – stitch(es)
- RS – right side
Special stitch:
– Shell: (2 dc, ch 2, 2 dc) in the same space.
Turning chains: Ch 3 counts as 1 dc. Ch 4 counts as 1 dc + ch 1.
Gauge and Checkpoints
Gauge: 24 sc and 10 dc rows = 4 in (10.2 cm). In other words, 6 sc = 1 in (2.5 cm), and each dc row is 0.4 in (1.0 cm) tall.
Make one Large motif first. It is your real gauge test.
Checkpoints:
– Large motif, after Row 10: 4.0 in (10.2 cm) from tip to top edge.
– Large motif, after Row 13: top edge 5.5 in (14.0 cm) wide; length 5.0 in (12.7 cm).
– Small motif, finished: 3.5 in (8.9 cm) × 3.4 in (8.6 cm).
– Long Center motif, finished: 5.5 in (14.0 cm) × 7.4 in (18.8 cm).
If your motif is too big, go down to a 3.0 mm hook. If it is too small, go up to a 3.5 mm hook. Width matters most, because the heading count depends on every motif having exactly the right number of top stitches. A motif that is 0.25 in (0.6 cm) too wide adds 2.25 in (5.7 cm) across all nine.
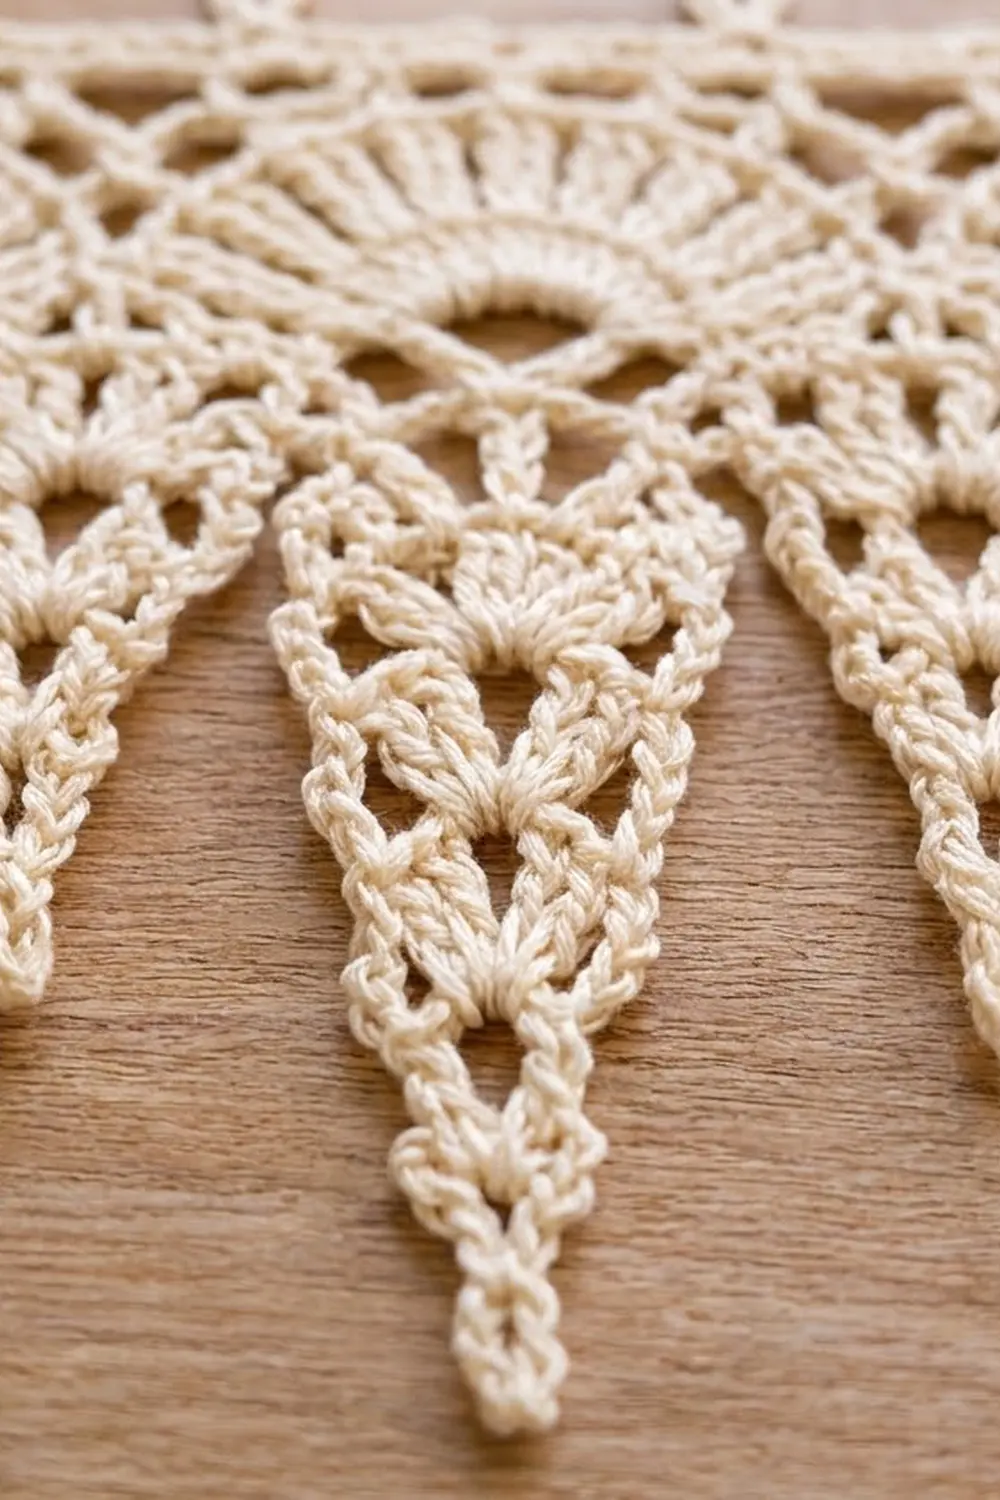
Large Motif (make 4)
Each motif is worked from the tip upward. Turn at the end of every row.
Row 1: Ch 4, sl st in first ch to form a ring. Ch 3 (counts as dc), (dc, ch 2, 2 dc) in ring. Turn. (4 dc, 1 ch-2 sp)
Row 2: Ch 3, skip next dc, shell in ch-2 sp, skip next dc, dc in top of tch. Turn. (6 dc, 1 ch-2 sp)
Row 3 (increase): Ch 4, shell in shell sp, ch 1, dc in top of tch. Turn. (6 dc, 2 ch-1 sps, 1 ch-2 sp)
Row 4: Ch 4, shell in shell sp, ch 1, dc in 3rd ch of tch. Turn. (6 dc, 2 ch-1 sps, 1 ch-2 sp)
Row 5 (increase): Ch 4, dc in next ch-1 sp, ch 1, shell in shell sp, ch 1, dc in next ch-1 sp, ch 1, dc in 3rd ch of tch. Turn. (8 dc, 4 ch-1 sps, 1 ch-2 sp)
Row 6: Ch 4, dc in next dc, ch 1, shell in shell sp, ch 1, dc in next dc, ch 1, dc in 3rd ch of tch. Turn. (8 dc, 4 ch-1 sps, 1 ch-2 sp)
Row 7 (increase): Ch 4, [dc in next ch-1 sp, ch 1] 2 times, shell in shell sp, [ch 1, dc in next ch-1 sp] 2 times, ch 1, dc in 3rd ch of tch. Turn. (10 dc, 6 ch-1 sps, 1 ch-2 sp)
Row 8: Ch 4, [dc in next dc, ch 1] 2 times, shell in shell sp, [ch 1, dc in next dc] 2 times, ch 1, dc in 3rd ch of tch. Turn. (10 dc, 6 ch-1 sps, 1 ch-2 sp)
Row 9 (increase): Ch 4, [dc in next ch-1 sp, ch 1] 3 times, shell in shell sp, [ch 1, dc in next ch-1 sp] 3 times, ch 1, dc in 3rd ch of tch. Turn. (12 dc, 8 ch-1 sps, 1 ch-2 sp)
Row 10: Ch 4, [dc in next dc, ch 1] 3 times, shell in shell sp, [ch 1, dc in next dc] 3 times, ch 1, dc in 3rd ch of tch. Turn. (12 dc, 8 ch-1 sps, 1 ch-2 sp)
The increase rows widen the mesh by one space on each side, and the plain rows in between keep the icicle tall and slim.
Row 11 (fan base, increase): Ch 4, [dc in next ch-1 sp, ch 1] 4 times, 7 dc in shell ch-2 sp, [ch 1, dc in next ch-1 sp] 4 times, ch 1, dc in 3rd ch of tch. Turn. (17 dc, 10 ch-1 sps)
All 7 fan stitches come out of one space, which starts the radiating fan.
Row 12 (fan opens): Ch 4, [dc in next dc, ch 1] 4 times, [dc in next fan dc, ch 1] 6 times, dc in last fan dc, [ch 1, dc in next dc] 4 times, ch 1, dc in 3rd ch of tch. Turn. (17 dc, 16 ch-1 sps)
The ch-1 spaces between the fan stitches spread the fan open across the top of the icicle.
Row 13 (top edge): Ch 1, sc in first dc, [sc in next ch-1 sp, sc in next dc] 16 times, working the last sc in 3rd ch of tch. (33 sc)
Fasten off and leave an 8 in (20.3 cm) tail on 2 of the 4 Large motifs for sewing.
Small Motif (make 4)
Rows 1–6: Work as Rows 1–6 of the Large Motif. (8 dc, 4 ch-1 sps, 1 ch-2 sp)
Row 7 (fan base, increase): Ch 4, [dc in next ch-1 sp, ch 1] 2 times, 5 dc in shell ch-2 sp, [ch 1, dc in next ch-1 sp] 2 times, ch 1, dc in 3rd ch of tch. Turn. (11 dc, 6 ch-1 sps)
Row 8 (fan opens): Ch 4, [dc in next dc, ch 1] 2 times, [dc in next fan dc, ch 1] 4 times, dc in last fan dc, [ch 1, dc in next dc] 2 times, ch 1, dc in 3rd ch of tch. Turn. (11 dc, 10 ch-1 sps)
Row 9 (top edge): Ch 1, sc in first dc, [sc in next ch-1 sp, sc in next dc] 10 times, working the last sc in 3rd ch of tch. (21 sc)
Fasten off and leave an 8 in (20.3 cm) tail.
Long Center Motif (make 1)
This motif uses six extra stem rows to make the longest point.
Rows 1–2: Work as Rows 1–2 of the Large Motif. (6 dc, 1 ch-2 sp)
Rows 3–8 (stem): Ch 3, skip next 2 dc, shell in shell sp, skip next 2 dc, dc in top of tch. Turn. (6 dc, 1 ch-2 sp in each row)
Rows 9–19: Work as Rows 3–13 of the Large Motif. (Row 18: 17 dc, 16 ch-1 sps; Row 19: 33 sc)
Check: The motif has 18 dc rows × 0.4 in = 7.2 in (18.3 cm), plus the sc row, for 7.4 in (18.8 cm) total.
Make All Pieces
- Large motifs: 4 (about 8 g each)
- Long Center motif: 1 (about 10 g)
- Small motifs: 4 (about 4 g each)
- Heading: about 15 g
Block all motifs flat before joining (see Final Blocking for the method). This makes the corners easier to line up.
Layout (left to right, top edges in a straight line):
[ A ][ B ][ A ][ B ][ L ][ B ][ A ][ B ][ A ]
 33   21   33   21   33   21   33   21   33   = 249 sc
A = Large, B = Small, L = Long Center.
Joining
Method: Whipstitch the side edges of neighboring motifs together near their tops.
Stitch-to-stitch logic: Lay two neighboring motifs RS up with their top sc rows level.
- Large or Long Center next to Small: Sew through the side of the top sc row and then through the post of the edge dc on the row below it, on both motifs. The rows below that stay free, which forms the V-shaped gaps between the points.
- The seam is 2 stitches long, about 0.6 in (1.5 cm).
- No new stitches are created. Each motif keeps its own corner sc, so the top edge still totals 33 + 21 + 33 + 21 + 33 + 21 + 33 + 21 + 33 = 249 sc.
Work all 8 seams.
Tension: Pull each stitch only until the edges touch. If you pull tighter, the top edge puckers and the motifs tilt inward.
Size checkpoint: The joined strip measures 41.5 in (105.4 cm) across the top (249 sc ÷ 6 sc per in). It is 7.4 in (18.8 cm) deep at the center.
Border (Heading)
Border gauge: 6 sc = 1 in (2.5 cm), the same as the motif top rows. Because the heading uses exactly 1 sc per top stitch, it keeps the width at 41.5 in (105.4 cm).
Row 1: With RS facing, join yarn in the first sc at the top right corner. Ch 1, sc in each sc across all 9 motifs. Turn. (249 sc: 33 + 21 + 33 + 21 + 33 + 21 + 33 + 21 + 33)
Do not add a stitch at any seam. The corner sc on each side of a seam is already counted.
Row 2 (mesh): Ch 4 (counts as dc + ch 1), skip next sc, dc in next sc, [ch 1, skip next sc, dc in next sc] 123 times. Turn. (125 dc, 124 ch-1 sps = 249 sts wide)
Row 3: Ch 1, sc in first dc, [sc in next ch-1 sp, sc in next dc] 124 times, working the last sc in 3rd ch of tch. Turn. (249 sc: 125 into dc + 124 into sps)
Row 4 (hanging loops): Ch 1, [sc in next sc, ch 10, sl st in same sc, sc in next 30 sc] 8 times, sc in last sc, ch 10, sl st in same sc. (249 sc, 9 loops)
Fasten off.
Why the math works:
– Row 2: Placing a dc in every odd-numbered stitch from 1 to 249 gives 125 dc with 124 spaces between them, so the row covers all 249 stitches.
– Row 4: 8 repeats of 31 sc + 1 final sc = 249. The loops fall on stitches 1, 32, 63, 94, 125, 156, 187, 218 and 249.
– Loop spacing: The loops are evenly spaced 5.2 in (13.2 cm) apart. Stitch 125 is the exact center, so the middle loop sits above the Long Center motif.
The heading is 1.0 in (2.5 cm) deep, and the loops add 0.75 in (1.9 cm).
Final Blocking
- Weave in all ends along the mesh. Keep them out of the fan spaces.
- Soak the valance in cool water for 10 minutes, then press out the water in a towel. Do not wring it.
- Lay it RS up on blocking mats. Pin the heading in a straight line 41.5 in (105.4 cm) long.
- Pull each point straight down. Pin the tips at 6.0 in (15.2 cm) for Large, 4.4 in (11.2 cm) for Small and 8.4 in (21.3 cm) for the Long Center, measured from the top of the heading.
- Pin each fan open in an even arc, and open the mesh spaces with a pin tip.
- Lightly mist the piece with starch or sugar water if you want crisp points.
- Let it dry completely before unpinning.
Final Quality-Control Checklist
- Top edge measures 41.5 in (105.4 cm).
- Heading Rows 1, 3 and 4 each have 249 sc.
- There are 9 evenly spaced loops, with the middle loop centered.
- Point depths are symmetrical on both sides of the center.
- Seams are flat, with no gaps or puckers.
- Every fan has the correct number of dc: 7 in Large and Long Center motifs, 5 in Small motifs.
- No visible ends.
Troubleshooting
- Icicles curl sideways: Your turning chains are too tight. Loosen them, and make sure each ch 4 counts as dc + ch 1.
- Fan looks crowded: Check that Row 11 (or Row 7 on Small motifs) puts every fan dc into the single shell space.
- Top edge ripples: Count the motif top rows. Each one needs exactly 33 or 21 sc.
- Heading too long: You probably added a stitch at a seam. Count 249 sc, then rework the row.
- Points too short: Your row gauge is tight. Block harder lengthwise, or use a larger hook for the dc rows.
- Loops twist: Work the sl st into the front loop and back loop of the same sc.
Care
Hand wash in cool water with mild soap, then reshape and dry flat. Re-block, pinning the points, whenever the icicles lose their shape.
Final Notes
The sizes build on each other in a fixed chain:
- The gauge of 6 sc per in (2.5 cm) gives motif tops of 33 sc (5.5 in / 14.0 cm) and 21 sc (3.5 in / 8.9 cm).
- Nine motifs joined without added stitches give 249 sc, or 41.5 in (105.4 cm).
- The heading keeps those 249 stitches, adds 1.0 in (2.5 cm) of depth, and places 9 loops 5.2 in (13.2 cm) apart.
- The finished valance is 8.4 in (21.3 cm) deep at its center point.
If your first Large motif hits its measurements, every later step will line up too.
Happy crocheting!