

This little tree ornament is made from one flat triangle of tight, two-color single crochet. Slate blue and cream stitches alternate across every row, so the whole tree is covered in a nubby checkerboard that looks almost beaded up close.
The style is quiet and Scandinavian rather than bright. The muted blue reads like frosted pine, and the cream picks up the trunk and the hanging loop. The ornament looks balanced on a tree, a gift tag, or a window hook.
The pattern uses US crochet terms. The finished tree measures about 3.3 in (8.4 cm) wide at the base and 4.0 in (10.2 cm) tall from the bottom of the trunk to the tip. The hanging loop adds about 3 in (7.6 cm).
You will work the triangle flat in rows from the bottom up, decreasing at both edges until one stitch is left at the tip. Then you add a small trunk into the free loops of the foundation chain and finish with a slip-stitch cord loop at the top.
Finished Size and Construction
- Finished size: 3.3 in (8.4 cm) wide × 4.0 in (10.2 cm) tall, plus a 3 in (7.6 cm) loop
- Skill level: Easy-intermediate (simple shaping, color change every stitch)
- Terminology: US crochet terms
- Yarn weight: Worsted (#4)
- Hook: 4.0 mm (US G-6)
- Number of pieces: 1 tree (the trunk and loop are worked onto it)
- Layout: Single flat triangle, no assembly
- Triangle size: 3.3 in (8.4 cm) wide × 3.2 in (8.1 cm) tall
- Trunk size: 1.1 in (2.8 cm) wide × 0.8 in (2.0 cm) tall
- Size before border: Same as finished size, because no border is added
- Border depth: 0 in (0 cm); the checkerboard stitches form the edge
Materials
Choose a smooth, plied worsted yarn in cotton, a cotton blend, or soft acrylic. Clear stitch definition matters more than fiber here, because each single stitch is one “dot” of the checkerboard. Avoid fuzzy or brushed yarns, which blur the pattern.
- Color A, slate blue: about 6 g / 12 m (13 yd)
- Color B, cream: about 7 g / 14 m (15 yd), including the trunk and loop
These quantities include a margin of roughly 25% for the swatch, weaving in ends, and small mistakes. One standard skein of each color will make many ornaments.
Tools:
– 4.0 mm (US G-6) crochet hook
– Tapestry needle
– Scissors
– Ruler or tape measure
– Rust-proof pins and a blocking mat or folded towel
– Spray bottle with clean water
Abbreviations (US Terms)
- ch: chain
- sc: single crochet
- sl st: slip stitch
- sc2tog: single crochet 2 together (one decrease)
- sc3tog: single crochet 3 together (two decreases)
- st(s): stitch(es)
- A / B: Color A (blue) / Color B (cream)
Special technique: tapestry color change. Work the last sc before a color change until 2 loops remain on the hook. Drop the working color, pick up the new color, and pull it through both loops. The new color is now ready for the next stitch. Lay the unused color along the tops of the stitches you are working into and crochet over it, so it stays hidden inside the row.
Checkerboard rule. Each new stitch uses the opposite color of the stitch directly below it. For a decrease, use the opposite color of the inner stitch, which is the one closer to the center of the row. If you follow this rule, every row alternates colors and starts and ends with the same color.
Gauge and Checkpoints
Gauge: 18 sts and 20 rows = 4 in (10.2 cm) in tapestry sc with alternating colors. That is 4.5 sts and 5 rows per 1 in (2.5 cm).
Work a small test swatch first: ch 19, then work 18 sc per row for 20 rows, changing color every stitch. Tapestry crochet is denser than one-color sc, so a plain sc swatch will not give a reliable reading.
The tree itself is a good second test because it is small. Measure at these checkpoints:
- After Row 3: 15 sts, 3.3 in (8.4 cm) wide, 0.6 in (1.5 cm) tall
- After Row 9: 9 sts, top row 2.0 in (5.1 cm) wide, piece 1.8 in (4.6 cm) tall
- After Row 16: 1 st at the tip, 3.2 in (8.1 cm) tall
- After the trunk: 4.0 in (10.2 cm) total height
If your tree is too big: switch to a 3.75 mm (US F-5) hook and keep the carried strand snug.
If your tree is too small or stiff: switch to a 4.5 mm (US 7) hook. Very tight stitches also make the checkerboard hard to see.
A difference of 0.1 in (0.3 cm) is fine for an ornament. If the 3.3 in (8.4 cm) base is off by more than 0.2 in (0.5 cm), fix it before you go on.
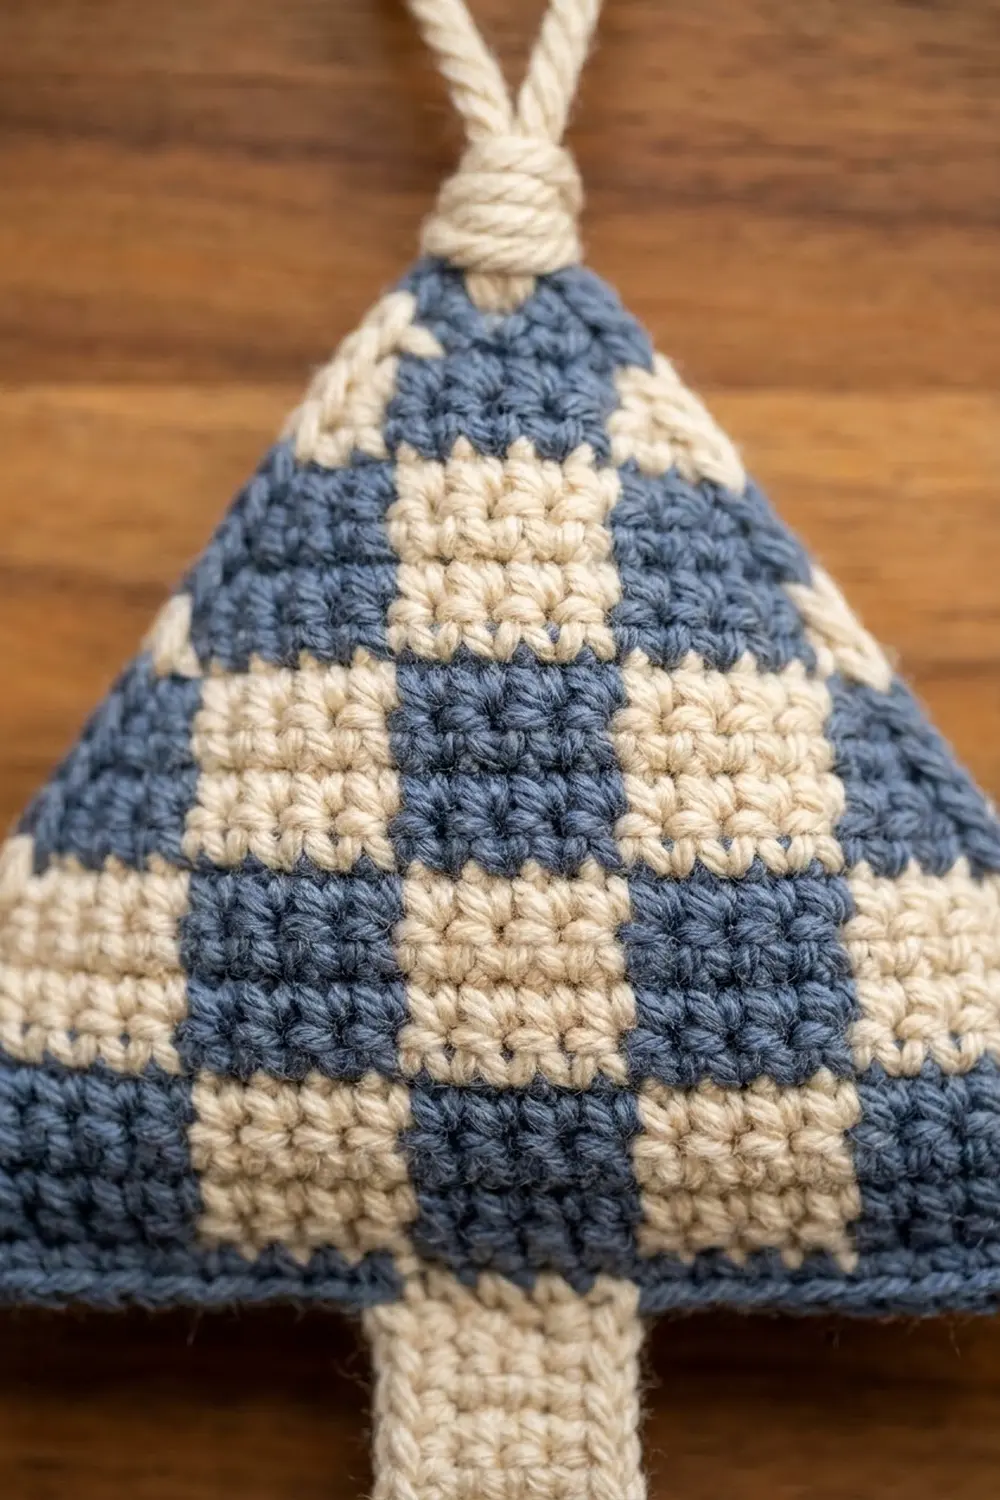
Tree Triangle
Work in rows and turn at the end of each row. The turning ch 1 does not count as a stitch. Carry the unused color across every row, including at the row ends, so it never floats loose along the side edge.
Foundation: With A, ch 16.
Row 1 (right side): Starting in the 2nd ch from the hook, work 15 sc in alternating colors: A, B; repeat from * 6 more times, ending with A. Turn. (15 sts: 8 A, 7 B)*
Row 2: Ch 1. Work 15 sc following the checkerboard rule. The row starts and ends with B. Turn. (15 sts: 8 B, 7 A)
Row 3: Ch 1. Work 15 sc following the checkerboard rule. The row starts and ends with A. Turn. (15 sts)
Checkpoint: the piece should be 3.3 in (8.4 cm) wide and 0.6 in (1.5 cm) tall.
From here, the shaping repeats in pairs: one decrease row, then one even row. Each decrease row removes 1 st at each end, for 2 sts fewer per decrease row.
Row 4 (decrease): Ch 1. Sc2tog, sc in the next 11 sts, sc2tog. Turn. (13 sts, starting and ending with A)
Row 5 (even): Ch 1. Sc in each st across. Turn. (13 sts, starting and ending with B)
Row 6: Ch 1. Sc2tog, sc in the next 9 sts, sc2tog. Turn. (11 sts)
Row 7: Ch 1. Sc in each st across. Turn. (11 sts)
Row 8: Ch 1. Sc2tog, sc in the next 7 sts, sc2tog. Turn. (9 sts)
Row 9: Ch 1. Sc in each st across. Turn. (9 sts)
Checkpoint: the piece should be 1.8 in (4.6 cm) tall, and the top row should be 2.0 in (5.1 cm) wide.
Row 10: Ch 1. Sc2tog, sc in the next 5 sts, sc2tog. Turn. (7 sts)
Row 11: Ch 1. Sc in each st across. Turn. (7 sts)
Row 12: Ch 1. Sc2tog, sc in the next 3 sts, sc2tog. Turn. (5 sts)
Row 13: Ch 1. Sc in each st across. Turn. (5 sts)
Row 14: Ch 1. Sc2tog, sc in the next st, sc2tog. Turn. (3 sts: B, A, B)
Row 15: Ch 1. Sc in each st across. Turn. (3 sts: A, B, A)
Row 16: Ch 1. Sc3tog with A. The center stitch below is B, so the tip is blue. (1 st)
Fasten off both colors, leaving 4 in (10.2 cm) tails.
Shaping check: Rows 1–3 have 15 sts. Six decrease rows (Rows 4, 6, 8, 10, 12, and 14) each remove 2 sts, for 12 in total, which leaves 3 sts. Row 16 removes the last 2: 15 − 12 − 2 = 1. That makes 16 rows, and at 5 rows per inch, 16 rows = 3.2 in (8.1 cm).
Alternating decrease rows with even rows makes a gently pointed triangle that is about as tall as it is wide, which gives a classic tree shape.
Trunk
The trunk is worked downward into the free loops on the other side of the foundation chain. Turn the piece so the bottom edge of the triangle faces up.
There are 15 free loops under the 15 stitches of Row 1. The trunk uses the center 5 loops (loops 6 through 10) and leaves 5 loops free on each side, so it sits exactly in the middle.
Row 1: With B, join with a sl st in free loop 6. Ch 1, sc in the same loop and in the next 4 loops. Turn. (5 sts)
Rows 2–4: Ch 1, sc in each st across. Turn. (5 sts)
Fasten off, leaving a 4 in (10.2 cm) tail. The trunk is all cream with no color changes. At 4.5 sts and 5 rows per inch, it measures 1.1 in (2.8 cm) wide × 0.8 in (2.0 cm) tall.
Checkpoint: the total height from the bottom of the trunk to the tip should be 4.0 in (10.2 cm).
Hanging Loop
Cord: With B, ch 31. Sl st in the back bump of the 2nd ch from the hook and in each back bump across. (30 sl sts)
Fasten off, leaving an 8 in (20.3 cm) tail. The cord should measure about 6 in (15.2 cm). Slip stitches worked through the back bumps make a firm, rounded cord that looks like the twisted cream loop.
Attach: Fold the cord in half and bring both ends to the tip of the tree. Use the long tail to sew both ends securely to the back of the tip stitch and the stitches just below it. This leaves a loop about 3 in (7.6 cm) tall.
Knot wrap: With the same tail, wrap 4–5 times around both strands of the cord right where they meet the tip, covering about 0.2 in (0.5 cm). Pass the needle up under the wraps to lock them, then down into the tree. This makes the small cream knot at the top of the tree.
Edge Finish (No Added Border)
This design has no border round. The two colors already run right to the edge of every row, and a border would hide the checkerboard along the slopes. Instead, the edge stays neat because of how the stitches are worked.
Edge gauge: The side edges follow the same 5 rows per inch (2.5 cm) as the body. Each sloped side climbs 16 rows, or 3.2 in (8.1 cm). The bottom edge has 15 sts, or 3.3 in (8.4 cm).
Edge counts:
– Bottom edge: 15 sts; the trunk uses the center 5, leaving 5 free on each side
– Each sloped side: 16 row-ends, with 1 decrease on every 2nd row from Row 4 to Row 14, then the sc3tog at the tip
– Tip: 1 st
Why the math works: Each side loses 1 st every 2 rows, so the edge moves inward by about half a stitch per row. Half a stitch is about 0.11 in (0.3 cm), and one row is 0.2 in (0.5 cm), so the edge climbs a little more than it moves in. Because that ratio stays the same all the way up, both sides come out straight and matching instead of curved or stepped.
Weaving ends: Weave each tail into stitches of the same color on the wrong side. Blue tails go into blue stitches and cream tails into cream stitches, so nothing shows through on the right side.
Final Blocking
- Weave in all ends before blocking, but do not trim them shorter than 0.4 in (1.0 cm) yet.
- Lay the ornament right side up on a blocking mat or folded towel.
- Pin the two bottom corners 3.3 in (8.4 cm) apart, keeping the bottom edge straight.
- Pin the tip 3.2 in (8.1 cm) above the bottom edge of the triangle, centered between the corners.
- Pin the trunk straight down from the bottom edge, square to it, at 0.8 in (2.0 cm) long.
- Mist the piece lightly with water until it is damp but not soaked.
- Gently press the sloped sides flat with your fingertips so they form straight lines from each corner to the tip.
- Let it dry completely, which usually takes 4–6 hours.
- Unpin the piece, then trim the ends.
- Hang the ornament by its loop for a few minutes to check that it hangs straight.
For acrylic, you can steam lightly instead. Hold the iron above the piece without touching it, and let the piece cool before unpinning.
Final Quality-Control Checklist
- Base measures 3.3 in (8.4 cm) wide
- Triangle measures 3.2 in (8.1 cm) tall; total height with trunk is 4.0 in (10.2 cm)
- Every row alternates colors, and no color sits directly on top of the same color
- No carried strands show on the right side or along the edges
- Both sloped sides are straight and the same length
- Trunk is centered, with 5 free loops on each side
- Tip is a single stitch with no gap
- Loop is about 3 in (7.6 cm) tall and firmly sewn, with a neat wrapped knot
- All ends are woven into stitches of the matching color
Troubleshooting
The colors show through each other. Pull the carried strand snug and keep it lying on top of the stitches you work into. A slightly smaller hook also helps.
The checkerboard turns into stripes. You have placed a color on top of the same color. Check the stitch below before each stitch, and use the inner-stitch rule for decreases.
The tree cups or puckers. The carried yarn is too tight. Gently stretch the row after each color change so the carried strand has as much slack as the width of the stitches.
The sides are wavy or uneven. You may have missed or added a stitch at an edge. Count after every row and compare with the counts given above.
The trunk is off-center. Count the free loops again and start in loop 6 of 15.
The loop flops sideways. Sew both cord ends to the back of the tip, slightly below the top, and tighten the knot wrap.
Care
Hand wash in cool water with mild soap, press the water out in a towel, and dry flat, reshaping as you did when blocking. Store the ornament flat or hanging, away from direct sun, so the slate blue keeps its color.

Final Notes
The whole ornament comes from one simple measurement chain. A gauge of 4.5 sts and 5 rows per inch (2.5 cm) turns a 15-st base into 3.3 in (8.4 cm). Sixteen rows with paired decreases make a 3.2 in (8.1 cm) triangle. A centered trunk of 5 sts and 4 rows adds 0.8 in (2.0 cm), for a total height of 4.0 in (10.2 cm). A 30-st cord folds into a 3 in (7.6 cm) hanging loop.
If you check your measurements at Rows 3, 9, and 16, the tree will come out as planned. Once you have the rhythm, each ornament takes well under an hour, so it is easy to make a whole set for your tree or for gift toppers.
Happy crocheting!