

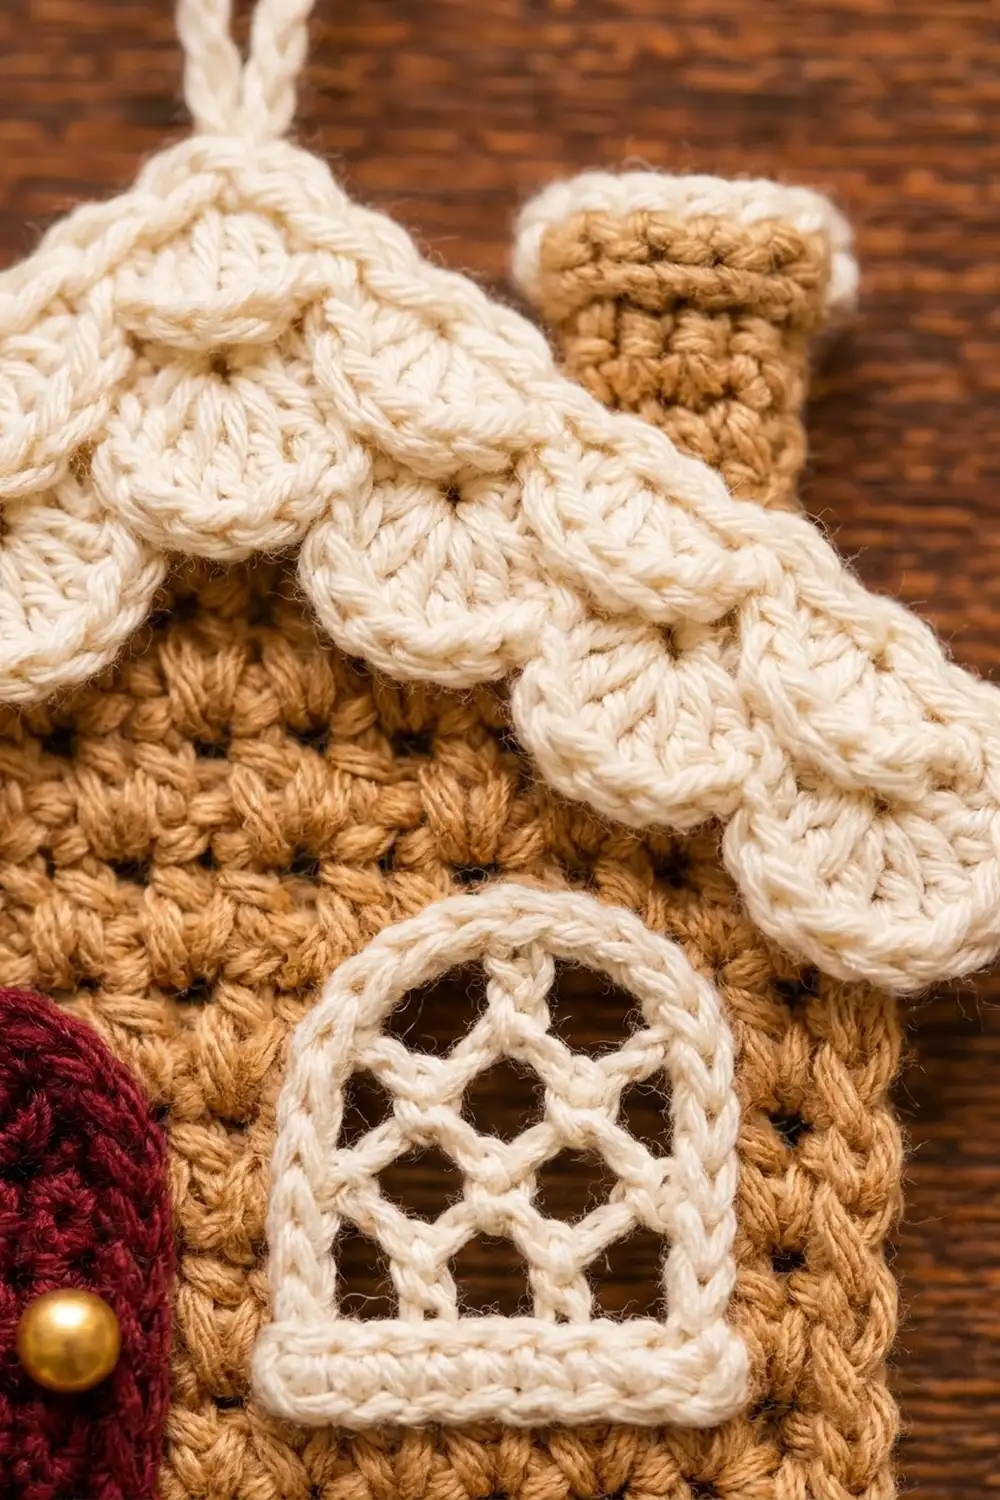
This little gingerbread house is one flat ornament built from a few simple parts. A caramel-tan house shape forms the base. A cream scalloped roof sits across the gable like piped royal icing, and a small tan chimney peeks out on the right.
The front gets a burgundy arched door with a gold bead knob and a cream arched window with an open grid lattice. A row of cream scallops trims the bottom edge, and a cream chain loop at the peak lets it hang from a branch.
The pattern uses US crochet terms. The finished ornament is about 4.8 in (12.2 cm) wide across the roof and 5 in (12.7 cm) tall, not counting the hanging loop.
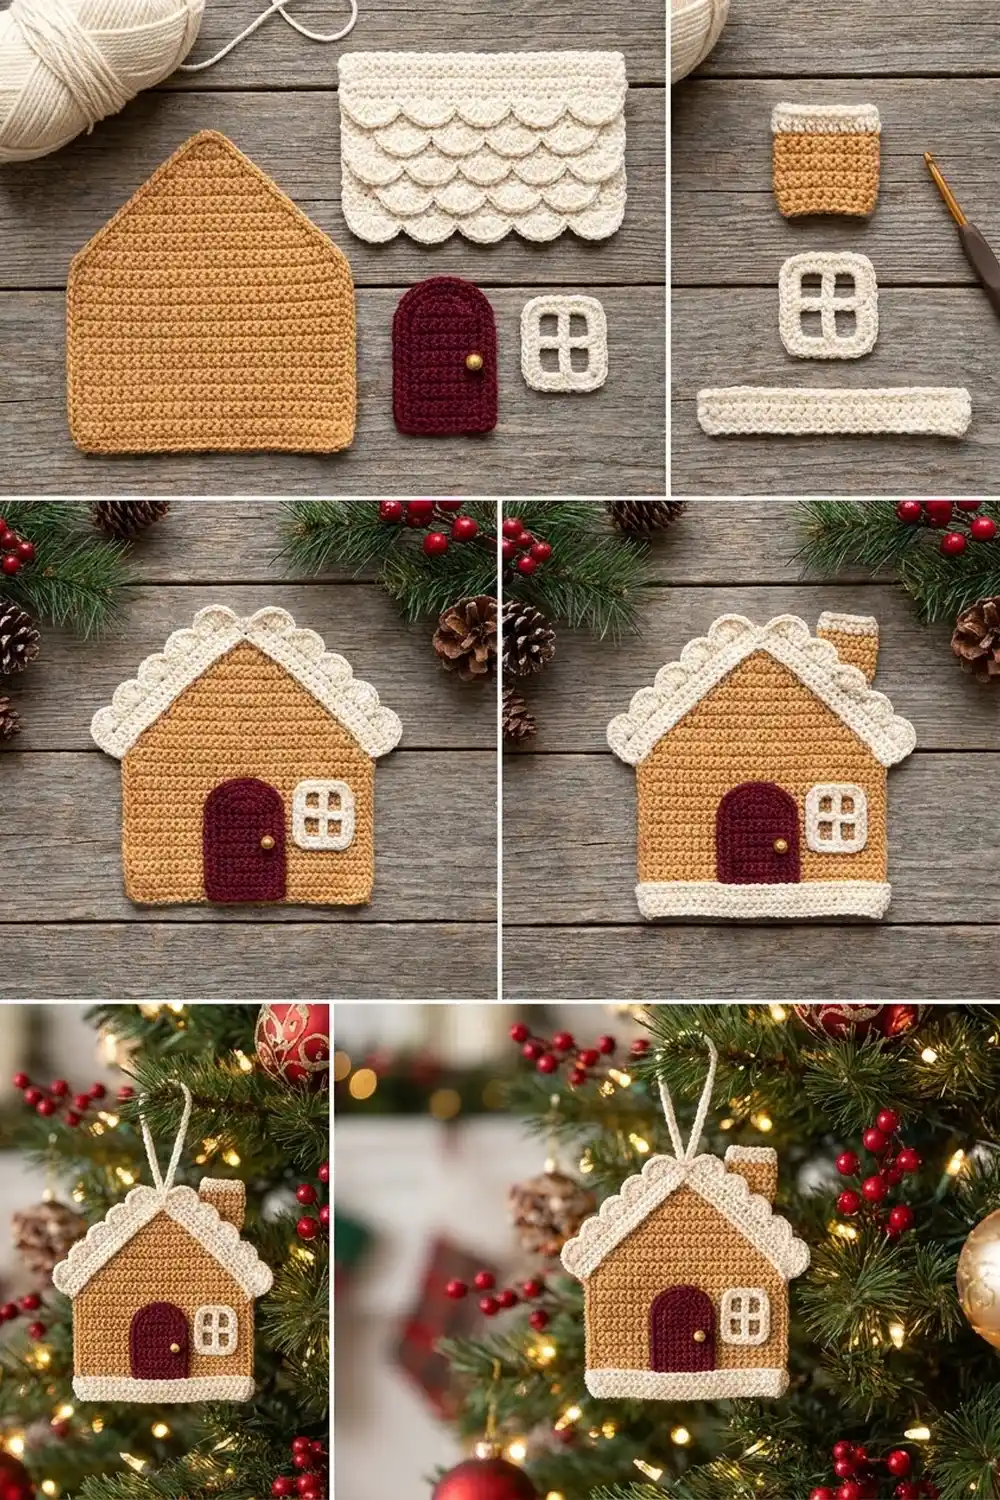
You crochet the base flat in rows, edge it with a round of single crochet, and add a scalloped trim along the bottom. The roof, chimney, door, and window are made separately and sewn on as appliqués. The loop goes on last.
Finished Size and Construction
- Finished size: about 4.8 in (12.2 cm) wide x 5 in (12.7 cm) tall, loop not included
- Skill level: Easy-intermediate
- Terminology: US crochet terms
- Yarn weight: DK (light, #3)
- Hook: 3.5 mm (US E-4)
- Number of pieces: 1 finished ornament, made from 5 crocheted parts (base, roof, chimney, door, window) plus a chain loop
- Layout: one house shape with layered appliqués on the front
- Base size before border: 4.2 in (10.7 cm) wide x 4 in (10.2 cm) tall
- Base size after tan edging: 4.4 in (11.2 cm) wide x 4.2 in (10.7 cm) tall
- Border depth: tan edging about 0.1 in (0.3 cm) all around; cream scallop trim about 0.4 in (1.0 cm), along the bottom only
Materials
Pick a smooth DK yarn with good stitch definition. Cotton or a cotton blend keeps the scallops crisp. Acrylic also works if you block it well. Avoid fuzzy yarn, because it blurs the lattice window.
- Tan / caramel (base, chimney): 15 g, about 36 m
- Cream (roof, window, bottom trim, loop): 10 g, about 24 m
- Burgundy (door): 3 g, about 7 m
All quantities include a small margin for your gauge swatch and sewing tails.
Tools:
- 3.5 mm (US E-4) crochet hook
- Tapestry needle
- One 6 mm gold bead or small gold button for the doorknob, plus sewing thread
- Stitch markers
- Rust-proof pins and a blocking mat
- Scissors and a ruler
Abbreviations (US Terms)
- ch: chain
- sl st: slip stitch
- sc: single crochet
- hdc: half double crochet
- dc: double crochet
- tr: treble crochet
- sc2tog: single crochet 2 together
- sc3tog: single crochet 3 together
- FLO / BLO: front loop only / back loop only
- st(s): stitch(es)
- sk: skip
- sp: space
Special stitch – sc3tog: Insert your hook in the next st and pull up a loop. Repeat in each of the next 2 sts (4 loops on hook). Yarn over and pull through all 4 loops.
Gauge and Checkpoints
Gauge: 10 sc x 12 rows = 2 in (5.1 cm) square, worked in rows with the tan yarn. That works out to 5 sts and 6 rows per inch.
Use the base as your test piece. Every other part is sized to fit it, so check these numbers as you go:
- After Row 1: 21 sc measure 4.2 in (10.7 cm) across.
- After Row 15: the rectangle is 4.2 in (10.7 cm) wide x 2.5 in (6.4 cm) tall.
- After Row 24: the base is 4 in (10.2 cm) tall at the peak.
- After the edging: 4.4 in (11.2 cm) wide x 4.2 in (10.7 cm) tall.
If the base is too big, switch to a 3.25 mm hook. If it’s too small, switch to a 3.75 mm hook. If only the height is off, check that you aren’t working into your turning chains. Use the same hook for every part so the appliqués stay in proportion.
Base (Tan)
The base is a rectangle that narrows into a gable. Decreasing at both ends of every gable row creates the sloped sides.
Row 1: Ch 22. Sc in 2nd ch from hook and in each ch across. (21 sc)
Rows 2–15: Ch 1, turn. Sc in each st across. (21 sc)
Checkpoint: 4.2 in (10.7 cm) wide x 2.5 in (6.4 cm) tall.
Row 16: Ch 1, turn. Sc2tog, sc in next 17 sts, sc2tog. (19 sc)
Rows 17–24: Ch 1, turn. Sc2tog, sc in each st to last 2 sts, sc2tog. Your stitch counts are:
- Row 17: 17 sc
- Row 18: 15 sc
- Row 19: 13 sc
- Row 20: 11 sc
- Row 21: 9 sc
- Row 22: 7 sc
- Row 23: 5 sc
- Row 24: 3 sc
The gable is 9 rows, or 1.5 in (3.8 cm) tall. Each row loses 1 st at each end, so each slope steps in 1.8 in (4.6 cm) horizontally.
Checkpoint: 4 in (10.2 cm) tall at the peak.
Don’t fasten off. Go straight on to the border section below.
Roof (Cream)
The roof is one strip worked from the ridge down. A center decrease bends it into an upside-down V. You then add two tiers of scallops from the same row. The front tier is worked in front loops, and the longer back tier in back loops, offset so its scallops peek out between the front ones.
Row 1 (ridge): Ch 32. Sc in 2nd ch from hook and in each ch across. (31 sc)
Row 2: Ch 1, turn. Sc in next 14 sts, sc3tog, sc in next 14 sts. (29 sc)
Place a marker in the sc3tog. That’s the roof peak and stitch 15 of 29.
Row 3 (front tier, FLO): Ch 1, turn. Working in FLO, sc in first st, [sk 1, 5 dc in next st, sk 1, sc in next st] 7 times. (8 sc + 35 dc = 43 sts; 7 scallops)
The sc’s land on stitches 1, 5, 9, 13, 17, 21, 25, and 29. The center scallop sits on the marked peak stitch (15).
Row 4 (back tier, BLO): Don’t turn. Ch 4, rotate the piece, and work back across the unused back loops of Row 2:
- 3 tr in first st (half scallop)
- sk 1, sc in next st
- [sk 1, 5 tr in next st, sk 1, sc in next st] 6 times
- sk 1, 3 tr in last st (half scallop)
That gives 7 sc + 30 tr + 6 tr = 43 sts, with 6 full scallops and 2 half scallops. All 29 back loops are used: 1 + 2 + (6 x 4) + 2 = 29.
Fasten off, leaving a 12 in (30.5 cm) tail for sewing.
Checkpoint: each arm of the ridge measures about 3.1 in (7.9 cm). Once the roof is blocked into a V, it spans about 4.8 in (12.2 cm) and is about 1 in (2.5 cm) deep.
Chimney (Tan)
Row 1: Ch 5. Sc in 2nd ch from hook and in each ch across. (4 sc)
Rows 2–5: Ch 1, turn. Sc in each st across. (4 sc)
Row 6 (cuff): Ch 1, turn. 2 sc in first st, sc in next 2 sts, 2 sc in last st. (6 sc)
Row 7: Ch 1, turn. Sc in each st across. (6 sc)
Fasten off and leave a tail. Checkpoint: 0.8 in (2.0 cm) wide at the stack, 1.2 in (3.0 cm) wide at the cuff, 1.2 in (3.0 cm) tall.
Door (Burgundy)
Row 1: Ch 6. Sc in 2nd ch from hook and in each ch across. (5 sc)
Rows 2–8: Ch 1, turn. Sc in each st across. (5 sc)
Row 9 (arch): Ch 1, turn. Sl st in first st, hdc in next st, 3 dc in next st, hdc in next st, sl st in last st. (7 sts)
Edging round: Ch 1. Work around the door:
- sc in each of the 7 arch sts
- 8 sc down the side (1 per row end)
- 5 sc across the bottom (1 in each foundation ch)
- 8 sc up the other side
Join with a sl st. (28 sc)
Fasten off and leave a tail. Sew the gold bead to the right side, about halfway up.
Checkpoint: 1.2 in (3.0 cm) wide x 1.8 in (4.6 cm) tall.
Window (Cream)
Row 1 (sill): Ch 8. Sc in 2nd ch from hook and in each ch across. (7 sc)
Row 2: Ch 4 (counts as dc + ch 1), turn. Sk next st, dc in next st, [ch 1, sk 1, dc in next st] 2 times. (4 dc, 3 ch-1 sps)
Row 3: Ch 4 (counts as dc + ch 1), turn. Dc in next dc, ch 1, dc in next dc, ch 1, dc in 3rd ch of the turning ch. (4 dc, 3 ch-1 sps)
Row 4 (arch): Ch 1, turn. Sc in first dc, ch 3, dc in next dc, ch 2, dc in next dc, ch 3, sc in 3rd ch of the turning ch. (2 sc, 2 dc, 3 ch-sps)
Frame round: Ch 1. Work around the window:
- Arch: sc in first sc, 3 sc in ch-3 sp, sc in dc, 2 sc in ch-2 sp, sc in dc, 3 sc in ch-3 sp, sc in last sc (12 sc)
- 5 sc down the side (2 sc per dc row end, 1 sc in the sill row end)
- 7 sc across the bottom of the sill
- 5 sc up the other side
Join with a sl st. (29 sc)
The open ch spaces form the grid lattice, and the bottom of the frame doubles as a thick sill. Checkpoint: 1.6 in (4.1 cm) wide x 1.5 in (3.8 cm) tall.
Assembly
- Block all the parts flat (see Final Blocking) before you sew anything.
- Chimney: Pin it to the front of the right gable slope, cuff up, with the bottom 0.4 in (1.0 cm) overlapping the base. Whipstitch it in place.
- Roof: Center the marked peak about 0.3 in (0.8 cm) above the base peak. Lay each arm along its slope so the scallops hang over the gable and cover the bottom of the chimney. Each arm overhangs the side of the base by about 0.2 in (0.5 cm). Backstitch along Row 1 and Row 2 only, leaving the scallops free so they stay dimensional.
- Door: Place it 0.5 in (1.3 cm) in from the left edge, with its bottom 0.2 in (0.5 cm) above the bottom edge of the base. Whipstitch around its edging.
- Window: Place it 0.4 in (1.0 cm) to the right of the door, with the sill bottom 0.6 in (1.5 cm) above the bottom edge of the base. Stitch around the frame only. Keep the lattice open so the tan shows through.
- Loop: With cream, ch 24 (about 4.8 in / 12.2 cm). Fold it in half and sew both ends to the back of the roof peak, so a 2.4 in (6.1 cm) loop stands above the roof.
Border
The border has two parts: a tan sc round around the whole base, then a cream scallop row along the bottom only. The border uses the same gauge as the base, 5 sts per inch.
Round 1 (tan edging): Continue from the end of Row 24 with ch 1, without turning. Count stitches as you go:
- Left slope: 9 sc, 1 per row end of Rows 24–16
- Left side: 15 sc, 1 per row end of Rows 15–1
- Bottom: 3 sc in the first foundation ch (corner), 1 sc in each of the next 19 ch, 3 sc in the last foundation ch (corner), for 25 sc
- Right side: 15 sc
- Right slope: 9 sc
- Top: sc in first st of Row 24, 3 sc in center st, sc in last st, for 5 sc
Join with a sl st to the first sc. (78 sc) Fasten off the tan.
Why the math works: 9 + 15 + 25 + 15 + 9 + 5 = 78. The bottom count of 25 already includes both 3-sc corner groups, so corners aren’t counted twice. One sc per sc row end lies flat at this gauge, because 6 rows per inch roughly matches 5 sts per inch with the edges slightly eased.
Row 2 (cream scallop trim, bottom only): With the right side facing, join cream in the first sc of the bottom-left corner group. Sc in the same st, [sk 1, 5 dc in next st, sk 1, sc in next st] 6 times. (7 sc + 30 dc = 37 sts; 6 scallops)
Why the math works: each repeat uses 4 sts, so 1 + (6 x 4) = 25, exactly the bottom count. The last sc lands in the last st of the right corner group. The trim is symmetrical and ends flush at both corners.
Fasten off and weave in the ends. Checkpoint: base plus trim is 4.6 in (11.7 cm) tall, and 4.4 in (11.2 cm) wide at the base.
Final Blocking
- Lightly mist the finished ornament with water, or steam it gently from above. Don’t let an iron touch acrylic.
- Pin it face up on a blocking mat.
- Pin the base to 4.4 in (11.2 cm) wide, keeping the sides straight and the corners square.
- Open the roof into a V that spans 4.8 in (12.2 cm), with the peak centered over the gable.
- Pin each scallop on the roof and bottom trim into a round curve.
- Check that the window lattice is open and square.
- Let it dry completely, at least a few hours, before you unpin it.
Final Quality-Control Checklist
- Base edging has 78 sc, and the bottom trim has 6 even scallops.
- Roof front tier has 7 scallops, back tier 6 full plus 2 half scallops.
- Roof peak sits centered above the base peak.
- Chimney base is hidden under the roof scallops.
- Door is 1.2 in (3.0 cm) wide, the knob is secure, and the door doesn’t tilt.
- Window lattice is open and the frame is stitched down evenly.
- Loop is firmly sewn and the ornament hangs level.
- All ends are woven in on the back.
- Finished size is about 4.8 in (12.2 cm) x 5 in (12.7 cm).
Troubleshooting
- Gable looks lopsided: You missed an sc2tog on one end. Count each gable row (19, 17, 15 and so on down to 3).
- Base edging ruffles: Your sts are looser than your rows. Skip 1 row end per side, or go down a hook size for the edging only.
- Edging pulls in: Work 2 sc into every 5th row end, but keep the bottom at 25 so the trim still fits.
- Roof won’t form a V: Steam-block it hard at the peak, and make sure Row 2 has the sc3tog.
- Back roof tier hides the front tier: Check that Row 4 is in BLO with tr stitches. If it’s still too long, switch the tr to dc.
- Window holes look closed: Pin the frame square while it’s damp, then stretch each ch space.
- Ornament tilts when hung: Re-center the loop at the true roof peak.
Care
Hand wash in cool water with mild soap, press out the water with a towel, and dry flat, reshaping the scallops. Store it flat between layers of tissue so the roof doesn’t crush.
Final Notes
Everything in this ornament comes back to one measurement: 5 sts and 6 rows per inch. At that gauge, the base is 4.2 in (10.7 cm) wide and 4 in (10.2 cm) tall. The tan edging brings it to 4.4 in (11.2 cm) x 4.2 in (10.7 cm), and the cream trim adds 0.4 in (1.0 cm). The roof arms are sized to cover the 2.4 in (6.1 cm) slopes with a little overhang, so the finished house is about 4.8 in (12.2 cm) x 5 in (12.7 cm). Match the gauge and everything fits.
Happy crocheting!