

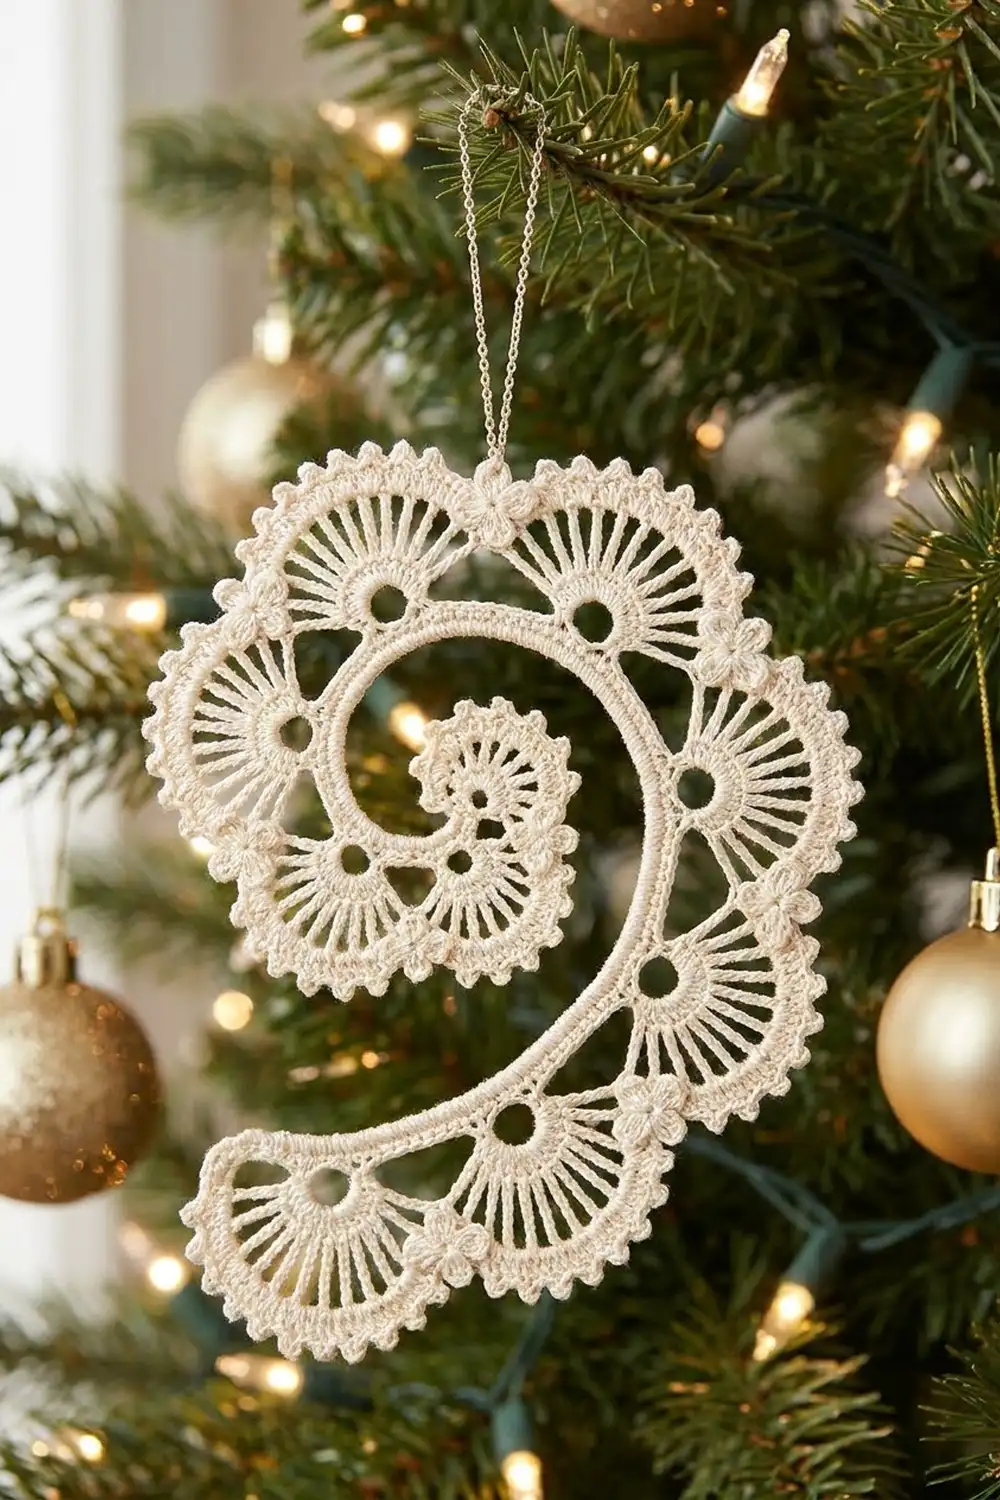
The Frosted Curl is a delicate thread-lace ornament shaped like an ocean wave curling in on itself. Seven fan motifs sit along a curved spine. They start small at the center and grow larger toward the top, so the spiral looks as if it is unfurling.
The sample is worked in a single cream thread for a soft, heirloom look. It looks lovely against green branches and warm fairy lights, and it also works as a gift-tag topper or window hanging. Any solid light color works, but pale shades show the open lace best.
This pattern uses US crochet terms. The finished ornament measures about 4.5 in (11.4 cm) tall by 3.25 in (8.3 cm) wide. With the hanging loop it is about 5.25 in (13.3 cm) tall.
Construction is one continuous piece with no sewing. First you work outward from the center, making a chain spine with a ring and a fan of spokes at each stage. Then you work back across the fan tops to make solid arcs. A picot border goes along the outer edge, and a single-crochet row firms up the inner spine. The difference in stitch count between the outer and inner edges pulls the strip into its spiral. Blocking sets the shape.
Finished Size and Construction
- Finished size: 4.5 in (11.4 cm) tall x 3.25 in (8.3 cm) wide, not counting the loop
- Height with loop: 5.25 in (13.3 cm)
- Skill level: Intermediate (thread work, counting in chain spaces)
- Terminology: US
- Yarn weight: Size 10 crochet cotton thread
- Hook: 1.5 mm steel hook (US 7 or 8, depending on brand)
- Number of pieces: 1
- Layout: One strip of 7 graduated fans, curled into a spiral
- Piece size: 4.5 x 3.25 in (11.4 x 8.3 cm)
- Size before border: about 4.25 x 3 in (10.8 x 7.6 cm)
- Border depth: about 0.125 in (0.3 cm)
Materials
Thread: Use mercerized size 10 cotton crochet thread. Mercerized cotton holds a crisp shape after stiffening and keeps a slight sheen. Avoid fuzzy or acrylic threads, because they blur the spokes and don’t block well.
- Cream / ecru: 5 g, about 20 m (22 yd)
This quantity includes a margin for your gauge swatch and weaving in ends.
Tools:
– 1.5 mm steel crochet hook
– Fine tapestry needle or small-eye beading needle
– Small sharp scissors
– Fabric stiffener, or a 1:1 mix of white craft glue and water
– Blocking board or foam, covered in plastic wrap
– Rustproof pins
– Thin ribbon or thread for hanging (optional)
Abbreviations (US Terms)
- ch – chain
- sl st – slip stitch
- sc – single crochet
- dc – double crochet
- tr – treble crochet
- sp – space
- st(s) – stitch(es)
Special stitches:
– Picot: Ch 3, sl st in 3rd ch from hook.
– Trefoil: Ch 4, sl st in 4th ch from hook. [Ch 3, sl st in the same st as the previous sl st] twice. This makes three small loops from one point.
– Ring: Ch the stated number, then sl st in the first ch of that group to close a small circle.
Gauge and Checkpoints
Gauge: 12 sc = 1 in (2.5 cm) in size 10 thread with a 1.5 mm hook.
Test with one fan before starting the ornament. Ch 6 and work Fan 5 (a large fan) as written below. Then work its arc row (31 sc). The finished large fan should measure 1.5 in (3.8 cm) across its widest point.
Checkpoints:
– Each ring: about 0.25 in (0.6 cm) across
– Small fan after the arc row: 0.75 in (1.9 cm) across
– Medium fan after the arc row: 1.25 in (3.2 cm) across
– Large fan after the arc row: 1.5 in (3.8 cm) across
– Whole piece before the border: about 4.25 x 3 in (10.8 x 7.6 cm), gently curved
– After the border and blocking: 4.5 x 3.25 in (11.4 x 8.3 cm)
If your fan is too big, try a 1.25 mm hook or tighten your chain spaces. If it’s too small, try a 1.75 mm hook. Change the hook size rather than the stitch counts, because every count in this pattern depends on the counts before it.
Spine and Fans (Row A)
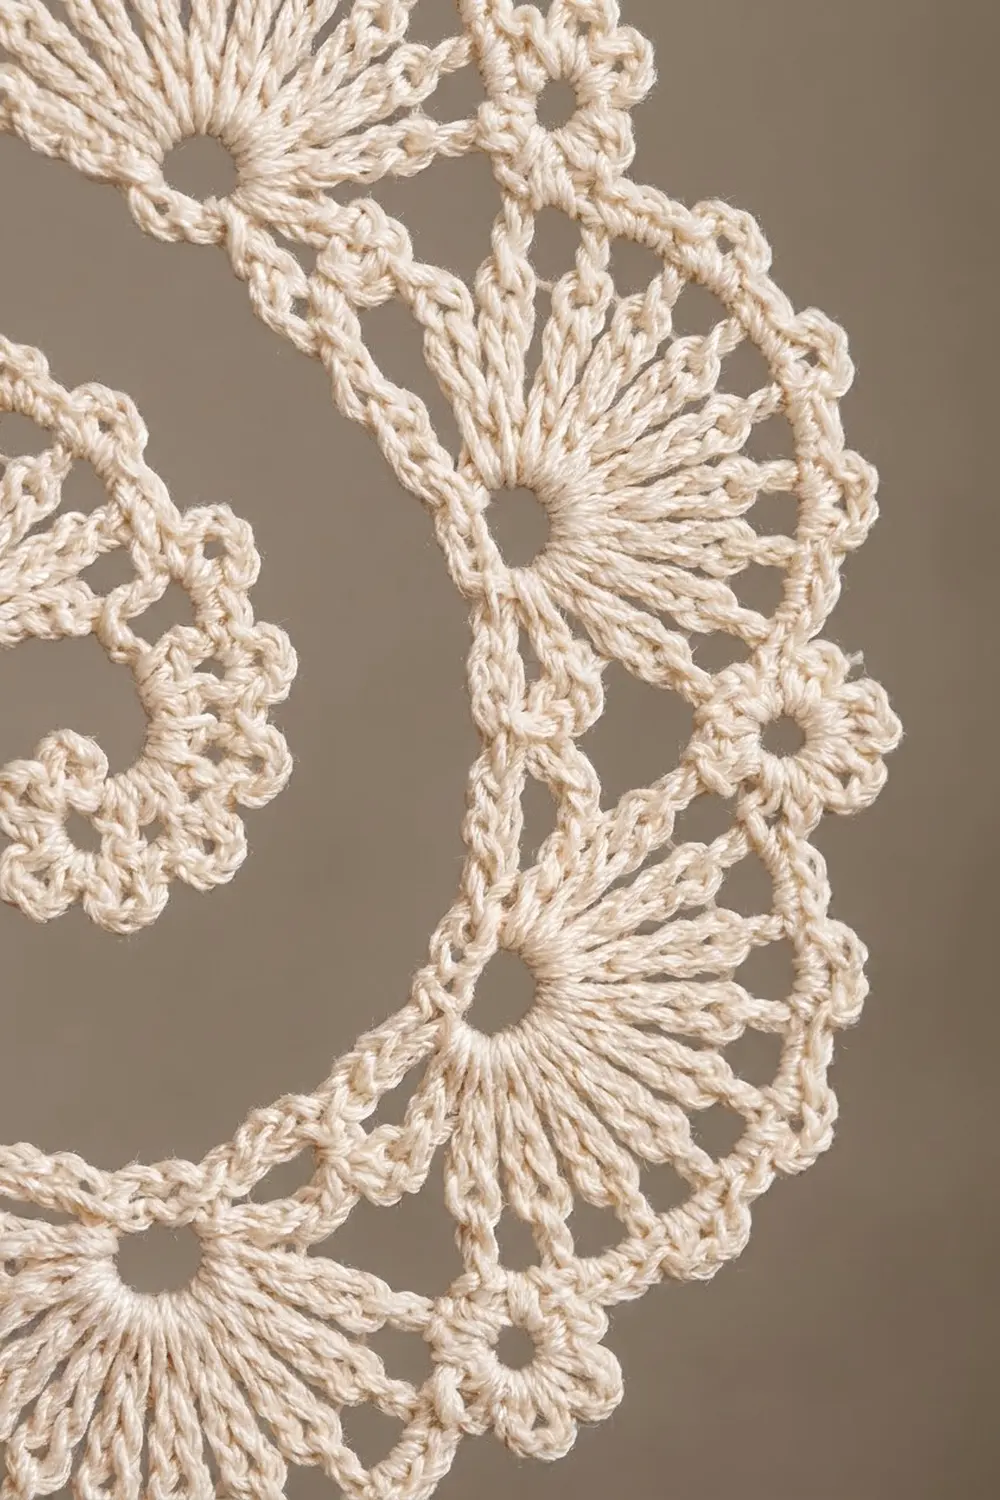
This row works outward from the center of the spiral. Keep every fan on the same side of the spine. That side becomes the outer edge of the curl.
Center curl: Ch 4, sl st in first ch to form a ring. [Ch 3, sl st in ring] 3 times. (3 ch-3 petals made.)
Spine to Fan 1: Ch 4.
Fan 1 (small): Ch 5, sl st in first of these 5 ch to form a ring. Ch 3 (counts as first dc). [Ch 1, dc in ring] 6 times. Sl st in ring to close the fan.
Count: 7 dc spokes, 6 ch-1 sps.
Spine: Ch 4.
Fan 2 (small): Work the same as Fan 1. Count: 7 spokes, 6 ch-1 sps.
Spine: Ch 5.
Fan 3 (medium): Ch 6, sl st in first of these 6 ch to form a ring. Ch 4 (counts as first tr). [Ch 1, tr in ring] 8 times. Sl st in ring.
Count: 9 tr spokes, 8 ch-1 sps.
Spine: Ch 5.
Fan 4 (medium): Work the same as Fan 3. Count: 9 spokes, 8 ch-1 sps.
Spine: Ch 6.
Fan 5 (large): Ch 6, sl st in first of these 6 ch to form a ring. Ch 4 (counts as first tr). [Ch 2, tr in ring] 10 times. Sl st in ring.
Count: 11 tr spokes, 10 ch-2 sps.
Spine: Ch 6.
Fan 6 (large): Work the same as Fan 5.
Spine: Ch 6.
Fan 7 (large, top fan): Work the same as Fan 5. Do not fasten off.
Row A totals: 7 rings, 36 spine chains (4 + 4 + 5 + 5 + 6 + 6 + 6), and 62 spokes (7 + 7 + 9 + 9 + 11 + 11 + 11).
Hanging loop: Ch 20, sl st in the Fan 7 ring. The loop hangs about 0.75 in (1.9 cm).
Checkpoint: Lay the strip flat. It should be about 7 in (17.8 cm) long, with the fans already leaning in one direction.
Fan Arcs (Row B)
This row works back from Fan 7 to Fan 1 across the top of every fan.
To reach the first stitch: Sl st up the post of the last tr of Fan 7 to its top. This takes about 3 sl sts, which are not counted. Ch 1.
Fan 7 arc: Sc in top of the last tr. [2 sc in next ch-2 sp, sc in next tr] 10 times. The last sc goes in the top of the beginning ch-4.
Count: 1 + (10 x 3) = 31 sc.
Bridge: Ch 2. Then sc in the top of the last tr of the next fan, which starts that fan’s arc.
Fan 6 and Fan 5 arcs: Work the same as Fan 7, starting with the sc just made. Count: 31 sc each. Ch 2 after each arc for the bridge.
Fan 4 and Fan 3 arcs: Sc in the top of the last tr. [2 sc in next ch-1 sp, sc in next tr] 8 times.
Count: 1 + (8 x 3) = 25 sc each. Ch 2 after each arc for the bridge.
Fan 2 and Fan 1 arcs: Sc in the top of the last dc. [Sc in next ch-1 sp, sc in next dc] 6 times.
Count: 1 + (6 x 2) = 13 sc each. Work a ch-2 bridge after Fan 2 only.
Row B totals: (3 x 31) + (2 x 25) + (2 x 13) = 93 + 50 + 26 = 169 sc, plus 6 ch-2 bridges.
Checkpoint: The piece should now measure about 4.25 x 3 in (10.8 x 7.6 cm) when you ease it into a loose spiral.
Border
The border has two parts. Row C adds picots to the outer edge, and Row D firms up the inner edge.
Border gauge: There is 1 picot every 3 sc, so about 4 picots per 1 in (2.5 cm) of arc.
Row C (picot edge, Fan 1 to Fan 7): Ch 1, turn.
- Fan 1: Sc in first sc. [Picot, sc in next 3 sc] 4 times. Count: 13 sc, 4 picots.
- Junction: (Sc, Trefoil, sc) in the ch-2 bridge.
- Fan 2: Work the same as Fan 1. Count: 13 sc, 4 picots. Work a Junction.
- Fans 3 and 4: Sc in first sc. [Picot, sc in next 3 sc] 8 times. Count: 25 sc, 8 picots each. Work a Junction after each.
- Fans 5, 6 and 7: Sc in first sc. [Picot, sc in next 3 sc] 10 times. Count: 31 sc, 10 picots each. Work a Junction after Fans 5 and 6 only.
Row C totals:
– Sc: 169 (on the arcs) + 12 (2 per junction x 6) = 181 sc
– Picots: (2 x 4) + (2 x 8) + (3 x 10) = 54 picots
– 6 trefoils
Why the math works: Each arc count fits the form 1 + 3k: 13 = 1 + 12, 25 = 1 + 24, 31 = 1 + 30. That means the picots spread evenly, and every arc both starts and ends on a sc. The trefoils sit exactly where two fans meet, which is the three-petal cluster seen at each joint.
Row D (inner spine edge, Fan 7 to center): Row C ends at the beginning ch-4 of Fan 7. Sl st down that ch-4 to the ring. Do not count these sl sts.
- 2 sc in the unworked lower part of the Fan 7 ring.
- Sc in each ch of the next spine segment.
- Repeat at every ring and spine segment back to the center.
The sc counts per spine segment are 6, 6, 6, 5, 5, 4, 4. Each of the 7 rings gets 2 sc.
Row D total: 14 ring sc + 36 spine sc = 50 sc. Sl st in the center ring and fasten off, leaving a 6 in (15.2 cm) tail.
Row D has 50 sc, while the outer edge has 181 sc plus picots. That difference is what curls the strip into a spiral. Keep Row D firm.
Final Blocking
- Weave in all ends along the spine. Trim close.
- Soak the ornament in stiffener for 1 minute. Squeeze out the excess gently. Don’t wring it.
- Lay it on the covered board and ease it into the spiral, with Fan 1 tucked into the center curl.
- Pin the ring of each fan first, then pin the arc of each fan into a smooth curve.
- Pin out every picot and every trefoil petal with its own pin.
- Check the size: 4.5 in (11.4 cm) tall x 3.25 in (8.3 cm) wide.
- Pin the hanging loop straight up from the top.
- Let it dry completely, about 12–24 hours, before you unpin it.
Final Quality-Control Checklist
- 7 fans, in the order small, small, medium, medium, large, large, large
- Spoke counts of 7, 7, 9, 9, 11, 11, 11
- Arc counts of 13, 13, 25, 25, 31, 31, 31 sc (169 total)
- 54 picots and 6 trefoils on the outer edge
- 50 sc along the inner spine
- Center curl shows 3 petals
- Size is 4.5 x 3.25 in (11.4 x 8.3 cm)
- Loop is secure and centered at the top
- Ornament lies flat with no twisting
- No ends show on the front
Troubleshooting
Fans flip to alternating sides: You turned the work between fans. Keep the same side facing you for all of Row A.
Arcs ruffle: Your chain spaces are too tight for the sc you’re working into them. Loosen the ch-1 and ch-2 spaces slightly, or go down a hook size for Row B only.
Arcs cup or pull in: Your sc are too tight. Relax your tension, or go up a hook size for Row B.
Spiral won’t curl: Row D is too loose. Rework it more firmly, or use a smaller hook for that row.
Spiral curls too tightly: Work Row D a little looser and block it more firmly.
Picots look flat: Pin each picot open during blocking.
Rings close up: Work the stitches into the ring without pulling the beginning chain shut.
Care
Dust gently with a soft brush. If it gets dirty, hand rinse in cool water, then re-stiffen and re-block. Store flat in tissue paper.
Final Notes
Each stage builds on the one before:
- Gauge is 12 sc = 1 in (2.5 cm).
- The test fan should be 1.5 in (3.8 cm) across.
- Row A builds 7 fans with 62 spokes.
- Row B adds 169 sc.
- The piece measures 4.25 x 3 in (10.8 x 7.6 cm) before the border.
- The border adds 181 sc, 54 picots, 6 trefoils and a 50 sc spine.
- After blocking, the ornament measures 4.5 x 3.25 in (11.4 x 8.3 cm).
Check at every stage and the spiral will come out true. Make several ornaments for a matching set on the tree.
Happy crocheting!