

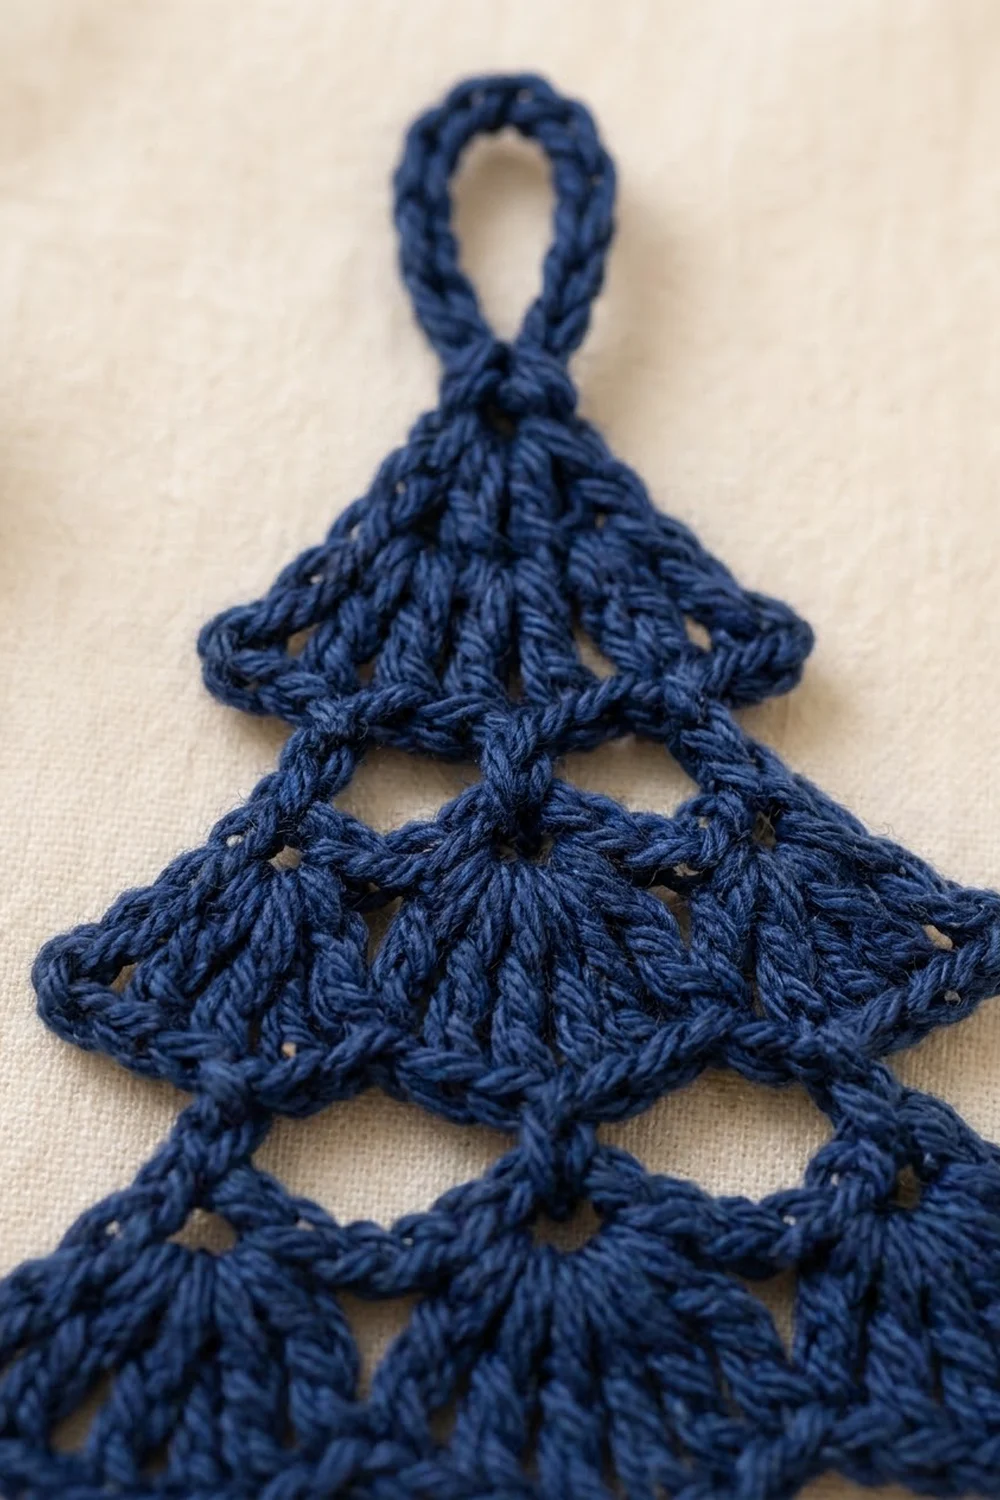
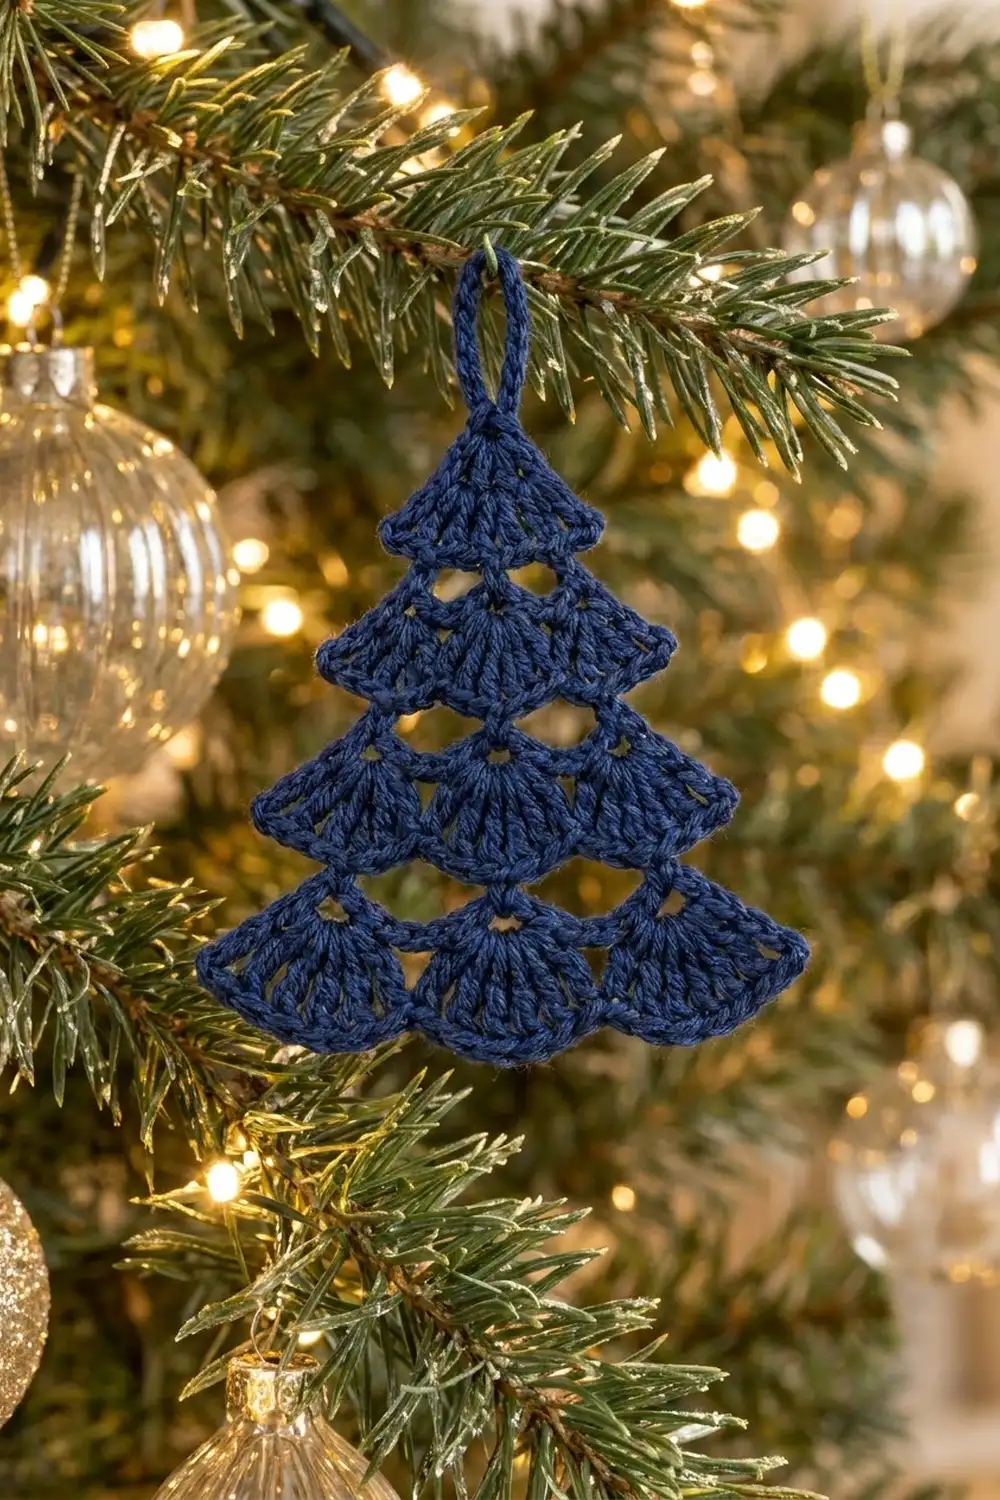
This little tree ornament is made from stacked dc fans and has a lacy, airy look. Every tier is wider than the one above, so the piece forms a stepped Christmas tree outline. Small open windows separate the tiers, and the bottom tier ends in soft scallops.
The sample is one deep navy color. A single dark color makes the fan texture stand out against green branches, gold baubles and warm lights. It also looks good in forest green, burgundy, ivory or metallic cotton.
The finished ornament is 4 in (10.2 cm) wide and 3.5 in (8.9 cm) tall, not counting the loop. With the 1 in (2.5 cm) hanging loop it is 4.5 in (11.4 cm) tall. All instructions use US crochet terms.
The construction is simple. First you chain a hanging loop, then you work the tree top-down in seven rows. The fan rows and the chain-bar rows alternate. One round of sc edging finishes the sides, the scallops and the loop.
Finished Size and Construction
- Finished size: 4 in (10.2 cm) wide × 3.5 in (8.9 cm) tall, plus a 1 in (2.5 cm) loop
- Skill level: Easy
- Terminology: US crochet terms
- Yarn weight: DK (light worsted, #3), cotton or cotton blend
- Hook: 3.5 mm (E-4)
- Number of pieces: 1
- Layout: One flat tree with four fan tiers (1, 2, 3 and 4 fans)
- Piece size before edging: 3.75 in (9.5 cm) wide × 3.375 in (8.6 cm) tall
- Edging depth: about 0.125 in (0.3 cm) per edge
Materials
Yarn: Use a smooth, mercerized DK cotton. Cotton keeps the fans crisp and the windows open, and it blocks flat. Fuzzy or very soft acrylic will blur the fan texture.
- Navy (main and only color): 5 g, about 10 m
These quantities include a safety margin. The ornament itself uses about 7 m. One 50 g ball is enough for a whole set of trees.
Tools:
– 3.5 mm (E-4) crochet hook
– Tapestry needle
– Scissors
– Rust-proof pins and a blocking mat or folded towel
– Spray bottle of water
– Optional: diluted fabric stiffener
Abbreviations (US Terms)
- ch – chain
- sl st – slip stitch
- sc – single crochet
- dc – double crochet
- sp – space
- st(s) – stitch(es)
- rep – repeat
Special stitch – Fan: You work all the stitches of a fan into one stitch or one chain space. A 7-dc fan is 7 dc in the same sp; a 9-dc fan is 9 dc in the same sp. The middle stitch of a 7-dc fan is the 4th dc.
Gauge and Checkpoints
The usual gauge is 18 dc = 4 in (10.2 cm). For this ornament, though, the checkpoints below matter more than a flat swatch. The piece works up fast, so make one tree as your test and measure it as you go.
Checkpoints (measure flat and unstretched):
– After Row 1: the fan is 1.25 in (3.2 cm) wide and 0.625 in (1.6 cm) tall.
– After Row 3: 2.25 in (5.7 cm) wide, 1.5 in (3.8 cm) tall from the bottom of the loop.
– After Row 5: 3 in (7.6 cm) wide, 2.375 in (6.0 cm) tall.
– After Row 7: 3.75 in (9.5 cm) wide, 3.375 in (8.6 cm) tall.
– After edging: 4 in (10.2 cm) wide, 3.5 in (8.9 cm) tall.
If your piece is too big: Go down to a 3.25 mm or 3 mm hook. Also check the chain bars, because loose chains make the tiers sag and the windows too large.
If your piece is too small: Go up to a 3.75 mm or 4 mm hook. If the fans cup or curl, the chain bars are too tight, so loosen your chains.
A small difference is fine for an ornament. What counts is that the tiers lie flat and get evenly wider.
Pattern
Hanging Loop
Leave a 6 in (15.2 cm) tail.
Loop: Ch 12, then sl st in the first ch to form a ring. This is the hanging loop, and the joining ch is the top point of the tree.
Tier 1 – Treetop
Row 1: Ch 3 (counts as dc), then work 6 dc in the same ch as the joining sl st. Turn.
(7 dc = one 7-dc fan)
The fan hangs straight down from the loop. Its outer dc form the two slanted sides of the treetop.
Row 2 (chain bar): Ch 1. Sc in the first dc, ch 4, skip 2 dc, sc in the 4th dc (the middle of the fan), ch 4, skip 2 dc, sc in the top of the turning ch-3. Turn.
(3 sc, 2 ch-4 sps)
Check: the chains should lie flat across the bottom of the fan with small open gaps behind them. These gaps are the first windows.
Tier 2 – Two Fans
Row 3: Ch 1. Sc in the first sc. Work 7 dc in the next ch-4 sp, sc in the next sc; rep from * once more. Turn.
(14 dc + 3 sc = 17 sts; 2 fans)*
Each fan sits in its own chain space, and an sc pinches the fans together in the middle. The sc at each end makes the small notch where this tier sticks out past the treetop.
Row 4 (chain bar): Ch 1. Sc in the first sc, ch 4, sc in the 4th dc of the first fan, ch 6, sc in the 4th dc of the second fan, ch 4, sc in the last sc. Turn.
(4 sc, 3 ch-sps: ch-4, ch-6, ch-4; 18 sts total)
The longer ch-6 crosses the dip between the two fans. This leaves the central window you can see under Tier 2.
Tier 3 – Three Fans
Row 5: Ch 1. Sc in the first sc. Work 7 dc in the next ch-sp, sc in the next sc; rep from * twice more. Turn.
(21 dc + 4 sc = 25 sts; 3 fans)*
Checkpoint: the piece should be about 3 in (7.6 cm) wide and 2.375 in (6.0 cm) tall.
Row 6 (chain bar): Ch 1. Sc in the first sc, ch 5, sc in the 4th dc of the first fan, [ch 7, sc in the 4th dc of the next fan] twice, ch 5, sc in the last sc. Turn.
(5 sc, 4 ch-sps: ch-5, ch-7, ch-7, ch-5; 29 sts total)
Tier 4 – Four Scalloped Fans
Row 7: Ch 1. Sc in the first sc. Work 9 dc in the next ch-sp, sc in the next sc; rep from * 3 more times. Do not turn and do not fasten off.
(36 dc + 5 sc = 41 sts; 4 fans)*
The 9-dc fans spread wider than the 7-dc fans above them. That makes the flared skirt and the scalloped hem. Checkpoint: 3.75 in (9.5 cm) wide and 3.375 in (8.6 cm) tall.
Edging
Edging gauge: One sc adds about 0.125 in (0.3 cm) at each edge. Along the slanted sides, work 2 sc per dc row end and 1 sc per sc row end.
You finish Row 7 at a bottom corner. Ch 1 and turn the piece so you can work up the side.
Edging Round:
– First side (11 sc): Work 2 sc around the post of the outer dc of Row 7. Then work 1 sc in the end sc of Row 6, 2 sc around the outer dc of Row 5, 1 sc in the end sc of Row 4, 2 sc around the outer dc of Row 3, 1 sc in the end sc of Row 2, and 2 sc around the turning ch-3 of Row 1.
(4 fan rows × 2 sc + 3 bar rows × 1 sc = 11 sc)
– Loop (16 sc): Work 16 sc into the ch-12 ring, covering the chains completely.
– Second side (11 sc): Work down the other side the same way in reverse: 2 sc around the outer dc of Row 1, 1 sc in the end of Row 2, 2 around Row 3, 1 in the end of Row 4, 2 around Row 5, 1 in the end of Row 6, and 2 around the outer dc of Row 7.
– Bottom (41 sc): Work 1 sc in each of the 41 sts of Row 7. That is 1 sc in each dc and 1 sc in each pinch sc, and the corner sc are included.
Sl st to the first sc. Fasten off and leave an 8 in (20.3 cm) tail.
Total: 11 + 16 + 11 + 41 = 79 sc
Why the math works: A dc row end is about two sc tall and an sc row end is about one sc tall. So 2 sc per fan row and 1 sc per bar row match the edge length without ruffling or pulling. On the bottom, you work exactly 1 sc per stitch, so the edging follows the fan curves and keeps the scallops. You don’t add any corner increases. The bottom corners are sharp, and the corner sc are already part of the 41. The 16 sc in a ch-12 ring is a little more than one sc per chain, which keeps the loop round instead of twisted.
The edging adds 0.125 in (0.3 cm) to each side, so the width grows by 0.25 in (0.6 cm): 3.75 in + 0.25 in = 4 in (10.2 cm). The bottom grows by 0.125 in (0.3 cm): 3.375 in + 0.125 in = 3.5 in (8.9 cm).
Final Blocking
- Weave in both tails. Run each tail through the back of several sts going one way, then turn and weave back the other way.
- Spray the ornament until it is damp all the way through, or soak it briefly and press it in a towel.
- Lay it face up on the blocking mat.
- Pin the hanging loop at the top and pull the loop open gently.
- Pin the two bottom corners so the base measures 4 in (10.2 cm) across.
- Pin the center of each of the four bottom fans down so the scallops curve evenly.
- Push each window open with a fingertip and pin the tier tips so both sides slant evenly.
- Check that the body is 3.5 in (8.9 cm) tall from the base of the loop to the hem.
- If you want a firmer ornament, brush on diluted stiffener now.
- Leave it to dry completely before you take out the pins.
Final Quality-Control Checklist
- Each tier has the right number of fans: 1, 2, 3 and 4.
- The Tier 1–3 fans have 7 dc each, and the Tier 4 fans have 9 dc each.
- There are open windows under every chain bar.
- Both sides have 11 edging sc and slant evenly.
- The bottom edge has 41 sc and four clear scallops.
- The loop is covered with 16 sc and isn’t twisted.
- The ornament is 4 in (10.2 cm) × 3.5 in (8.9 cm), plus the 1 in (2.5 cm) loop.
- No tail ends show on the front.
Troubleshooting
The fans cup into bowls: The chain bar below is too short or too tight. Redo the bar with looser chains, or add one ch to the inner spaces.
The tiers sag and the windows are huge: The chains are too loose. Use a smaller hook for the bar rows only.
The tree leans to one side: Make sure you placed the bar sc in the 4th dc of every 7-dc fan, and turned after each of Rows 1–6.
The sides ripple after edging: You worked too many sc along a side. Count again: 11 per side.
The scallops flatten out: You probably worked sc into the gaps between stitches instead of into the tops. Work 1 sc into the top of each st.
The loop twists: Pull it straight while blocking, or redo it with the 16 sc spaced evenly.
Care
Hand wash in cool water, press out the water in a towel, and reshape the ornament flat to dry. If you stiffened it, store it flat so the fans keep their shape.
Final Notes
This is the measurement chain. The Row 1 fan is 1.25 in (3.2 cm) wide. Tier 2 brings the width to 2.25 in (5.7 cm), Tier 3 to 3 in (7.6 cm), and Tier 4 to 3.75 in (9.5 cm). The sc edging adds 0.25 in (0.6 cm) across and 0.125 in (0.3 cm) at the hem. That gives a finished tree of 4 in (10.2 cm) × 3.5 in (8.9 cm), with a 1 in (2.5 cm) loop on top. If your checkpoints match at each stage, the finished ornament will too.
Happy crocheting!