

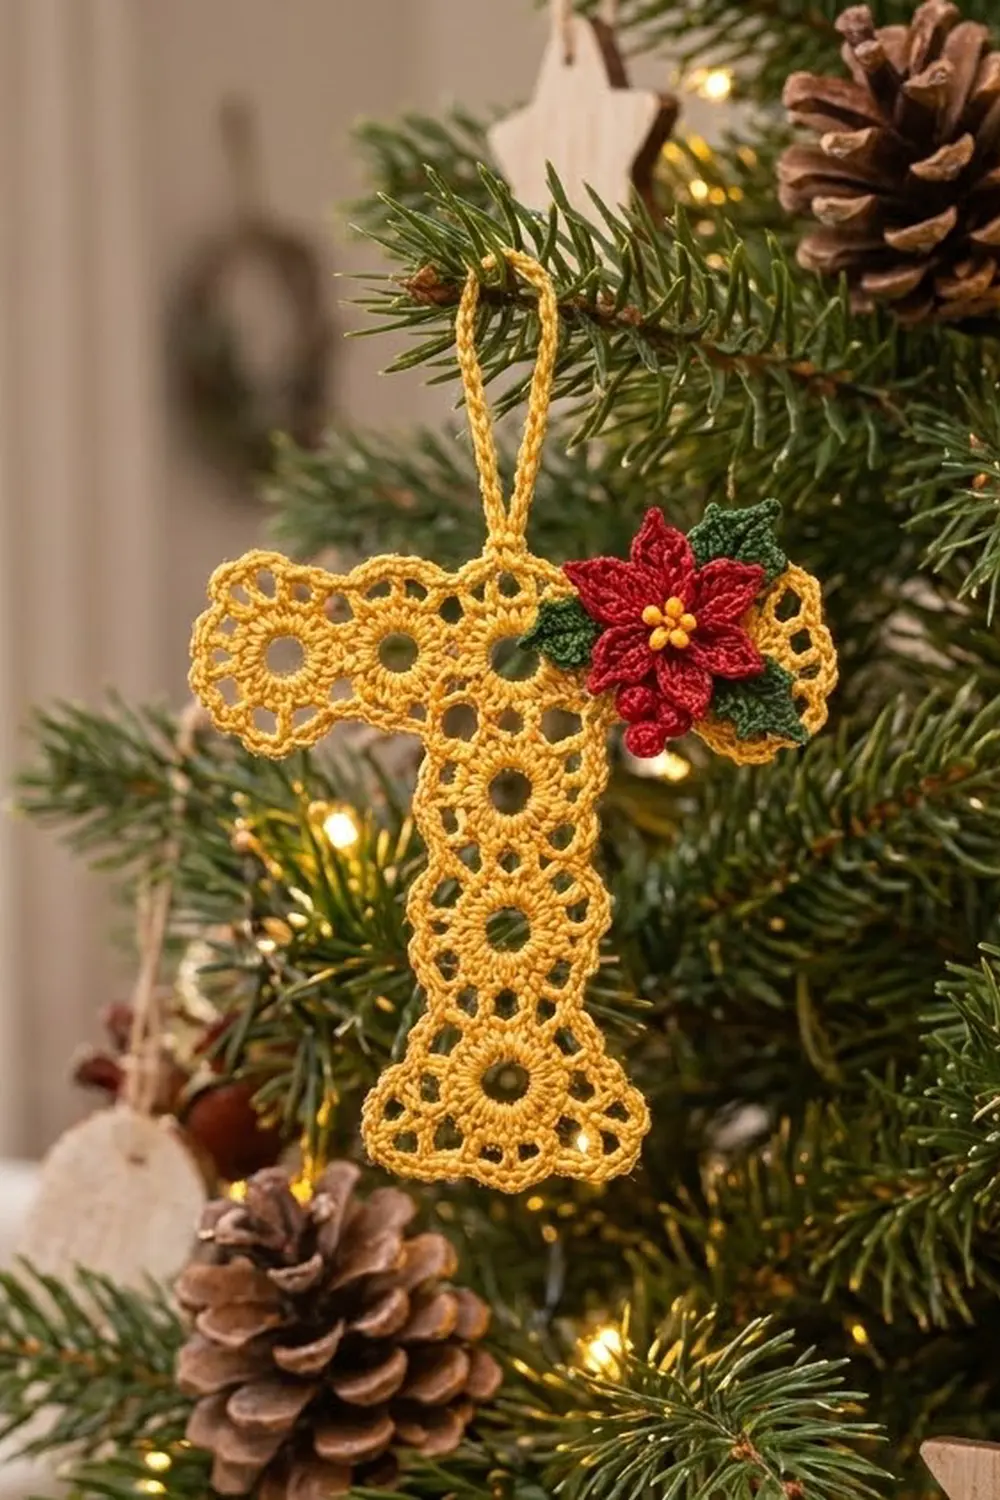
The Golden Noel Letter T is a lacy monogram ornament in warm golden yellow thread. Nine small open-ring motifs join into a crisp capital T, and a scalloped picot border goes around the whole outline. A red poinsettia with yellow knot centers, two spiky holly leaves, and three round berries sit on the upper right of the crossbar.
The style is vintage doily lace with a cheerful Christmas accent. It works as a personalized tree ornament or gift tag, or as a package topper for anyone whose name starts with T.
This pattern uses US crochet terms. The finished T measures 4.5 in (11.4 cm) wide and 4.5 in (11.4 cm) tall. It is 5.75 in (14.6 cm) tall including the hanging loop.
Construction is simple and modular. You make one ring motif, then join eight more to it as you go in a T layout. Next you work a two-round scalloped border around the outline, add a corded hanging loop, and sew on the poinsettia appliqué.
Finished Size and Construction
- Finished size: 4.5 in x 4.5 in (11.4 cm x 11.4 cm); 5.75 in (14.6 cm) tall with loop
- Skill level: Intermediate (thread work, join-as-you-go)
- Terminology: US crochet terms
- Yarn weight: Size 10 crochet cotton thread (Lace / 0)
- Hook: 1.75 mm steel hook (US steel 6 or 7, depending on brand)
- Number of pieces: 9 lace motifs plus 6 appliqué pieces (1 poinsettia, 2 leaves, 3 berries)
- Layout: Crossbar of 5 motifs, stem of 4 motifs below the center motif
- Motif size: 0.8 in (2.0 cm) square
- Size before border: 4.0 in x 4.0 in (10.2 cm x 10.2 cm)
- Border depth: 0.25 in (0.6 cm) on every edge
Materials
Use a mercerized size 10 cotton thread for crisp stitches and lace that holds its shape. Avoid fuzzy or acrylic thread, because the ring holes will close up and the picots will look soft.
- Golden yellow (main): 10 g / 50 m (motifs, border, loop, flower centers)
- Red: 2 g / 10 m (poinsettia and berries)
- Green: 2 g / 8 m (holly leaves)
Tools:
- 1.75 mm steel crochet hook
- Fine tapestry needle
- Rust-proof pins and a foam blocking board
- Spray starch or a fabric stiffener
- Small sharp scissors
All quantities include a margin of about 30% for your test motif and for weaving in ends.
Abbreviations (US Terms)
- ch – chain
- sl st – slip stitch
- sc – single crochet
- hdc – half double crochet
- dc – double crochet
- tr – treble crochet
- st(s) – stitch(es)
- sp – space
- rnd – round
- RS – right side
Picot: Ch 3, sl st in the 3rd ch from the hook.
Corner loop: A ch-6 loop in Rnd 2 of a motif. Side loop: A ch-4 loop in Rnd 2 of a motif.
Gauge and Checkpoints
Make Motif A first and measure it before you go on. Gauge controls the whole measurement chain.
- After Motif Rnd 1: 0.6 in (1.5 cm) across, with a center hole about 0.3 in (0.8 cm) wide.
- After Motif Rnd 2: 0.8 in (2.0 cm) square, side to side, lightly pressed flat.
- After 5 crossbar motifs: 4.0 in (10.2 cm) long.
- After all 9 motifs: 4.0 in x 4.0 in (10.2 cm x 10.2 cm).
- After border: 4.5 in x 4.5 in (11.4 cm x 11.4 cm).
If your motif is larger than 0.8 in (2.0 cm), switch to a 1.5 mm hook. If it is smaller, try a 2.0 mm hook. A difference of 0.1 in (0.3 cm) per motif adds up to 0.5 in (1.3 cm) across the crossbar, so fix it now.

Ring Motif (Make 1 Complete, Then Join 8)
With golden yellow:
Ch 8, sl st to the first ch to form a ring.
Rnd 1: Ch 3 (counts as dc), 23 dc in the ring, sl st to the top of the beginning ch-3. (24 dc)
Pack the stitches evenly around the ring. They should cover the chain completely and leave a clean, round open center.
Rnd 2: Ch 1, sc in the same st, ch 6 (corner loop), skip 2 dc, sc in next dc, ch 4 (side loop), skip 2 dc, sc in next dc, ch 6, skip 2 dc, sc in next dc, ch 4, skip 2 dc; repeat from * to * 2 more times, sl st to the first sc. (8 sc, 4 corner loops, 4 side loops)
The 24 dc divide into 8 groups of 3, so each loop spans exactly 3 dc. The longer corner loops square up the ring.
Each side of the motif has 3 loops: corner, side, corner. This count already includes that side’s 2 corner loops. Fasten off Motif A and weave in the ends.
Make All Pieces
You need 9 golden yellow motifs in total: 1 complete motif (A) and 8 motifs joined as you go (B through I).
Layout (letters show the joining order):
A  B  C  D  E
      F
      G
      H
      I
- Crossbar: A, B, C, D, E (5 motifs wide)
- Stem: F, G, H, I (4 motifs below C)
Joining (Join-As-You-Go)
Work Rnd 1 of each new motif as usual. On Rnd 2, work normally until you reach the side that touches a finished motif, then replace those 3 loops with joining loops:
- Joining corner loop: Ch 3, sl st into the matching corner loop of the finished motif, ch 3.
- Joining side loop: Ch 2, sl st into the matching side loop of the finished motif, ch 2.
Match corner to corner and side to side so both motifs lie flat with RS facing up. Each joined side uses 1 sl st per loop: 3 sl sts per seam.
Join order:
- B joins its left side to the right side of A.
- C joins to B. D joins to C. E joins to D.
- F joins its top side to the bottom side of C.
- G joins to the bottom of F. H joins to G. I joins to H.
There are 8 seams in total (4 in the crossbar, 4 in the stem).
When you join F, its top left corner meets the point where B and C already join. Sl st into C’s corner loop only. Leave B’s corner loop free so it can take a border stitch. Do the same with D’s corner loop on the other side.
Tension tip: Keep the joining chains the same tension as your normal loops. If the joins are tight, the T will cup at the seams. If they are loose, gaps appear between the rings.
Checkpoint: Lay the T flat. The crossbar should be 4.0 in (10.2 cm) wide and 0.8 in (2.0 cm) deep. The total height should be 4.0 in (10.2 cm), and the stem should hang 3.2 in (8.1 cm) below the crossbar.
Border
The border goes around the whole outline. Every free motif loop counts as its own space, including joined loops on the outer edge, which you work on each side of the join.
Border gauge: One sc plus a ch-4 loop per motif loop keeps a flat edge. That is 3 spaces per 0.8 in (2.0 cm) side.
Counting the Starting Spaces
Each edge count is (motifs along that edge) x 3 loops. Outer corner loops are counted only once, on the long edge.
- Top edge (A to E): 5 x 3 = 15
- Right end (E): 3 loops, but both corners are counted on the top and underside, so 1 new space (side loop)
- Crossbar underside right (E, D): 2 x 3 = 6
- Stem right side (F to I): 4 x 3 = 12
- Base (I): 1 new space (side loop)
- Stem left side (I to F): 4 x 3 = 12
- Crossbar underside left (B, A): 2 x 3 = 6
- Left end (A): 1 new space (side loop)
Total: 54 outer spaces. C’s bottom loops are hidden by the stem and are not counted.
There are 6 outer corners: the top left and bottom left of A, the top right and bottom right of E, and the bottom left and bottom right of I. There are 2 inner corners, where the crossbar meets the stem.
Border Rnd 1
With RS facing, join golden yellow in the top left corner loop of A.
Ch 1, then work (sc, ch 4) in each space. In each of the 6 outer corner loops, work (sc, ch 4, sc, ch 4) instead. At the 2 inner corners (after D’s last loop before F, and after F’s last loop before B), work ch 1 instead of ch 4. Sl st to the first sc.
Count: 54 spaces + 6 extra corner sc = 60 sc. That gives 60 spaces: 58 ch-4 loops and 2 ch-1 spaces.
The spaces per edge are: top 17, right end 1, underside right 7, stem right 13, base 1, stem left 13, underside left 7, left end 1. That makes 60. The last space on the underside right and the last space on the stem left are the ch-1 inner-corner spaces, which leaves 58 ch-4 loops.
Checkpoint: About 4.3 in x 4.3 in (10.9 cm x 10.9 cm).
Border Rnd 2 (Scallops)
Sl st into the first ch-4 loop. In each ch-4 loop work (sc, hdc, dc, picot, dc, hdc, sc). In each ch-1 space, work 1 sl st. Sl st to the first sc and fasten off.
Count: 58 scallops (6 sts + 1 picot each = 348 sts and 58 picots) + 2 sl sts = 350 sts plus 58 picots.
Why the Math Works
One border loop per motif loop matches the edge length exactly, so straight edges stay flat. The extra loop at each outer corner gives the stitches room to turn 90 degrees. Those doubled corner scallops also give the crossbar ends and the base their slight flare. At the inner corners the edge turns the other way and has less room, so a ch-1 and a sl st keep those corners sharp instead of ruffled.
Hanging Loop
Join golden yellow in the picot of the scallop centered above C (the 9th of the 17 top scallops). Ch 30, sl st in the same picot. Ch 1, work 42 sc over the chain loop, sl st to the first sc. Fasten off.
The loop stands about 1.25 in (3.2 cm) tall.
Poinsettia Appliqué
Flower (Make 1, Red)
Ch 4, sl st to form a ring.
Rnd 1: Ch 1, 10 sc in the ring, sl st to the first sc. (10 sc)
Rnd 2 (petals): Ch 8, sl st in 2nd ch from the hook, sc in next ch, hdc in next ch, dc in next 2 ch, tr in next 2 ch, skip next sc of Rnd 1, sl st in next sc. Repeat from * 4 more times. (5 petals, 7 sts each)
Each petal uses 2 sc of Rnd 1, so 5 petals use all 10 sc. Working from the tip down gives each petal a pointed end. The flower is about 1.25 in (3.2 cm) across. Fasten off.
With golden yellow, stitch 5 small French knots in the center.
Holly Leaf (Make 2, Green)
Ch 11.
- First side: Sc in 2nd ch from the hook, hdc in next, dc in next, picot, dc in next 2, picot, dc in next 2, picot, hdc in next, sc in next. Work (sc, ch 3, sc) in the last ch for the tip.
- Second side: Working along the other side of the foundation, sc in next, hdc in next, picot, dc in next 2, picot, dc in next 2, picot, dc in next, hdc in next, sc in next. Sl st to the first sc.
Each side has 9 sts and 3 picots, which make the spiky holly edge. Each leaf is 0.9 in (2.3 cm) long. Fasten off.
Berry (Make 3, Red)
Ch 2, 6 sc in 2nd ch from the hook, sl st to the first sc. Tuck the tail inside and cinch the opening closed. Each berry is 0.2 in (0.5 cm) across.
Assembly
Place the flower over motif D, just right of the hanging loop. Tuck one leaf behind it pointing up and to the left, and the other leaf pointing right over E. Group the 3 berries just below the flower. Sew each piece down with small stitches through the back of the stitches so nothing shows on the lace front.
Final Blocking
- Mist the T lightly with water.
- Lay it RS up on the blocking board.
- Pin the 6 outer corners first so the crossbar is 4.5 in (11.4 cm) wide and the total height is 4.5 in (11.4 cm).
- Pin the stem edges straight, keeping the stem 1.3 in (3.3 cm) wide.
- Pin out the picots along each edge if you want a sharp finish.
- Open each ring center with a fingertip.
- Spray with starch and let it dry completely.
- Unpin it, then sew on the appliqué. Blocking first keeps the flower raised.
Final Quality-Control Checklist
- 9 motifs, each with 24 dc and 8 loops
- 8 seams, each with 3 joining sl sts
- Border Rnd 1: 60 sc, 58 ch-4 loops, 2 ch-1 spaces
- Border Rnd 2: 58 scallops, 2 sl sts at the inner corners
- Size: 4.5 in x 4.5 in (11.4 cm x 11.4 cm), with the crossbar and stem each 1.3 in (3.3 cm) deep
- Hanging loop centered above C
- Poinsettia with 5 petals and 5 knots, 2 leaves, 3 berries, all firmly sewn
- All ends woven in and trimmed
Troubleshooting
- Ring holes closing up: The starting ch-8 is too tight. Chain loosely, or start with ch 9 and keep 23 dc after the ch-3.
- Motifs cupping: Rnd 1 stitches are too short. Relax your tension or go up a hook size.
- T twisting at seams: Some joining loops were matched in the wrong order. Undo the seam and match corner to corner.
- Ruffled border: Check that you did not add extra loops on straight edges. Each motif side gets exactly 3 spaces.
- Pulled inner corners: Check that you worked ch 1, not ch 4, at those corners in Rnd 1.
- Floppy ornament: Starch it again with a stronger mix.
Care
Hand wash in cool water with mild soap and press dry in a towel. Re-block and re-starch to restore the crisp shape.
Final Notes
The measurement chain is simple. Each 24-dc ring with 8 loops makes a 0.8 in (2.0 cm) motif. Five motifs across and four below the center give a 4.0 in x 4.0 in (10.2 cm x 10.2 cm) T. The 54 border spaces become 58 scallops, which add 0.25 in (0.6 cm) on every edge, for a finished 4.5 in x 4.5 in (11.4 cm x 11.4 cm) ornament. Get the first motif to size and the rest follows.
Happy crocheting!