

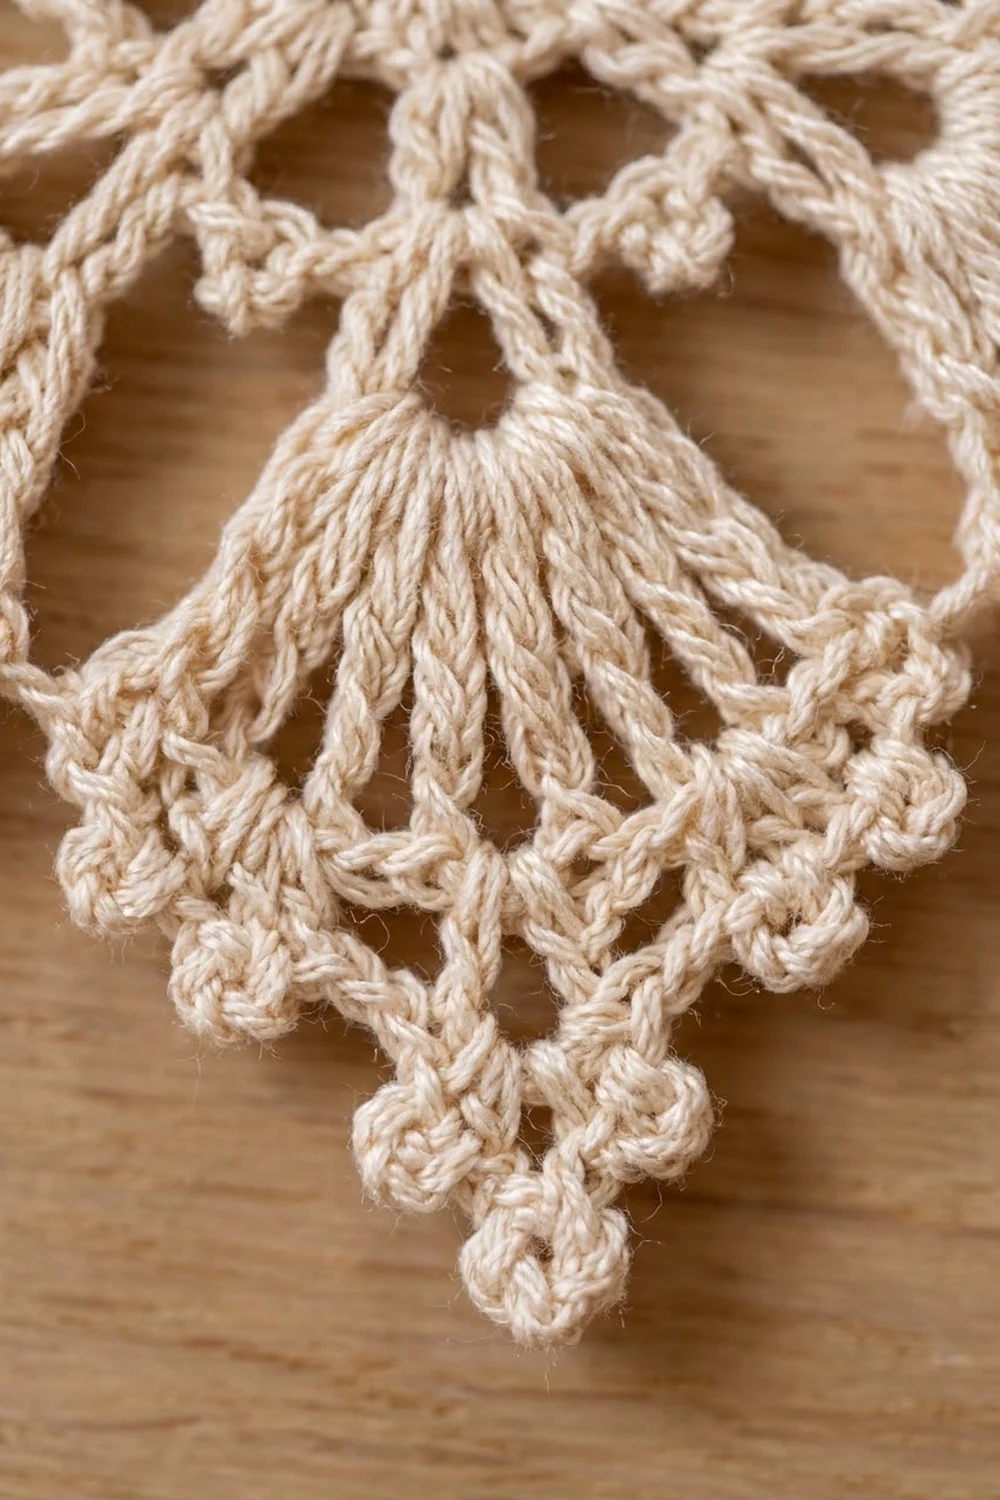
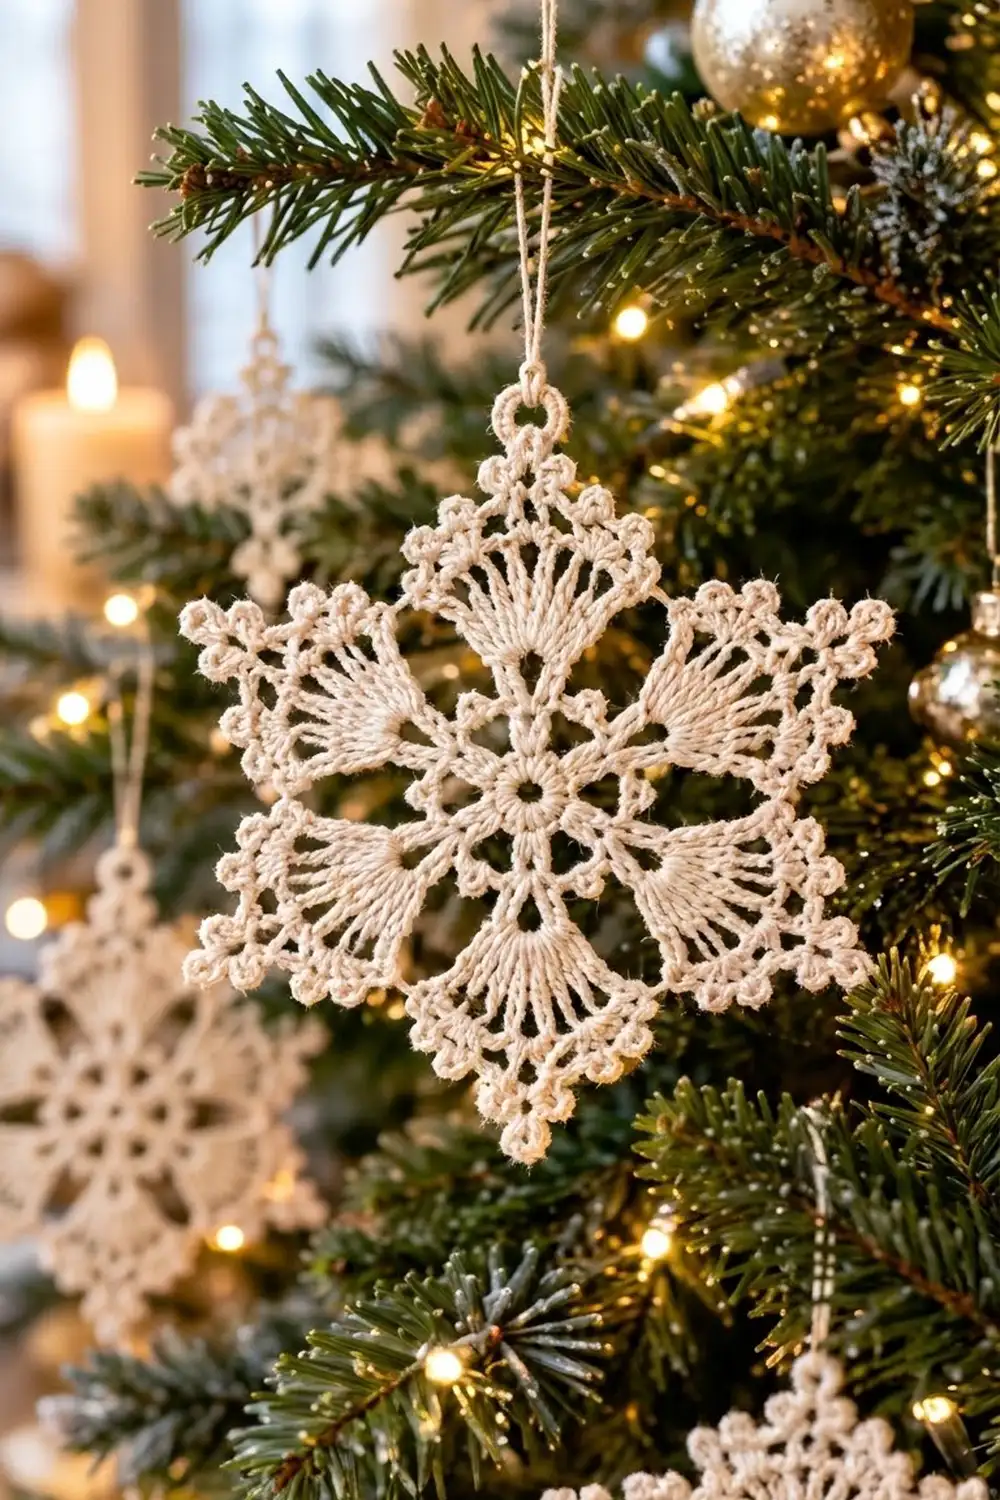
The Frosted Fan Snowflake is a delicate six-point thread ornament made of radiating fans. Each arm opens from a slim stem into a wide fan of treble crochet stitches. Above each fan, a pointed tip is finished with a little cluster of picots. Open V-shaped spaces with a single picot sit between the arms, so the snowflake looks airy and light against tree branches or a window.
This pattern is written for one color of cream or ivory cotton thread, which gives the soft, vintage look shown here. White, silver-gray, or pale gold thread work just as well. All instructions use US crochet terms.
The finished snowflake measures 4.25 in (10.8 cm) from point to point after blocking. It is a single motif, so there is no joining or assembly. You work eight rounds from a magic ring, block the piece flat, and add a chain hanging loop.
Construction overview: Rounds 1–3 make the center ring and the fan bases. Rounds 4–5 grow the fans and the V-shaped sections between them. Rounds 6–7 build the chain loops that form each point. Round 8 is the picot border.
Finished Size and Construction
- Finished size: 4.25 in (10.8 cm) point to point
- Skill level: Intermediate (thread work, tall stitches, picots)
- Terminology: US crochet terms
- Yarn weight: Size 10 cotton crochet thread (lace weight)
- Hook: 1.75 mm (US steel 6)
- Number of pieces: 1 single motif
- Layout: Six-point snowflake worked in the round
- Piece size: 4.25 in (10.8 cm) point to point
- Size before border (after Round 7): 3.75 in (9.5 cm) point to point
- Border depth: about 0.25 in (0.6 cm) on each side
Materials
Thread: Size 10 mercerized cotton crochet thread. Mercerized cotton has a slight sheen, gives clear stitch definition, and holds its shape well after starching. Avoid fuzzy or acrylic threads, because they blur the picots and don’t block crisply.
- Cream (one color): 8 g, about 40 m (43.7 yd) per snowflake
Tools:
- 1.75 mm (US steel 6) crochet hook
- Tapestry needle with a small eye
- Scissors
- Blocking board or foam mat
- Rustproof pins
- Fabric stiffener, liquid starch, or a sugar-water solution
- Small bowl and a towel
The thread quantity includes a margin of about 25% for your gauge swatch, weaving in ends, and the hanging loop. One snowflake uses about 6 g of thread.
Abbreviations (US Terms)
- ch – chain
- sl st – slip stitch
- sc – single crochet
- dc – double crochet
- tr – treble crochet
- sk – skip
- sp(s) – space(s)
- st(s) – stitch(es)
- rep – repeat
Special stitches:
- Picot: Ch 3, then sl st in the 3rd ch from the hook.
- Tall picot: Ch 5, then sl st in the 5th ch from the hook.
- V-stitch (V-st): (Dc, ch 3, dc) in the same stitch.
Gauge and Checkpoints
Gauge for thread lace is measured by diameter, not by a stitch swatch. Rounds 1–3 = 1.2 in (3.0 cm) across. Make Rounds 1–3 first and measure them before you continue.
Measurement checkpoints (laid flat, unblocked, measured across):
- After Round 1: 0.6 in (1.5 cm)
- After Round 3: 1.2 in (3.0 cm)
- After Round 5: 2.4 in (6.1 cm)
- After Round 6: 3.0 in (7.6 cm)
- After Round 7: 3.75 in (9.5 cm) point to point
- After Round 8 and blocking: 4.25 in (10.8 cm) point to point
If your piece is too big: Change to a 1.5 mm hook, or work your chains more tightly. Loose chain loops are the most common reason a snowflake comes out oversized.
If your piece is too small: Change to a 2.0 mm hook. Check that you are pulling the tr stitches up to their full height instead of squeezing them.
An unblocked snowflake can be up to 0.25 in (0.6 cm) smaller than the target, because blocking opens the loops. If it is more than 0.5 in (1.3 cm) off at Round 3, change hooks.
Pattern
Round 1 – Center Ring
Make a magic ring. Ch 3 (counts as first dc), then work 17 dc into the ring. Pull the ring closed, leaving a small open center. Sl st to the top of the beginning ch-3.
Count: 18 dc.
Round 2 – Spoke Ring
Ch 1, sc in the same st. Ch 3, sk 2 dc, sc in next dc. Rep from * 4 more times. Ch 3, sk the last 2 dc, then sl st to the first sc.
Count: 6 sc and 6 ch-3 sps. The sc stitches sit on dc numbers 1, 4, 7, 10, 13, and 16.
Round 3 – Fan Bases
Sl st into the first ch-3 sp. Ch 3 (counts as first dc) and work 4 dc in the same sp. Ch 2. 5 dc in the next ch-3 sp, ch 2. Rep from * 4 more times. Sl st to the top of the beginning ch-3.
Count: 30 dc (6 groups of 5) and 6 ch-2 sps. Each ch-2 sp sits above one sc from Round 2.
Checkpoint: 1.2 in (3.0 cm) across.
Round 4 – Widen the Fans
Ch 3 (counts as first dc) and dc in the same st. These 2 sts are the increase in the first dc of the group. Then finish the first fan: 2 dc in the next dc, dc in the next dc, and 2 dc in each of the next 2 dc. Ch 2, sc in the next ch-2 sp, ch 2.
Over the next 5-dc group: 2 dc in each of the next 2 dc, dc in the next dc, 2 dc in each of the next 2 dc. Ch 2, sc in the next ch-2 sp, ch 2. Rep from * 4 more times. Sl st to the top of the beginning ch-3.
Each fan follows the sequence 2-2-1-2-2, which turns 5 sts into 9 sts. The single dc sits in the center of the fan.
Count: 54 dc (6 fans of 9), 6 sc, and 12 ch-2 sps.
Round 5 – Tall Fans and V-Stitches
Ch 4 (counts as first tr). Tr in each of the next 8 dc, for a 9-tr fan. Ch 3, sk the ch-2 sp, V-st in the next sc, ch 3, sk the ch-2 sp.
Tr in each of the next 9 dc, ch 3, sk ch-2 sp, V-st in next sc, ch 3, sk ch-2 sp. Rep from * 4 more times. Sl st to the top of the beginning ch-4.
The tr stitches make the long, fanned rays. The V-stitches start the open V-shaped sections between the arms.
Count: 54 tr (6 fans of 9), 12 dc (6 V-sts), and 18 ch-3 sps (6 inside the V-sts and 12 on the sides).
Checkpoint: 2.4 in (6.1 cm) across.
Round 6 – Fan Tops and Side Picots
Ch 1, sc in the same st, which is tr 1 of the first fan. (Ch 3, sk 1 tr, sc in the next tr) 4 times. This puts sc stitches on trs 1, 3, 5, 7, and 9, with 4 ch-3 loops across the fan top. Ch 3, sk the side ch-3 sp. In the ch-3 sp of the V-st, work (sc, picot, sc). Ch 3, sk the next side ch-3 sp.
Next fans: sc in tr 1 of the next fan, then work as for the first fan from * to the end of the V-st section. Rep 4 more times. Sl st to the first sc.
Count per repeat: 7 sc, 6 ch-3 loops, and 1 picot.
Round total: 42 sc, 36 ch-3 loops, and 6 picots.
Checkpoint: 3.0 in (7.6 cm) across.
Round 7 – Building the Points
Sl st into the first ch-3 loop of the first fan. Ch 1, sc in the same loop. This is fan loop 1.
Ch 4, sc in fan loop 2, ch 7, sc in fan loop 3, ch 4, sc in fan loop 4. Ch 4, sk the side ch-3 loop, sc in the picot of the V section. Ch 4, sk the next side ch-3 loop. For the next fan, sc in loop 1 of that fan and rep from *. Work this 6 times in total. On the last repeat, finish with ch 4 and sl st to the first sc instead of working another sc.
The ch-7 loop sits directly above the center tr of each fan and becomes the tip of the point. Each ch-4 that crosses a V section makes a shallow valley between two arms.
Count per repeat: 5 sc, 4 ch-4 loops, and 1 ch-7 loop.
Round total: 30 sc, 24 ch-4 loops, and 6 ch-7 loops (30 loops in total).
Checkpoint: 3.75 in (9.5 cm) point to point. This is the size before the border.
Border
Round 8 is the picot border. It adds about 0.25 in (0.6 cm) beyond each point.
Border gauge: One ch-4 loop filled with (2 sc, picot, 2 sc) measures about 0.4 in (1.0 cm) along the edge.
Round 8 – Picot Edging
Sl st into the first ch-4 loop, ch 1. In this loop, work (2 sc, picot, 2 sc).
In the ch-7 tip loop, work (3 sc, picot, sc, tall picot, sc, picot, 3 sc). In each of the next 3 ch-4 loops, work (2 sc, picot, 2 sc). For the next arm, work (2 sc, picot, 2 sc) in the next ch-4 loop, then rep from *. Work this 6 times in total, skipping the first ch-4 loop on the final repeat because you already filled it. Sl st to the first sc and fasten off.
Count per arm:
- 4 ch-4 loops × 4 sc = 16 sc, plus 4 picots
- 1 ch-7 tip loop = 8 sc, plus 3 picots (2 picots and 1 tall picot)
- Per arm: 24 sc and 7 picots
Round total: 144 sc and 42 picots.
Why the math works: A chain loop lies flat when you fill it with about one sc per chain. The ch-4 loops take 4 sc, which is exact. The ch-7 tip loop takes 8 sc, one more than its length, and the 3 picots are crowded into it. That slight crowding pushes the tip outward into a sharp point instead of a rounded curve. The picots sit on top of the sc stitches and don’t use any base length, so they don’t make the edge ruffle.
Hanging Loop
Join the thread with a sl st in the tall picot of any tip. Ch 15, which is about 2 in (5.1 cm), and sl st in the same tall picot. Fasten off. If you prefer, thread a 12 in (30.5 cm) length of thread through the tall picot and tie the ends together.
Weave in all ends along the back of the stitches. Weave each end in one direction, then turn and weave back, so the ends don’t work loose after starching.
Final Blocking
- Make the stiffener by mixing fabric stiffener with water according to the label, or use full-strength liquid starch.
- Soak the snowflake for 1–2 minutes until it is fully saturated.
- Squeeze it gently in a towel. Don’t wring or twist it.
- Lay it on a blocking board. Draw or print a 4.25 in (10.8 cm) circle with six evenly spaced lines through the center to use as a guide.
- Pin the center ring flat first, then pin the tall picot of each tip onto its guide line at the 4.25 in (10.8 cm) circle.
- Pin the V-section picot of each valley between the arms, pulling it toward the center so the valley stays clearly defined.
- Pin each fan-edge picot outward so the fans open evenly.
- Shape the rays inside each fan with a pin tip so they spread out evenly.
- Let it dry completely, for 12–24 hours.
- Unpin and check that the snowflake holds its shape when you hang it up.
Final Quality-Control Checklist
- [ ] The center ring is closed tightly, with a small, even hole
- [ ] There are 6 fans, each with 9 tr
- [ ] There are 6 V-sections, each with one centered picot from Round 6
- [ ] Each point has a ch-7 tip loop centered above the middle tr of its fan
- [ ] The border has 7 picots per arm (42 in total)
- [ ] It measures 4.25 in (10.8 cm) point to point after blocking
- [ ] All six points are the same length to within 0.1 in (0.3 cm)
- [ ] No ends are visible on the front
- [ ] The hanging loop is secure and attached at a tip
Troubleshooting
The center ring has a big hole. Pull the magic ring tighter before joining Round 1, and weave the tail around the ring once more before trimming.
The fans cup or curl. The tr stitches are too tight. Pull each loop up to its full height, or go up 0.25 mm in hook size for Round 5 only.
The snowflake ruffles after Round 7. The chains are too loose. Work the ch-4 and ch-7 loops more firmly, or try a smaller hook.
The points are rounded instead of sharp. Pin the tall picot firmly outward while blocking, and check that you worked all 8 sc and 3 picots into the ch-7 loop.
The repeat count doesn’t come out right. Count the fans after Round 4. Every fan must have exactly 9 dc, in the sequence 2-2-1-2-2.
The snowflake goes limp after a season. Re-starch it, using the same pinning guide.
Care
Store the snowflakes flat between sheets of tissue paper, away from humidity. If one gets dirty, hand wash it in cool water with mild soap, then starch and block it again.
Final Notes
The measurement chain for this snowflake is 0.6 in (1.5 cm) after Round 1, 1.2 in (3.0 cm) after Round 3, 2.4 in (6.1 cm) after Round 5, 3.0 in (7.6 cm) after Round 6, and 3.75 in (9.5 cm) after Round 7. The picot border adds 0.25 in (0.6 cm) on each side, for a blocked size of 4.25 in (10.8 cm) point to point. If you hit the Round 3 checkpoint, everything after it follows. Make one snowflake, check it against the numbers, and then make as many as you want for your tree, gift tags, or window.
Happy crocheting!