
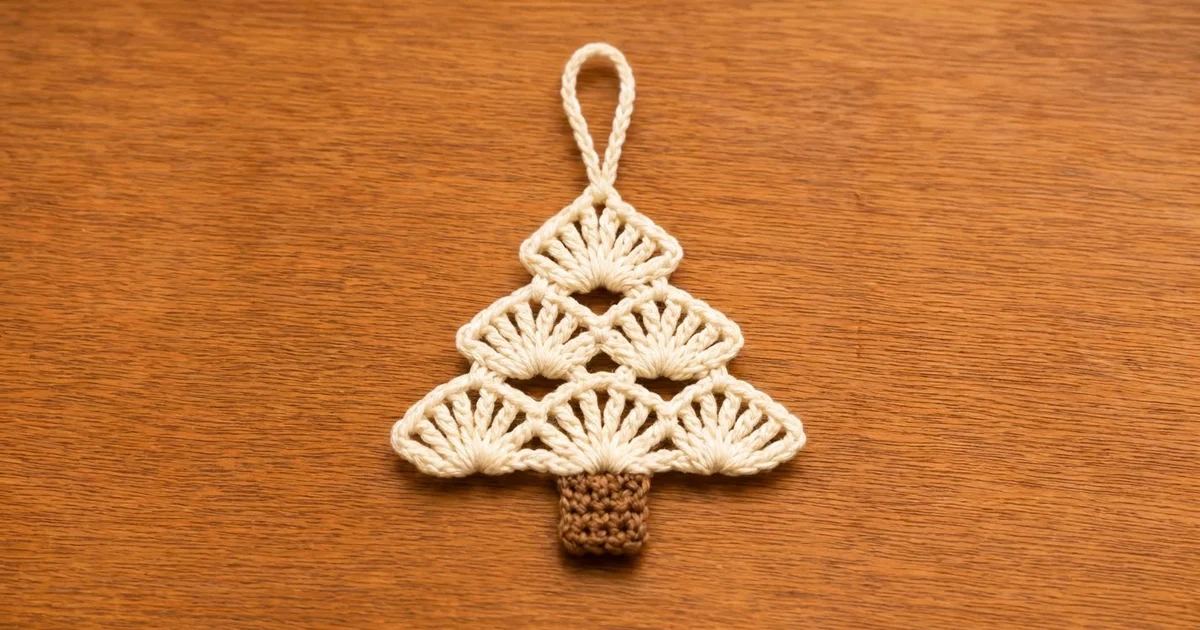
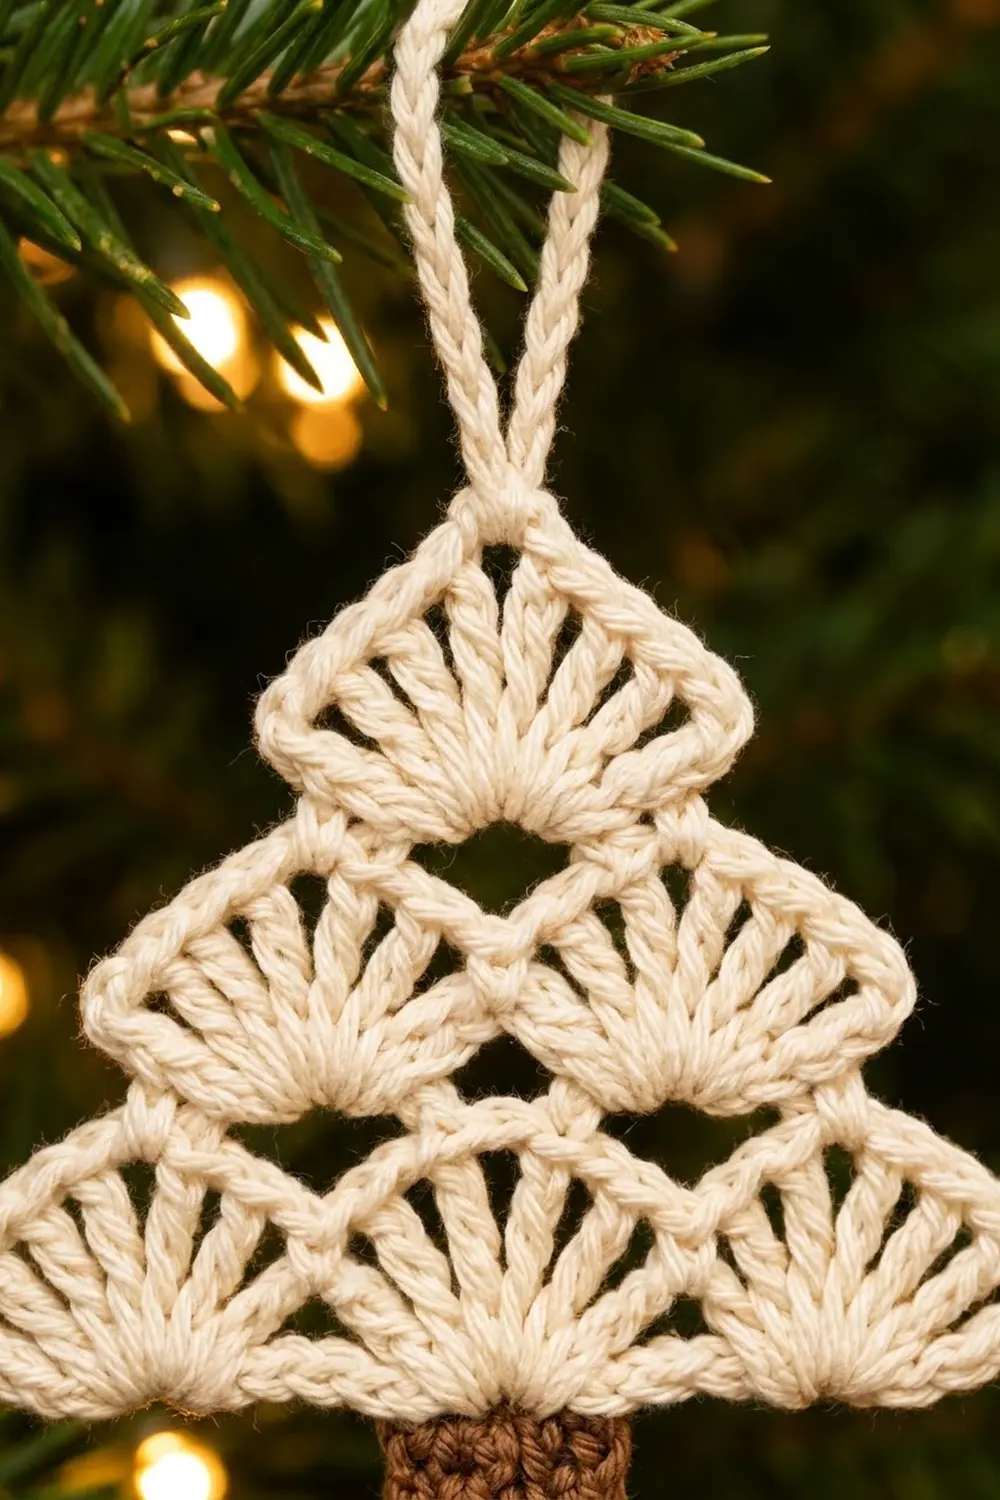
The Frosted Fan Tree is a small, flat Christmas tree ornament made from stacked fan shells. Three fans sit along the bottom, two in the middle, and one at the top, so the tree tapers to a neat point. Small diamond-shaped openings between the tiers give the ornament a light, lacy look against the branches.
The tree is worked in soft cream cotton with a short chocolate-brown trunk in tight single crochet. A chain hanging loop rises from the top fan. The style is simple and Scandinavian, so it suits a natural, neutral tree as well as a colorful one.
This pattern uses US crochet terms. The finished ornament measures about 4.2 in (10.7 cm) wide and 4.1 in (10.4 cm) tall, plus a 1.5 in (3.8 cm) hanging loop.
The ornament is made in one piece. You work the tree body in rows from a foundation chain, building fan tiers upward with chain bridges between them. Next, you work the trunk into the underside of the foundation chain. Finally, a single row of edging outlines the sides and top and makes the hanging loop as you go.
Finished Size and Construction
- Finished size: 4.2 in (10.7 cm) wide x 4.1 in (10.4 cm) tall, plus a 1.5 in (3.8 cm) loop
- Skill level: Easy (advanced beginner)
- Terminology: US crochet terms
- Yarn weight: DK (weight 3) cotton
- Hook: 3.5 mm (E-4)
- Number of pieces: 1
- Layout: single flat ornament; no joining
- Piece size before border: 3.8 in (9.7 cm) wide x 3.9 in (9.9 cm) tall
- Tree body alone (before border): 3.8 in (9.7 cm) wide x 2.7 in (6.9 cm) tall
- Trunk: 1 in (2.5 cm) wide x 1.2 in (3.0 cm) tall
- Border depth: 1 row of sc, about 0.2 in (0.5 cm)
Materials
Choose a smooth DK cotton or cotton blend. Cotton shows the fan stitches clearly and holds a flat shape after blocking. Avoid fuzzy or very splitty yarn, because the tr fans will lose their crisp outline.
- Cream (tree, border, loop): 8 g, about 18 m (20 yd)
- Brown (trunk): 3 g, about 7 m (8 yd)
These amounts include a margin for weaving in ends. One ornament uses very little yarn, so leftovers work well.
Tools:
- 3.5 mm (E-4) crochet hook
- Tapestry needle
- Scissors
- Stitch marker (optional)
- Ruler or tape measure
- Blocking mat and rust-proof pins
- Spray bottle with water, and optional spray starch
Abbreviations (US Terms)
- ch – chain
- sl st – slip stitch
- sc – single crochet
- tr – treble crochet (yarn over twice, insert hook, yarn over and pull up a loop, [yarn over, pull through 2 loops] 3 times)
- sp – space
- st(s) – stitch(es)
- RS / WS – right side / wrong side
Special stitch – Fan: Work 9 tr into the same stitch or space. One Fan is 9 sts. The 5th tr is the center of the Fan.
Gauge and Checkpoints
Gauge: 10 sc and 10 rows = 2 in (5.1 cm) with a 3.5 mm hook. One tr stands about 0.7 in (1.8 cm) tall. One Fan, worked over a 6-st base, is about 1.2 in (3.0 cm) wide.
Make one test ornament before you make a set. It is small enough to serve as your gauge check. Measure at each checkpoint below.
- After Row 1: 3.8 in (9.7 cm) wide
- After Row 2: 0.9 in (2.3 cm) tall
- After Row 4: 1.8 in (4.6 cm) tall
- After Row 6: 2.7 in (6.9 cm) tall
- Trunk: 1 in (2.5 cm) wide x 1.2 in (3.0 cm) tall
- Before border: 3.8 in (9.7 cm) wide x 3.9 in (9.9 cm) tall
- After border: 4.2 in (10.7 cm) wide x 4.1 in (10.4 cm) tall
If your piece is too big, go down to a 3.25 mm (D-3) hook. If it is too small, go up to a 3.75 mm (F-5) hook. If only the height is off, check your tr. Pull each loop up to the same height, and don’t pull the final loops tight.
Tree Body
Work in cream. Turn at the end of each row. The ch 1 at the start of a row does not count as a stitch.
Foundation: Ch 20.
Row 1 (RS): Sc in 2nd ch from hook and in each ch across. Turn. (19 sc)
Checkpoint: the row is 3.8 in (9.7 cm) wide.
Row 2 (bottom tier): Ch 1, sc in first sc, skip 2 sc, Fan in next sc, skip 2 sc, sc in next sc; repeat from * 2 more times. Turn. (3 Fans + 4 sc = 31 sts)*
Each repeat uses 6 sts of Row 1, and 1 + (3 x 6) = 19, so the row ends exactly in the last sc. With the RS facing, name the Fans A, B and C from the left edge. You will use these names in the border.
Row 3 (bridge row): Sl st in first sc and in next 4 tr. Ch 1, sc in next tr (the center tr of the first Fan). Ch 5, sc in center tr of next Fan; repeat from * once more. Turn. (3 sc + 2 ch-5 sps)*
Each ch-5 bridge runs from the center of one Fan to the center of the next. Its middle sits directly above the sc between those Fans in Row 2, so the next tier lines up over the gaps. The open space under each bridge becomes a diamond-shaped opening.
Row 4 (middle tier): Ch 1, sc in first sc, Fan in next ch-5 sp, sc in next sc, Fan in next ch-5 sp, sc in last sc. Turn. (2 Fans + 3 sc = 21 sts)
Checkpoint: the piece is 1.8 in (4.6 cm) tall. Name these Fans D (left) and E (right).
Row 5 (bridge row): Sl st in first sc and in next 4 tr. Ch 1, sc in next tr (center of the first Fan), ch 5, sc in center tr of next Fan. Turn. (2 sc + 1 ch-5 sp)
Row 6 (top tier): Ch 1, sc in first sc, Fan in ch-5 sp, sc in last sc. (1 Fan + 2 sc = 11 sts) Name this Fan F.
Fasten off and weave in the cream tail.
Checkpoint: the body is 3.8 in (9.7 cm) wide at the base and 2.7 in (6.9 cm) tall. That height comes from 0.2 in (0.5 cm) for Row 1, three tiers of 0.7 in (1.8 cm) Fans, and two bridge rows of 0.2 in (0.5 cm) each.
Trunk
Work in brown, into the free loops on the underside of the foundation chain.
Turn the body upside down so the foundation chain is at the top, with the RS facing you. There are 19 free loops.
Row 1: Counting from the right end, join brown with a sl st in the 8th free loop. Ch 1, sc in same loop and in next 4 loops. Turn. (5 sc)
This leaves 7 free loops on each side of the trunk (7 + 5 + 7 = 19), so the trunk is exactly centered.
Rows 2–6: Ch 1, sc in each sc across. Turn. (5 sc)
Fasten off after Row 6. Weave in the brown tails along the trunk edges.
Checkpoint: the trunk is 1 in (2.5 cm) wide and 1.2 in (3.0 cm) tall. The full piece is now 3.9 in (9.9 cm) tall: 2.7 in (6.9 cm) of body plus 1.2 in (3.0 cm) of trunk.
Border and Hanging Loop
The border is one row of cream sc. It outlines the left side, the top point and the right side. It does not go along the bottom edge or around the trunk.
Border gauge: about 5 sc per 1 in (2.5 cm) along straight edges. Along the Fan tops, work 1 sc per tr.
Rows 3 and 5 began with sl sts, and those sl sts sit on the outer tr of a Fan. Work into the top of each sl st as if it were the tr underneath. The count does not change.
Hold the piece RS facing with the trunk pointing down. Start at the bottom-left corner and work up toward the top point.
Left side:
- Join cream with a sl st in the row-end of Row 1 at the bottom-left corner. Ch 1, sc in same row-end. (1 sc)
- Fan A: work 3 sc evenly around the post of the first tr, then 1 sc in the top of each of the first 4 tr. (7 sc)
- Sc in the end sc of Row 4, which sits above the center of Fan A. (1 sc)
- Fan D: work 3 sc around the post of the first tr, then 1 sc in the top of each of the first 4 tr. (7 sc)
- Sc in the end sc of Row 6, which sits above the center of Fan D. (1 sc)
- Fan F: work 3 sc around the post of the first tr, then 1 sc in the top of each of the first 4 tr. (7 sc)
Left side total: 24 sc
Top point and loop:
- In the center (5th) tr of Fan F, work: sc, ch 18, sc. (2 sc + ch-18 loop)
Right side (mirror of left):
- Fan F: 1 sc in the top of each of the last 4 tr, then 3 sc around the post of the last tr. (7 sc)
- Sc in the end sc of Row 6. (1 sc)
- Fan E: 1 sc in each of the last 4 tr, then 3 sc around the post of the last tr. (7 sc)
- Sc in the end sc of Row 4. (1 sc)
- Fan C: 1 sc in each of the last 4 tr, then 3 sc around the post of the last tr. (7 sc)
- Sc in the row-end of Row 1. (1 sc)
Right side total: 24 sc
Border total: 24 + 2 + 24 = 50 sc, plus the ch-18 loop. Fasten off and weave in both ends.
Why the math works: Each outer half-Fan shows exactly 4 tr on the outside edge, so 4 sc along the curve keep it smooth. The tr post is about 0.7 in (1.8 cm) tall. At 5 sc per inch that would be 3.5 sc, so working 3 sc eases the post slightly and stops the stepped edge from rippling. The single sc at each step fills the notch where one tier ends and the next begins. Both sides use identical counts, so the tree stays symmetrical. At the tip, the 2 sc with the loop between them turn the corner cleanly and sharpen the point.
The border adds about 0.2 in (0.5 cm) on each side and at the top. The width becomes 3.8 + 0.2 + 0.2 = 4.2 in (10.7 cm). The height becomes 3.9 + 0.2 = 4.1 in (10.4 cm). The ch-18 loop folds to about 1.5 in (3.8 cm) tall.
Final Blocking
- Weave in any remaining ends before blocking.
- Spray the ornament evenly with water until it is damp but not soaking.
- Lay it RS up on the blocking mat.
- Pin the bottom edge straight, 3.8 in (9.7 cm) across.
- Pin the two bottom corners and the top point so the piece measures 4.2 in (10.7 cm) at its widest and 4.1 in (10.4 cm) tall.
- Gently open each Fan with your fingers so the tr spread evenly, and open each diamond-shaped opening.
- Pin the trunk straight and square at 1 in (2.5 cm) wide.
- Lay the hanging loop flat and straight.
- For a stiffer ornament, mist lightly with spray starch.
- Let it dry completely, at least 6 hours, before unpinning.
Final Quality-Control Checklist
- Row 1 has 19 sc and measures 3.8 in (9.7 cm).
- The tiers have 3, 2 and 1 Fans, and every Fan has 9 tr.
- The ch-5 bridges lie flat without pulling.
- There are two diamond openings in the bottom tier gaps and one in the middle tier gap.
- The trunk has 6 rows of 5 sc, with 7 free loops on each side.
- The border has 24 sc on each side and 2 sc at the tip.
- The finished piece is 4.2 in (10.7 cm) wide and 4.1 in (10.4 cm) tall.
- The loop is centered over Fan F and stands about 1.5 in (3.8 cm) tall.
- All ends are woven in and hidden.
Troubleshooting
The bottom edge curls up. Your foundation chain is too tight. Redo it with a hook one size larger, then switch back for Row 1.
The Fans ruffle or cup. Your tr are too tall or too loose. Go down a hook size, or work on pulling each loop to the same height.
The tiers lean to one side. At the start of Rows 3 and 5, check that your last sl st lands in the 4th tr. That puts the next sc into the true center tr.
The ch-5 bridges sag. Chain more firmly. If your chains run long, work ch 4 instead.
The trunk sits off center. Count the free loops again. You need 7 on each side of the 5 trunk sts.
The border edge waves. Work 2 sc around each post instead of 3, and make the same change on both sides.
The loop twists. Block it flat, or work sl sts back along the chain to make a firmer cord.
Care
Hand wash in cool water with mild soap, roll in a towel, and dry flat. If the Fans lose their crisp outline, reshape and pin again.

Final Notes
Here is how the measurements build. A gauge of 10 sc and 10 rows to 2 in (5.1 cm) makes the 19-sc Row 1 3.8 in (9.7 cm) wide. Three Fan tiers and two bridge rows bring the body to 2.7 in (6.9 cm) tall. The 6-row trunk adds 1.2 in (3.0 cm), for 3.9 in (9.9 cm) before the border. The 50-sc border adds 0.2 in (0.5 cm) on each side and at the top. That gives a finished ornament 4.2 in (10.7 cm) wide and 4.1 in (10.4 cm) tall, with a 1.5 in (3.8 cm) loop.
Make one ornament and check it against these numbers. Then make a full set for your tree or for gift toppers.
Happy crocheting!